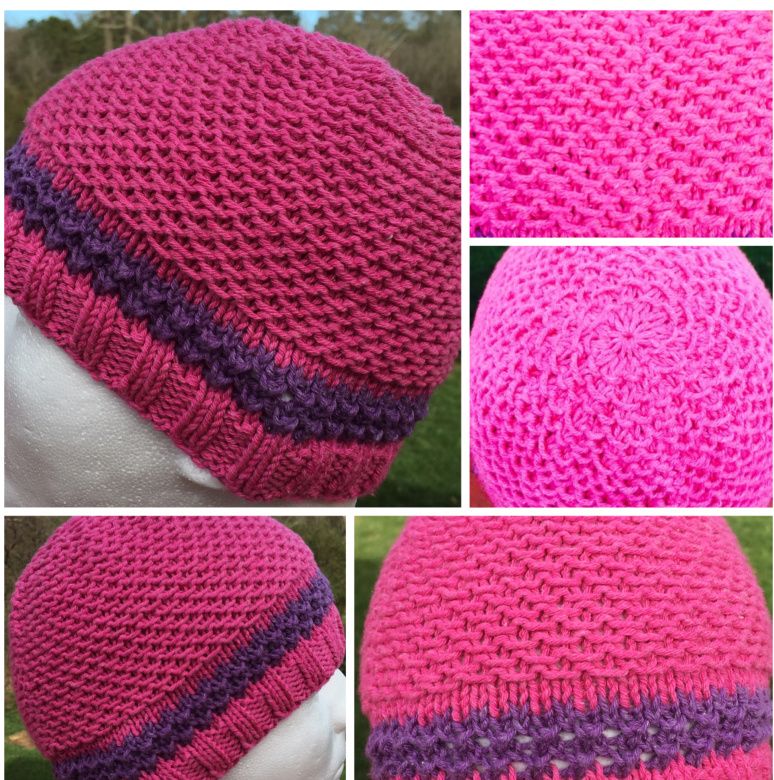
Hat #17 Mini Honeycomb
| DetailsabouttheProjectPicture | |
| Hat #17Mini Honeycomb | |
| Based on | my design |
| Multiple | 8stitches/4rounds |
| Needle | Size 6 |
| Cast on | 96 stitches |
| Finished size | Adult medium |
| YarnPlymouthJeannee | |
| Worsted weight, 51% cotton, 49%acrylic | |
| main color | 25 med pink |
| contrast color | 20 med purple |
| There are some mini tutorials at the end. | |||
| Supplies | |||
| 2 circulars or DPNs) | |||
| Needles for decreasing (long circular for magic loop, 2 circulars or DPNs) | |||
| Tapestry needle for weaving in ends | |||
| worsted weight yarn (recommend a light worsted). I used a cotton blend here. | |||
| A NoteaboutSize | |||
| I'm definitelyNoT a designer and have issueswithgauge.I am a fairly tightknitter andwith the #6 needles, this hat fit me about perfectly. I have an average size woman's head. | |||
| Casting On | |||
| I use a long-tail cast on. I cast on in knit and purl (yes, there IS a way to cast on in purl too). Just | |||
| regular long tail will work too. If you'd like to learn how to do the long tail purl cast on, google it, there are several good sites. | |||
| Joining in the Round You probably already know how to do this, if not, there are TONS of good online resources. My preferred method is to cast on one extra stitch and pass it over. Just make sure your work isn't twisted! | |||
Hat #17 Mini Honeycomb
| Abbreviations | ||||
| k | knit | |||
| p | μnd | |||
| sl-1 yo | yarnover, move the yarn to the other side of the needle and work the next stitch from that position. | |||
| If you are working purl stitches (in this case p2tog), you move the yarn to the back (to the knit side) | ||||
| andworkthep2togfromthere | ||||
| k1-tbl | knit 1 through the back loop | |||
| k2tog | knit 2 together (go thru 2 stitches at same time & knit them together) | |||
| sl-1 wyif | slip 1 with yarn in front. If the yarn is in the back (on the knit side), move it to the front (the purl side). | |||
| If you are already purling, the yarn will already be on the front. Keeping the yarn in front, slip | ||||
| RescueRow Alsosometimescalled a lifeline.If youareworried aboutamistake,Irecommend a | ||||
| RescueRow nowand thento add toyourpeace of mind.What you basically do is run a slender piece of yarn or thread(l use | ||||
| a bright color nylon thread because I can see it and it's slippery and easy to pullout later) through the stitches. This way if I | ||||
| have to pull out my work later because of a mistake,Ill have these "correct" stitches saved on that thread and they'll be easy | ||||
| Pattern Directions | ||||
| Lay out 12 stitch markers. Cast on 96, using long tail cast on method, putting markers every 8 stitches. | ||||
| I'd recommend a distinctive marker for the beginning of the round (for instance I always use a bright green there). | ||||
| I usually need to pull out about 75-80" of yarn for this when doing the long tail method. | ||||
| A note about stitch markers for this pattern: Once you get going, you probably won't really need them, except | ||||
| and thenreplacedfor thedecreaserounds. | ||||
| Ribbing | ||||
| Ribbing Round 1 | *k2 p2* | |||
| with main color | Repeat Ribbing Round until about 1" long | |||
Hat #17 Mini Honeycomb
| ContrastColor and DecorativeElement | |
| Decorative Element Round 1 with main color | knit |
| DecorativeElement tRound2 withcontrastcolor | * sl-1 k1 * |
| Decorative Element tRound3 with contrast color | knit |
| DecorativeElementRound 4 with contrast color | *yo | |||
| Each section should start with knitting the yarnover (from the round before) through the back loop. | ||||
| Sometimes the yarnovers migrate across the stitch marker. Don't worry, just move your marker. | ||||
| DecorativeElementRound5 with contrast color | * k1-tbl k1 * | |||
| DecorativeElementRound6 with contrast color | * k1-tbl k1 * | |||
| For the first yarnover, since you are going from a knit stitch to a purl (which means moving the yarn from the back to the | ||||
| DecorativeElementRound 7 with contrast color | * yo p2tog * | |||
| Decorative Element Round 8 withcontrastcolor | k1-tbl k1 |
| Decorative Element Round9 withcontrastcolor | 大 k1-tbl k1 大 |
Hat #17 Mini Honeycomb
| Decorative Element Round 10 withmaincolor | 大 sl-1 k1 * |
| Decorative Element Round 11 with main color | knit |
| MainPattern |
A quick note on the pattern - it is really easy to get into a groove and repeat either round 2 or round 4 over and over. But notice that round 2 STARTS with the slip 1 but round 4 STARTS with the p1. You want to alternate to get the pattern. When you are almost done working an all knit round, look at the last couple stitches of the round. - If the last stitch of the previous slip round was a purl, begin the next slip round with a purl. - If the last stitch of the previous slip round was a slipped stitch, begin the next slip round with a slipped stitch. Anytime you see purled stitches coming up after your beginning of round marker, you know the next round is an all knit. There is a mini tutorial at the end with pictures. Note that in the decrease rounds. follow the directions as written. it aets a hit wonkv and the rule above doesn't annlv.
| Main Pattern Round 1 with main color | knit |
| MainPatternSlipRound2 with main color | * sl-1 wyif p1 * |
| MainPattern Round 3 with main color | knit |
| Main Pattern Slip Round 4 with main color | * p1 k sl-1 wyif * |
Repeat Rounds 1-4 until piece is around 6.25-6.50" long from cast on round to top of needle.
| Decrease Rounds | |
| Decrease Round1 with main color | knit |
Hat #17 Mini Honeycomb
| DecreaseRound 2 with main color | * sl-1 wyif p1 * | ||||
| Change to whatever needle style you prefer for decreasing in the round - magic loop (my preferred | |||||
| method), double-pointed needles, or two circulars. | |||||
| Decrease Round 3 with main color | * k6 k2tog * | ||||
| Note on the next round that you repeat the directions over and over within each section. | |||||
| You will begin and end each section with a sl-1 wyif | |||||
| Decrease Round 4 with main color | * sl-1 wyif p1 | sl-1 wyif p1 | sl-1 wyif p1 | sl-1 wyif * | |
| Decrease Round 5 with main color | * k5 k2tog * | ||||
| Decrease Round 6 with main color | *p1 sl-1 wyif | p1 sl-1 wyif | p1 Sl-1 wyif * | ||
| Decrease Round 7 with main color | *k4 k2tog * | ||||
| Note on the next round that you repeat the directions over and over within each section. | |||||
| You will begin and end each section with a sl-1 wyif | |||||
| Decrease Round 8 with main color | * sl-1 wyif p1 | sl-1 wyif p1 | sl-1 wyif * | ||
| Decrease Round9 with main color | 大 k3 k2tog |
| DecreaseF Round 10 withmaincolor | * p1 sl-1 wyif 大 |
Hat #17 Mini Honeycomb
| Decrease Round 11 with main ncolor | ¥ k2 | k2tog ¥ |
| Note on the next round that you repeat the directions over and over within each section. | ||
| You will begin and end each section with a sl-1 wyif. | ||
| Decrease Round 12 大 withmaincolor | sl-1 wyif p1 大 | sl-1 wyif |
| Decrease Round 13 with main color | 大 k1 k2tog 大 |
As you work the next round, remove all but your beginning of round stitch markers.
| Decrease Round 14 withmaincolor | p1 sl-1 wyif |
| Decrease Round 15 with main color | 大 k2tog 大 |
| Cut your yarn, leaving about a 12" tail. Thread the tail onto a tapestry needle. | |||
| Go through the stitches on your needles (in the same direction like you were going to knit them). | |||
| Slide them off your knitting needles. Tighten them up, cinching the top of the hat. | |||
| Thread the end through to the inside of the hat. Securely sew in the ends and trim off extra. | |||
Mini Tutorial on Reading Your Knitting
1. Since you can see purl stitches on the left needle (after the green beginning of round marker) (you can tell they are purls because the "collar" is right up against the needle) you know that the next round will be all knit.
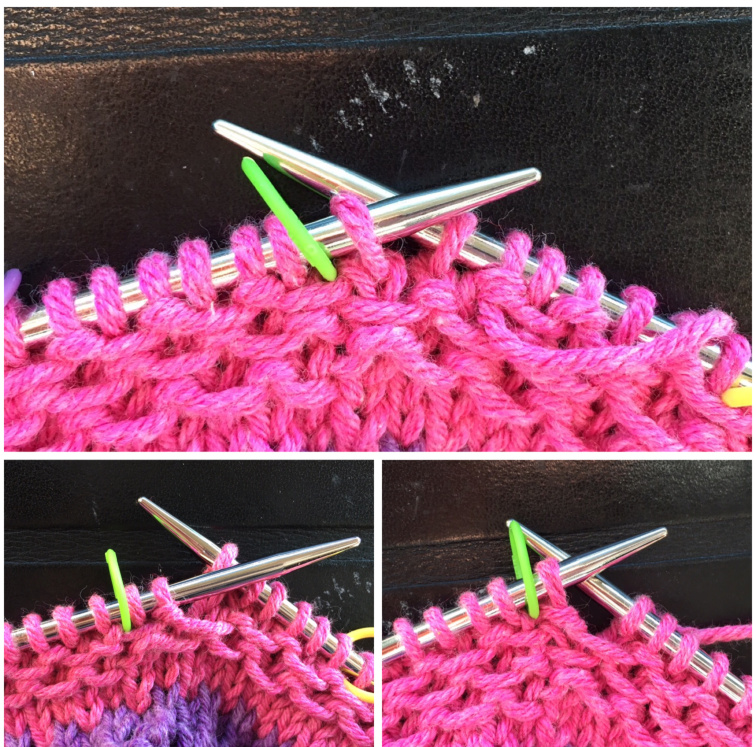
2.Thelast stitchbefore the marker was slipped from the round before. That means the first stitch of the new round (the first stitch after the marker) will also be a slipped stitch. 3.The last stitch before the marker was a purl from the round before. So the first stitch of the new round (the first stitch after the marker) will be a purl stitch.
Hat #17 Mini Honeycomb
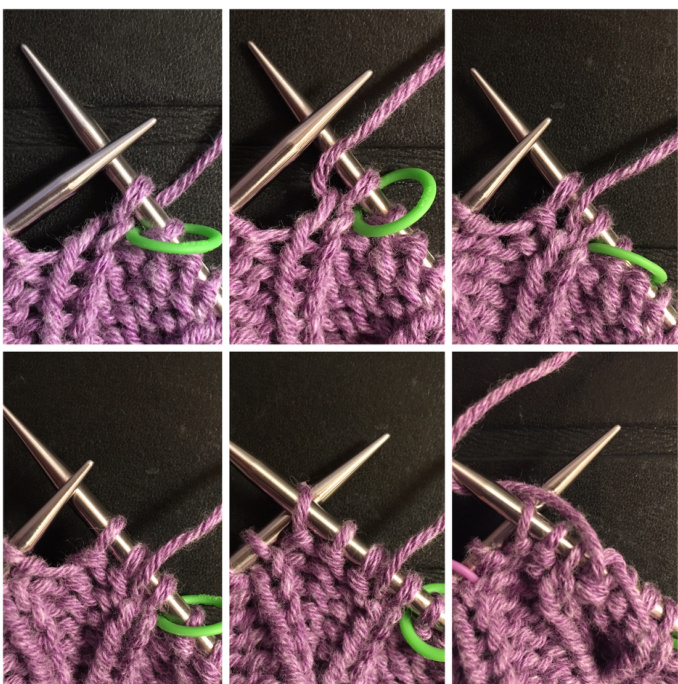
Mini Tutorial Sl-wyif, purl (Slip with yarn in front, purl)


