Pattern information
Sablier is a feminine pullover. The appeal: subtle lines to shape your body and give it a nice silhouette. The deep V neck is compatible with nursing This garment is worked seamlessly from the top-down using the contiguous sleeve method developed by Susie Myers : http://www.ravelry. com/groups/contiguous/pages/The-ContiguousMethod No pick-up required (except for the neck band) Contrast lines are cleverly worked in this pattern afterthought using a simple crochet slip stitch (directions included). You can also leave the pullover as it is with the purl line following the shape of your body. This means simple colour work without having to work Intarsia.
Gauge
19 sts and 29 rows = 10 cm / 4" in stockinette stitchwashed and blocked.

Protect your earth:
To preserve our planet, I recommend that you only print the instructions, from page 4 to page 10. Thank you :-)
Materials
Main color: 904 (954, 1024, 1074, 1144, 1187, 1236, 1307) meters 989 (1043,1120,1174,1251,1298, 1352,1429) yards (including + 10% for security factor) Contrast color: 20 meters / 22 yards The sample is shown in Ostane yarn from Kaneh-Bosem.
. Needles:
Circular needles in size needed to obtain gauge (I suggest: 4.5mm / US 7). One crochet of the same size. ·Other: 12 markers, tapestry needle, waste yarn. Skill level

About the yarn used
The yarn used is made of recycled cotton and hemp, for a soft, vegan and resistant garment. The yarn used for this pattern has a different gauge when washed (the length is shorter after the wash). The indicated gauge is after washing it. Always wash your swatch to be sure that the final garment is at the right size ! You can of course replace it with the yarn of your choice. Please, do not forget to check your gauge, and to check my swatch advice below. If you want to make a spring pullover, use a cotton, or linen fibre. For a warm pullover, you can go for hemp, wool, etc... To check the yarns compatible with this pattern go to this Ravelry link: http://www.ravelry.com/ yarns/search#view=thumblist&sort=best&weig ht=dk
Sizes
Sample shown in size 36 with no ease on the model at the bust area.
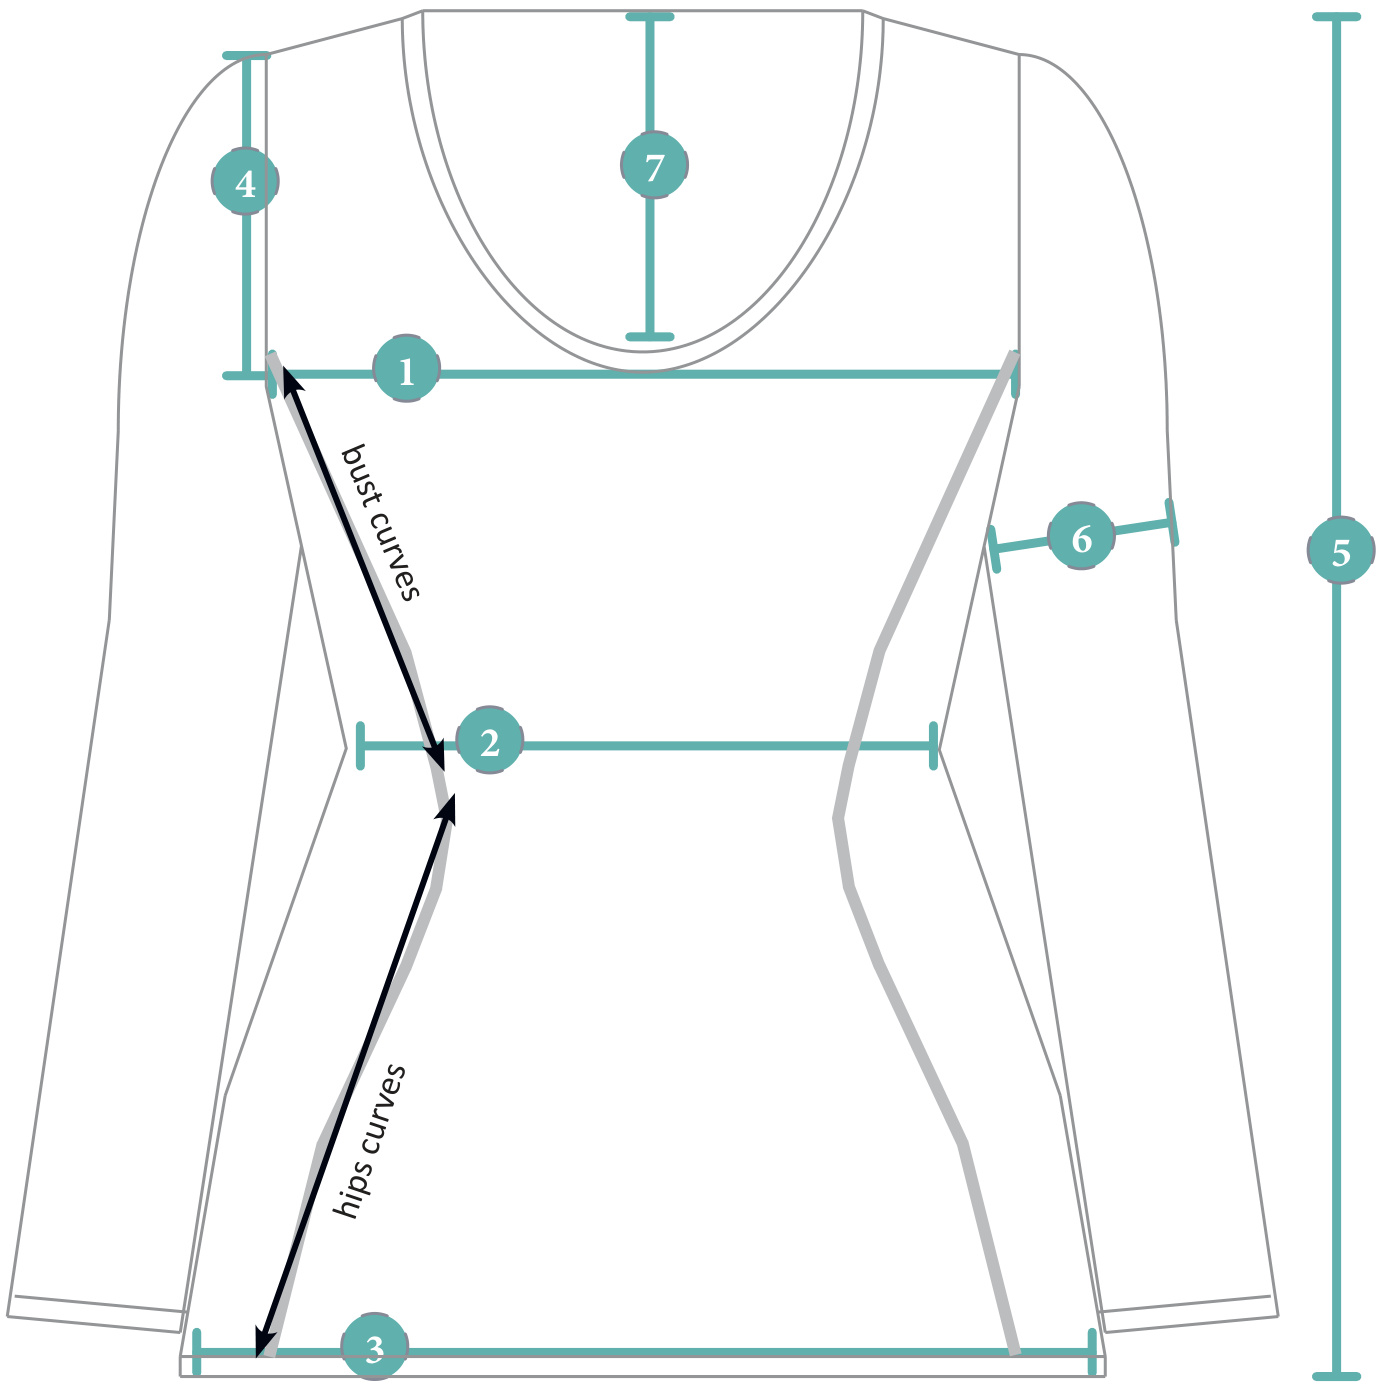
Finished dimensions
| Size | 32 | 34 | 36 | 38 | 40 | 42 | 44 | 46 |
| Bust circ. 1 | 32" 81 cm | 34' 86 cm | 36" 91 cm | 38 96 cm | 40 101 cm | 42" 106 cm | 44" 111 cm | 46" 116 cm |
| Waist circ. 2 | 26" 66 cm | 27 3/4" 70 cm | 30 1/4" 77 cm | 32" 81 cm | 34 1/2" 88 cm | 36 1/4" 92cm | 38″ 97 cm | 40 1/2" 103cm |
| High hips circ. 3 | 36 1/4" 92 cm | 38 3/4" 98 cm | 40 1/2" 103 cm | 42" 107 cm | 44 3/4" 114 cm | 46 1/4" 117 cm | 48 3/4" 124 cm | 50 1/2" 128 cm |
| Armhole depth 4 | 6 3/4" 17 cm | 7" 18 cm | 7 1/4" 18 cm | 71/2" 19 cm | 73/4" 20cm | 8" 20 cm | 81/4" 21 cm | 8 1/2" 22 cm |
| Garment length 5 | 22 3/4" 58 cm | 23" 58 cm | 23 1/4" 59 cm | 23 1/2" 60 cm | 23 3/4" 60 cm | 24" 61 cm | 24 1/4" 62 cm | 24 1/2" 62 cm |
| Arm circ. 6 | 11' 28 cm | 11 1/4" 29 cm | 12 1/4" 31 cm | 12 3/4" 32 cm | 13 1/2" 34 cm | 14 36 cm | 14 1/4" 36 cm | 15 1/4" 39 cm |
| Neck line depth 7 | 7 3/4" 20 cm | 8" 20 cm | 81/4" 21 cm | 8 1/2" 22 cm | 8 3/4" 22cm | 16 23 cm | 9 1/2" 24 cm | 9 1/2" 24 cm |
Glossary / and advice
K: knit P: purl M1L: make one left (see techniques below). M1R: make one right (see techniques below). M1PL: make one purl left (see techniques below). M1PR: make one purl right (see techniques below). M1P: make one purl. With left needle tip, lift strand between last knitted stitch and first stitch on left needle, from back to front. Purl lifted loop RS: right side WS: wrong side sl : slip pm : place marker (to avoid confusion between pm and sm, pm is in orange in the pattern) sm : slip marker K2tog: K 2 sts together SSK: Slip 1 st, Slip 1 st, insert the left hand needle into the front of the 2 sts and K them together. K2tog TBL: K 2 sts together trough the back loop. Your right-hand needle goes through the back loop of the first stitch, then the second. Then make a knit stitch as normal, pulling both loops off the left-hand needle. One stitch remains on the right-hand needle. Work stitches as they appear: Slip m as you encounter them and knit the knit stitches, purl the purls.
About the 《Contiguous》 method
If it's your first contiguous project, here are some things to understand with this kind of construction. You can check Suzie's summary here http://www. ravelry.com/groups/contiguous/pages/TheContiguous-Method. Follow each instruction step by step, everything will be ok, really.
About the pattern layout
If you see a blue line like this one, this means that these instructions are going to be repeated more than once.
About the swatch
It is absolutely important to get the same sts gauge. However, the row gauge is not crucial. If you don't have the same row gauge, it will have an impact on where the lines go over your waist. I recommend that in that particular case, you should make a small calculation. For example : if your gauge has 26 rows instead of 29 : Original pattern waist decreases : every 8 rows Z times = 56 rows. 56 \* 4" / 29 = 7.75 inches of waist decreases. Your gauge is 26 so : 7.75 \* 26 / 4" = 50 rows (against 56 originally). 50/7 = Decrease every Zth row more or less instead of every 8th row. Apply the same calculation for the hips: Original pattern hips increases : every 4 rows 12 times = 48 rows. 48 \* 4" / 29 = 6.6 inches of hips increases. Your gauge is 26 so : 6.6 \* 26 / 4" = 43 rows (against 48 originally). 43/12 = 3.5 Increase every 3.5th row more or less instead of every 4th row. Of course, this number is not round so you should probably increase every 3 rows 6 times (12/2) and every 4 rows 6 times (12/2). Apply the same concept to sleeves decreases, V-Neck increases and armholes length (before armholes increases).
Instructions 1// SHOULDERS
With the circular needle, cast on 40 [42, 42, 44, 46, 46, 48, 48] sts. Do not join in the round: the pattern is worked flat until the V-Neck is done.
1.1 Setup row:
P1, pm, P4, pm, \*P6 [6, 6, 7,7,7,8, 8], pm\* twice, P6[8, 8, 6,8,8, 6, 6], pm, \*P6 [6, 6, 7,7,7,8, 8], pm\* twice, P4, pm, P1. The 8 markers are identified as: shoulder, shoulder, back, back, back, back, shoulder, shoulder.
1.2 Shoulder and back increases:
· Row 1: K to m, M1R, sm, K4, sm, M1L, K to m, sm, M1l, Kto m, sm, M1L, Kto m, M1R, sm, K to m, M1R, sm, Kto m, M1R, sm, K4, sm, M1L, K to end. · Row 2: Pto m, M1PL, sm, P4, sm, M1PR, \*P to m, Sm\* (5 times), M1PL, Sm, P4, sm, M1PR, P to end. Repeat the last two rows 1 more time. You now have 64 [66, 66, 68, 70, 70, 72, 72] sts. You can now remove the 4 back markers and only keep the 4 shouldermarkers.
2 // SHOULDER AND V-NECK INCREASES
You are going to work the V-Neck increases at the same time (every 4 row) as the shoulder increases (every row). See tips for helpful notes of keeping track of your progress.
2.1 Shoulder and V-Neck increases:
· Row 1: K1, M1L (V-neck inc.), K to m, M1R, sm, K4 (seam sts), sm, M1L, K to m, M1R, sm, K4 (seam sts), sm, M1L, K to 1 st, M1R (V-neck inc.), K1 (V-neck increases and shoulders increases worked). · Row 2: P to m, M1PL, sm, P4 (seam sts), sm, M1PR, P to m, M1PL, sm, P4 (seam sts), sm, M1PR, P to end (shoulders increases worked).
2.2 Shoulder increases:
· Row 3: Kto m, M1R, sm, K4 (seam sts), sm, M1L, K to m, M1R, sm, K4 (seam sts), sm, M1l, K to end (shoulders increases worked). · Row 4: P to m, M1PL, sm, P4 (seam sts), sm, M1PR, P to m, M1PL, sm, P4 (seam sts), sm, M1PR, P to end (shoulders increases worked).
Tip to memorize the increases
RS : When you arrive at the right of a marker, make one right (M1R). When your next stitch is at the left of the marker, make one left (M1L) WS : do the opposite. M1L on the right of a m, and M1R on the left of a m.
V-Neck increases
I recommend that you keep track of the V-Neck increases, marking it every time you make one : V-Neck increases every 4th row 10 [10, 11,11,1,11,11,11] times.

V-Neck increases every 2nd row 8 [9, 8, 9, 10, 11, 12, 12] times.

Size 32 and 34 : repeat rows 1 and 2 one more time. Size 36 to 40 : repeat rows 1, 2, 3 and 4 one more time. Size 42 and 44 : repeat rows 1, 2, 3 and 4 one more time. Then repeat row 1 once more. Next row : P allsts. Size 46 : repeat rows 1, 2, 3 and 4 one more time. Then repeat rows 1 and 2 once more. You now have 58 [60, 64, 66, 68, 70, 72, 76] back sts (this number does not include the front sts or the seam sts).Stop shoulder increases. v you are going to work the sleeves (paragraph 3), continuing the V-Neck increase · every 4th row for a total of 10 [10, 11,11,11,11,11,11] times (including increases worked previously). I· every 2nd row for a total of 8 [9, 8, 9, 10, 11, 12, 12] times. Do them this way : K1, M1L, .. K to 1 st, M1R, K1. (like paragraph 2.1 Row 1)

3 // SLEEVES
3.1 Setup row:
At the same time as you work the V-Neck increases, \*Work as set to 1 st before m (adding a V-Neck increase if needed), slip next st to right needle, remove m, slip the st back to left needle, M1R, pm, K5, remove marker, K1, pm, M1L\*, (repeat from \* to \* 1 more time), work as set to end (adding a V-Neckincreaseifneeded). Next row : P all sts. Tip: You can attach a removable marker on each inc st to give you a visual reference later, when you will have to measure the armhole depth.
3.2 Sleeves "rapid" increases:
· Row 1: \*Work as set to m (adding a V-Neck increase if needed), sm, M1L, K to m (sleeve sts), M1R, sm\*, (repeat from \* to \* 1 more time), work as set to end (adding a V-Neck increase if needed). · Row 2: \*P to m, sm, M1PR, P to m, M1PL, sm\*, (repeat from \* to \* 1 more time), P to end. Repeat the last two rows 2 [3, 3, 3, 3, 3, 4, 4] times more.
3.3 Sleeves "normal" increases:
· Row 1: \*Work as set to m (adding a V-Neck increase if needed), sm, M1L, K to m, M1R, sm\*, (repeat from \* to \* 1 more time), work as set to end (adding a V-Neck increase if needed). · Row 2: Work stitches as they appear. Repeat the last two rows 12 [11, 12, 13, 14, 15, 13, 15] times more. You now have 44 [46, 48, 50, 52, 54, 54, 58] sts for each sleeves.
4 // ARMHOLES AND LINES SHAPING
4.1 v-Neck increases only, no more sleeves increases:
· Row 1: \*Work as set to m (adding a V-Neck increase if needed), sm, K to m (sleeve sts), sm\*, (repeat from \* to \* 1 more time), work as set to end (adding a V-Neck increase if needed). · Row 2: Work stitches as they appear. Repeat the last two rows until the armhole depth is 5.25 [5.25, 5.5, 5.5, 5.5, 5.5, 5.75, 5.75] inches - 13.5 [13.5, 14, 14, 14, 14, 14.5, 14.5] cm measuring it from the shoulder side. If you have the correct swatch this should be around 38 [38, 40, 40, 40, 42, 42] rows done (including only rows done from chapter 3.1 to now). Always end with a WS row.
Sleeves"normal" increases
recommend that you keep track of the increases, marking it every time you make one.
About the armhole depth
If your swatch grows or stretches in length after washing it, you should not measure directly your armhole, but instead calculate the number of rows you need to do because the measure will change after the first wash. Example: Size 36 needs a 5.5"armhole depth If your row gauge is 26 this means you have to do a total of 5.5 \* 26 / 4 = 36 rows.
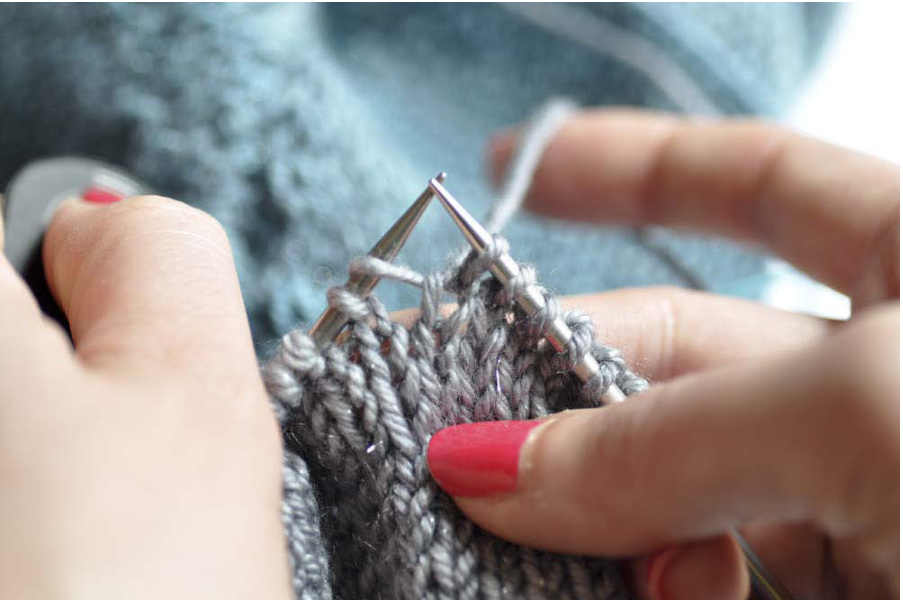
4.2 Armhole increases and lines shaping:
· Row 1 (Rs): \*Work as set to 2 sts before m (adding a V-Neck increase if needed), pm, K2, M1P, sm, K to m (sleeve sts), sm, M1P, K2, pm\*, (repeat from \* to \* 1 more time), work as set to end (adding a V-Neck increase if needed). · Row 2 (Ws): P to m, sm, Work stitches as they appear, sm, P to end. · Row 3 (RS): \*Work as set to m (adding a V-Neck increase if needed), sm, K2, P1, M1R, sm, K to m, sm, M1L, P1, K2, sm\*, (repeat from \* to \* 1 more time), work as set to end (adding a V-Neck increase if needed). · Row 4 (Ws): P to m, sm, Work stitches as they appear, sm, P to end. · Row 5 (RS): \*Work as set to m (adding a V-Neck increase if needed), sm, K2, P1, K1, M1R, sm, K to m, sm, M1L, K1, P1, K2, sm\*, (repeat from \* to \* 1 more time), work as set to end (adding a V-Neck increase if needed). · Row 6 (Ws): P to m, sm, Work stitches as they appear, sm,P to end. · Row 7 (RS): \*Work as set to m (adding a V-Neck increase if needed), sm, K2, P1, K2, pm, M1R, sm, K to m, sm, M1L, pm, K2, P1, K2, sm\*, (repeat from \* to \* 1 more time), work as set to end (adding a V-Neck increase if needed). · Row 8 (Ws): P to m, sm, Work stitches as they appear, sm,P to end. · Row 9 (RS): \*Work as set to m (adding a V-Neck increase if needed), sm, K2, P1, K2, sm, K to m, M1R, sm, Kto m, sm, M1L, Kto m, sm, K2, P1, K2, sm\*, (repeat from \* to \* 1 more time), work as setto end (adding a V-Neckincrease if needed). · Row 10 (Ws): P to m, sm, Work stitches as they appear, sm,P to end. Size 32: stop and go to next paragraph. Size 34 and 36: repeat rows 9 and 10 one more time (total: 12 rows worked). Size 38 : repeat rows 9 and 10 two times more (total: 14 rows worked). Size 40: repeat rows 9 and 10 three times more (total: 16 rows worked). Size 42 and 44: repeat rows 9 and 10 four times more (total: 18 rows worked). Size 46 : repeat rows 9 and 10 five times more (total: 20 rows worked). Always end with a WS rows (purl row). Your V-Neck increases should be also all done by now. You now have 224 [236, 248, 260, 272, 284, 288, 308] sts total. The armhole depth should be 6.75 [7, 7.25, 7.5, 7.75, 8, 8.25, 8.5] inches / 17 [18, 18.5, 19, 19.5, 20, 21, 21,5] cm (except if your yarn stretches or shrinks after the first wash. In this case the length could be a little "off") Measure it from the shoulder side, not from the neck side, which is higher. You are going to join in round, and separate sleeves from the body.
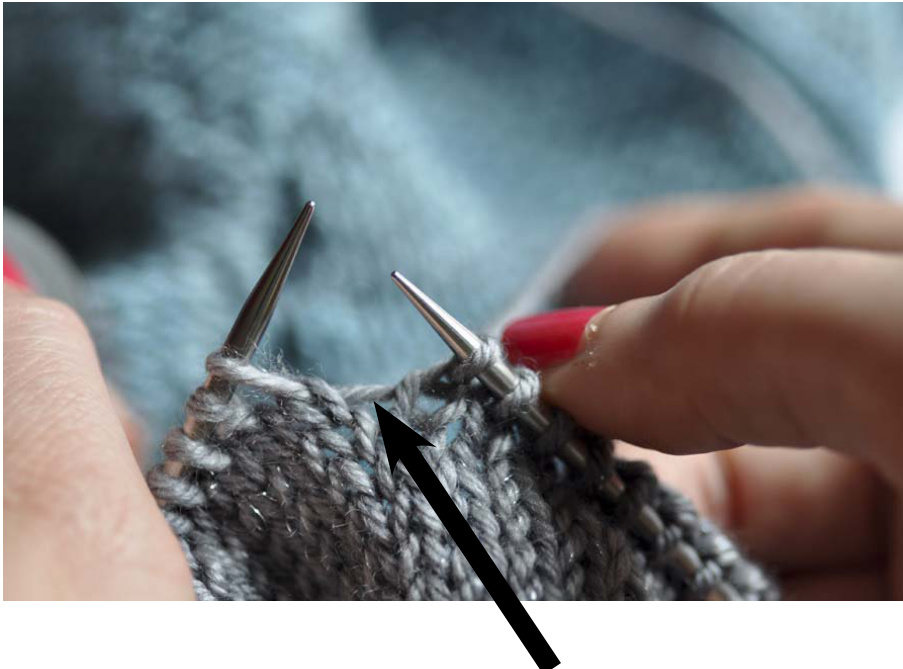
4.3 Separating sleeves from the body:
\*Work as set to m, sm, K2, P1, K2, sm, K to m, remove m, place 44 [46, 48, 50, 52, 54, 54, 58] sts on holder or waste yarn, C0 8 [8, 10, 10, 12, 12, 14, 14] sts (underarm sts), remove m, K to m, sm, K2, P1, K2, sm\*, (repeat from \* to \* 1 more time), work as set to end. Do not turn. place a marker different from all other markers, and join both fronts in the round, knitting the first stitch very tightly to avoid any gap. The beginning of the round is now at the middle of the front. You now have 152 [160, 172, 180, 192, 200, 208, 220] sts total.
5 // BODY AND LINES SHAPING
5.1 Bust curves (every 4th round):
· Round 1: \*K to 2 sts before m, SSK, sm, K2, P1, K2, sm, M1L, K to m, M1R, sm, K2, P1, K2, sm, K2tog\* (repeat from \* to \* 1 more time), K to end. · Round 2: Work stitches as they appear. · Round 3: same as round 2. · Round 4: same as round 2. Repeat the last four rounds 1 more time. 5.2 Waist decreases (every 8th round) and Bust curves (every 4th round): · Round 1: \*Kto 2 sts before m, SSK, sm, K2, P1, K2, sm, Kto m, sm, K2, P1, K2, sm, K2tog\* (repeat from \* to \* 1 more time), K to end. 4 decreases have been worked for waist + Bust curves. · Round 2: Work stitches as they appear. · Round 3: same as round 2. · Round 4: same as round 2. · Round 5: \*K to 2 sts before m, SSK, sm, K2 P1 K2, sm, M1L, K to m, M1R, sm, K2 P1 K2, sm, K2tog\* (repeat from \* to \* 1 more time), K to end. 4 inside shaping worked only (no waist decrease). · Round 6: same as round 2. · Round 7: same as round 2. · Round 8: same as round 2. Repeat the last eight rounds 6 times more. You now have 124 (132, 144, 152, 164, 172, 180, 192) sts total.
5.3 Hips increases (every 4th round) and Hips curves (every 8th round):
· Round 1: \*Kto m, M1R, sm, K2 P1 K2, sm, SSK, Kto 2 sts before m, K2tog, sm, K2 P1 K2, sm, M1L\* (repeat from \* to \* 1 more time), K to end. 4 Hips curves worked only (no hips increase). · Round 2: Work stitches as they appear. · Round 3: \*K to m, M1R, sm, K2 P1 K2, sm, K to m, sm, K2 P1 K2, sm, M1L\* (repeat from \* to \* 1 more time), K to end. 4 increases have been worked for hips + Hips curves. · Round 4: same as round 2. · Round 5: same as round 2. Pullover total length · Round 6: same as round 2. · Round 7: same as round 3 (hips increases + Hips curves). I If you want to m · Round 8: same as round 2. | the pullover lon Repeat the last eight rounds 2 times more (total hips increases worked 6 times). just repeat rounds 1 to 4 from chapter 5.4 for as long as you need.
5.4 Hips increases only (every 4th round):
· Round 1: \*K to m, M1R, sm, K2 P1 K2, sm, K to m, sm, K2 P1 K2, sm, M1L\* (repeat from \* to \* 1 more time), K to end. 4 increases have been worked for hips. · Round 2: Work stitches as they appear. · Round 3: same as round 2. · Round 4: same as round 2. Repeat the last four rounds 6 times total (total hips increases worked 6+6 = 12 times). You now have 172 [184, 192, 200, 212, 220, 232, 240] sts total.
5.5 Hem decreases:
Work one decrease round (to avoid the hem floating too much around you): K to m but do 2 decreases evenly before the m (front decreases), sm, K2 P1 K2, sm, K to m but do 5 decreases evenly before the m (side decreases) (you should adapt this number, so that you end with a number of sts equal to a multiple of 4 + 2), sm, K2 P1 K2, sm, K to m but do 4 decreases evenly before the m (back decreases), sm, K2 P1 K2, sm, K to m but do 5 decreases evenly before the m (side decreases) (you should adapt this number, so that you end with a number of sts equal to a multiple of 4 + 2), sm, K2 P1 K2, sm, K to m but do 2 decreases evenly before the m (front decreases).
Hem decreases
You can work your favourite decrease here, or do a simple K2tog decrease. 8 sts less (depending on the number of sts you removed on each sides of the body.
5.6 Hem:
Round 1: Kto m, sm, K2, P1, K2 sm, \*P2 K2\* (repeat to m ending with P2), sm, K2, P1, K2 sm, Kto m, sm, K2, P1, K2 sm, \*P2 K2\* (repeat to m ending with P2), sm, K2, P1, K2 sm, K to end. Repeat last round 4 times more. K3rounds. BO loosely all sts this way : \*K2tog TBL loosely, put the st back on the left needle keeping it loose\* (repeat from \* to \* till the end).
6 // RIGHT SLEEVE
6.1 Picking-up stitches:
Underarm sts advice
Put back the 44 (46, 48, 50, 52, 54, 54, 58) sts on the needle. Pick-up and knit the 8 (8, 10, 10, 12, 12, 14, 14) underarm sts, placing a marker at the middle of the underarmsts.
6.2 Arm decreases:
Like all top-down pullovers, if you just pick-up the underarm sts, you will probably have some "holes" under the arm. I recommend that you pick-up 4 more sts (2 at each underarm side), and that for the next 2 rounds, you decrease them quickly this way: K 7 rounds. K2tog, K to 2 sts bef. the end, SSK. Repeat this series one more time (16 rows worked, 4 decreases done) K 9 rounds. K2tog, K to 2 sts bef. the end, SSK. Repeat this series 6 times more (70 rows worked, 14 decreases done) You now have 34 [36, 40, 42, 46, 48, 50, 54] sts. K2tog, K to 2 sts bef. the end, SSK
6.3 Arm and hem:
K 39 rounds. Make one decrease round : K allsts, spacing evenly 6 [0, 4, 6, 2, 4, 6, 2] decreases of your choice (like K2tog for example). Next row: for the first half sts, 2x2 ribbing (beginning and ending with P2), then for the last half, K all sts. Repeat last round 7 times more then K 3 rounds. BO loosely all sts this way : \*K2tog TBL, put the st back on the left needle\* (repeat from \* to \* till the end).
7 // LEFT SLEEVE
7.1 Picking-up stitches: Follow paragraph 6.1 7.2 Arm decreases: Follow paragraph 6.2
7.3 Arm and hem:
K 39 rounds. Make one decrease round : K allsts, spacing evenly 6 [0, 4, 6, 2, 4, 6, 2] decreases of your choice (like K2tog for example). Next row: for the first half sts, K all sts, then for the last half, 2x2 ribbing (beginning and ending with P2). Repeat last round 7 times more. K3 rounds. BO loosely all sts this way : \*K2tog TBL, put the st back on the left needle\* (repeat from \* to \* till the end).
8 // NECK BAND
You are going to pick-up and knit sts along the back and front. Begin where you feel comfortable. I recommend that you begin at the middle of the back: Pick-up and K one st for each 15 [16, 16, 17, 18, 18, 19, 19] back sts. Pick-up and K one st for each 4 shoulder sts. Pick-up and K 2 sts for every 3 sts of the V-Neck half. Pick-up and K 1 st at the middle of the V-Neck. ? Pick-up and K 2 sts for every 3 sts of the V-Neck last half. Pick-up and K one st for each 4 shoulder sts. Pick-up and K one st for each 15 [16, 16, 17, 18, 18, 19, 19] back sts. Place marker and join in the round. K 5 rounds. y : \*K2tog TBL, put the st back on the left needle\* (repeat from \* to \* till the end)
9 // CROCHET EACH LINES
With a crochet of the same size as the circular needles, and the contrast yarn, you are going to make a crochet slip stitch inside the “purl line" for each side. For this specific part of the pattern I made a video tutorial that you can check here: http://youtu.be/ nmjt4MGP_lw (for the English version, activate the subtitles at the bottom of the video) Weave in ends (you can check my video here: http://www.youtube.com/watch?v=PUALiz21Uu0 even if it is in French, the video is very self-explanatory), wash and block lightly.
//ABOUT
Elise is a designer living in Paris, France. She works a lot to find the best fit based on body shapes, for real life women. She also likes to play with colors. You can find her patterns on elisedupont.fr and on ravelry. com.
//THANKYOU
To Kate, my tech editor and to ladyoga, Seve2vie, nellydoudou, dominiquerey, Agnesdevichy, NinaO, nuala29, poussinette02 and teace for their generous help with the test knit. To my man, and his unconditional support from the start. And thank you to all the knitters who have knit my patterns and encouraged me in every possible way.
I/ APROBLEM?
If something in the instructions is puzzling you or if you have a problem, check this page: http://elisedupont.fr/en/support-errors/ For any questions you can email me at: elise.dupont@gmail.com When you have a question, ALWAYS give me the paragraph number where the problem is (as numbered in the pattern), so that I can help you quickly.
//COPYRIGHT
The entire content of this pattern and the knitted designs to which it refers are subject to copyright. In purchasing this pattern you agree to print and use this pattern only for your personal, non-commercial use. You may not distribute or sell electronic or paper copies of this pattern, nor may you sell any items produced using the directions in this pattern.

Elise Dupont 2014
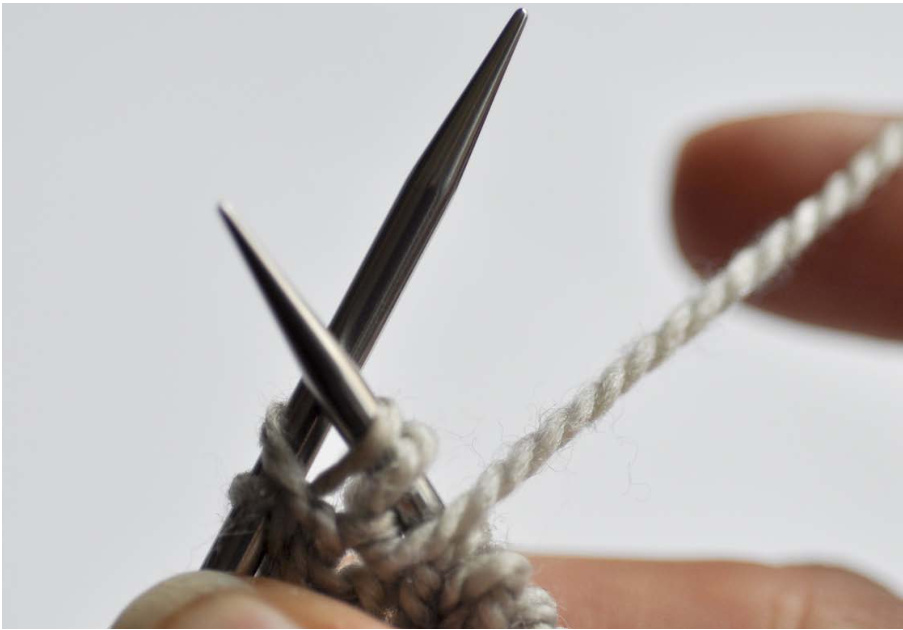
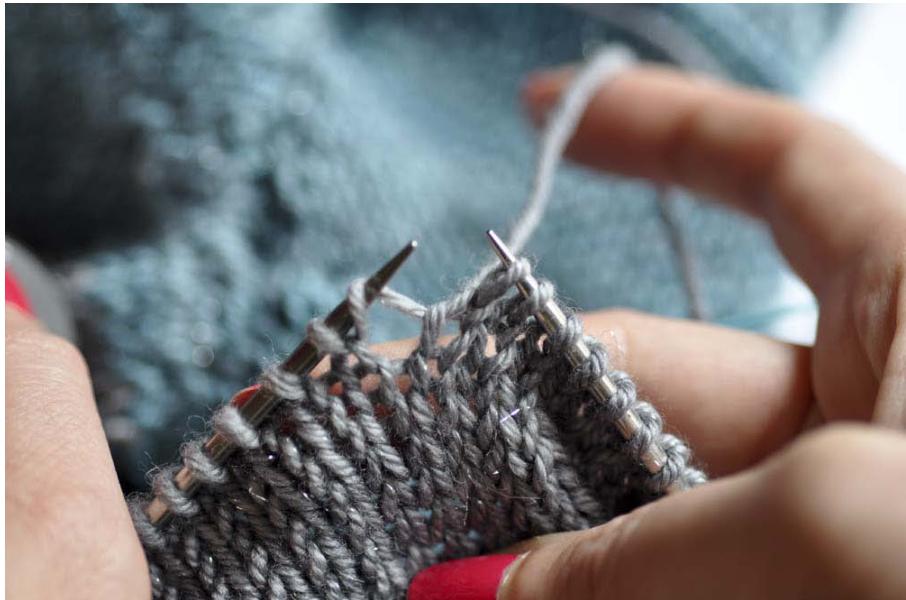
// M1L: MAKE ONE LEFT
ne strand of yarn which runs between the stitch just worked and the next stitch
Insert the left hand needle from front to back into the strand:
Knit this stitch through the back loop:

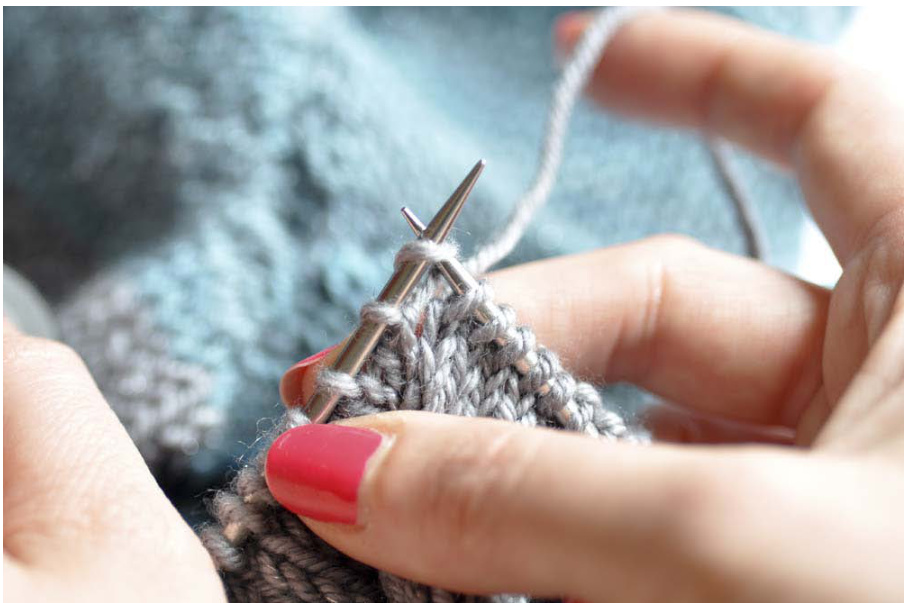
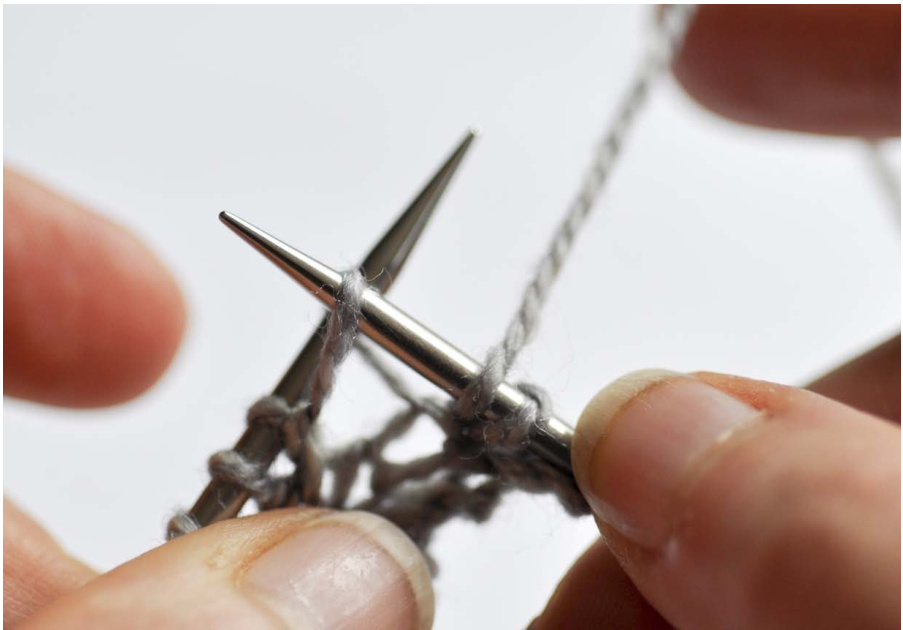
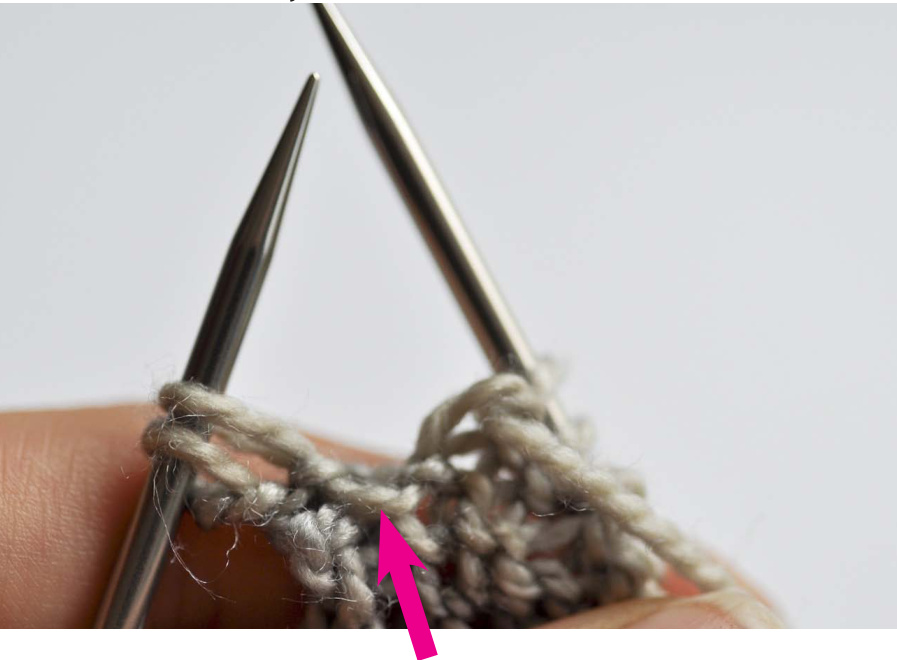
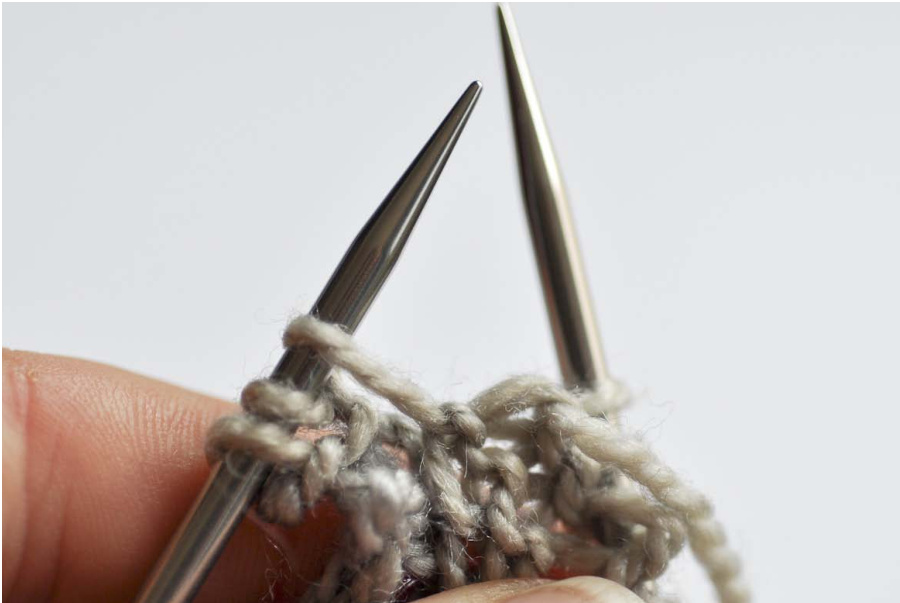
// M1R: MAKE ONE RIGHT
ne strand of yarn which runs between the stitch just worked and the next stitch

Insert the left hand needle from back to front into the strand:
Knit this stitch through the front loop:
I/MAKE ONE PURL RIGHT
This increase is worked at the beginning of WS rows. Notice the place under the strand of yarn which runs between the stitch just worked and the next stitch on the left-hand needle:
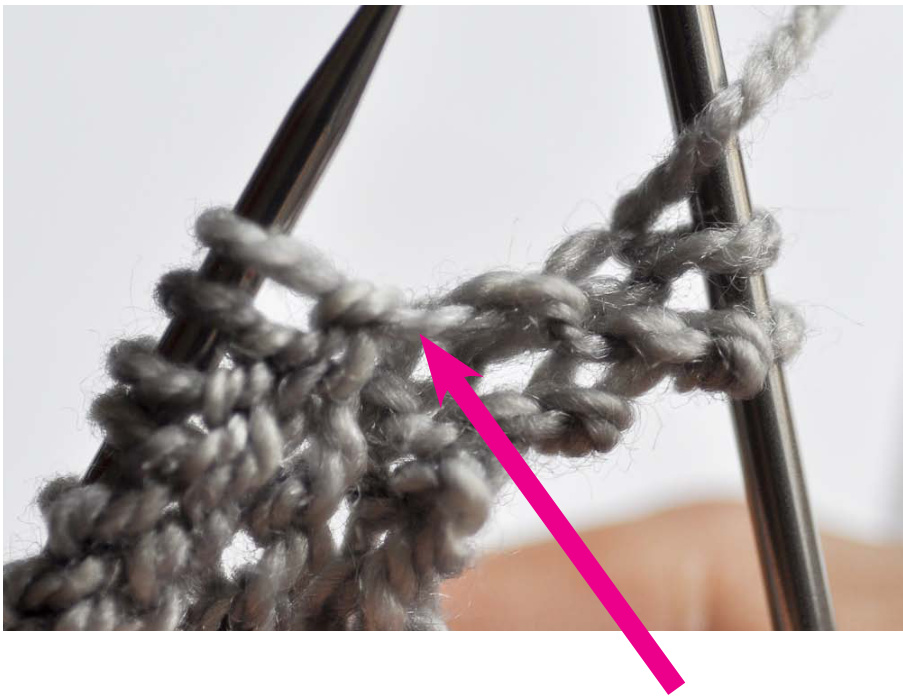
Insert the left hand needle from back to front into the strand:
Purl this stitch through the front loop:
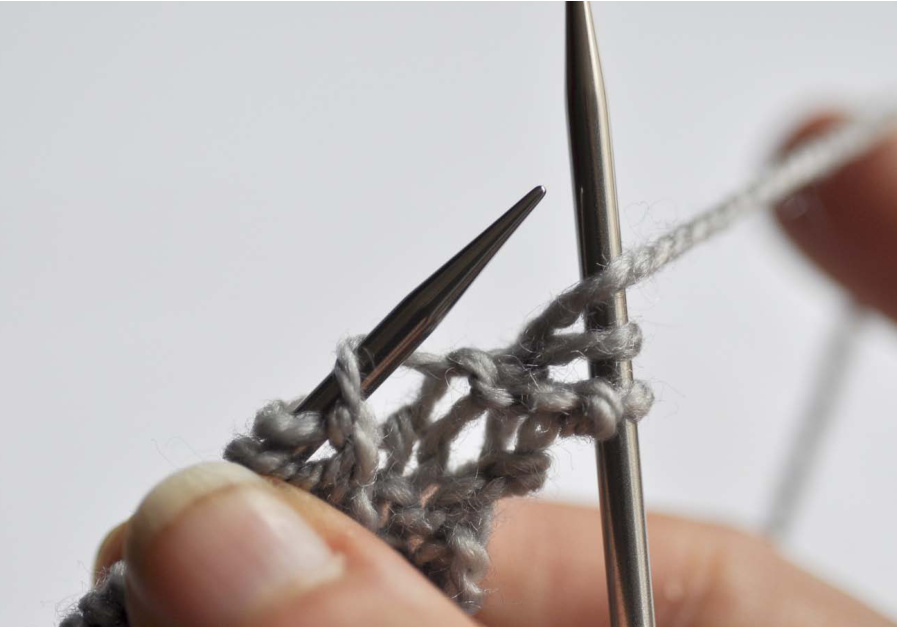
// MAKE ONE PURLLEFT
This increase is worked at the end of WS rows. Notice the place under the strand of yarn which runs between the stitch just worked and the next stitch on the left-hand needle:
Insert the left hand needle from front to back into the strand:
Purl this stitch through the back loop: