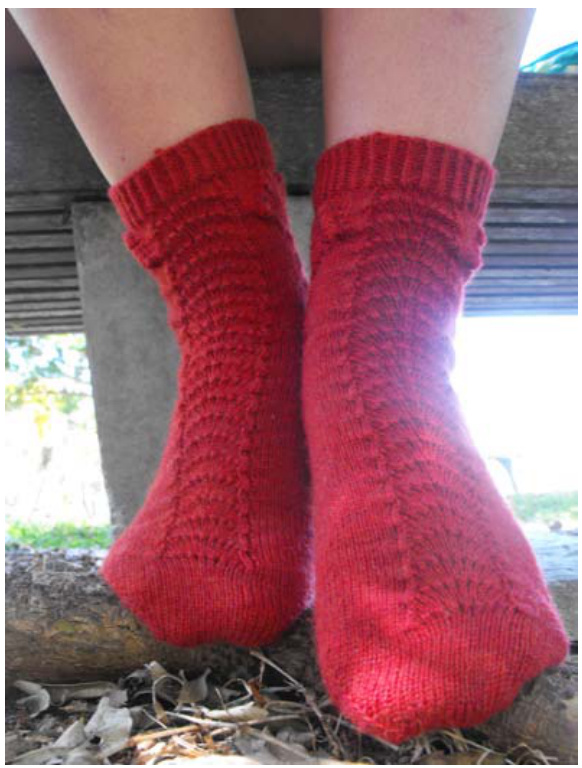
By Sarah v. Miller Inspired by the bird that is born and dies in flame, these sockes feature a feathery pattern going up the foot and the front and back ofthe leg. The leg has a cable motif on both sides signifying the tail ofthe phoenix. The red color is for the phoenix flame. This sock also features a marvelous cast-off, the invisible cast off. it's just about as stretchy as jeny's or EZ sewn, but it is invisible when worked with a 1x1 rib. Kind of like the tubular cast-off, without the tube. Enjoy! Needles: US1 / $2.25\mathrm{mm}$ , one long circular for magic loop, or two circulars (the pattern is written for magic loop) Yarn: Two balls Knit Picks Stroll, in Firecracker Heather $75\%$ superwash merino wool, $25\%$ nylon, fingering weight, 231yards/ $50\mathrm{g}$ per ball) Notions: Cable needle, or spare DPN, Stitch Markers Gauge: 9sts/inch
Size: For a foot circumference of 9 to 9.25 inches (yes, my fellow wide-footed people, this is for you!) ${***}$ For all chart keys, f there ae insruction withtwo diferent things separated by a slash (ex. $\mathrm{K}2\mathrm{tog}/\mathrm{P}2\mathrm{tog})$ , ONLY pay attention to the first part (the K2tog, in this case). Free online charting software is not leting me only put right side keys, as is needed for the round\*\*\* Toe: CO 30 sts total using Judy's Magic Cast-on (15 sts per needle). Knit one round. Round 1:K1, M1, Kto the last st on the neede, M1, K1, repeat for second needle Round 2: K Repeat these two rounds until you have 74 sts total, 37 on each needle.
Foot:
K13, PM, work row 1 of the fan chart (next page), PM, K13, K all the sts on the other needle. Continue as such (K13, corresponding row of fan chart, K13, etc), until sock is 1.5 inches less than desired length. Take note of what row in the fan chart you ended at.
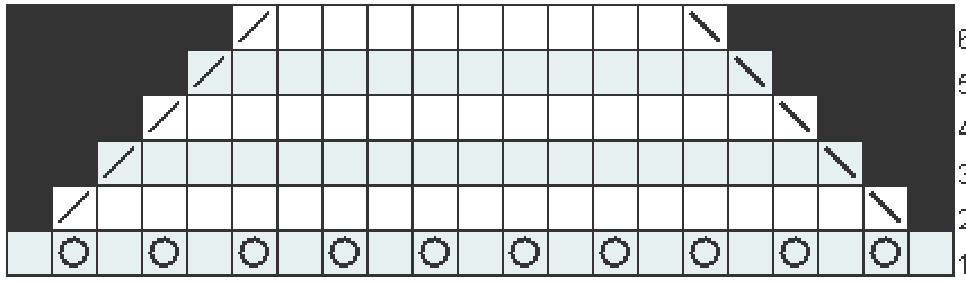
Key yo sskip2tog-b k1/p1 k2tog/p 2tog No Stitch
Heel:
Knit the sts on the first needle as you did with the foot. Now you will be proceeding with a short row heel. Don't worry, it's really quite simple. Row 1: Knit all the way to the last stitch on the needle. Wrap & turn. Row 2: Purl all the way to the last stitch on the needle. Wrap & turn. Row 3: Knit to the stitch before the wrapped one from two rows before. Wrap & turn. Row 4: Purl to the stitch before the wrapped one from two rows before. Wrap & turn. Continue in the manner of the last two rows until you have 15 unwrapped stitches in the middle, and eleven wrapped stitches on either side on the unwrapped ones. Row 1: Knit until you get to the first wrapped stitch. Pick up and knit your wrap. Wrap & turn. Row 2: Purl until you get to the first wrapped stitch. Pick up and purl your wrap. Wrap & turn. Row 3: Knit until you get to the first double wrapped stitch. Pick up and knit both wrap.Wrap & turn. Row 4: Purl until you get to the first double wrapped stitch. Pick up and purl both wraps. Wrap & turn.
Continue in the manner of the last two rows until you only have two double wrapped stitches left,. one on each end of the needle. Knit to this last double wrapped stitch, pick both wraps up and knit them. Then, continue on with the instep, following the pattern from the foot (remember what fan row you're on?). Then, when you get back to the needle you worked the heel on, pick up and knit the two wraps of the first stitch. Knit to the end of the needle.
All these short rows confusing you???
A video tutorial on short rows (all the way at the bottom of the page) An excellent tutorial on short row heels, including those pesky double wraps Leg: Work as per foot until the end of your current fan repeat. Next round: Knit the instep as you have been, then Ki3, PM, knit row 1 of the fan chart, PM, K13. Work established pattern for an inch from the heel. Stitch re-arrangement time! K the first 12sts onto the back needle (the one you worked the heel on). K1, SM, then work whatever row of the fan chart you're on, SM. K1 st. Now, I don't care how you do it, but before you proceed, it is imperative that you get the first 12 sts from the other half of the sock (the half you worked the heel on) onto the working needles, right next to those remaining 11 sts you have on your left needle. PM, and work the first row of the phoenix tail chart (see next page), PM, K1. On needle #2 now, the back of the sock, K1, SM, knit your current fan chart row, SM, K1. PM, work the first row of the phoenix tail chart, PM, K1. Stitch re-arrangement round complete. Work as follows until you finish the entirety of the Phoenix tail chart: K1, SM, Fan Chart, SM, K1, SM, Phoenix Tail Chart, SM, K1. Repeat for Needle #2. Once you finish the chart, work as you did the leg pre-phoenix tail chart until you finish your current fan chart repeat (or,if you just finished one in the last round, start and complete another One).

Cuff Work 1 inch of twisted rib (\*K1tbl, P1\*). BO using the Invisible Cast-Off. Phoenix Tail Cbart
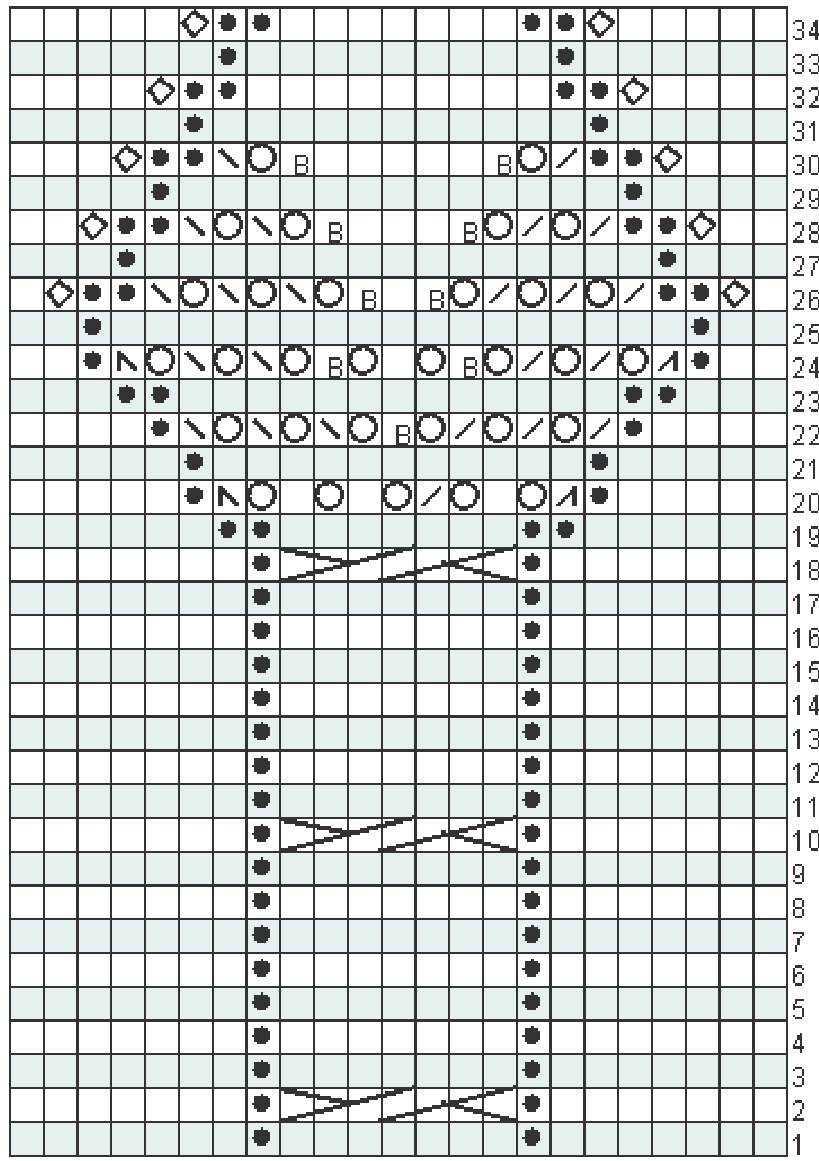
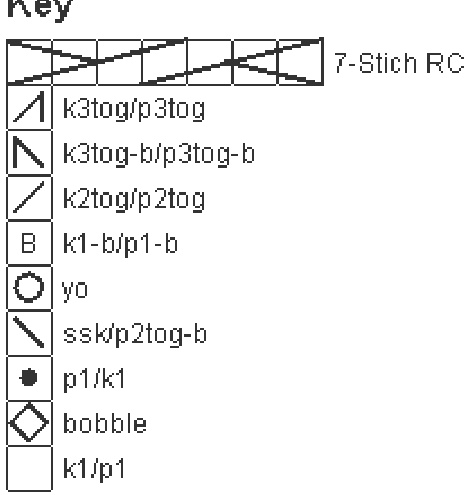
7-Stitch RC: Put 4 sts on a CN, hold in back, K 3sts, K 4sts from CN Bobble: K1, P1, K1, P1, K1 allinto the designated bobble stitch. Turn, and P across. Turn, slip the 2nd, 3rd, 4th, and 5th stitches over the 1st stitch. Ktbl. The suffix "-b"' is equal to "tbl"


