Flower Loom Frosties\*\*
\~by Jenny Stark Fluffy little Frosties, what a jolly, happy pair - with their button eyes and sweet winter wear, they are cute, as cute can be. Perch one here, or set one there, or give a Frostie away - spread a bit of holiday cheer and show how much you care!
Materials:
Loom: Large gauge round loom with 12 pegs. The Knifty Knitter Flower Loom was used for this project. Yarn: A white #5 bulky weight yarn. Bernat Pipsqueak yarn was used in the samples. A white #4 worsted weight yarn. Dawn Sayelle was used in the samples. Yarn in desired color for scarf and hat. Samples feature Lion Brand Hometown USA in Phoenix Azalea (bright pink) and Loops and Threads Charisma in Sunny Day (blue-green) Notions: knitting tool, scissors, tapestry needle, 6 mm buttons (for eyes), and any additional embellishments desired.
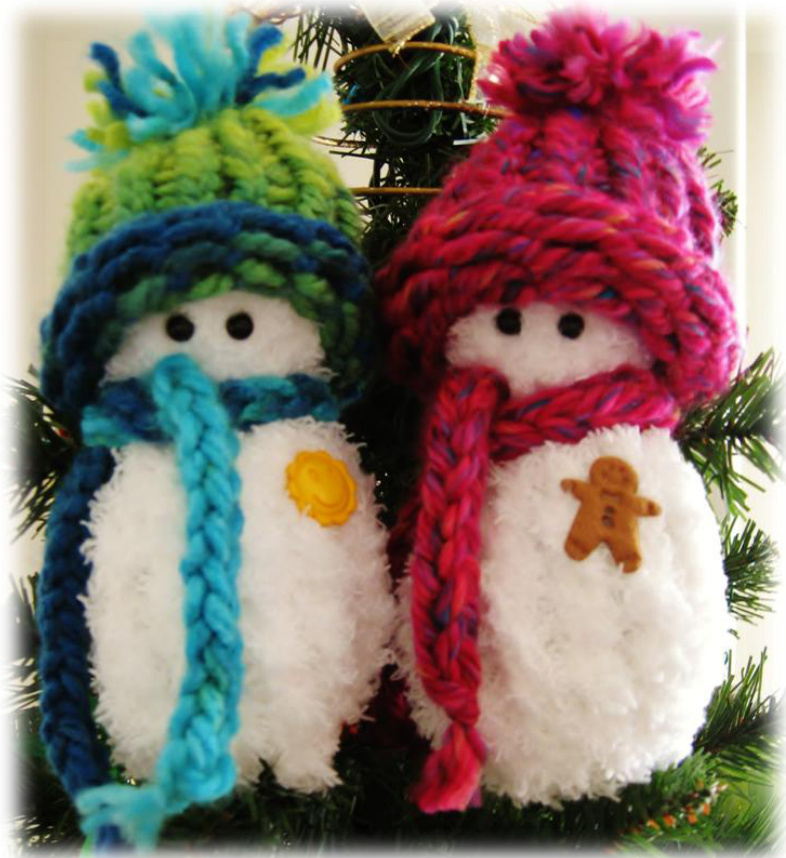
Finished Size: About 6.5" in height Other: Polyester fiberfill. You may also want a glue gun and some glue to use when attaching the buttons and embellishments. Stitches/Techniques used: E-wrap, Drawstring Cast On, Basic Cast On, Gather Removal Method, Using a lifeline to cinch in/shape the neck (details on this process included in this pattern).
Instructions:
Body: Work with 1 strand of the white worsted weight yarn and 1 strand of the white bulky weight yarn (held together as one). Cast on 12 pegs using the drawstring cast on method: 1. Make a slip knot and place it on the anchor peg on the front of the loom. 2. Lay the working yarn flat against the pegs and wrap it all the way around the outside of the loom one time. 3. Now place the working yarn above the wrapped strands on the first peg and flat knit this peg by lifing the bottom strands over the working yarn. 4. On the next peg, hold the working yarn off to the side (toward the last peg worked) and hook the lower strands of yarn. Lift the lower strands over the peg and into the center of the loom. This peg will now be empty. Pass the working yarn across the front of this peg and move to the next peg. 5. On peg 3 (and all remaining odd numbered pegs) repeat step 3. 6. On peg 4 (and all remaining even numbered pegs) repeat step 4. Follow these steps for all pegs. This will complete the drawstring cast on. Now you can take the slip knot from the anchor peg and continue on to the first round of your project.
Flower Loom Frosties\*\* \~by Jenny Stark
Rnds 1-12: E-wrap all pegs. Add a lifeline: Cut an 18" length of white worsted weight yarn and thread it onto the tapestry needle. Push the tapestry needle up through the stitch on peg one. Pull the length of yarn through the stitch. Stop when only 2-3 inches of the yarn tail remain at the bottom of the stitch. Move to the next peg and pullthe tapestry needle up through the stitch. Pull the length of yarn until all of the slack is gone between the two pegs. Continue this process all the way around the loom, pulling the lifeline up through each stitch on each peg. When the lifeline has passed through the last stitch, remove the tapestry needle and leave the lifeline in place. It will be used later to shape Frostie's neck. Continue on to create Frostie's head.
Head:
Rnds 1-4: E-wrap all pegs. Working at the bottom of the loom, pull on the yarn tails from the drawstring cast on to close up the bottom of the Frostie. Stuff Frostie's lower body with the fiberill. Note: You may want to add a small fabric pouch filled with plastic pellets before stuffing the lower body. This will help weight Frostie down so he/she will stand upright better. Working from the bottom of the loom, locate both ends of the lifeline. Pull them in to cinch up Frostie's neck. Tie the ends of the lifeline together in a knot to secure the gather. Weave these ends in. Rnds 5-8: E-wrap all pegs. Remove Frostie from the loom using the gather removal method. Stuff the head with fiberil. Gather the top of the head. Weave in all ends and set aside.
Scarf:
Using one strand of bulky weight yarn - or two strands of worsted weight yarn held together as one, cast on 2 pegs. Work a two peg I-cord measuring 12 inches in length. (Don't include the yarn tails in this measurement). 2 peg l-cord: Place a slip knot on the first peg. Wrap the second peg (around the back and to the front of the peg). Wrap the first peg (around the back and to the front of the peg). Wrap the second peg again. Notice how you are wrapping back and forth in a figure 8. Knit the bottom loops up over the top loops on peg one and peg two. Continue wrapping in a figure 8 and knitting the bottom loops over the top loops until the I-cord reaches the desired length. (Tip: Gently tug on the I-cord every so often to help set the stitches in place). When the cord has reached the length you need, fasten it off by moving the loop from peg two over above the loop on peg one. Knit off. Cut the working yarn, and then lay the yarn tail across the peg, above the last loop. Knit off and pull on the yarn tail to tighten up the bind off. Tie the I-cord scarf around Frostie's neck. Trim yarn tails to the desired length for fringes' on the scarf.
Roll Brim Hat:
Using one strand of bulky weight yarn - or two strands of worsted weight yarn held together as one, cast on 12 pegs. Join to work in the round. E-wrap for 12-14 rounds (12 rounds for a smaller roll up brim, 14 for a wider brim). Remove the hat from the loom using the gather removal method. Pull the yarn tails to gather and close the top of the hat, then place it on Frostie. Use the yarn tails and sew 2 or 3 small stitches through the hat and Frostie's head to tack the hat in place. Roll brim up. If needed, use cast on yarn tails to tack the brim in place. Add a pom-pom to the top if the hat, if desired. Weave in all ends on hat.
Finishing:
Glue button eyes on Frostie's face. If preferred, the eyes can be embroidered on with black yarn or embroidery thread. Add any other desired embellishments and find a nice little spot for Frostie to brighten up. Make a few more Frosties so they can keep each other company. Happy Holidays!


