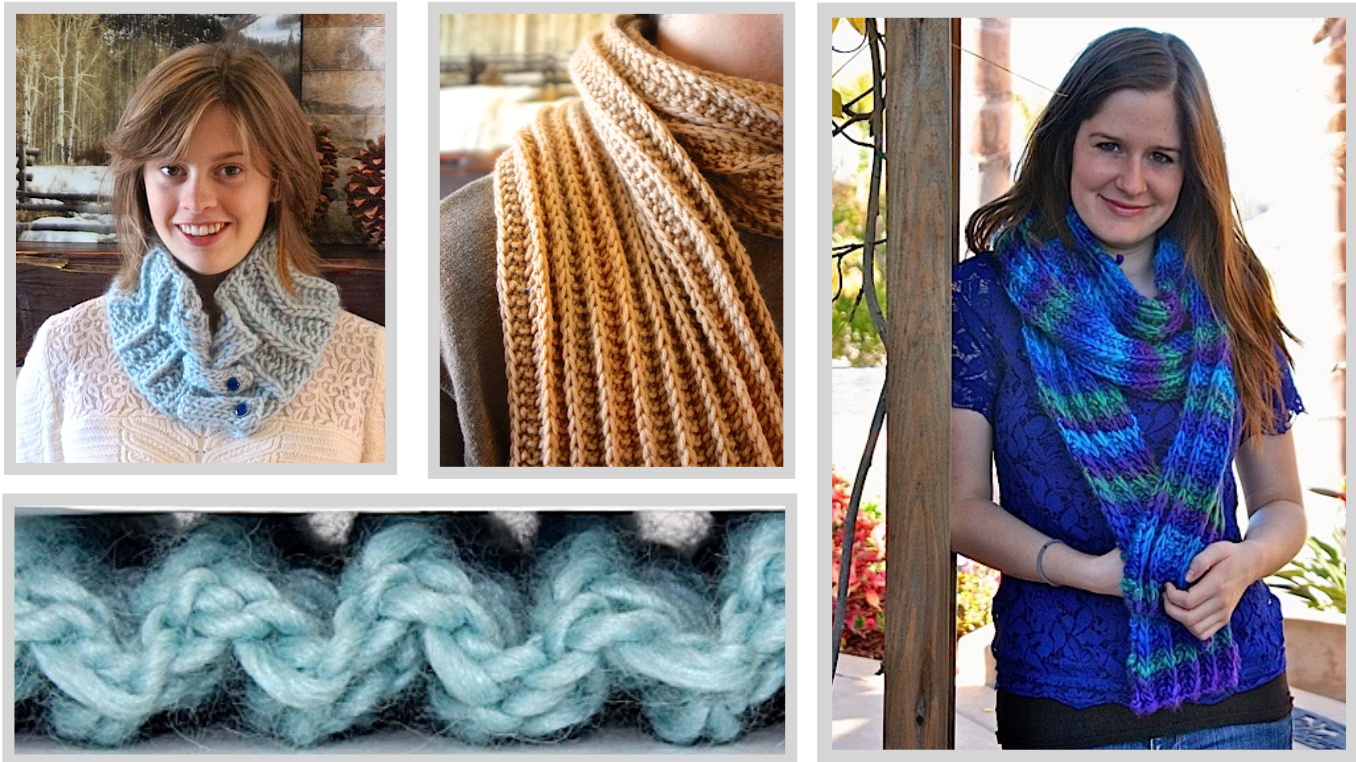
Seismic Waves Scarf
The Showy Decrease adds amazing depth to this two-sided Showy Rib.
| MoreInformationAvailableOnline |
| 1. Read ourFebruary,2015 5 blog announcement for more design details. |
| 2. The patternpage has more photos, downloadable charts & related blog posts. |
| 3. Free tutorial downloads for the Alternating Long Tail Cast On, Flat i-Cord and Showy Decrease are on our Techniques page. |
Seismic Waves Scarf
Reference Sheet
| Gauge (4" in stockinette stitch) |
| Scarf: 22 sts/28 rows Long Scarf: 20 sts/24 rows Cowl:16 sts/22rows |
| Yarn |
| Scarf: Karabella Margrite [80% fine merino, 20% cashmere; 154 yds per 50g ball], 5.5 sts per 1"; color 6; 3 balls (similar to Cashmerino). s g nylon, 95 yds per 50g ball], 5 sts per 1"; 6 balls of Neptune Rainbow. Cowl: Mirasol Sulka [60% merino, 20% alpaca, 20% silk; 55 yds per 50g skein], 4 sts per 1"; color 225: Spearmint; 2 skeins (used every yard) |
| Size Scarf: 55" by 6" (or to desired length) |
| Long Scarf: Shown at (very long) 90" by 6" but 72" is more reasonable. Cowl: 22" by 5" How longshould youknit yourscarf?CheckourwebsiteLink |
| Knitting Notions Scarf: US 6-7 /4mm - 4.5mm needles Cowl: US 10-10.5 /6mm - 6.5mm circular needles Yarnneedle 6 [12] markers (1 for every repeat plus 1) Optional yarn scrap for life line Cowl: Optional Crochet Hook (to create a firmer edge) Cowl: 2 shank buttons or pair of cuff links |
Pattern Notes
Make 1 Loop Increase [m1]
Twist a loop of yarn counter clockwise and add to right needle. The yarn tail will be facing the front. Do not use the lifted make one increase, it will pull the adjacent Showy Decrease.
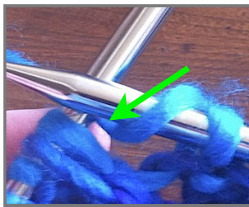
Reverse Yarn Over (ryo)
A reverse yarn over increase is paired with the k2tog and p2tog to create vertical Showy Decreases without an eyelet. The eyelets can be closed by knitting or purling normally. This is easier than purling through the back loop and faster than make 1 loop. To yarn over in reverse: wrap the yarn from back to front over the top of the right needle first. The yarn will sit like this / on the needle (see photo).
Showy Decrease
The Showy Decrease connects lines of k2tog and p2tog decreases with a slip stitch. This results in a raised decrease that stands out on stockinette or adds tremendous depth to rib patterns. There is a free tutorial on the Knitting Nuance web site. Alternating Long Tail Cast On (optional but recommended) This cast on alternates knit and purl stitches. It is the partner concept to binding off in the rib pattern and enhances the curve of the rib. A tutorial has been included on the last page.
Chart Legend
| knit | |
| RS:knitstitch WS:purl stitch | |
| k2tog RS:Knittwostitchestogetherasone stitch WS:Purl2stitchestogether | |
| nd RS:purl stitch WS:knitstitch | |
| p2tog RS:Purl2stitchestogether WS:Knit2stitchestogether | |
| make1Loop RS:Addatwistedlooptotheright needletoincrease1 st. | |
| slip RS:Slip stitch asiftopurl,holding yarninback WS:Slipstitchasiftopurl,holding yarninfront | |
| slip wyif RS:Slipstitchasiftopurl,withyarn infront WS:Slipstitchasiftopurl,withyarn inback | |
| yarnoverreversed RS:wrapyarninoppositedirectionso yarnstartsoverrightneedlefirst |
Abbreviations
| k, p | knit or purl |
| k2tog | knit 2 together |
| m1 | twistaloopofyarncounter clockwise,addtorightneedle |
| p2tog | purl 2 together |
| pm | placemarker |
| sl1 | slip as if to purl w/ yarn in back |
| sl1wyif | slip as if to purl w/ yarn in front |
| ryo | reversedyarnover |
Chart Reading Tutorial
Available in the free downloads section of our web site. There is a link on our home page. KnittingNuances.com
Seismic Waves Scarf
Scarf Pattern
Cast On
Multiple of 4 plus 5 sts; 2 sts are added to each repeat in the 1st set up row, therefore, working sts = multiple of 6 plus 5 sts Cast On 41 (or desired) sts with the Alternating Long Tail Cast On alternating knit and purl sts (see Pattern Notes). You can skip this step and use a standard long tail cast onbut the start of the ribwill beflatter.
Set Up Rows:
Row 1 [RS]: k1, p1 \*pm, m1, k2,p1, m1, k1\* pm, m1, k1, p1, k1 Row 2 [WS]: k2, sl1 wyif, p1 \* k2, sl1, k1, sl1 wyif, p1\* k2

Main Scarf
Row 1 [RS]: k1, p1 \* ryo, k2tog, k1, p2tog, ryo, k1\* ryo, k2tog, p1, k1 Row 2 [WS]: k2, sl1 wyif, p1 \* k2, sl1, k1, sl1 wyif, p1\* k2

Work these 2 rows until scarf is 55 (72)" long (or to desired length) ending on a WSrow. Pull scarf lengthwise along each of the Showy Ribs to help set stitches.
Bind Off
Remove the added Showy Decrease stitches by eliminating the yarn overs as follows: [Rs] follows: [RS]: k1, p1 \* k2tog, k1, p2tog, k1\* k2tog, p1, k1 Bind off in rib pattern (3 purls sts and 1 knit st per repeat). ·Weave inends.
Notes & Tips
Place markers (pm) to help set up the pattern. Once you get going, you won't need the markers to recognize where you are in the pattern but they will help spot mistakes. Consider a life line since yarn overs are hard to pick up. M1 vs RYO: For purposes of speed, the make 1 loop increase has been replaced with a reverse yarn over that is closed on the following row. You can continue using the make 1 loop increase if you'd like. Read our 12/2/14 blog post for more.
Slip [sl] vs Slip with Yarn in Front [sl wyif]
Chart symbols are viewed from the “right" side. When you work the slip stitches on a wrong side row, the V symbol means the yarn will be in front as you slip it. It may be easier to read the instructions to start the pattern. After the first few rows, it will be easy to spot the correct yarn placement. The stitch pattern is easier to remember if you note there is only 1 purl st in each repeat; a p2tog on the RS and the last st on the WS. The rib depth will start to show after about 2".
| knit | |
| k2tog | |
| purl | |
| p2tog | |
| make1 Loop | |
| slip | |
| slip wyif | |
| yarnoverreversed |
Please see Pattern notes for m1 definition.
Seismic Waves Scarf
Cowl Pattern
Cast On
Cast On 57 sts with the Alternating Long-Tail Cast On alternating knit and purl sts (see Pattern Notes). You can skip this step and use a standard long tail cast on but the start of the rib will be flatter.
Set Up Rows:
Row 1 [RS]: k3, p1 \*pm, m1, k2, p1, m1, k1\* pm, m1, k1, p1, sl3 wyif Row 2 [WS]: k4, sl1 wyif, p1 \* k2, sl1, k1, sl1 wyif, p1\* k1, sl3 wyif

Main Scarf
Row 1 [RS]: k3, p1 \* ryo, k2tog, k1, p2tog, ryo, k1\* ryo, k2tog, p1, sl3 wyif Row 2 [WS]: k4, sl1 wyif, p1 \* k2, sl1, k1, sl1 wyif, p1\* k1, sl3 wyif

Work these 2 rows until scarf is 5" (or desired length making sure you have enough yarn for the 2 Flat i-Cords) ending on a WS row. Pull scarf along each of the Showy Ribs to help set stitches.
Bind Off
Remove the added Showy Decrease stitches by eliminating the yarn overs. The decrease at the start of the next 2 rows helps roll the side i-cord in before bind off. [RS]: k2tog, k1 p1. \* k2tog, k1, p2tog, k1\* k2tog, p1, sl3wyif Bind Off: p2tog, then bind off in rib pattern (3 knit sts and 1 purl st for each repeat)
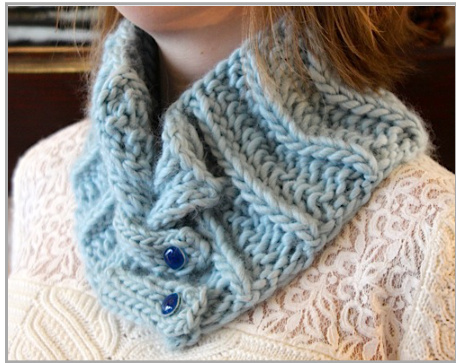
Flat i-Cord attachment for Folded Scarf (make 2)
Knit 2 Flat i-Cords as described on next page. Use tail to place Flat i-Cords on scarf as shown in photo adjusting placement to customize fit. Use tail to place Flat i-Cords on scarf as shown in photo adjusting placement to customize fit.
Finishing
See note to the right regarding a firmer front edge. Weave in remaining ends. Close cowl using a shank button sewn to the scarf or for a bit of fun try a pair of cufflinks.
Firmer front Edge Option:
You can create a firmer edge by inserting a crochet chain into the i-cord edge. With a crochet hook of similar size to your needles, make 2 crochet chains the height of your cowl. Use a tapestry needle to pull the chain inside the side i-cords. Use top tail to tie down flap to the scarf.
Notes & Tips
Place markers (pm) to help set up the pattern. Once you get going, you won't need the markers to recognize where you are in the pattern but they will help spot mistakes. Consider a life line since yarn overs are hard to pick up. M1 vs RYO: For purposes of speed, the make 1 loop increase has been replaced with a reverse yarn over that is closed on the following row. You can continue using the make 1 loop increase if you'd like. Read our 12/2/14 blog post for more.
Slip [sl] vs Slip with Yarn in Front [sl wyif]
Chart symbols are viewed from the “right" side. When you work the slip stitches on a wrong side row, the V symbol means the yarn will be in front as you slip it. It may be easier toread the instructions tostart the pattern. After the first few rows, it will be easy to spot the correct yarn placement. The stitch pattern is easier to remember if you note there is only 1 purl st in each repeat; a p2tog on the RS and the last st on the WS. The rib depth will start to show after about 2".
| knit | |
| k2tog | |
| purl | |
| p2tog | |
| make1Loop | |
| slip | |
| slip wyif | |
| yarnoverreversed |
Please see Pattern notes for m1 definition.
Seismic Waves Scarf
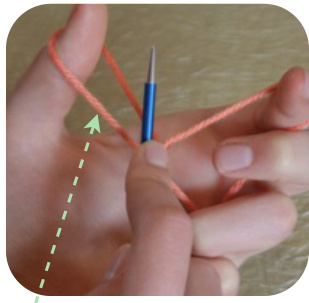
Alternating Long-Tail Cast On
The Alternating Long Tail Cast On alternates a traditional long-tail cast on with a reversed long-tail cast on that mimics the purl stitch. There are several benefits. First, it looks more interesting than the standard chain edge but it's more functional also. The cast on has more give and in enhances the flow of the rib stitch. More photos on the free tutorial download. Set up just as you would for a long tail cast on with plenty of yarn for the tail. This cast on uses approximately the same length. The tail is on the left over the thumb as usual. Knit stitch (standard): the needle travels behind and through the thumb loop from left to right, over to grab finger yarn, and bring it back through the thumb loop. Purl stitch: the needle travels to the outside of the finger loop, through the loop from right to left, then over to the thumb yarn. Grab the thumb yarn from beneath and bring it through the finger loop. Snuggle the yarn up to the needle, but don't pull too tightly. You do not want to “cast on loosely" for this technique or you'll lose the structure. You can combine knit and purl cast-ons to match your rib pattern (1x1, 1x2, 3x3 etc.).
Traditional Knit Cast On
The Purl Cast On

Thumb Loop
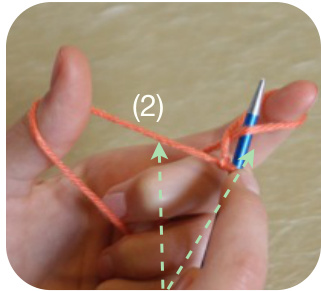
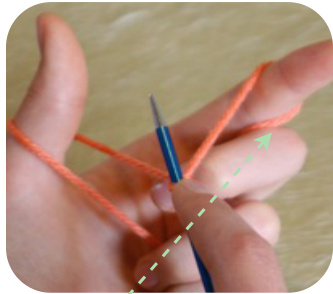
Finger Loop Around and through the finger loop from right to left then grab thumb yarn from underneath (2) and bring it through the finger loop.
Basic Flat i-Cord Pattern:
Cast on 6 sts with enough tail to attach to scarf later. Every row: k3, sl3 wyif.
Adding a Button Hole:
Knit Flat i-Cord for 3" then add a button hole as follows: Row 1: k3, yo , sl3 wyif Row 2: k4, sl 3 wyif Row 3: k3, p1rb, sl3 wyif \*\* Row 4: k2, k2tog, sl 3 wyif Chart JPG Files are available for download at knittingnuances.com/help. Knit 1 more row (k3, sl3 wyif ) then bind off as follows: BO 2 sts, slip 3 wyif (4 sts remaining) BO 2 sts, sl1 (the bind off from the other side), pass last stitch over. Cut tail and weave in so chain lies flat against top of Flat i-Cord. Hide remaining tail down the center of i-cord. Use beginning tail to attach Flat i-Cord to scarf. \* p1rb (purl 1 row below): purl 1 into the eyelet hole created by the yo in row 1.


