Smarter than the Average Mitt Version 2 Carine Lai
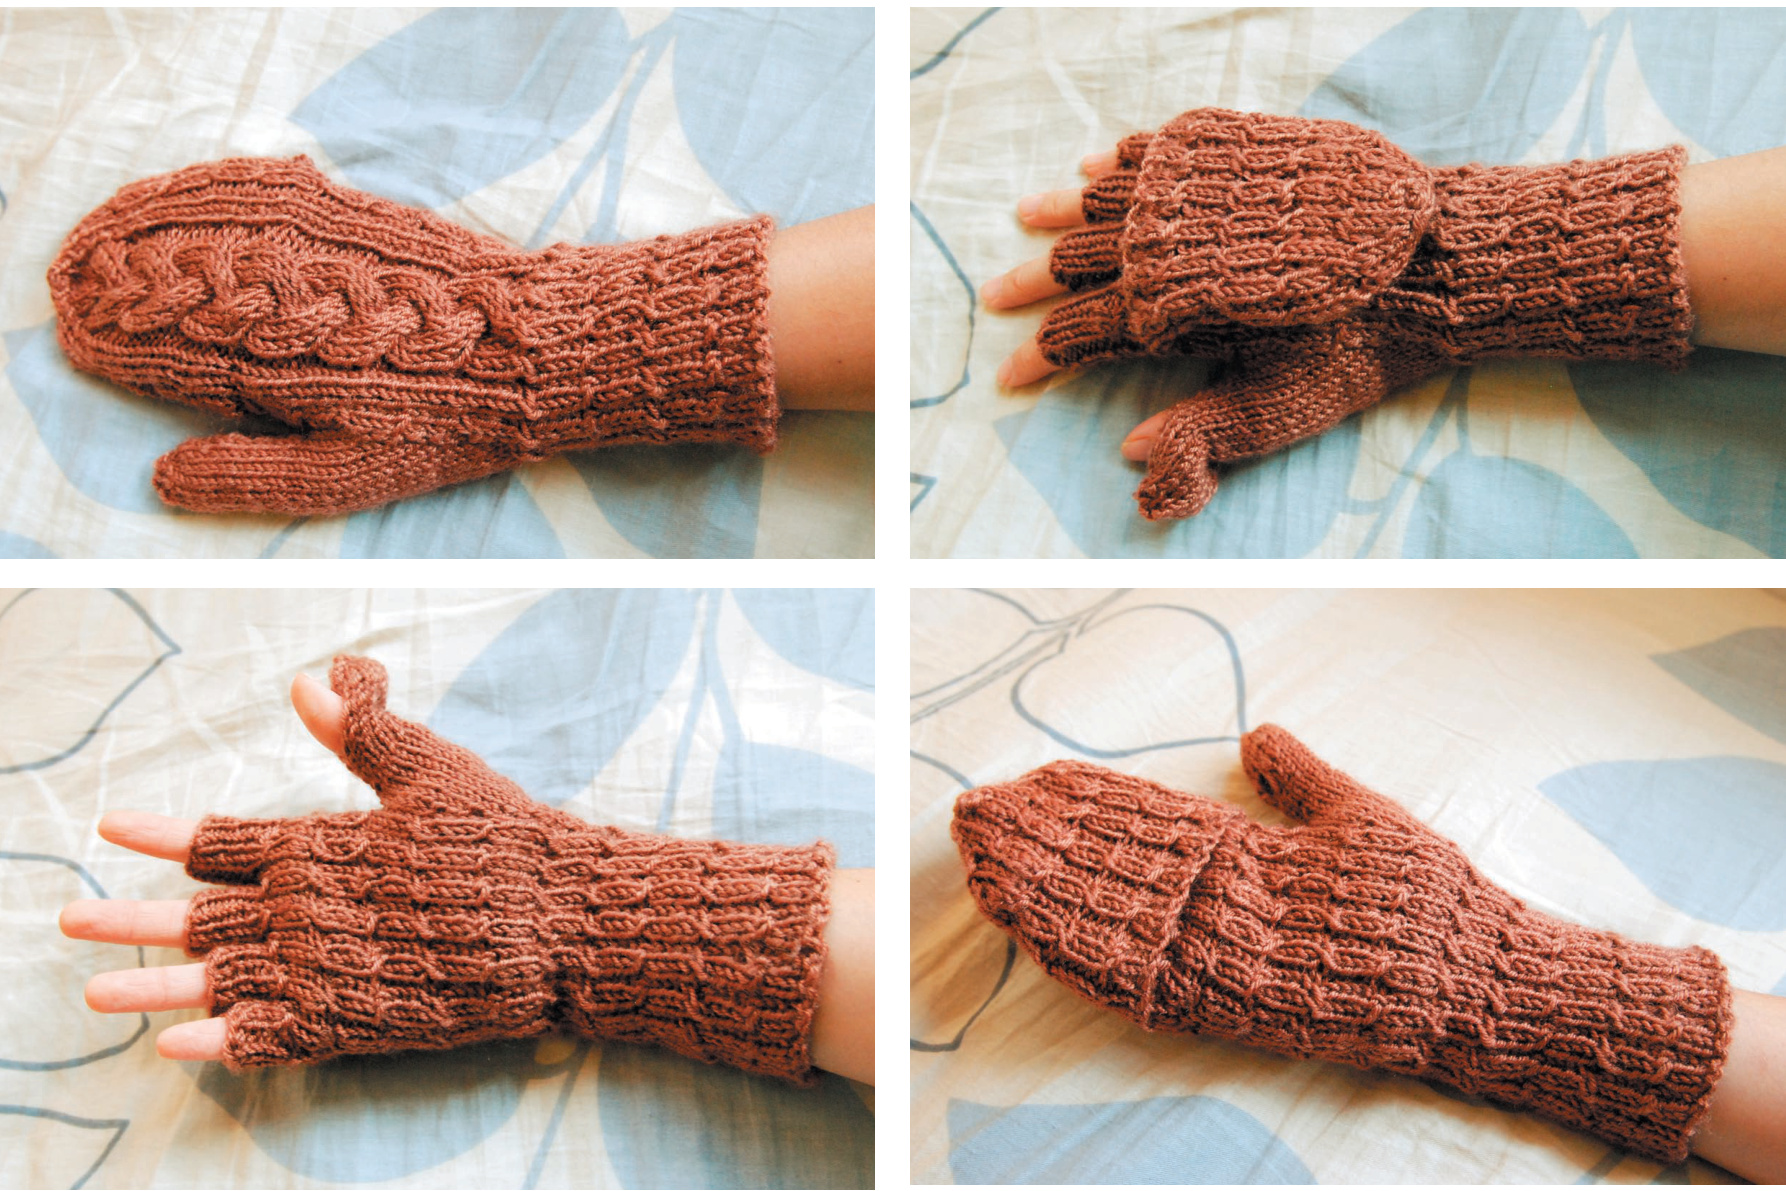
Description A cosy cabled flip-top mitten that keeps your fingers and thumb free for texting on your cell phone or handling small change. The unique construction method makes the fliptop seam invisible. Improvements over Version 1 Roomier fit, especially in the fingers. Eliminated large cable on the palm for more streamlined look. Clearer instructions with new row count auide . All text and images in this pattern copyright of Carine Lai. For personal use only.
Pattern Specifications
Difficulty level: Requires concentration. Techniques include knitting in the round, cabling, mid-rown cable cast-on, three needle bind-off. Yardage: 220 yards/202 m Recommended fibres: Wool or acrylic. Stretchy, good stitch definition. Equipment: 1 set double-pointed needles. 2 stitch holders, 3 stitch markers, large darning needle, scrap yarn, 3 mm crochet hook (optional).
Women's extra small to small
Fits hand 6.0-6.5"/15.0-16.5 cm around knuckles. Double knit weight yarn 3.5 mm/US size 4 needles Gauge: 30 stitches and 32 rows to 10 cm/4" in unstretched mini-cable pattern.
Women's medium to large
Fits hand 7.0-7.5"/17.75-19.0 cm around knuckles Worsted weight yarn 4.5 mm/US size 7 needles Gauge: 24 stitches and 28 rows to 10 cm /4" in unstretched mini-cable pattern Center Braid Pattern for Main Mitten (17 stitches wide)
Right hand
Lines 1 to 3: k2, p2, k9, p2, k2 Line 4: k2, p2, k3, C3F, p2, k2 Lines 5 to 7: k2, p2, k9, p2, k2 Line 8: k2, p2, C3B, k3, p2, k2 Repeat from start.
Left hand
For left hand, begin on Line 5.
Abbreviations:
kknit pPurl c1f Cable 1 forward. Slip stitch onto cable needle, hold in front, knit next stitch, knit stitch from cable needle. c1b Cable 1 backward. Slip stitch onto cable needle, hold in back, knit next stitch, knit stitch from cable needle c3f Cable 3 forward. Slip 3 stitches onto cable needle, hold in front, knit next 3 stitches, knit stitch from cable needle. c3b Cable 3 backward. Slip 3 stitches onto cable needle, hold in back, knit next 3 stitches, knit stitch from cable needle m1 Make stitch. Knit into into the back of the strand between the current stitch and the next stitch. [] Repeat the contents of the square brackets as specified. skpo Slip 1 stitch, knit next stitch, pass slipped stitch over k2tog Knit 2 together k3tog Knit 3 together Charts and diagrams Page 6: Row count guide Page 7: Seaming diagram Mini-cable pattern
Right Hand:
Rounds 1 to 5 : [k2, p1] to end Round 6 (Crossover Round): [C1F, p1] to end. Round 7-11: [k2, p1] to end. Round 12 (Crossover Round): [C1B, p1] Repeat to end.
Left Hand
For left hand, begin on round 7.
Right mitten
Cast on 45 stitches on double pointed needles, divide evenly. Place stitch marker at beginning of round. Note1 Print out the row count guide on page 6 separately and keep it on hand for easy reference. This will help you keep track of increases, decreases, and cables. Wrist band Work mini-cable pattern for 24 rounds, or to desired length.
Thumb gusset section Round 1 (establishing round):
k2, p1, work first row of braid panel, p1, k2; Insert 1st thumb gusset marker, m1, insert second gusset marker (1 stitch between markers); p1, k2 to end of round, ending on a purl stitch.
Note 2
Rounds 2 and 3: Work in established pattern for 2 rounds. Remember that the braid panel includes a 2-stitch stockinette column on either side. Do not mini-cable these. (See photo on page 1 for reference.) Round 4: k2, p1, work next row of braid panel, p1, k2; pass marker, m1, k1, m1, pass marker; p1, k2 to end of round, ending on a purl stitch. Repeat rounds 2 to 4 six more times, until there are 15 stitches between the markers. The mini-cable pattern should be continued all the way around the mitten except for on the thumb, which is worked in stockinette stitch. Work even for 2 more rounds until the next minicable crossover round (round 24). Work up to the start of the thumb gusset, then place the 15 thumb stitches on a holder or scrap yarn. (You can remove the thumb markers at this point). Join yarn to the rest of the stitches, and continue to end of round. Work even for 5 rounds, ending on a mini-cable crossoverround.
Mitten flip top
Remove beginning-of-round marker and divide stitches so that there are 25 stitches on the braid side of the mitten, and 20 stitches on the palm side (45 stitches total). Ensure that there are 4 stitches on either side of the braid panel. Place the palm stitches on holder or scrap yarn. Work the 25 stitches even.Turn work and cast on 20 stitches using the cable cast-on method.Re-insert BOR marker after cast-on stitches, and join yarn to other side (marks new beginning of round) Work the 25 back stitches, then continue [k2, p1] ribbing across the 20 palm stitches. This re-establishes the mini-cable pattern on the palm. Continue working even for 3 mini-cable segments.
Set up for decreases
Shift beginning-of-round marker 1 stitch to the left. Insert a second marker after 23 stitches, marking off 23 stitches for the braid side of the mitten and 22 stitches for the palm side. There should be 3 stitches on either side of the braid panel.
Round 19 of chart (1st decrease):
work as established until 6 stitches before 2nd marker, k2tog; continue in pattern, pass marker; work 2 stitches, skpo; work as established until 4 stitches before marker; k2tog, work to end of round. 41 stitches remaining. Round 20: Work even Round 21 (2nd decrease): Repeat round 19. 37 stitches remaining. Round 22 (braid cable crossover): Work 5 stitches; k3 C3F for right mitten (or C3B k3 for left mitten); complete round as established. Round 23 (3rd decrease): Repeat round 19. 33 stitches remaining. Round 24 (minicable cross-over round): C1F for right mitten (or C1B for left mitten), p1 k11, p1; [C1F (or C1B), p1] to end. Round 25 (4th decrease): Repeat round 19. 29 stitches remaining. Round 26 (braid cable crossover): Work 5 stitches; C2B, k1 for right mitten (or k1, C2F for left mitten) ; complete round as established.
Round 27 (5th decrease): Repeat round 19.
25 stitches remaining. Round 28: Work even.
Round 29 (final decrease):
K2, p1, kl, skpo, k3tog, k1, p1, k2; pass marker; p1, k1, skpo, p1, k2, p1, k2tog, k1, p1. (20 stitches remaining).
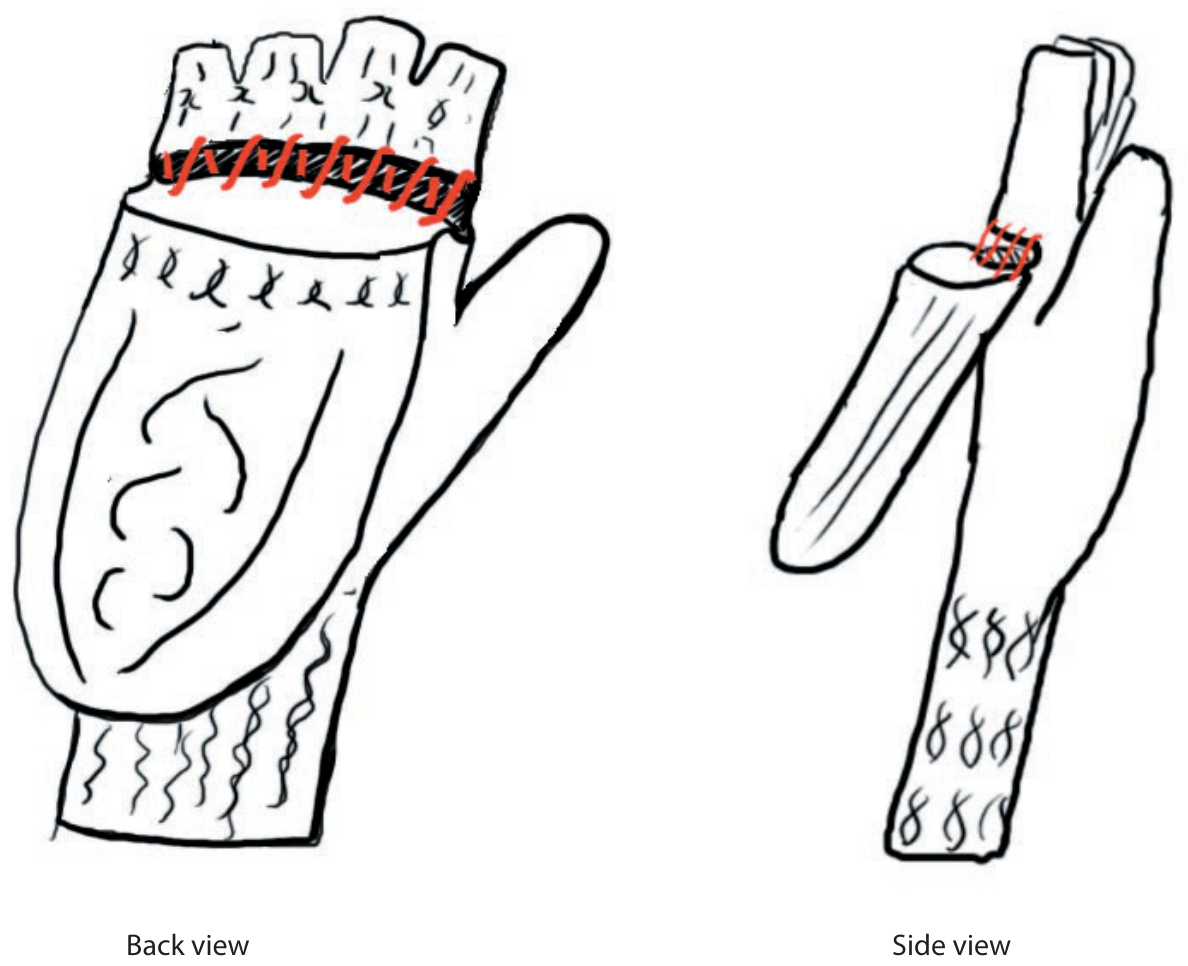
3 needle bind-off to close the top
The top of the mitten will be seamed using a 3 needle bind-off. The seam runs over the top of the mittenfromfront to back. Work 5 stitches, bringing you to the centre of the braid panel. Place next 10 stitches on scrap yarn, and the last 10 stitches on a separate piece of scrap yarn. Turn the mitten top inside-out, transfer stitches from each piece of yarn to a needle, hold the 2 needles parallel, and do a three-needle bindoff. This ensures that the seam will be on the inside. Inner mitten and fingers Pick up the 20 palm stitches from scrap yarn. Join new yarn and work the 20 stitches as established. Turn and cast on 25 stitches using the cable cast-on method, and join yarn to other end. Work mini-cable pattern in the round for 1 segment (6 rounds), ending on a cross-over round. Work 1 more round as established, then divide stitches for the fingers: 12 stitches each for the index finger, middle finger, and ring finger, and 9 for the little finger. Work each finger in the round using 2k 1p ribbing for 8, 8, 6, and 4 rounds respectively. Loosely bind off using ribbing bind-off.
Thumb
Transfer 15 thumb stitches from holder to double pointed needles. Join new yarn on the inner edge of the thumb, and work 6 rounds in stockinette stitch. Note 3 For a neater edge on the thumb slit, slip 1st stitch ofeach row. Optional thumb slit: To create slit on inner edge of thumb, switch from working in the round to working backand-forth for 4 rounds. Switch back to working in the round for 4 more rounds, or to desired length. Decrease round: k1, k2tog until end of round (10 stitches remaining) Next round: Repeat decrease round (7 stitches remaining). Cut yarn, thread it through the remaining stitches and pull tight.
Left mitten
The left mitten a mirror image of the right mitten, so the braid pattern and mini-cables are reversed, and the flip-top opens on the opposite side. Wrist band: Cast on 45 stitches and work the cuff the same as the right hand. Note 4 Since the left mitten is a mirror image, the first mini-cable crossoveris C1B, not C1F.
Thumb gusset
Round 1: Insert 1st gusset marker (which is also the beginning-of-round marker), m1, insert 2nd gusset marker; k2, p1, work first round of braid panel, p1, k2; [p1, k2] to end of round, ending on a purl stitch.
Rounds 2 and 3: Work even
Round 4: Pass 1st marker; m1, k1, m1; pass second marker, complete round as established. Remember thatthebraidcrossoverisC3BratherthanC3F. Increase the thumb gusset every 3rd round until it reaches the same size as the right mitten thumb gusset. Keep 1st marker, place the 15 thumb stitches on a holder or scrap yarn, remove 2nd marker, join yarn to opposite side, and continue working as establishedtoend of round.Workevenfor 1 more mini-cable segment, ending on a mini-cable crossoverround. Mitten flip top: Work the same as the right mitten. Ensure that you place the opening on the correct side! Inner mitten: Work the same as the right mitten, until the part where you divide the stitches for the fingers. Remember that the left mitten fingers go in the opposite order—9 stitches for the little finger, 12 stitches each for the ring finger, middle finger, and index finger. Work each finger in the round using 2k 1p ribbing for 4, 6, 8, and 8 rounds respectively. Loosely bind off using ribbing bind-off.
Thumb
Work left thumb the same as the right.
Finishin8
Sew the cast-on edge of the inner mitten to the inside of the flip-top, so that the seam is not visible from the outside. See diagram on page 7 for reference. If the cast-on edge of the flip top opening looks untidy, you can work one row of single crochet across it. (Note: crochet into 2 out of every 3 stitches) Sew up the holes between the fingers and weave in ends.
Row count guide for main body of mitten
As there are 2 cable patterns plus increases/decreases going on simultaneously, things can get confusing. This table is to help you keep track. The table indicates on which rows there are cables, increases and decreases. When the table is blank, work even.
| Round | Minicable crossover (Right/Left) | Large braid crossover | Increasesor Decreases (Right/Left) |
| Wristband | (Right/Left) | ||
| 1-24 | Every 6th round | ||
| Thumb gusset section | |||
| 1 | one M1 | ||
| 2 | |||
| 3 | |||
| 4 | C3F/C3B | two M1s | |
| 5 | |||
| 6 | C1F/C1B | ||
| 7 | two M1s | ||
| 8 | C3B/C3F | ||
| 9 | |||
| 10 | two M1s | ||
| 11 | |||
| 12 | C1B/C1F | C3F/C3B | |
| 13 | two M1s | ||
| 14 | |||
| 15 | |||
| 16 | C3B/C3F | two M1s | |
| 17 | |||
| 18 | C1F/C1B | ||
| 19 | two M1s | ||
| 20 | C3F/C3B | ||
| 21 | |||
| 22 | two M1s | ||
| 23 | |||
| 24 | C1B/C1F | C3B/C3F | |
| 25 | Place15thumbstitchesonholder | ||
| 26 | |||
| 27 | |||
| 28 | C3F/C3B | ||
| 29 | |||
| 30 | C1F/C1B | ||
| Round | Minicable crossover (Right/Left) | Large braid crossover (Right/Left) | Increasesor Decreases (Right/Left) |
| Flip Top | |||
| Cast on stitches for palm | |||
| 1 2 | C3B/C3F | ||
| 3 | |||
| 4 | |||
| 5 | |||
| 6 | C1B/C1F | C3F/C3B | |
| 7 | |||
| 8 | |||
| 9 | |||
| 10 | C3B/C3F | ||
| 11 | |||
| 12 | C1F/C1B | ||
| 13 | |||
| 14 | C3F/C3B | ||
| 15 | |||
| 16 | |||
| 17 | |||
| 18 | C1B/C1F | C3B/C3F | |
| 19 | 1st Decrease | ||
| 20 | |||
| 21 | 2nd Decrease | ||
| 22 | C3F/C3B | ||
| 23 | 3rd Decrease | ||
| 24 | C1F/C1B | ||
| 25 | 4thDecrease | ||
| 26 | C2B/C2F | ||
| 27 | 5th Decrease | ||
| 28 | |||
| 29 | Final Dec | ||
| 30 | Work %4 round only, then seam top | ||
Seaming Diagram