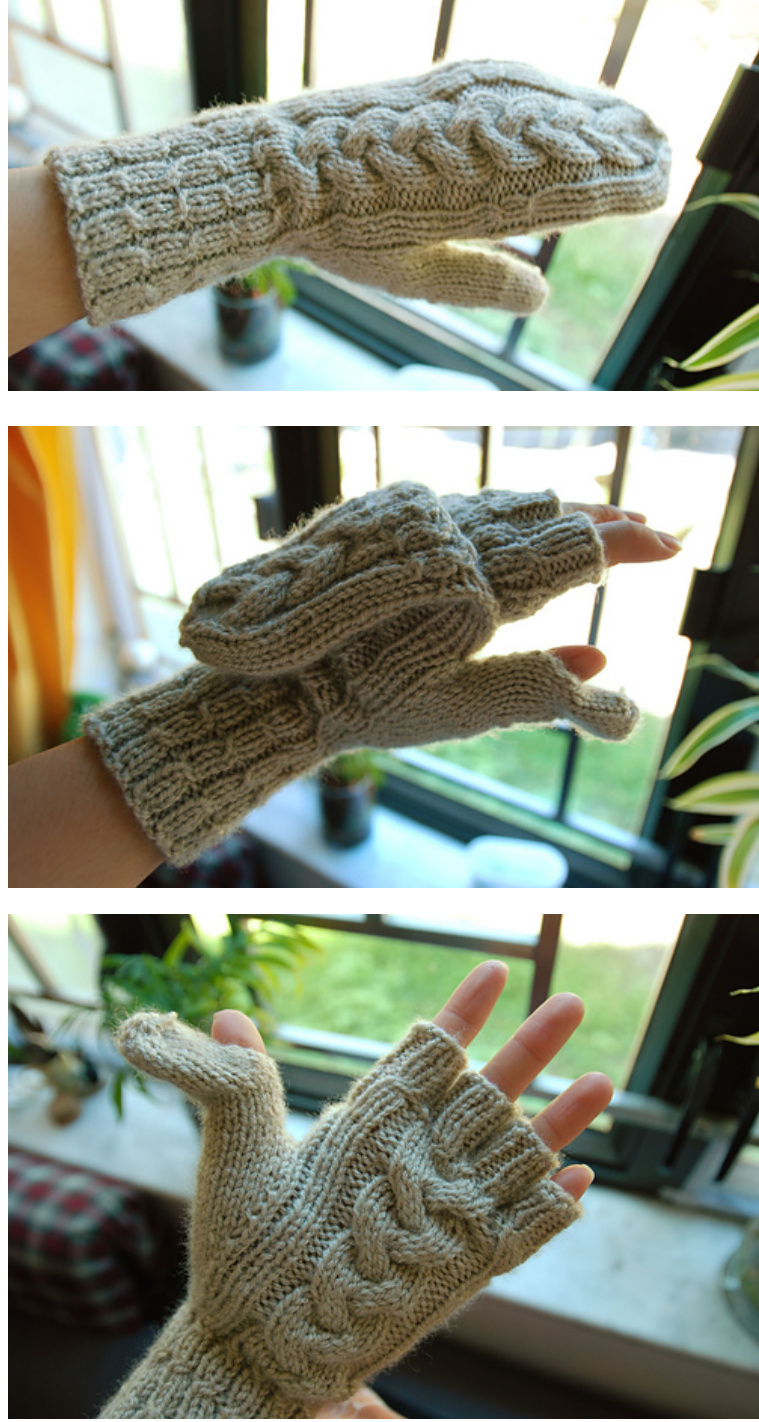
Smarter than the Average Mitt
Women's size extra small/small. Fits hand 6.5 inches long from wrist to tip of middle finger, with unstretched palm 3.5 inches/9 cm wide. DK weight yarn, 3.5 mm needles For a larger mitten, use worsted weight or thicker yarn. Gauge: 6 stitches and 8 rows per inch squared in stockinette stitch Terms: K- knit P-Purl C1F - Cable 1 forward. Slip stitch onto cable needle, hold in front, knit next stitch, knit stitch from cable needle. C1B - Cable 1 backward. Slip stitch onto cable needle, hold in back, knit next stitch, knit stitch from cable needle C3F - Cable 3 forward. Slip 3 stitches onto cable needle, hold in front, knit next 3 stitches, knit stitch from cable needle. C3B - Cable 3 backward. Slip 3 stitches onto cable needle, hold in back, knit next 3 stitches, knit stitch from cable needle between current stitch and the next stitch. Knit to the back in order to twist stitch so as not to leave a hole. Rib n - work ribbing as established for n number of stitches [] - work contents of square brackets the number of times specified. Skpo - slip 1 stitch, knit slipped stitch, pass slipped stitch over K2tog - knit 2 together
Mini-cable Pattern for Wrist Band Right Hand:
Rounds 1to 5 : [k1, k1, p1] to end Round 6: [C1F, p1] to end. Round 7-11: [k1, k1, p1] to end. Round 12: [C1B, p1] Repeat to end.
Rounds 1 to 5 : [k1, k1, p1] to end Round 6: [C1B, p1] to end. Round 7-11: [k1, k1, p1] to end. Round 12: [C1F, p1] Repeat to end.
Center Braid Pattern for Main Mitten Left hand:
Lines 1 to 3: p2, k9, p2 Line 4: p2, C3B k3, p2 Lines 5 to 7: p2, k9, p2 Line 8: p2, k3, C3F, p2 Repeat from start.
Right hand:
Lines 1 to 3: p2, k9, p2 Line 4: p2, k3, C3F, p2 Lines 5 to 7: p2, k9, p2 Line 8: p2, C3B, k3, p2 Repeat from start.
RIGHT MITTEN
Cast on 42 stitches on double pointed needles, divide evenly. Place stitch marker at beginning of round. Wristband: Work mini-cable pattern for 24 rounds (2 repetitions), or to desired length.
Thumb gusset and palm:
Establishing round: Thumb gusset - Remove stitch marker. Knit 1 stitch. Reinsert stitch marker. M1. Insert second stitch marker. (1 stitch between markers) Side ribbing - K1, p1, k2. Braid panel: P2, k9, p2. Side ribbing: K2, p1, k2, p1, k2. Braid panel: P2, k9, p2. Side ribbing: K2, p1, k1. Round 1: Pass marker, m1, k1, m1, Pass marker. (3 stitches between markers); Work ribbing (4 stitches). Begin right hand braid pattern on line 1 (13 stitches). Work ribbing (8 stitches). Begin right hand braid pattern on line 1 (13 stitches). Work ribbing (4 stitches). Continue braid panels and ribbing while increasing thumb gusset every $3^{\mathsf{r d}}$ row until there are 15 stitches between the markers. To increase thumb gusset, m1 just after the $1^{\mathrm{{st}}}$ marker, and then just before the $2^{\mathsf{n d}}$ marker. Continue working even (i.e. stop increasing the thumb gusset) until you have 3 full repetitions of the cable braid pattern (Round 24).Place the 15 thumb gusset stitches on a holder or scrap yarn. Join the rest of the stitches together,remove $1^{\mathrm{{st}}}$ marker,keep $2^{\mathsf{n d}}$ markerin place. Continue working until you have 4 repetitions of the braid pattern in total. (Round 32)
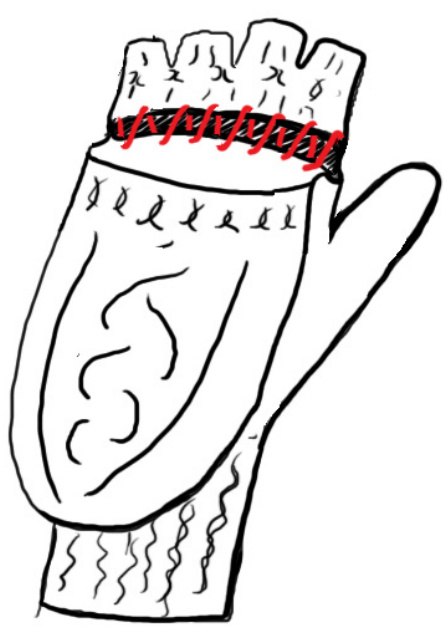
Mitten flip top:
Round 33: K1 and move stitch marker 1 place to the left to mark new beginning of round. Place next 19 stitches on holder for palm opening. Cast on 19 stitches using the cable cast-on method. Join cast-on stitches to the other side of mitten, and continue working across the back of the mitten in the established pattern (23 stitches). Beginning-ofround marker should be positioned just before the 19 new cast-on stitches. Rounds 34 to 40 create a row of mini-cables across the opening of the flip-top. Rounds 34 and 35: [p1, k2] 8 times. Work braid pattern. K2, p1, k2. Round 36: [p1, C1B] 8 times. Work braid pattern. C1B, p1, C1B Rounds 37 to 39: [p1, k2] 8 times. Work braid pattern. K2, p1, k2 Round 40: [p1, C1F] 8 times. Work cable pattern. C1F, p1, C1F Round 41: Ribbing: p1, k2. Next 13 stitches: Begin braid pattern again on Line 1. Ribbing: K2, p1, k2, p1, k2. Braid pattern: Continue braid pattern (should be now on Line 1). Ribbing: k2, p1, k2. Working even, make $2\,\%$ repetitions of cable pattern. (End on Round 60)
Mitten top decreases:
Round 61: p1, $^{*}\mathsf{k}\mathsf{1}$ , skpo, k11, k2tog, k1.\* P1, k2, p1. Repeat \* to \*. P1, k2. 38 stitches left. Round 62: p1, $^{*}\mathrm{k}1$ , skpo, k9, k2tog, k1.\* P2, k2, p1. Repeat \* to \*. P1, k2. 34 stitches left. Round 63: p1, $\ast_{\mathsf{k1}}$ , skpo, k7, k2tog, k1.\* P2, k2, p1. Repeat \* to \*. P1, k2. 30 stitches left. Round 64: p1, $\ast_{\mathsf{k1}}$ , skpo, k5, k2tog, k1.\* P2, k2, p1. Repeat \* to \*. P1, k2. 26 stitches left. Round 65: p1, $^{*}\mathrm{k}1$ , skpo, k3, k2tog, k1.\* P2, k2, p1. Repeat \* to \*. P1, k2. 22 stitches left. Round 66: p1, $\ast_{\mathsf{k1}}$ , skpo, k1, k2tog, k1.\* P2, k2, p1. Repeat \* to \*. P1, k2. 18 stitches left. Round 67: p1, skpo, k1, k2tog, p1, k2tog, p1, skpo, k1, k2tog, p1, k2tog. 12 stitches left. Cut yarn, thread through remaining 12 stitches, and pulltight. Weave in end.
Inner mitten cuff/fingers:
Transfer the 19 palm stitches from the holder to double-pointed needles. Attach yarn on the right. Working the 19 stitches: p, k, k; work cable pattern (beginning on line 1); k, k p. Cast on 23 stitches using chain cast-on method. Join to other side. Round 2: p1, k1, k1; work cable pattern; finish round in 2X1 ribbing. Rounds 3-7: Keeping pattern consistent, keep working until 7th line of braid pattern. Round 8: [p, C1F] until end of round. Either make a simple cuff: Continue working in 2X1 ribbing for about an inch; then bind off loosely. Or, make Individual fingers: Transfer the last stitch of the previous round ontothefirst stitchholer,follwed bythe next 20stitches. Transfer next 21 stitches to 2nd stitch holder. The stitches should be distributed as shown on the diagram below. Holding the mitten with the palm facing you and the thumb gusset to the right, divide and work individual fingers (see diagram below for guidance): Index finger: 6 stitches from front holder, 6 stitches from back holder. Work in 2X1 ribbing (k, k, p) for 7 rounds. Bind off loosely in ribbing bind-off. Middle finger: 5 stitches from front holder, 6 stitches from back holder Rib5 stitches from front holder, pick up1 stitch, rib 6 stitches from back holder. 12 stitches total. Continue in 2X1 ribbing for 9 rounds. Bind offloosely. Ring finger: 5 stitches from front holder, 5 stitches from back holder Rib 5 stitches from front holder, rib 5 stitches from back holder, pick up 2 stitches from bottom of middle finger.12 stitches total. Continue in 2X1 ribbing for 7 rounds. Bind off loosely. Little finger: Little finger: 5 stitches from front holder, 4 stitches from back holder. Work 2X1 ribbing for 6 rounds, bind off loosely
Right Hand - Finger Stitch Distribution
Thisis atop downview of the mitten.
back of hand side
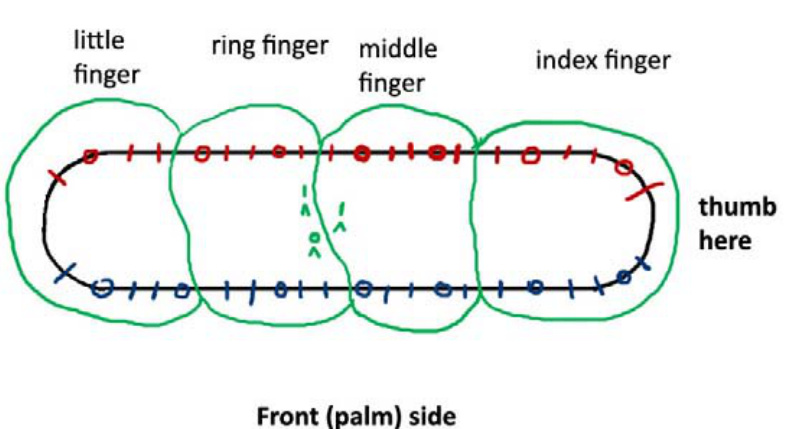
blue stitches on front holder red stitches on backholder knit stitch 。 purl stitch 人 pick up and knit new stitch pick up and purl new stitch Thumb Transfer 15 thumb stitches from holder to double pointed needles. Working in stockinette stitch, knit 6 rounds Optional thumb slit: Making a slit in the thumb makes it easier for you to handle coins and other small objects. To create slit on inner edge of thumb, switch from working in the round to working back-and-forth for 5 to 6 rounds. (i.e. Knit up to inner edge of thumb, turn work, purl 15, turn work, knit 15, etc.) Switch back to working in the round for 5 more rounds, or to desired length. Decrease round 1: [k2, K2tog] until last stitch, k1. (11 stitches) Decrease round 2: [k2tog, k1] until last 2 stitches, k2tog. (7 stitches) Thread yarn through remaining stitches and pull tight.
LEFT HAND
The left hand is a mirror-image of the right hand, so cable forwards instead of cabling backwards, and vice versa. From the cuff to round 31 of the thumb gusset/palm, it is made exactly the same except: 1. Use the left hand mini-cable pattern. 2. Use the left hand braid pattern
Mitten flip top:
The left mitten opens on the other side, so: Round 33: Remove beginning of round marker. Work next 22 stitches in established cable braid pattern (this part goes across the knuckles). Reinsert marker for new beginning of round, which will now be on the little finger side. Transfer next 19 stitches to stitch holder for palm opening. Cast on 19 stitches using chain cast-on method, and join to other side of mitten. Continue working across back of mitten in established pattern (23 stitches). Beginning-of-round marker now should be positioned just before the 19 new cast-on stitches. Continue mitten flip-top the same as the right hand. Inner cuff/fingers: Work the same as right hand until round 8, except C1B instead of C1F. Cuff: Same as right hand Individual fingers: Divide for individual fingers in a mirror image of the right hand. Thumb: Same as right hand
FINISHING
If the cast-on edge ofthe flip top looks untidy, you can work one row of single crochet to neaten it up. Sew the back of the inner mitten cuffto the inside of the flip-top (see diagram below). The seam should be invisible from the outside.
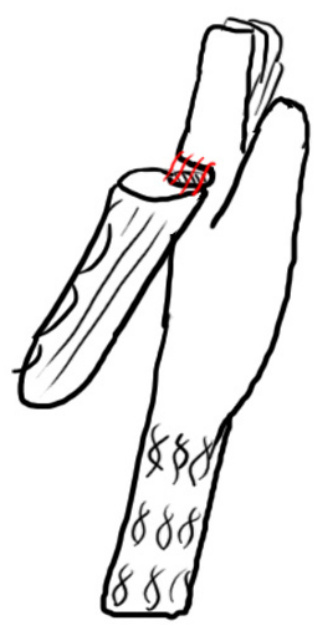
Weave in all the ends


