mbossed
Online Extras
Pattern links to online tips and blog posts Detailed photos on Photobucket Jpg charts to download onto your phone or tablet.
Note from the Designer
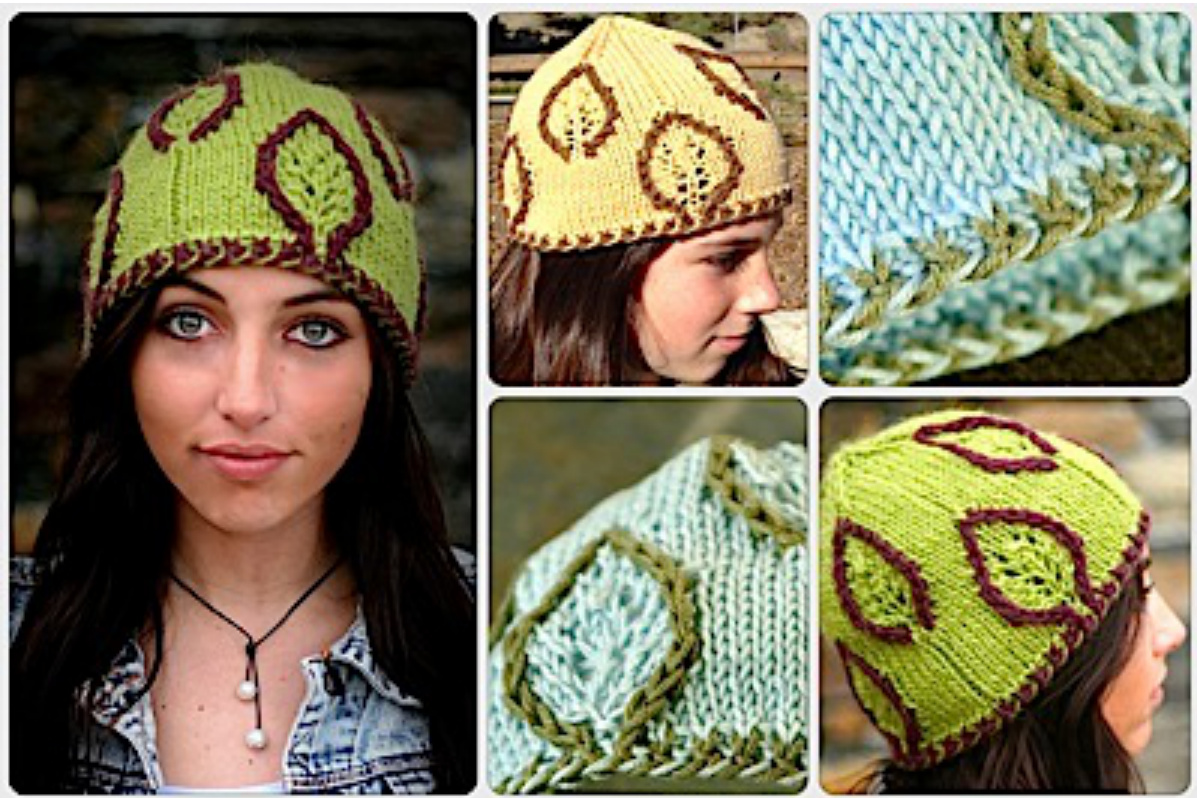
There are a lot of new techniques packed into this pattern but don't panic! Each one is straightforward and not difficult to master if you're an intermediateknitter withsomehat knitting experience. There are free tutorials for each Nuance online. Two-Color Cast On: Looking to add interest to your hat brims? This pretty cast on is a variation of our Resilient Cast On that also provides some flexibility on the cast on edge. The Embossed Leaf: One of the benefits of the Showy Decrease is that it rises up off the face of Stockinette giving you the opportunity to add design without having to resort to reverse stockinette. The use of a contrasting color in this hat really adds some punch. Vaulted Hat Crown: Showy Decreases redefine the hat top and each of our hats play with a new design idea. The decreases in the Vaulted crown start in the leaf pattern creating a look reminiscent of medieval ceiling. If you would like to try a flat swatch you can download instructions in our bonus materials section online. This is where you can also download chart files. KnittingNuances.com/help
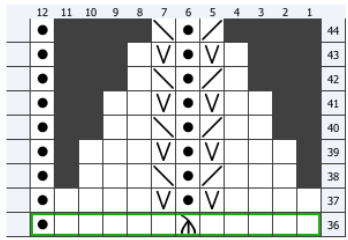
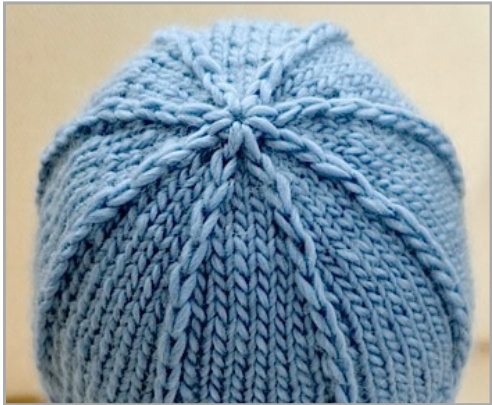
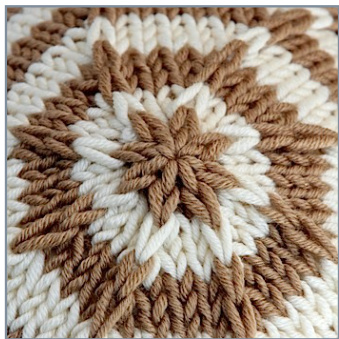
Embossed Leaf Repeat
| Rnd 1:k4,add CC as knit, k1,k1 w/CC,k4 |
| Rnd 2: k3, k1 w/CC, sl1, k1, sl1, k1 w/CC, k3 |
| Rnd 3: k3, k2tog w/CC, yo, k1, yo, ssk w/CC, k3 |
| Rnd 4: k2, k1 w/CC, [sl1,k1 tbl] twice, sl1, k1 w/CC, k2 |
| Rnd 5: k2, k2tog w/CC, k1,yo, k1,yo, k1, ssk w/CC, k2 |
| Rnd 6: k1, k1 w/CC, sl1, k2, sl, k2, sl1, k1 w/CC, k1 |
| Rnd 7: k1, k2tog w/CC, k2, yo, k1, yo, k2, ssk w/CC, k1 |
| Rnd 8: k1 w/CC, sl1, k3, sl, k3, sl1, k1 w/CC |
| Rnd 9: k2tog w/CC, k3, yo, k1, yo, k3, ssk w/CC |
| Rnd 10:sl,k1w/CC,k3,sl1,k3,k1w/CC,sl1 |
| Rnd 11: ssk w/CC, k2, yo, k3, yo, k2, k2tog w/CC |
| Rnd 12: sl1, k1 w/CC, k3, sl1, k3, k1 w/CC, sl1 |
| Rnd 13: yoR, ssk w/CC, k2, yo, [sl2 kwise, k1, p2sso], yo, k2, k2tog w/CC, yo |
| Rnd 14: k1 to close, sl1,k1 w/CC, k5,k1 w/CC, sl1, k1tbl |
| Rnd 15: k1, yoR, ssk w/CC, k5, k2tog w/CC, yo, k1 |
| Rnd 16:k1,k1 to close,sl1,k1w/CC,k3,k1 w/CC,sl1,k1tbl,k1 |
| Rnd 17: k2, yoR, ssk w/CC, k3, k2tog w/CC, yo, k2 |
| Rnd 18: k2, k1 to close, sl1, k1 w/CC, k1, k1 w/CC, sl1, k1tbl, k2 |
| Rnd 19: k3, yoR, ssk w/CC, k1, k2tog w/CC, yo, k3 |
| Rnd 20: k3, k1 to close, sl1, k1, sl1, k1tbl, k3 |
| Rnd 21: k4, yoR, [sl1kwise, k2tog, psso], yo, k4 |
| R22: k4, k1 to close, p1, k1 tbl,k4 |
| knit | |
| knittoclose | |
| knittbl | |
| k2tog | |
| purl | |
| ssk | |
| sl1kwisek2togpsso | |
| slip2,knit,pass | |
| slip | |
| yo | |
| YarnOverinReverse | |
| NoStitch | |
Yarn Overs:
The yarnovers onrnd 3 arecloseonrnd 4 by knitting through the back loop. This prevents the lowerleaf from stretching out too much. Please see page 3 for note on yarn over in reverse.
Reference Sheet
| Gauge | Size | Height | |
| 5.5 | Baby | 16.0" | 6” |
| 5.0 | Child | 17.5" | 7" |
| 5.0 | Small | 17.5 | 8” * |
| 4.5 | Med | 19.5" | 8” |
Note: The difference between the Child and Small Women's Hat is the height. Instructions for a taller hat have been included in the pattern. If you'd like a taller hat, they work with any size
Chart Legend
knit knit stitch knittoclose knit as usual to close reverse yo from prior round
Yarn/Yardage
General: 75-100 yards yarn in Main Color and about 20 yards of CC
Sample 2: Sirdar Snuggly Baby Bamboo (blue)
- 80% bamboo, 20% wool, 104 yds/50g ball, gauge 5.5 st per 1". Can make 2 baby hats in reversible colors.
Sample 1: Karabella Aurora 8 (yellow)
100% Merino, 98 yds/50g ball, label gauge of 4.5 st. per 1" (knit at 5 st) on US 5, Sample used 75 yds of yellow and, 20 yds of brown for girl's size.
Sample 3: Cascade Pastaza (green)
50% Llama, 50% Wool. 132 yards /100g skein, label gauge 4 st per 1" (knit at 4.5 st). Sadly discontinued but still available online. An alternative is the Brown Sheep Lamb's Pride Bulky. It says 3 sts per 1" but would easily knit to 4.5 sts for ahat. purl purl stitch Slip one stitch as if to knit,Slip another stitch as if to knit. Insert left-hand needle into front of these 2 stitches and knit them together sl1 kwise k2tog psso sl1 kwise, k2tog, psso slip2,knit,pass Slip 2 stitches knitwise, knit 1, pass 2 slip stitchesover slip Slip stitch as if to purl, holding yarn in back yo Yarn Over YarnOverinReverse Wrap the yarn in the opposite direction than your normal yarn over. NoStitch Placeholder - No stitch made.
Notions
Needles: Two 16 circular needles, US 4 - 7, as needed for gauge. Due to the placement of a leaf spanning the BOR you'll want to knit the base on one 16" circular (or Magic Loop) instead of 2 needles. Stitch Markers: 1 for beginning of round, 3 to mark repeats TapestryNeedle
There's More Information Online
,Free tutorial downloads for the following Nuances are available in the Techniques section of ourwebsite. Basic Resilient Cast On 2-Color Resilient Cast On Introduction to Showy Decreases Double Decker Hat Top
Managing the CC Yarn Pieces
Peek on the backside to make sure you are not crossing the yarn strands. The MC goes around the back of the CC. Make sure to pull the MC knit st tight so there is no gap around the leaf lines.
yoR (yarn over in Reverse)
The yarn over reversed increase is paired with a ssk. The opposite stitch orientation means you can knit it normally on the next rnd (row) to close the loop. The MC increase blends better this way but you can knit a yarn overs normally. > Our blog is full of descriptions, tips, charts and sample swatches. · Download Chart Files: Find .jpg files for your phone or tablet at KnittingNuances.com/help 、 Project photos including work in progress pictures are on our Photobucket Site here at 1013.Photobucket.com

=acebook Iwitter Pinterest Wordpress
knittinalnstructions.
Preparation > Cut 8 pieces of Contrasting Color (CC) yarn 5 feet long each for the leaves.
Resilient Cast On Edge
This decorative edge starts with 1/3 more stitches than working stitches. You'll need to use a nice long tail for the CC. Step 1: Cast On 132 sts alternating 2 sts of CC and 1 of MC. Here's how: · Cast on 2 sts with CC followed by 1 st with MC ? Pick up the two CC strands from in between MC strands and cast on 2 sts > Drop CC, pick up MC strands in between CC strands and cast on 1 st · Continue casting on 2 sts in CC and 1 st in MC
Step 2: Reduce Stitches
> Slide the sts to the other end of the needle and start from the 1st cast on stitch. Working yarn is not used in this row. > Reduce cast on sts are by passing 1 of the CC sts over the other. Like this: \* sl2 CC, pssO , sl1 MC\* . If you havequestions about theResilient Cast Onthere isafreetutorial availablefor download onour website.Seepage3forall links. 88 sts remain. Cut CC. Join in the round making sure the cast on is not twisted.
Hat Brim and Leaf Set Up
> Rnd 1:With MC Slip the CC sts and purl the MC sts: \* sl1, p1\* placing markers for BOR and after each 22 sts. > Rnd 2: \*k1, p1\* 5 times, k1 w/CC, p1, k1 w/CC, \*p1, k1\* 4 times , p1 Only sts 11 & 13 are worked in CC. You will purl the MC sts & knit the CC sts.
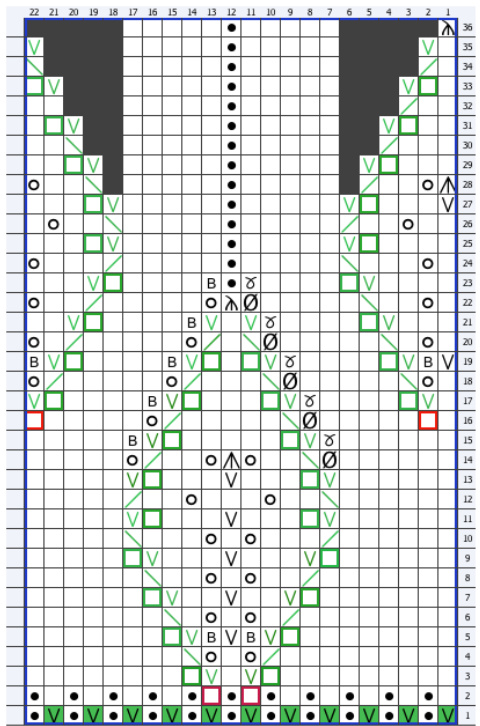
Chart Notes:
- Rnd 1 is knit w/MC. The solid green shows how the slip st brings up the color from the cast on. - The hollow green squares indicate a CC knit st. - The red Squares show where you are adding the strands of CC by knitting that stitch.
To add CC fold the 5' yarn piece in half, loop it over the needle to knit 1st CC st. By starting in the center of the yarn piece you can use each end towork the leaf and eliminate extra tails.
| knit | |
| knittoclose | |
| knittbl | |
| k2tog | |
| purl | |
| ssk | |
| sl1kwisek2togpsso | |
| slip2,knit,pass | |
| slip | |
| yo | |
| YarnOverinReverse | |
| NoStitch | |
> Rnd 3: k9, k1 w/CC, sl1, k1, sl1, k1 w/CC, k8 After you knit a setup round you'll see 2 CC sts on each leaf side. See tip to the right. > Rnd 4:. k9, k2tog w/CC, yo, k1, yo, ssk w/CC, k8 On decrease rounds only the k2tog & ssk are knit in CC
Working CC Leaves
The leaves are a series of Showy Decreases. When you knit a decrease, the 2 sts are already in CC from the prior round. After you k2tog or ssk with CC there will remain just 1 st of CC. The additional CC st is added back in the next round when you knit the st on the outside of the CC slip st. That means for each side of the leaf: - all set up rounds have 2 CC sts - all decrease rounds will have just 1 CC st
Knitting Instructions (con't)
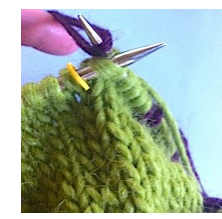
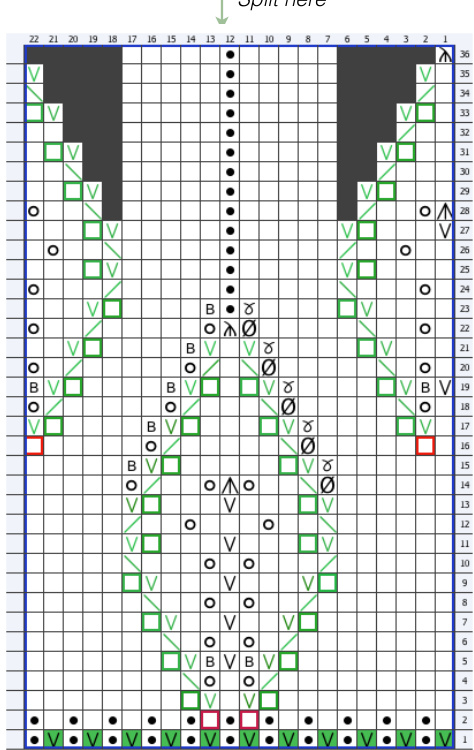
Using the repeat directions on page 2, continue in pattern knitting 4 outward leaning decreases before switching to 5 inward leaning decreases for the top of the leaf, and at the same time when you get to round 16 start the 2nd set of leaves as below. Starting the new set of leaves: On Rnd 16 add 4 more strands of CC yarn. The first leaf sits on both sides of the BOR marker. Using the same method of knitting from the center of the yarn strand, knit the stitch BEFORE the BOR marker with your CC to start that leaf (photo).
Stop after 1st inward leaning decrease (rnd 27) to review instructions for thedecreasing roundsbelow.It takes 20 rounds to work decreases. You can add height to the hat by following the taller hat instructions below. CC on upper leaf is added on last st of round before.
Decrease Rounds for Standard Height Hat
? Split sts onto 2 needles with the purl from the lower leaf as the last st: work 12 on current needle, work 44 sts on new needle then the remaining 32 on back on 1st needle. Once you split and reorient your sts onto 2 needles, round 27 will look like this.
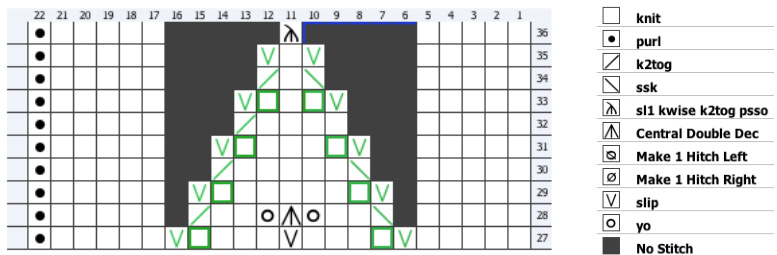
> Decreases start on the top half up the upper leaf with the elimination of the increases. Continue knitting rows 27 to 35 as above. Once the leaf is complete, decrease each of the 4 sections asfollows. - Rnd 37: k4, sl1, p1, sl1, k4, p1 - Rnd 38: k3, k2tog, p1, ssk, k3, p1 Continue decrease rounds following established pattern until 16 sts remain. There will be 2 purl sts and 2 Showy Decrease sts in each set.
Row 36 is repeat from above Work Double Decker Hat Top (details on next page).
Finishing
· Weave in ends running the CC along inside leave outline. If the main color peeks through the CC of the k2tog slide your needle under the two CC strands of the stitch and pull them up a bit. ↓Steam edaes to lie flat Donel Enioy. Steam edges to lie flat. Done! Enjoy.
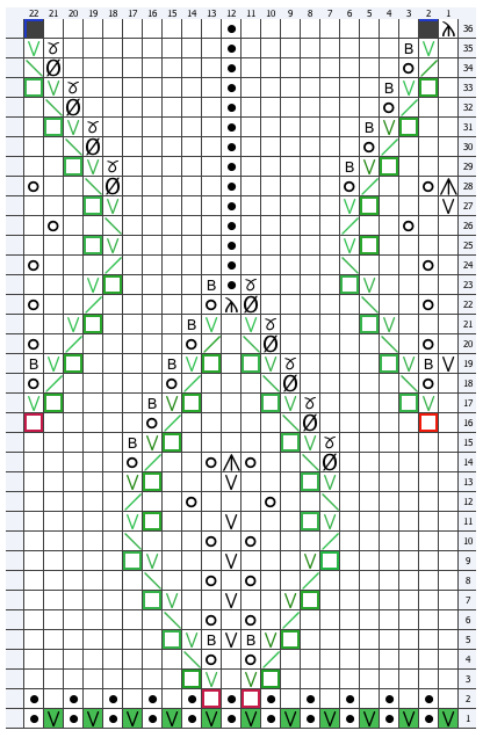
Notes for Knitting a Taller Hat
For a taller hat (see pg 3) continue yarn overs as used in the lower leaf until you reach the double decrease on round 36 as shown on the chart to the right. Start decreasing by eliminating the yarn overs around the joining double decrease on round 36. Now you can split the sts on to 2 needles as above. The final decreases shown above are the same, you'll just need more of them. Note the double decrease is knit in maincoloratthetopofthe embossedleaf onrnds22 and 35.
Standard Height
Taller Hat
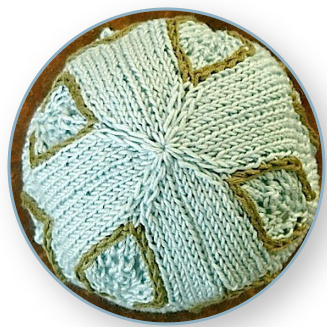
Double Decker Hat Top
Add texture and interest where there's been none before with this easy two-tier hat closure. Here's a fun new technique that's quick, easy and can work on almost any hat pattern. We combine it with our Showy Decrease for real punch.
Separating the Stitches
The hat crown is shaped by decreases every other round until there are just 2 stitches per decrease set remaining For example, if you are working 8 decreases there will be 16 stitches remaining. These stitches alternate in two categories: those that are part of a Showy Decrease and those that are not. After your last decrease round: > cut the working yarn with a 12" tail and thread it through a tapestry needle. The sts are still on 2 circular needles. Slip the stitches one by one onto: 1. the tapestry needle with yarn tail if it is a 'normal' stitch and, 2. the other end of the same circular needle (without working it) if it is a raised Showy Decrease stitch.
The Lower Layer
With the tail running through all the normal sts, pulltight to close. 8 sts remain on your 2 circular needles.
The Upper Layer
, Run the tapestry needle and yarn tail through the remaining stitches. Slide off knitting needles and pull tight to close. . Run the tapestry needle and yarn through the small circle of raised stitches again a few times to augment the height (optional). , Push the tapestry needle down through the center of the hat top and weave in remaining ends. More information and project photos are available on our web site at KnittingNuances.com/Techniques.
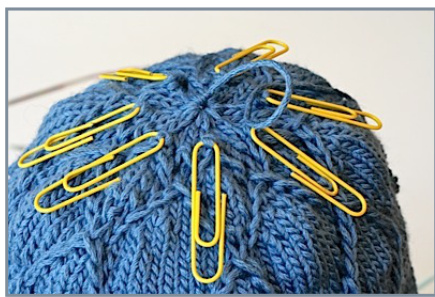
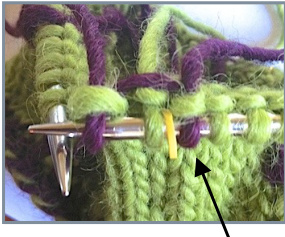
For demonstration purposes, the raised stitches were placed on holders (OK, paperclips) to separate them. The tail has been run through the lower stitches ready to be pulled tight.

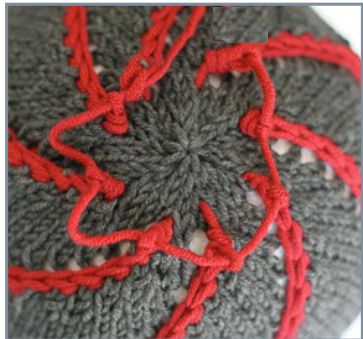
Adapting Existing Patterns
These hats use 8 deceases every other round, which is typical for hat shaping. At the top there are 8 sets of 2 (16 stitches) remaining. For our patterns one of these stitches is a raised Showy Decrease. If you're using another pattern, decrease until you have 2 stitches for each decrease set. Split the stitches in half as above, closing every other stitch on the lower layer and slipping the others to close on top. We recommend no fewer than 6 sets of stitches (12 total) for this technique. For this 2-color Galaxy Hat, the lower tier is closed with the gray yam while the upper stitches will be closed with the contrasting red yarn.
Star Top Option
Cut a 15" tail. After you've pulled the lower layer tight, knit 1 more round with the upper layer stitches for this star effect.


