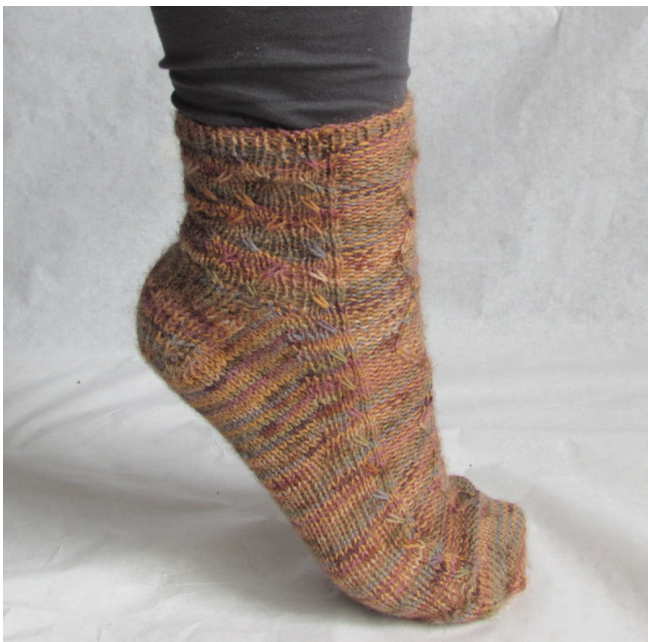
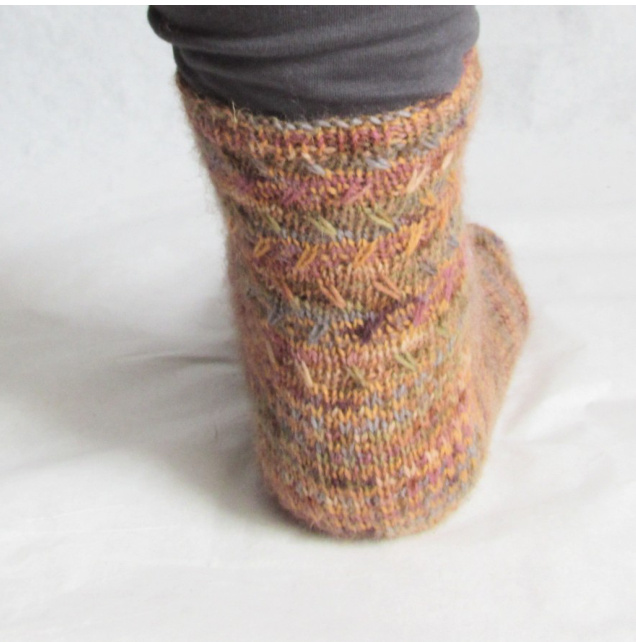
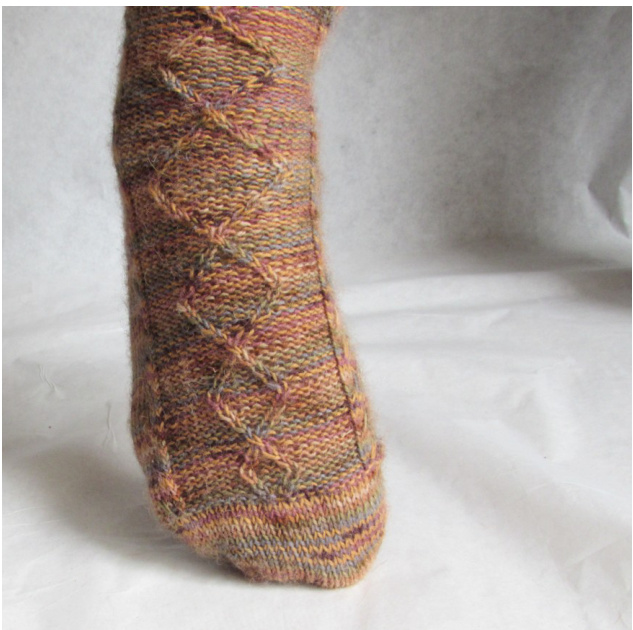
Hermes
By Letipanda
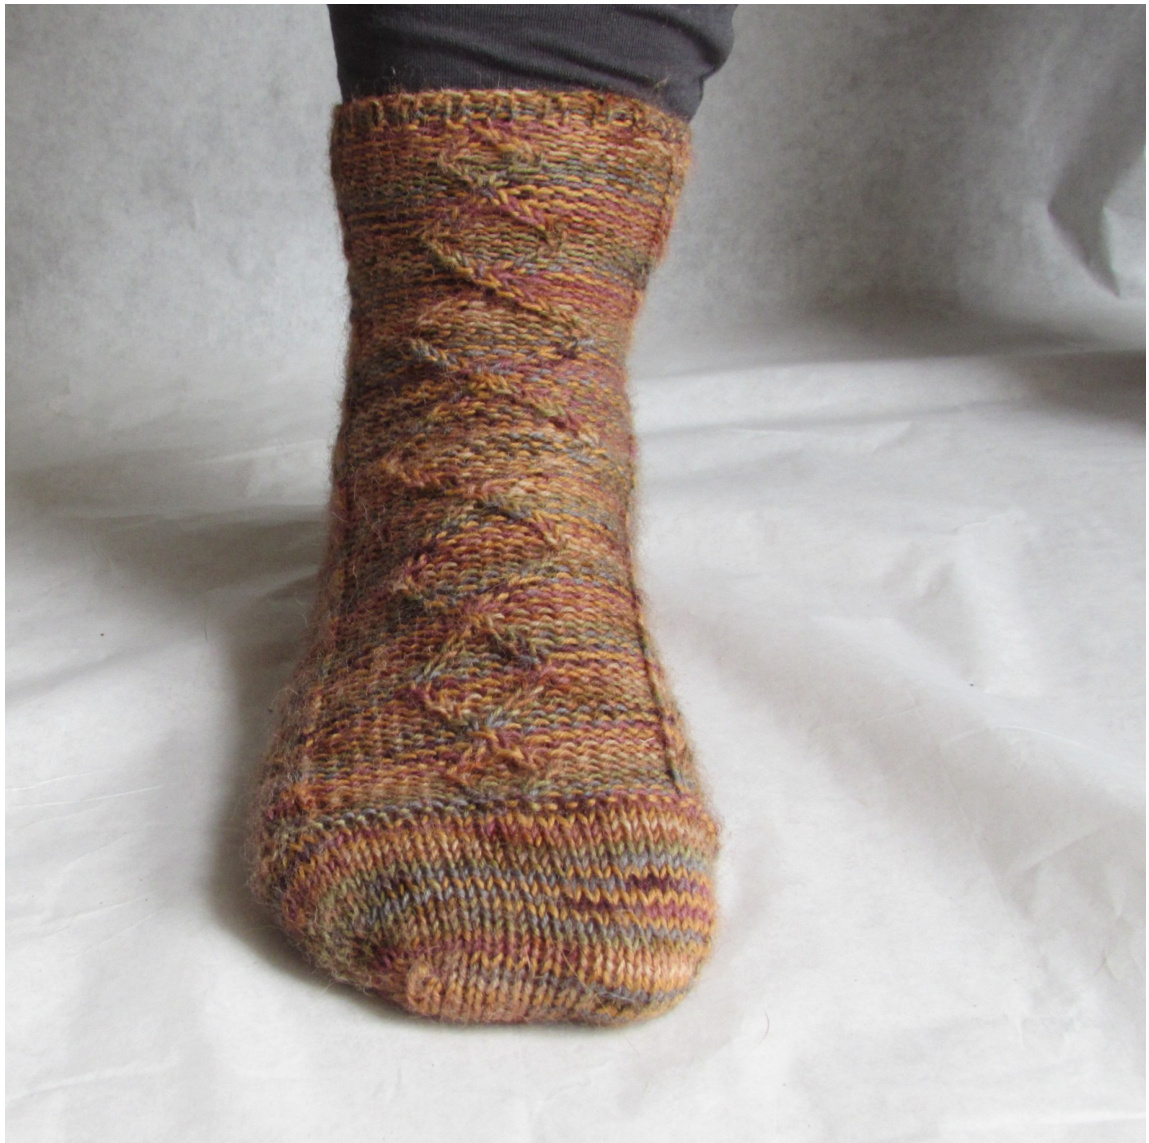
This pattern is my intellectual property. It's for PERSONAL USE ONLY. It means you cannot sell this pattern on commercial purpose, fully or partially, or any object based on it. Contact me if you need any information : LetipandaBC@gmail.com Socks Hermes have been created in memory of my first passion, ancient Greek and mythology. Hermés, in Greek mythology, was the messenger of gods. He has winged feet and his emblem is a caduceus. So, to feel as Hermes in our socks, I think the easiest way is to draw a caduceus on the top of the feet and give some wings to sides and ankle. About techniques : this is a toe-up knit, So you begin with the toes and finish with the ankle. No gathering. The only sewing needle you will use is for the sewn bind off of Elisabeth Zimmerman, a very useful and stretchy bind-off for ribbing. This pattern is knitted with one circular needle and magic loop technique. Nevertheless, you can knit these socks with two circular needles or some double pointed needles. This pattern is knitted with negative ease. It means everything is calculated so that the sock fits closely to the foot without pressing it. This pattern contains two charts that allow you to adapt the length of your socks (ankle or half-calf). So, ready tofly with comfy socks ? :)
Material :
Thread : Fingering / 4ply - 250 to 360 yd depending of the lengh My version, size 4, I used Tartu, Woll Butt, (75% wool - 25% polyamide, 100 g = 460 yd), 65 g in total (around 298 yd), ankle version. Circular needles 2.5 mm. Cable needles 2.5 mm, if necessary. A marker to mark the beginning of the row, if necessary. Gauge : 28 st x 36 R = 4 inch (stockinette in round).
re to respect this gauge if you want to obtain indicated final size
In accordance with your thread's choice, choose needle size which give this exact gauge. Each size has been calculated to the right stitch as closely as possible, you will have a smaller or bigger socks if you do not respect the gauge
Abbreviations :
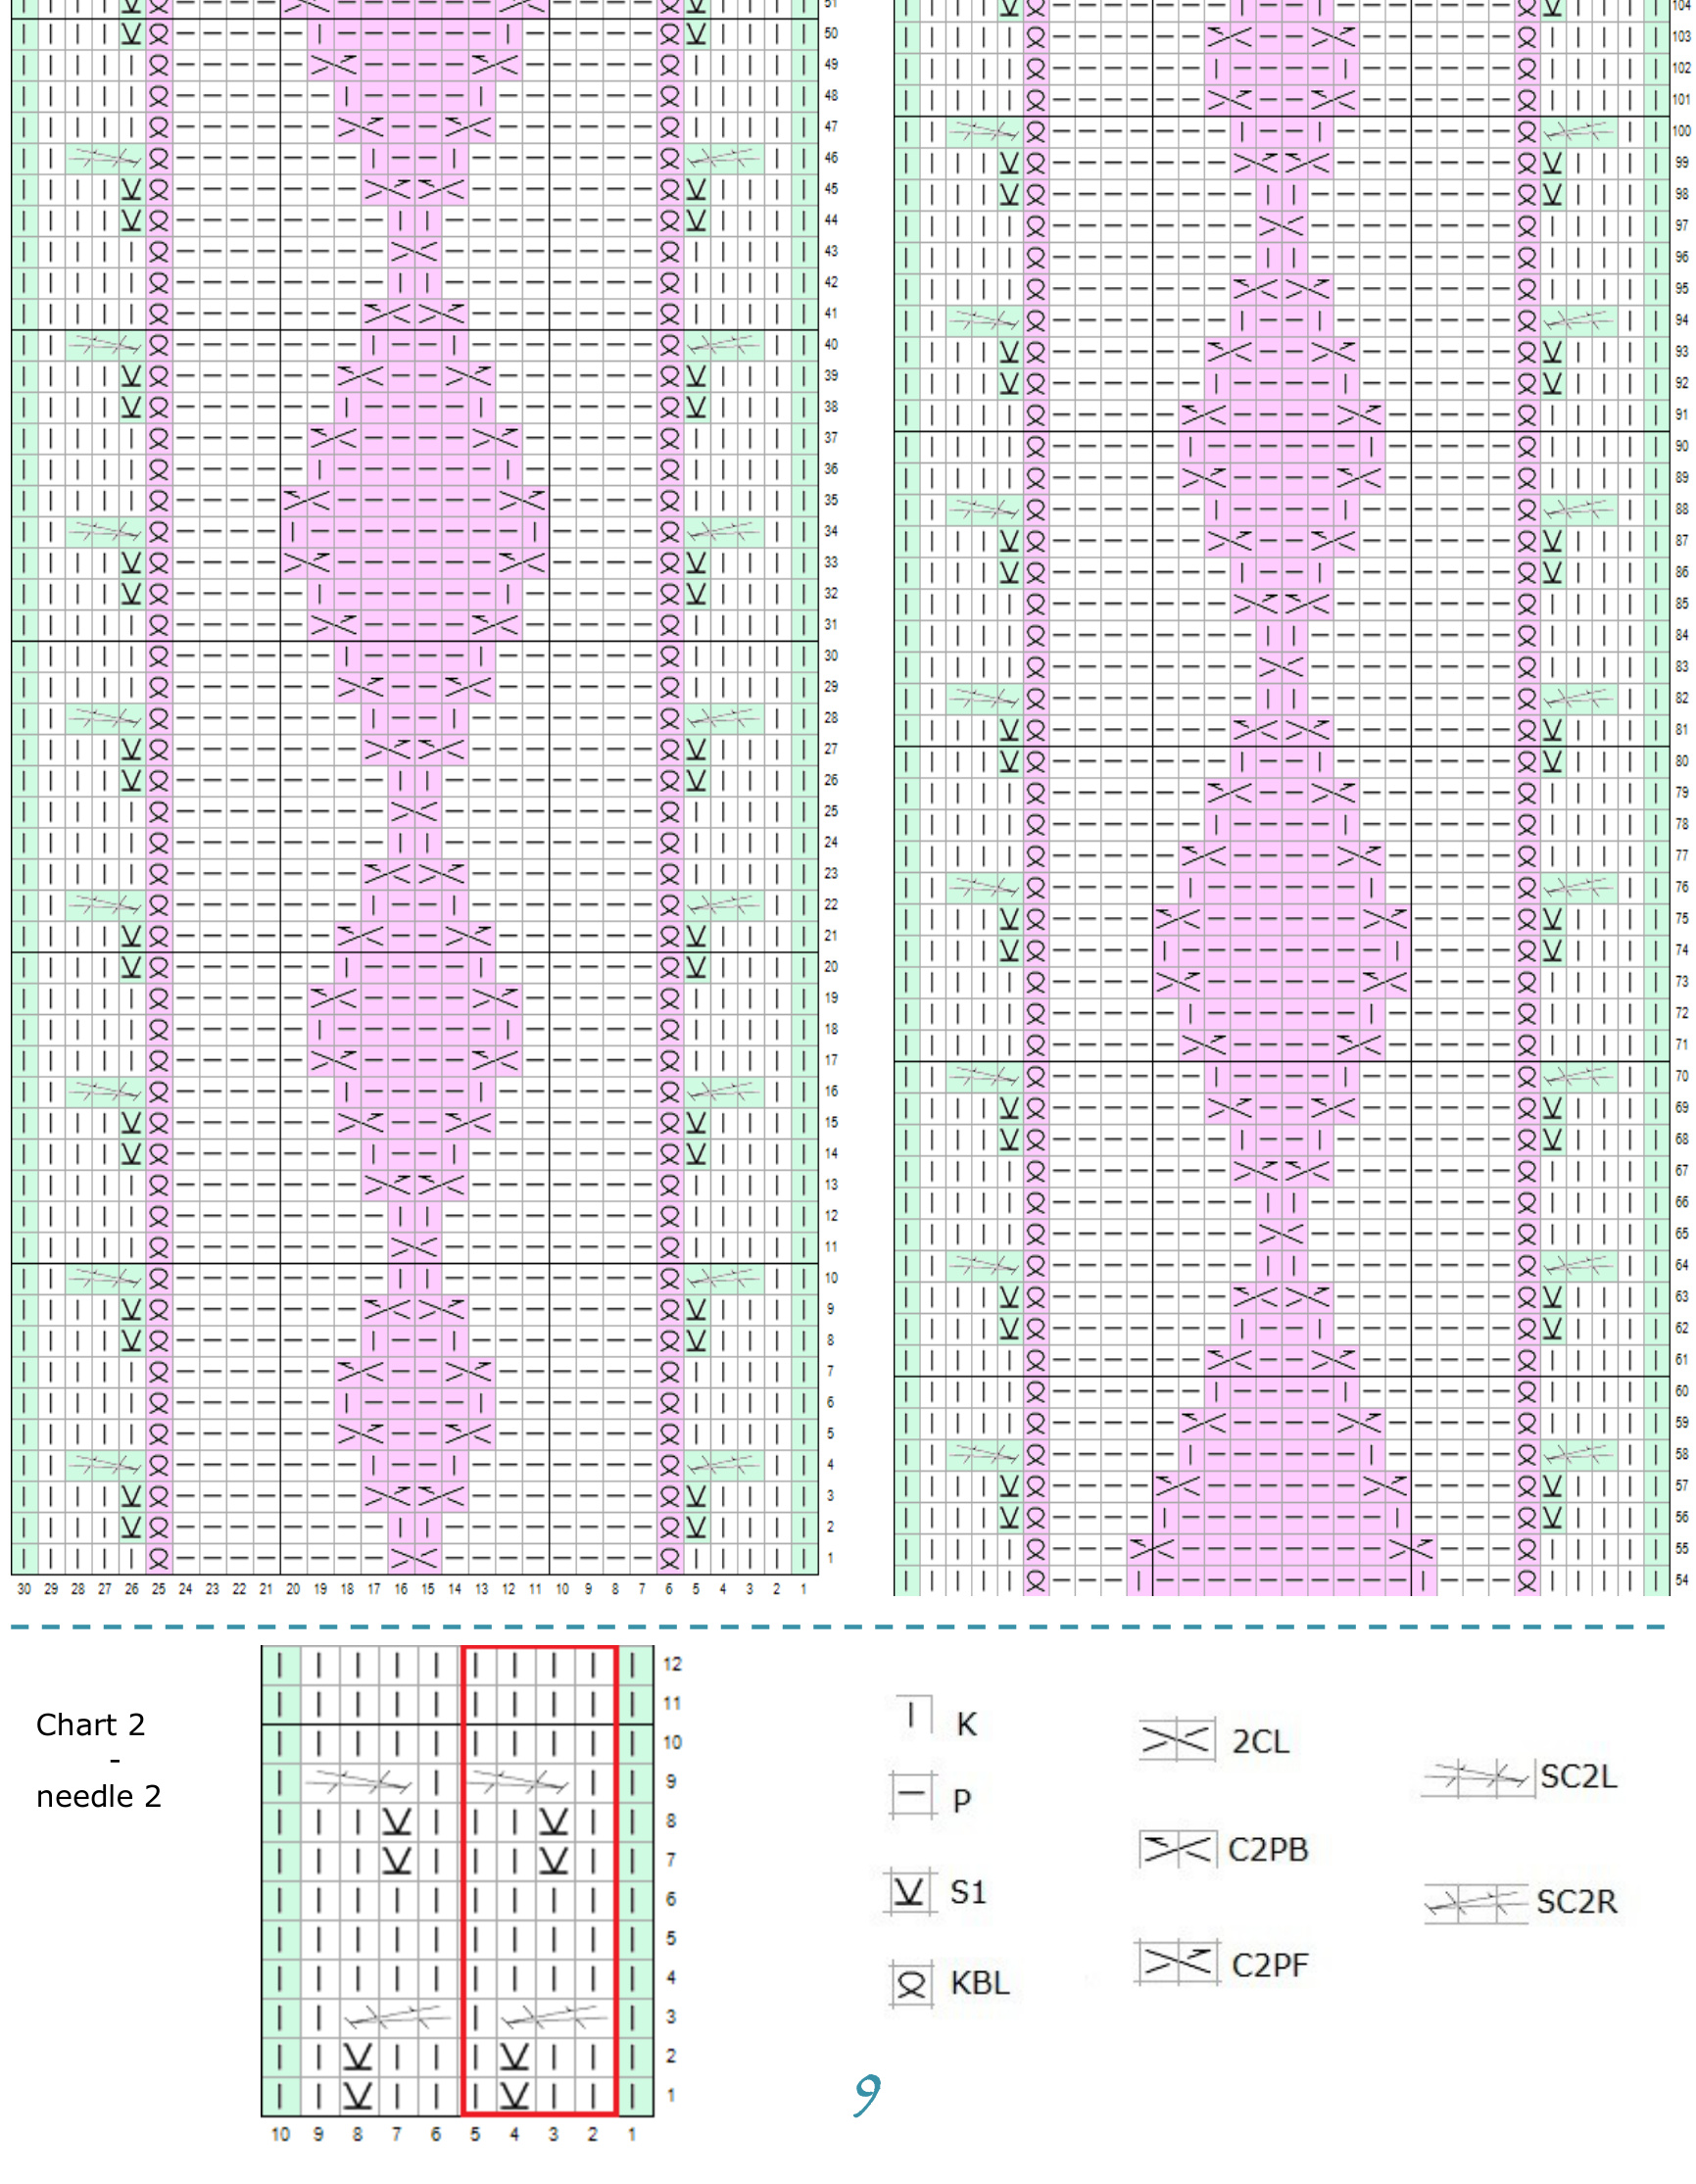
RS : Right Side - WS : Wrong Side St.: stitch - r : row N1 : Needle 1 (top of the foot). N2 : Needle 2 (bottom of the foot). CN : Cable Needle KBL : Knit through Back Loop. M1 : Make One (see annexes p.12) KF&B / PF&B : Knit Front and Back / Purl Front and Back. You have to knit or purl in the front loop, then the back loop, this way you obtain an increase. SSK : Slip, Slip, Knit. P2tog : Purl two stitches together. S1 : Slip one stitch without knitting it. W&T : Wrap and Turn. Wrap aknit stitch_: Put the thread before the work, S1, put the thread behind the work, put the wrapped stitch on the left needle, turn the work. Wrapa purl stitch_: put the thread behin the work, S1, put the thread before the work, put back the stitch on the left needle, turn the work. SC2L : Slip stitch Crossed two stitches on the Left. Slip 1 st. on CN, leave it on the front. Knit next 2 stitches, take back CN stitch without knitting it. SC2R : Slip stitch Crossed two stitches on the Right. Slip 1 st. on CN, leave it on the back. Slip next stitch on the right needle without knitting it 2CL : 2 stitches crossed left. S1 to CN and hold to front of the work, K1, K1 from CN. C2PB : Cross 2 stitches, 1 purl, on the back. S1 to CN and hold to back of the work, K1, P1 from CN. C2PF : Cross 2 stitches, 1 purl, on the front. S1 to CN and hold to front of the work, P1, K1 from CN. Advices and explanations : You will find, at the end of this pattern, in annexes p. 9 and 10 , the chart you have to follow to knit the motif. There is two versions : short (ankle) and long (half-calf). For a better visibility, charts are divided in two parts, the second part begins with the last row of the first part, do not repeat this row. You will find, at the end of this pattern, in annexes, p. 11 and followings, the methods used, described step-by-step. I advise you to check them, even if you already know this techniques. All important explanations are indicated in italic, underlined and colored. I highly recommend you to read entirely the pattern before beginning, at least once, to avoid any kind of surprise. Moreover, always read entirely each paragraph before continuing. A/ways read the whole paragraph before beginning/continuing. The number (xx) corresponds to the number of stitches you have after the row is knitted. This number of stitches x/x corresponds to N1/N2. If you want to save paper and ink, print only pages 5 to 7, and charts. ;)
Before beginning :
You need two measures to knit Hermes : the circumference of your foot at the bigger spot (right under your toes) and the length of your foot (from bigger toe to heel). Take those measures putting your foot flat on the floor. In order to satisfy every feet, I calculated 7 sizes. The sizes indicated below are without cutting of 1o%. When you choose a size, choose the closest one. Size 1 : 19 cm (7.4 in) Size 2: 20 cm (7.8 in) Size 3 : 21 cm (8.2 in) Size 4 : 22 cm (8.6 in) Size 5 : 23 cm (9 in) Size 6 : 24 cm (9.4 in) Size 7 : 25 cm (9.8 in) Now, you have to take the second measure, length of the foot (LF). Then cut off 10%. For example : My LF is 22.5 cm, cut off 10%, we have 20 cm. Save this measure for later. And that's all, now knitting time ! Each size is indicated in this order, with this color code 19 [20, 21, 22,23,24,25]
PATTERN :
1 - Toes :
Cast on 26 [28, 26, 30, 28, 30, 32] stitches with Turkish cast on method (or any other similar technique). You do not know how to ? No worries, there is a step-bystep in annexes p. 11 & 12 . This row counts as row 1. Do not hesitate to mark the beginning of the row and divide the top from the bottom of the foot. Knit two rows. Now that the first three rows are done, let's increase to shape the toes. As a reminder, needle 1 hold stitches of the top, needle 2 the bottom. Row 4 : N1 : K1, M1, knit to 1 st before end, M1, K1. N2 : K1, M1, knit to 1 st before end, M1, K1 You have 30 [32, 30, 34, 32, 34, 36] stitches. Row 5 : Knit (N1+N2). Repeat rows 4 and 5, 4 [4, 5, 5, 6, 6, 6] times. In total : 5 [5, 6, 6, 7, 7, 7] repeats. You have 46 [48, 50, 54, 56, 58, 60] stitches in total, and 23 [24, 25, 27, 28, 29, 30] on each needle. Repeat rows 4 and 5, without M1 on N2, 2 [2, 1, 0, 0, 0, 0] time. You have 27/23 [28/24, 27/25, 27/27, 28/28, 29/29, 30/30] stitches. Be careful, for sizes 1, 3, 4 and 6, on the next row, increase one stitch (M1) anywhereonN1. Sizes 1 to 5 have 28 stitches on N1. Sizes 6 and 7, 30 stitches. Continue with stockinette until your toes are covered. Do not forget to note the row, this way you could make an identical second sock.
2 - The body of the sock :
Read the whole paragraph before continuing. Now, time to begin the chart 1 on needle 1. There is 107 (155) rows. Begin with the left part, then the right part. The motif is done on 28 stitches. Be careful, the two stitches in green color (the first and the last) are valid only for sizes 6 and 7. In other words, for sizes 1 to 5, the motif begins with the second stitch and ends with the 29th stitch of the chart. Each size is indicated in this order, with this color code 19 [20, 21, 22,23,24,25] Take back the measure (LF) you saved earlier (p. 4). Substract 7,5 cm. Continue until you reach this length (motif on N1, stockinette on N2). For example : My LF cut off 10% : 20 -7.5 = 12.5 cm. rget to note the row, this way you could make an identical second socl
3 - Bottom of the heel :
Let's increase to shape the heel. So, while knitting the motif on needle 1 : Row 6 : N1 : motif (28, 28, 28,28, 28, 30, 30 stitches) N2 :K1, M1, knit to 1 st before end, M1, K1 (25, 26, 27, 29, 30, 31, 32 stitches). Row 7: N1:motif. N2 : knit. Repeat rows 6 and 7 until you have 47 [48, 49, 51, 52, 53, 54] stitches on needle 2. 12 times in total. Be careful, for sizes 2, 5 and Z, on the last row of needle 2, increase one stitch (M1), anywhere. You have 47 [49, 49, 51, 53, 53, 55] stitches on needle 2.
4 - Back of the heel
Knit motif on needle 1. Then, you have to work only on needle 2, back and forth, next rows (this is a short rows time !) : Row 8 (RS) :K33 [34, 34, 35, 36, 36, 37], KB&F, K1, W&T ; Row 9 (WS) : P21 m env., PB&F, P1, W&T ; Row 10 : K19, KB&F, K1, W&T ; Row 11 :P17, PB&F, P1, W&T ; Row 12 :K15, KB&F, K1, W&T ; Row 13 :P13, PB&F, P1, W&T ; Row 14 : K11, KB&F, K1, W&T ; Row 15 :P9, PB&F, P1,W&T ; You have 55 [57, 57, 59, 61, 61, 63] stitches on needle 2. Each size is indicated in this order, with this color code 19 [20, 21, 22,23,24,25] Finish the row on needle 2 with stockinette (knit). When you meet a wrap, put it on the left needle and purl it together with the stitch it wrapped. Knit needle 1 (with motif) keeping strong the tension of the thread. Then, again, needle 2, back and forth : Row 16 : keeping knitting remaining wraps, K39 [41, 41, 43, 45, 45, 47], SSK, turn. Row 17 : S1, P23 [25, 25, 27, 29, 29, 31], P2tog, turn. careful, when you slip a stitch, row 18, put the thread behind the work. Row 18: \*S1, K1\* x 12 [13, 13, 14, 15, 15, 16] times, SSK, turn. Repeat 17 and 18 until every stitch of needle 2 has been knitted. You have 25 [27] 27, 29, 31, 31, 33] stitches on needle 2. Be careful, when you make the last repeat of row 18, there is not ssK, but a K1 instead.
5 - The ankle :
Knit needle 1 (with motif). When you make the junction between the two needles, keep the tension strong to avoid gap. But, if it is not enough, you can pick up a stitch (see annexes p. 13 ) before the first stitch of needle 1 and knit it together with. Same thing for the second junction. Knit needle 2. For all sizes, increase one stitche anywhere on the row. Now, you have 28/26 [28/28, 28/28, 28/30, 28/32, 30/32, 30/34] stitches. Continue chart 1 on needle 1. On needle 2, begin chart 2 (repeat red box) and match it with chart 1 (begin the 《 wings 》 on N2 at the same time on N1). For sizes 1, 4 and Z, K1 before and after the motif (indicated in green on chart 2). Finish charts, then knit 6 rows of ribs 1/1 (K1, P1), or more if you want.
6 - Bind off :
Bind off in a good elastic way so your ankle or your calf will not be hurt by socks. I advise you to use Elisabeth Zimmerman's method, describes step-by-step in annexes, p. 14. And that's all ! Knit the second one and weave in ends :). Since motifs are embossed, including corollas, I invite you to wet block your socks. It Worth it. It's quite simple. Soak them for about twenty minutes in tepid soapy water. Press the socks in a towel to pull out water and block them on sock blockers. You do not have sock blockers ? No problem, there is a solution. You have paper ? You have card and scissors ? That's all you need ! You can print those sock blocker templates for example : http://cyberseams.com/ downloads/sock_blocker_template_adults.pdf Match your size and cut. Copy the templates on card (3mm width at least), twice and cut. I advise you to frame your card with adhesive tape, this way, it will not become soft while socks dry on it. Some waterproof thing. It is not aesthetically pleasing but it works well !
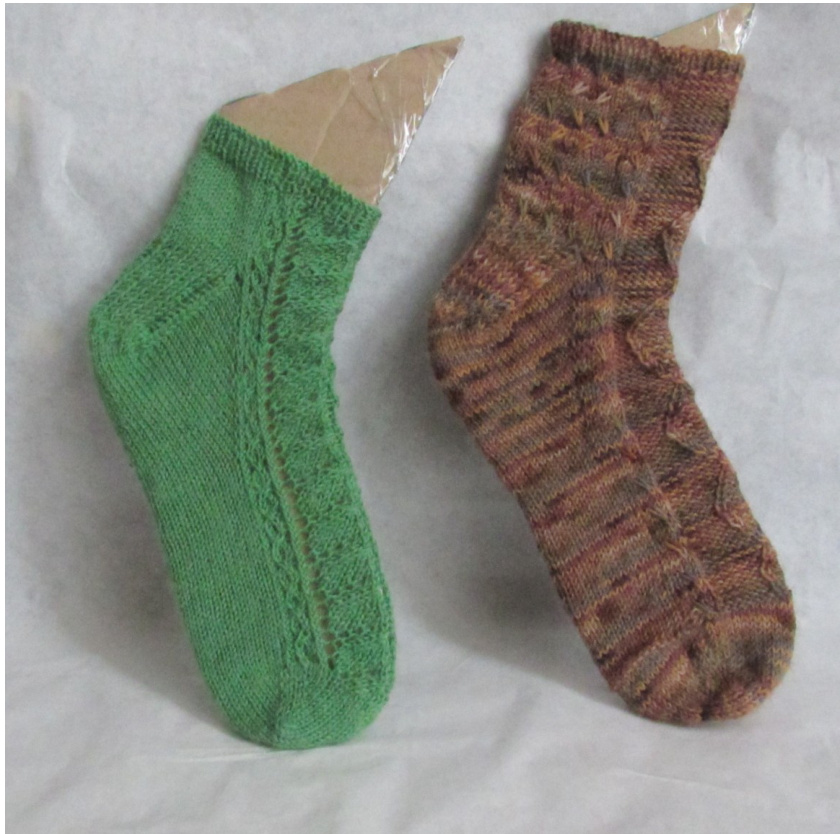
Let dry and voila :)
Chart 1 - needle 1
| K | ||||||||||||
| Chart 2 needle 2 | ||||||||||||
| 2CL C2PB | ||||||||||||
| KBL | SC2L SC2R C2PF | |||||||||||
| 三甘材 S1 10 | 米 X |
Turkish cast on
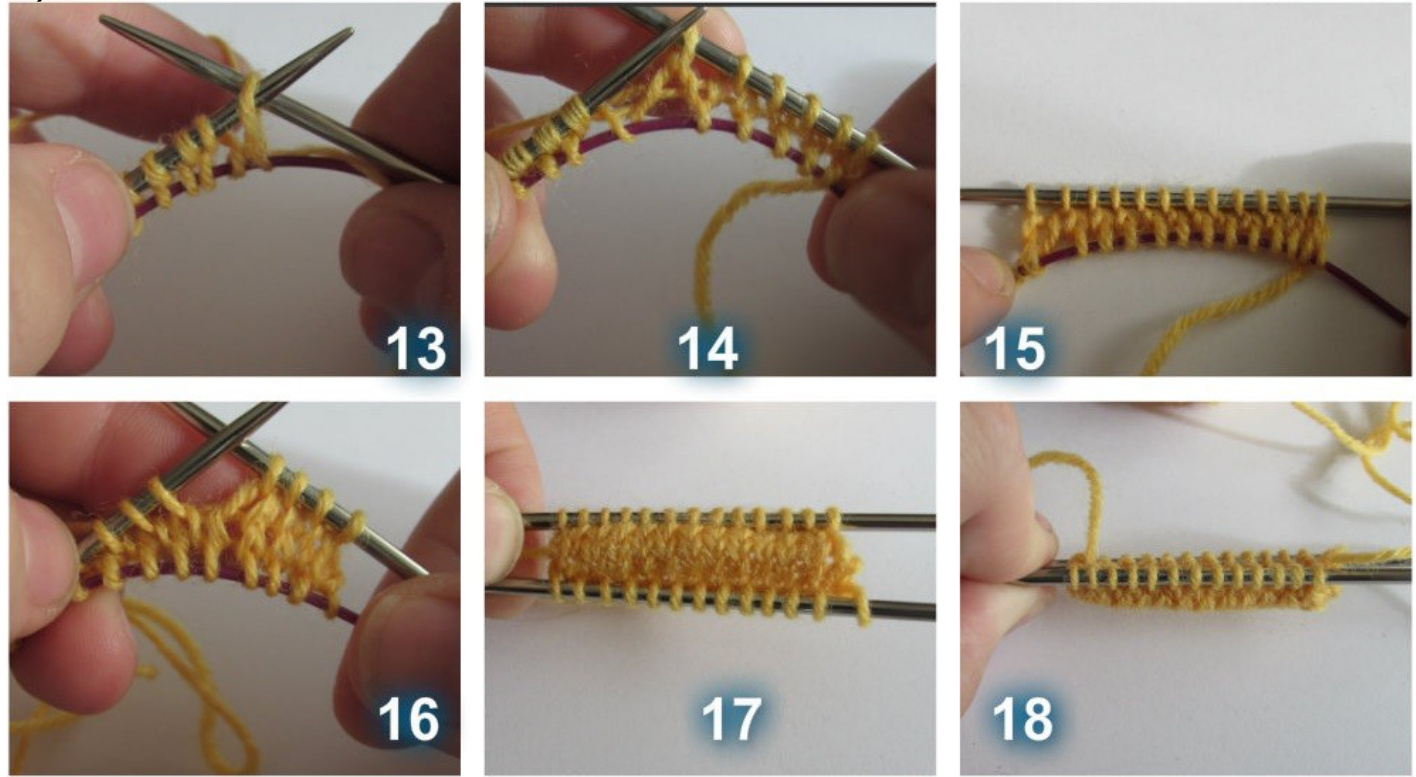
Cast on one stitch, then hold the needles together, letting the stitch on the top needle (picture 1 and 2). Then turn 13 [14, 13, 15, 14, 15, 16] around the two needles (pictures 3 and 4) and put the thread between the needles to 《 block 》 it (picture 5). Turn the needles to have the first cast on stitch now on the bottom needle (picture 6). Do not take in account the number of stitches on the needles of step-by-step tutorial, there is more than necessary.
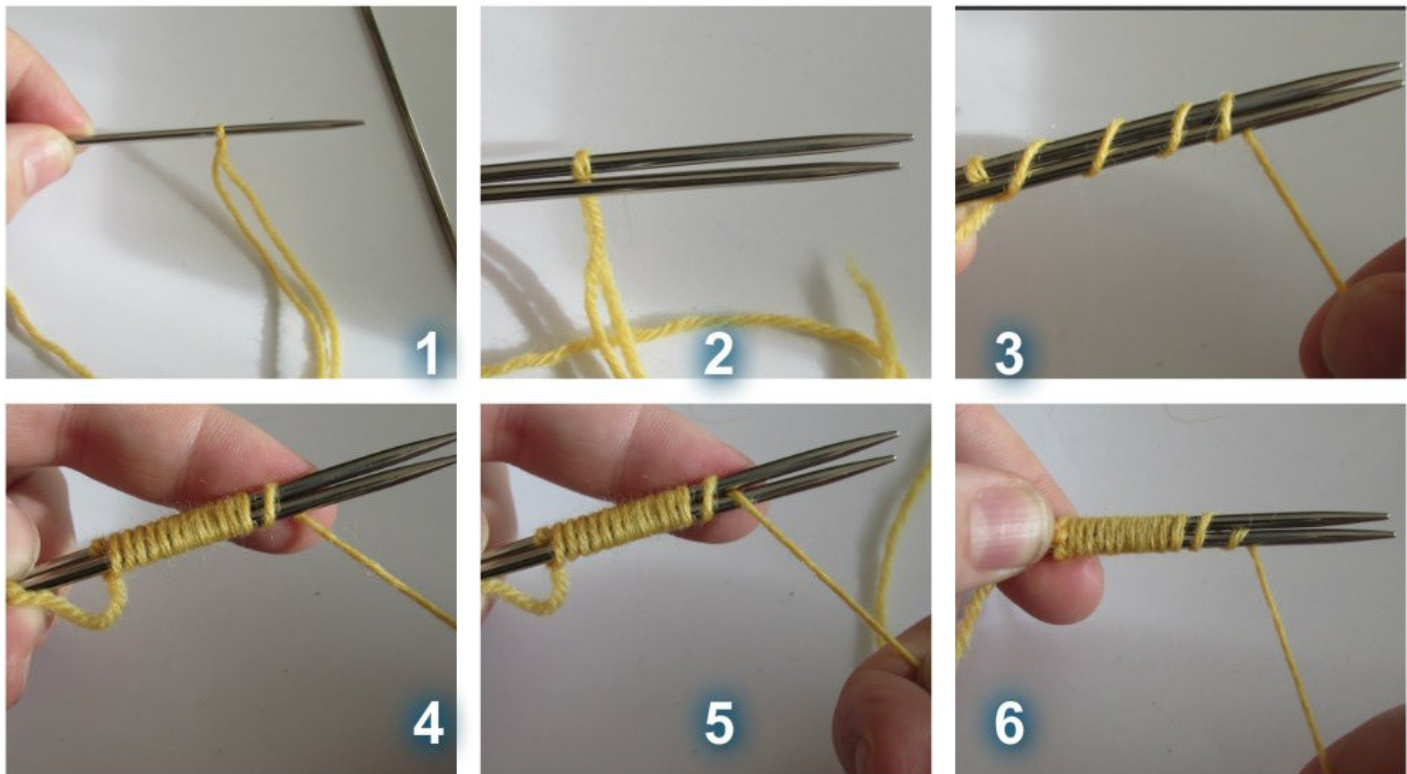
Pull the bottom needle and its cable through the stitches and knit the top needle, in round, through back loop (pictures 7, 8 and 9) ), you will have a better result this way, be careful, tighten the thread for the first stitch. Do not hesitate to count the stitches as knitting, just to be sure. There you have 13 [14, 13, 15, 14, 15, 16] knitted stitches (picture 10). Pull the bottom needle through non-knitted stitches, slip the knitted stitches (top needle) on the cable (picture 11). You can undo the first casted on stitch quite simply (picture 12).
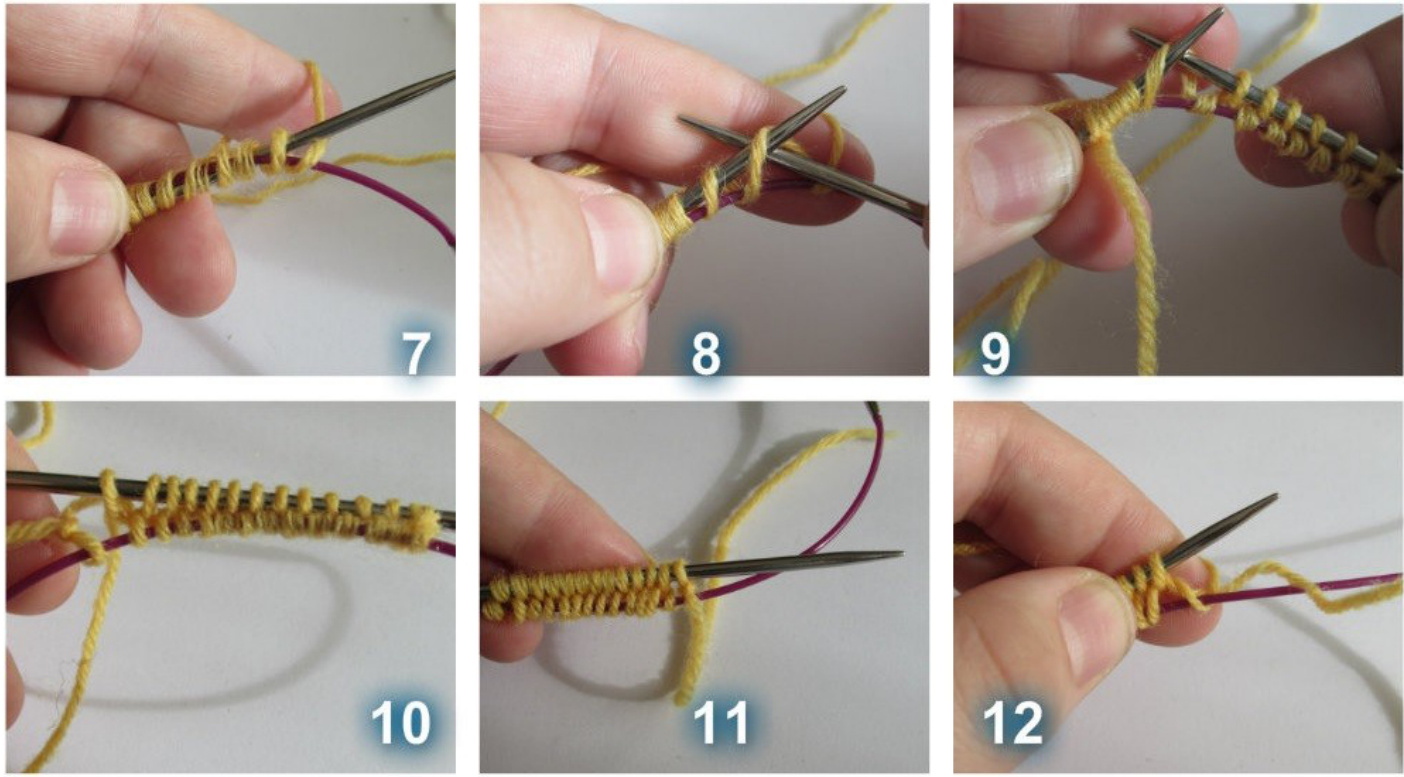
Knit 13 [14, 13, 15, 14, 15, 16] other stitches, through back loop (pictures 13 and 14). So, now you have 26 [28, 26, 30, 28, 30, 32] cast on stitches (picture 15). This is the first row. Go on with knitting two rows in round, through the front loop (picture 16). Then, you see a little bump, this is the beginning of your toes (pictures 17 and 18).
Make One.
When you have to Make One on the left side of the work (picture 1), from the front, pick up the thread between two stitches with left needle (picture 2) then knit through back loop (picture 3). When you have to Make One on the right side of the work (picture 1), from the back, pick up the thread between two stitches with left needle (picture 2) and knit through front loop (picture 3).

Let's imagine that picture 1 represents the space between N1 and N2. With the left needle, pick up the stitch two stitches below the stitch you just knit and 《 pull 》 it (picture 2). Pictures 3 and 4 help you to visualize this new stitch. Put the stitch in the right position to knit it (picture 5). K2tog with the next stitch (picture 6). Picture 7 show you the result.

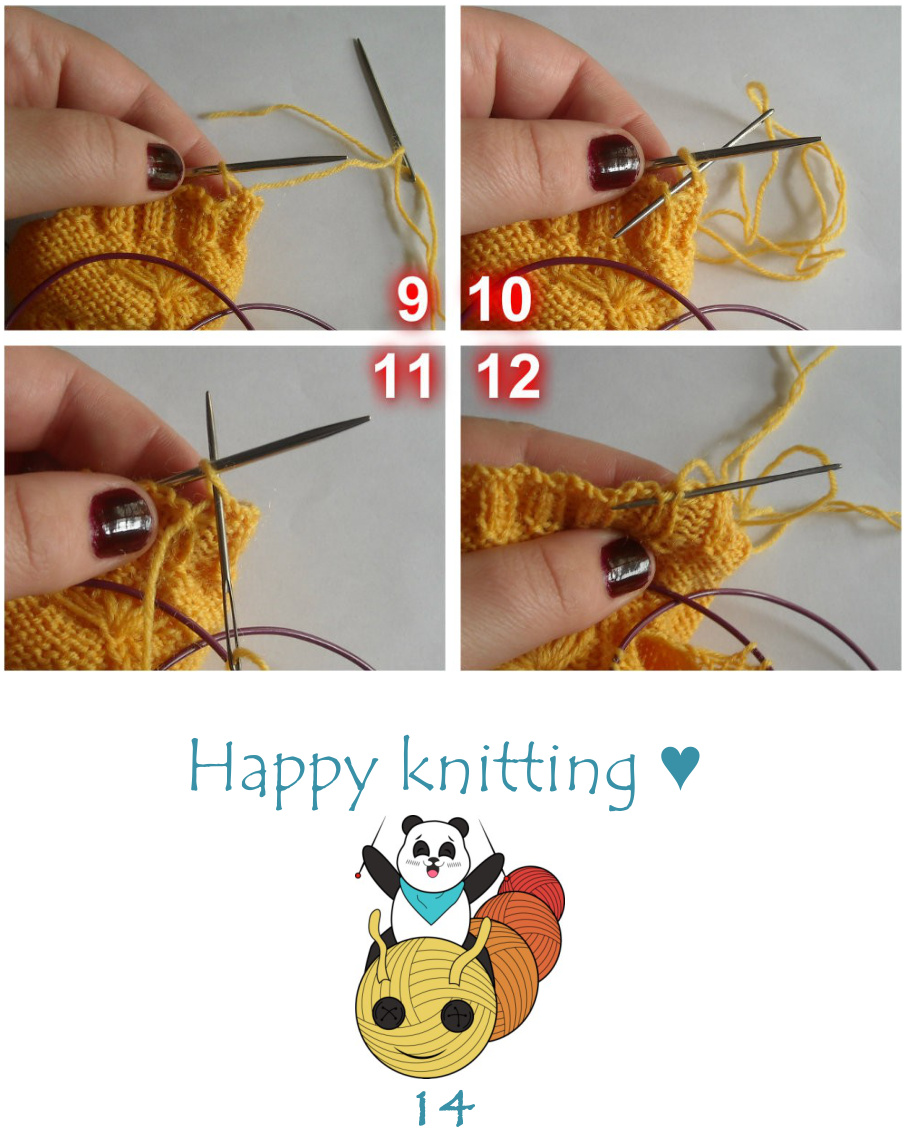
lisabeth Zimmerman' sewn bind off : Cut your thread, keeping 3 times the length of your last ribbing row. Put it on your sewing needle (picture 1). Put the needle in the first two stitches, as if to purl (picture 2).Pull the thread (picture 3). Put the needle on the first stitch as if to knit and pull the thread (picture 4).
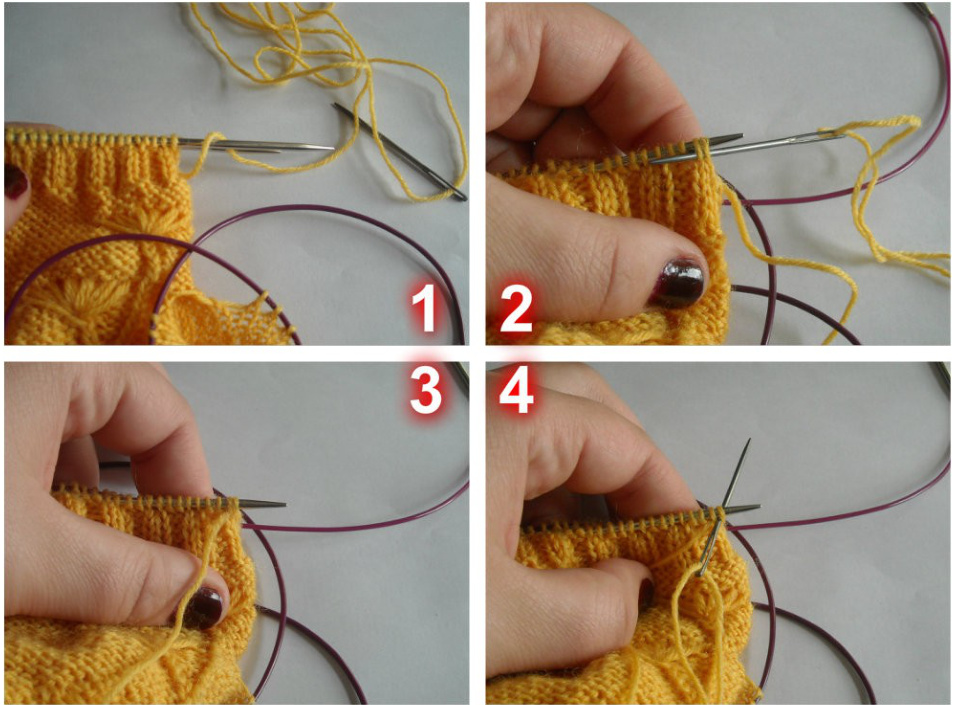
Slip the first stiche off the needle (picture 5). Put your needle on the first two stitches, as if to purl (picture 6) and pull the thread. Put your needle on the first stitch, as if to knit, pull the thread and slip the stitch off the needle (picture 7). Continue this way until all stitches are done (picture 8).
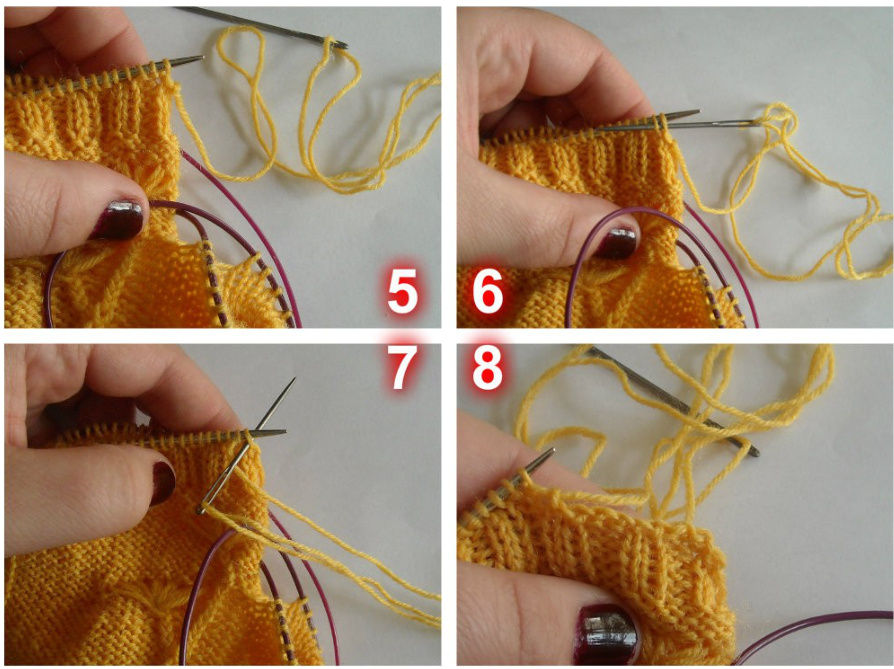
When only one stitch remains (picture 9), put your needle on this stitch, as if to purl, and on the first stitch you bound off at the beginning (picture 10). Put the needle on the last stitch, as if to knit (picture 11). Weave in ends (picture 12).