Go, Go Lion!!
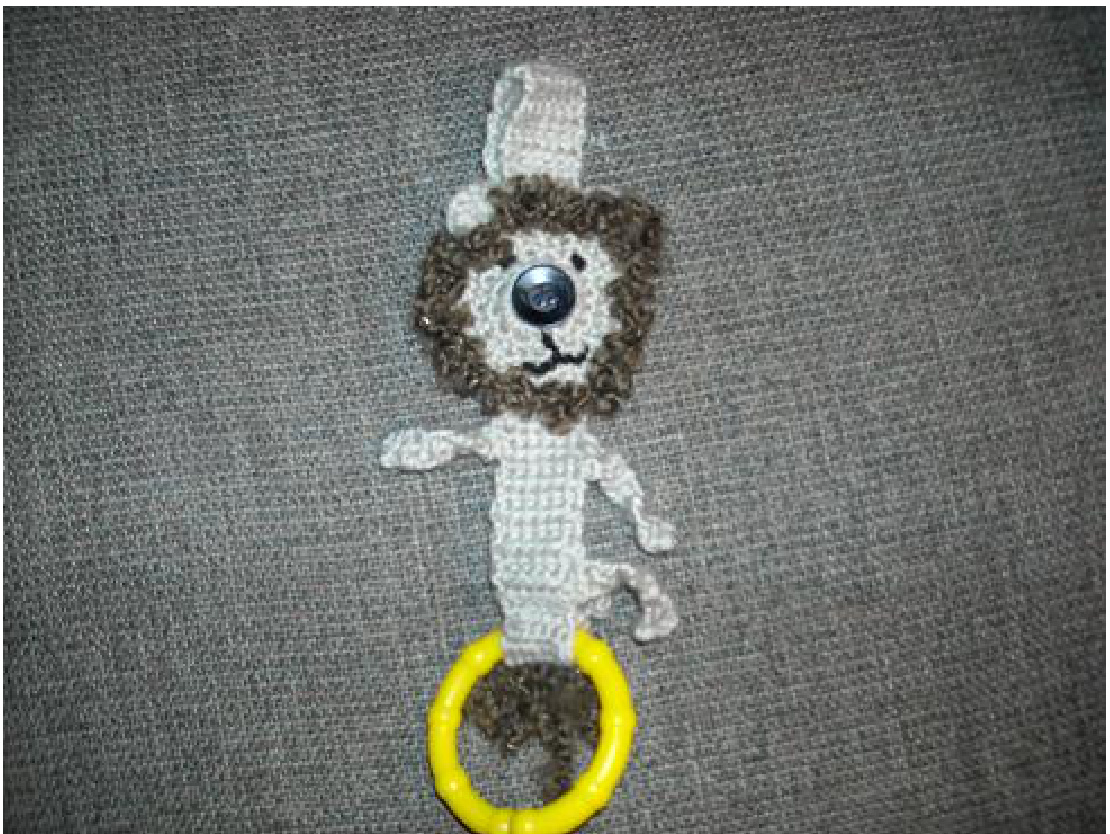
This lion was made initially for the Gryffindor Quidditch team's baby projects for the HP Knitting and Crochet House Cup, Spring 2009 term. I think it's a fun, quick project that any mom and baby on the go would love! By leaving off the mane, I think he'd make a cute bear. By adjusting the ear positioning, he'd be a cute monkey! (This pattern is untested, as of now.) Abbreviations: Ch: chain sc: single crochet dc: double crochet sl st: slip stitch Materials: I used an F hook, because it was what I had on hand. The example was made using Vanna's Choice worsted weight in Linen with a stash brown chenille like worsted weight for the mane. I also used a Linkadoo to attach the toy. Scrap black worsted weight was used for the features, sewn on with a tapestry needle. A 3/4" button was used for the nose. Head: Ch 10. Join with sl st to form circle. Round 1: 12 sc around loop. (12) This will leave a hole in the middle. It will be used for a button hole which will also double as the nose! Round 2: 2sc in each sc around. (24) Round 3: $\ast_{2}$ sc in first sc,sc. Repeat from \* around. (36) Round 4: $\ast_{2}$ sc in first sc, sc in next 2 sc. Repeat from \* around. (48) Do not finish off. Ears: 8 dc in next stitch. Finish off. Join yarn with sl st in 7th sc to the right of dc cluster for ear. 8 dc in next sc. Finish off. Body: Join with sl st next to one of the ears. Sc back and forth with a ch 1 at the end. (6) Work in this manner until body measures approximately 10 inches from the join between the ears. Fasten off, leaving a tail for attaching Linkadoo. Fold end over tightly and stitch end of body/tail onto itself around Linkadoo. Arms/Legs: Ch 3, sc in second ch from hook, sc in next st, ch 1. Row 1: Sc in both sts across, ch 1. Repeat Row 1 until arms/legs measure approximately 2". Make 4. Leave ends long enough to sew onto body. Arms were attached at approximately 7" from join between ears, and legs were attached at approximately 8 1/2". Features: Attach the 3/4" black button in the center of body strip at approximately the 5" area. This should give enough room to go around most stroller/baby carrier handles, overall straps, baby wrists, etc. Using the contrast yarn and tapestry needle, stitch around head, making loops, for mane. Embroider eyes and nose with black yarn. Weave in all loose ends. Enjoy! This pattern is @2009 Michelle Adams of Michelle's Stitchwitchery. Please do not reproduce this pattern or any items from it to sell. It may be given freely to other people, with due credit given to me. :O) You may also produce items from this pattern to donate to charity or to give as gifts. If you have any problems, questions, comments, or conerns, please feel free to contact me at michellesstitchwitchery@gmail.com


