RUTHLESS KNITTING
Otto the Turkey by Ruth Homrighaus
Notes
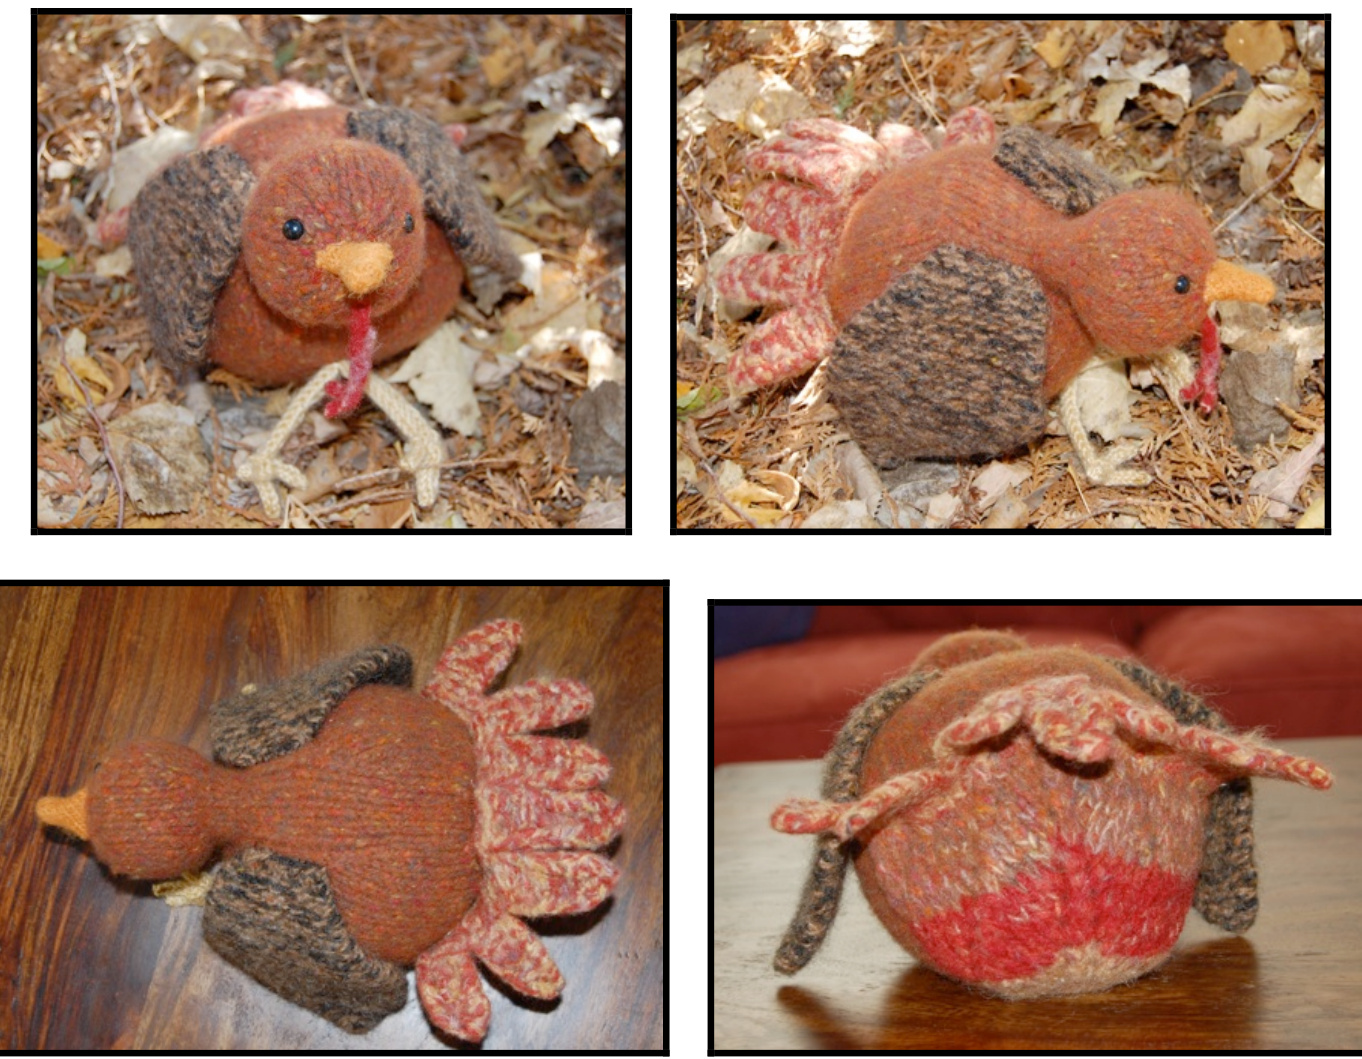
In a fever of Thanksgiving inspiration, I created Otto the Turkey over the course of about twenty-four hours, making up the pattern as I went along and using up old odds and ends of yarn left over from earlier projects. Though I did take notes, thus creating a generally accurate record of the steps I took, this pattern should be taken as a set of general guidelines rather than instructions to be followed to the letter. Don't be afraid to improvise a bit and let your turkey's own unique personality emerge! Otto's body and head are knit in one piece in the round and stuffed prior to being slightly felted. Two wings and a tail are knit separately, as well as a flat piece to be used to create the beak. These four pieces are thoroughly felted. A set of legs and a beanbag weight (optional) are knit but not felted. Finally, the entire turkey is sewn together. This pattern is suitable for the adventurous beginner or intermediate knitter. Required skills include casting on; knitting and purling in the round and flat using double-pointed needles; increasing by knitting into the front and back of a stitch; decreasing by the SsK, K2tog, and slip two, knit one, pass slipped stitches over methods; binding off; working I-cord; felting; handsewing (even if poorly); and double-knitting (optional).
Size
One size. Finished turkeys will vary in size, but mine was about a foot long and eight inches broad at the rump. Whatever size your turkey comes out is a good size. It's not like you're going to eat it.
Materials
All of the yarns used for Otto must be feltable. I used 100 percent wool of various brands and thicknesses (many of them tweeds), which I list below. Feel free to use whatever you have lying around, so long as you're certain that it will felt. For the body, you'll need some bulky weight yarn. I used a partial ball of Rowan's Yorkshire Tweed Chunky (label gauge: 12 sts over 4") in the color Pecan. I knit the other pieces in worsted weight yarn. The wings were knit in Brown Sheep's Lamb's Pride Worsted in Wild Oak stranded with Debbie Bliss Aran Tweed in color 08. For the tailfeathers, I held a multicolored fingering-weight wool sock yarn (Yarntails' Kumo'Socki) together with one or two worsteds for most tiers. These included Mountain Colors 4/8's Wool in Sand, Lamb's Pride Worsted in Wild Oak and Spice, and Harrisville Designs New England Highland in Russet. It doesn't much matter which yarns you use as long as you maintain roughly the same gauge throughout. Other required materials include: US size 10.5 double-pointed needles or size to give you a gauge that is loose enough to leave some room for felting but not so loose that you can see through it 9 mm safety eyes (or black felt) dried beans for the rump weight stitch marker • felt for beak and wattle (optional—see below) sewing needle tapestry needle • inconspicuous thread polyfill stuffing crochet hook
Abbreviations
inch(es) BO bind off Co cast on foll following k knit k2tog knit two together kfb knit into the front and back of the stitch MC main color p purl PM place marker rep repeat SKP slip 2, knit $^{1,}$ pass slipped sts over SSK slip, slip, knit st(s) stitch(es) X times (i.e. $4\times=$ four times) yo yarnover
Pattern
Body The body is knit from the rump to the head. Using MC, CO 6 stitches. Divide sts evenly on 3 needles. Join to begin working in the round, being careful not to twist. PM. Round 1. [Kfb] in each st. 12 sts. Round 2. K all sts. Round 3. [Kfb, k1] twice, [kfb] twice, [k1, kfb] twice, k2. 18 sts. Round 4. K all sts. Round 5. [Kfb, k2] 6X. 24 sts. Rounds 6-9. K all sts. Round 10. [Kfb, k3] twice, kfb, k4, [kfb, k3] twice, kfb, k2. 30 sts. Round 11. K all sts. Round 12. [Kfb, k4] twice, kfb, k6, [kfb, k4] twice, kfb, k2. 36 sts. Round 13. K all sts. Round 14. [Kfb, k5] twice, kfb, k8, [kfb, k5] twice, kfb, k2. 42 sts. Round 15. K all sts. Round 16. [Kfb, k6] twice, kfb, k10, [kfb, k6] twice, kfb, k2. 48 sts. Round 17. K all sts. Round 18. [Kfb, k7] twice, kfb, k12, [kfb, k7] twice, kfb, k2. 54 sts. Round 19. K all sts. Round 20. [Kfb, k8] twice, kfb, k14, [kfb, k8] twice, kfb, k2. 60 sts. Rounds 21-28. K all sts. K first st and slide it onto the third dpn, so that it becomes the last stitch of the previous round. Round 29. [Ssk, k7] twice, ssk, k16, k2tog, [k7, k2tog] twice, k4. 54 sts. Even-numbered rounds 30-42. K all sts. Round 31. [Ssk, k6] twice, ssk, k14, k2tog, [k6, k2tog] twice, k4. 48 sts. Round 33. [Ssk, k5] twice, ssk, k12, k2tog, [k5, k2tog] twice, k4. 42 sts. Round 35. [Ssk, k4] twice, ssk, k10, k2tog, [k4, k2tog] twice, k4. 36 sts. Round 37. [Ssk, k3] twice, ssk, k8, k2tog, [k3, k2tog] twice, k4. 30 sts. Round 39. [Ssk, k2] twice, ssk, k6, k2tog, [k2, k2tog] twice, k4. 24 sts. Round 41. [Ssk, k1] twice, ssk, k4, k2tog, [k1, k2tog] twice, k4. 18 sts. Round 43. Ssk 3X, k2, k2tog 3X, k4. 12 sts. Rounds 44-47. K all sts. Pause here to stuff the body. Do not overstuff; the body will shrink slightly when felted. Round 48. Kfb twice, k4, kfb twice, k4. 16 sts. Round 49 . K all sts. Round 50. [Kfb, k2, kfb] 4X. 24 sts. Round 51. K all sts. Round 52. [Kfb, k4, kfb] 4X. 32 sts. Rounds 53-57. K all sts. Round 58. [Ssk, k4, k2tog] 4X. 24 sts. Round 59. K all sts. Round 60. [Ssk, k2, k2tog] 4X. 16 sts. Round 61. K all sts. Round 62. [Ssk, k2tog] 4X. 8 sts. Round 63. K all sts. Round 64. K2tog 4X. 4 sts. Break yarn. Using tapestry needle, thread yarn tail through all 4 sts, beginning with first k2tog and ending with the last one you worked. Use your finger to open this hole up enough so that you can place your safety eyes (if using). Then stuff the head. Pull the tail to close the hole, tie a knot near the opening, cut off all but about an inch of the yarn tail, and use the crochet hook to pull it into the body. Wings CO 8 sts. Rows 1-2. K all sts. Row 3. Kfb, k6, kfb. 10 sts. Even-numbered rows 4-40. K all sts. Row 5. Kfb, k9. 11 sts. Row 7. K all sts. Row 9. Kfb, k9, kfb. 13 sts. Row 11. Kfb, k12. 14 sts. Row 13. K all sts. Row 15. Kfb, k12, kfb. 16 sts. Row 17. Kfb, k15. 17 sts. Row 19. K all sts. Row 21. K15, k2tog. 16 sts. Row 23. K14, k2tog. 15 sts. Row 25. K13, k2tog. 14 sts. Row 27. K12, k2tog. 13 sts. Row 29. K2tog, k9, k2tog. 11 sts. Row 31. K9, k2tog. 10 sts. Row 33. K2tog, k6, k2tog. 8 sts. Row 35. K6, k2tog. 7 sts. Row 37. K2tog, k3, k2tog. 5 sts. Row 39. K3, k2tog. 4 sts. Row 41. K2tog twice. 2 sts. Row 42. K2tog. Break yarn, thread tail through last st, and weave in ends.
Tailfeathers
CO 5. Row 1 and foll odd-numbered rows. P all sts. Row 2. K2, yo, k1, yo, k2. 7 sts. Row 4. K3, yo, k1, yo, k3. 9 sts. Row 6. K4, yo, k1, yo, k4. 11 sts. Row 6. K5, yo, k1, yo, k5. 13 sts. After row 7, change to a new set of colors. Row 8. K1, yo, k2tog, k3, yo, k1, yo, k3, ssk, yo, k1. 15 sts. Row 10. K2, yo, k2tog, k3, yo, k1, yo, k3, ssk, yo, k2. 17 sts. Row 12. K3, yo, k2tog, k3, yo, k1, yo, k3, ssk, yo, k3. 19 sts. Row 14. K4, yo, k2tog, k3, yo, k1, yo, k3, ssk, yo, k4. 21 sts. After row 15, change to a new set of colors. Row 16. K1, yo, k2tog, k3, yo, k2tog, k3, yo, k3, ssk, yo, k3, ssk, yo, k1. 23 sts. Row 18. K2, yo, k2tog, k3, yo, k2tog, k3, yo, k3, ssk, yo, k3, ssk, yo, k2. 25 sts. Row 20. K3, yo, k2tog, k3, yo, k2tog, k3, yo, k3, ssk, yo, k3, ssk, yo, k3. 27 sts. Row 22. K4, yo, k2tog, k3, yo, k2tog, k3, yo, k3, ssk, yo, k3, ssk, yo, k4. 29 sts. After row 23, change to a new set of colors. Row 24. K5, yo, k2tog, k3, yo, k2tog, k3, yo, k3, ssk, yo, k3, ssk, yo, k5. 31 sts. Row 26. K6, yo, k2tog, k3, yo, k2tog, k3, yo, k3, ssk, yo, k3, ssk, yo, k6. 33 sts. Feather #1 Row 1. K5. Turn. Row 2. P5. Turn. Rows 3-6. Rep rows 1-2. Row 7. Ssk, k1, k2tog. Row 8. P3. Row 9. SKP. Break yarn. Feather #2 Row 1. K4. Turn. Row 2. P4.Turn. Rows 3-8. Rep rows 1-2. Row 9. Ssk, k2tog. Row 10. P2. Row 11. K2tog. Break yarn. Feather #3 Row 1. K5. Turn. Row 2. P5.Turn. Rows 3-10. Rep rows 1-2. Row 11. Ssk, k1, k2tog. Row 12. P3. Row 13. SKP. Break yarn. Feather #4 Row 1. K5. Turn. Row 2. P5. Turn. Rows 3-12. Rep rows 1-2. Row 13. Ssk, k1, k2tog. Row 14. P3. Row 15. SKP. Break yarn. Feather #5 Work same as feather #3. Feather #6 Work same as feather #2. Feather #7 Work same as feather #1.
Legs and Feet
CO 24 sts. Row 1. P all sts. Row 2. K all sts. Rows 3-5. Rep rows 1-2. Row 6. Rep row 1. Row 7. K each st together with the matching st in the CO row to make a tube at the same time as you BO while you work across, reserving final 3 sts. Kfb into each of these sts, then pick up 3 sts from the base of the tube. Turn and knit back across these 9 sts. Turn. Placing the non-working stitches on a holder or waste yarn, make 3 I-cord toes one at a time, working as many rounds as looks right to you. The middle toe should be slightly longer than the others. You'll have to break the yarn between each toe and rejoin for the next toe. Once you've finished the toes, take the yarn ends where you rejoined the yarn and use them to pull the toes toward the center slightly and form a small ball on the base of the foot.
Beak
I made the beak by knitting a 3" square and felting it, then cutting a beak shape out of it. Alternatively, you could cut one out of a square of felt and fold it diagonally.
Wattle
I made the wattle by twisting a few scraps of yarn together and felting them. You might also try making one out of felt. Weight for tail (optional) I weighted down Otto's tail in order to keep his head from touching down to the ground, which gave him a rather depressed look. To create the tail weight, I double-knit a little pouch about $3^{\prime\prime}$ square and stuffed it with dried pinto beans before binding off the top. If you'd like a tail weight and don't know how to do double knitting, it would be just as functional to make two squares in stockinette or garter stitch and then sew them together, or to cut a pouch out of felt or fabric and sew up the sides and top.
Felting
To felt the pieces, place all of them in zippered pillow covers and put them in the washing machine with an old towel or two. Wash them on hot at maximum agitation with a little soap, checking now and then to see how far along the felting has come. I only felted the body for a little while, taking it out when it had acquired a nice fuzzy look and a tighter fabric but still showed all the original stitch definition. I felted all the other pieces until the original stitch definition had disappeared and they didn't appear to be getting any smaller. Once your pieces have felted as much as you'd like, run them through the spin cycle to remove the extra water and send all of them through the dryer with your towel. Once they're dry, let the finishing begin!
Finishing
Using matching or invisible thread, sew the beak to the head. Sew the wattle on below the beak. Sew the two wings on along either side of the shaping lines that run up the back of the body to the neck. I sewed mine only along the top so they could flap around, but if they seem too flappy, you can tack them down. Sew the legs onto the base of the body so that they stick out from the underside. If your tailfeathers are curly, you might want to press them with a iron before attaching them to the turkey. Sew the tailfeathers on beginning at the base and working up each side to where the individual feathers begin. If you're using a weight, stuff it between the tailfeathers and the body. Finish by tacking each feather to the body at the base of the feather. Voila!
Contact Me
I'd love to see pictures of your finished turkeys or to answer questions about the pattern. I can be reached by e-mail at ruthlessknitting@gmail.com.


