Ankh Morpork Guild of Assassins: Pointy Stick Case
by Stephanie Mclntosh
What does every good knitter need? Yarn, good light, yarn, friends and relatives who value handknitted gifts, yarn, storage space, yarn, needles, yarn... What does every good Discworld Assassin need? Aristocratic birth, good contacts, climbing ability, ruthlessness, black clothing of the highest quality, plenty of concealed weapons... Ah! Assassins carry thin pointy objects around with them at all times, and so do knitters. Bingo.
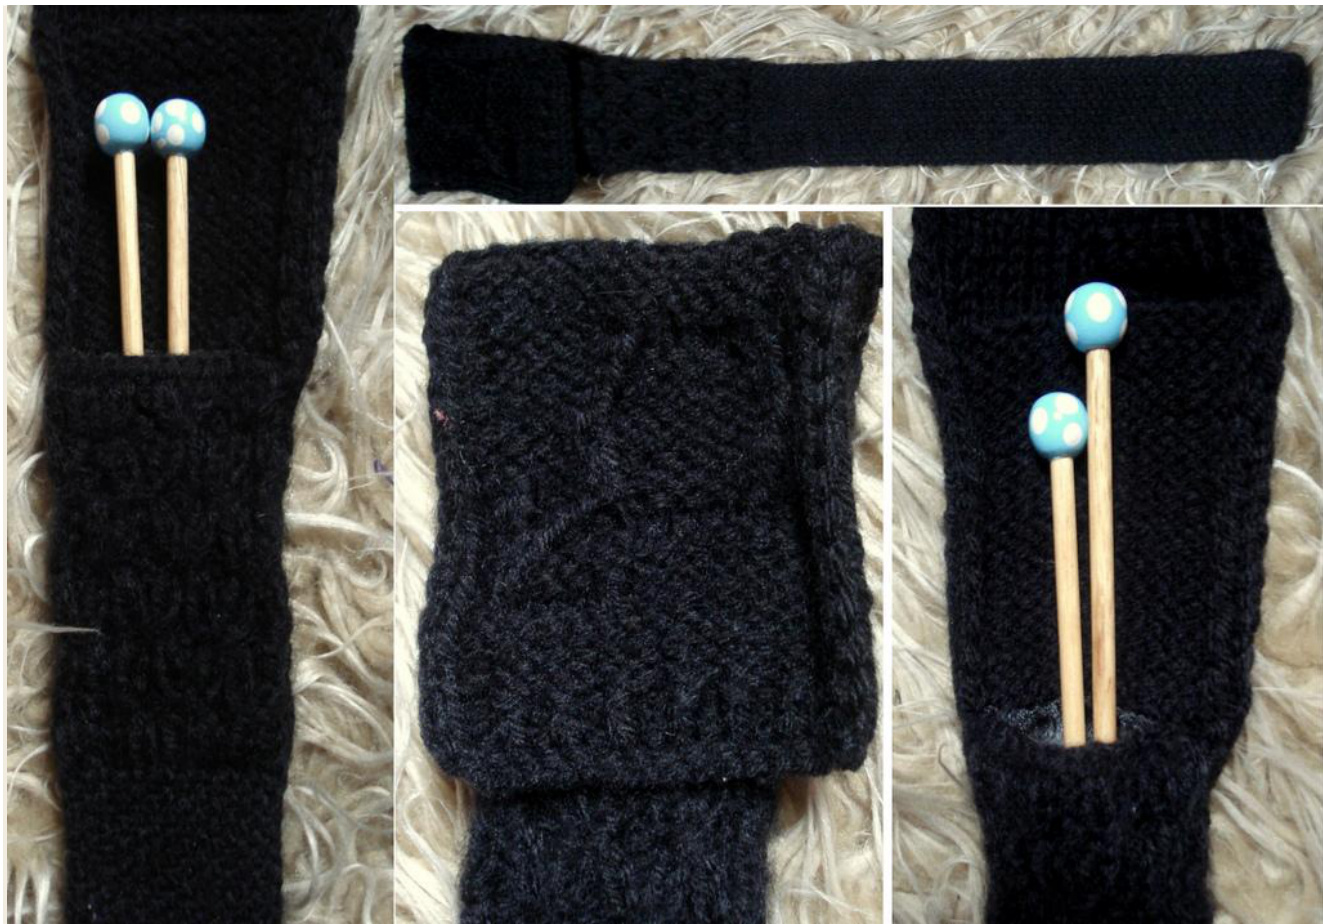
This pointy stick case was created for the Ankh Morpork Knitter's Guild swap on Ravelry in 2009. I entered as an Alchemist, my swap partner was an Assassin.
Assassin's Pointy Stick Case - Knitting Pattern
The case has a linen stitch body and faux-smocked border, creating a densely textured fabric. The design on the flap is the alchemical symbol for Night - this pattern is charted. The pattern can be easily adapted for different yarn and a wider or narrower case, although a different charted motif may need to be substituted if you are changing stitch numbers. As long as you cast on an odd number of stitches initially, you will be able to work the faux-smocking by increasing l stitch as you finish the linen stitch section.
You will need:
Black DK yarn (any, as long as it's a matt black - Assassins don't want to carry anything shiny that might give them away) 3mm circular needle & 2.5mm dpns (for cast-on & setup) 3.5mm circular needle Cable needle (optional) 1m black ribbon, width 1.5 inches Embroidery needle Pins Black thread
Abbreviations:
k = knit p = purl kfb = knit into front and back of stitch swyif = slip next stitch with yarn in front ofwork sl = slip next stitch with yarn behind work yf = bring yarn to the front of the work yb = bring yarn to the back of the work k2tog = knit 2 together ktbl = knit through back loop
Pattern:
Setup:
Using a 3mm circular needle, cast on 16 stitches. Row 1: kfb 15 times, k1 (31 stitches). Slide stitches to the other end of the needle. Using 2 double pointed needles held parallel, rearrange stitches, starting with the needle further away from you and alternating them between the 2 needles. The 1st stitch goes to the back needle, the 2nd to the front needle, 3rd stitch to the back, 4th to the front, and so on. When all the stitches are transferred you should have 15 stitches on the front needle (Needle1 from now on) and 16 stitches on the back needle (Needle 2).
Body:
Using a 3.5mm circular needle, work linen stitch in the round as follows: Round 2: [k, swyif] to last stitch in round, k Round 3: [swyif, k] to last stitch, swyif Repeat these 2 rounds until case is approximately 4 inches shorter than the total length of the knitting needles it will eventually contain. Setup round for faux-smocking: kfb, k to end of ro (32 stitches) Border: To create the smocking effect, work the following rounds 1-8 twice, then rounds 1-6 once. Rounds 1-3: [p, k] to end of round Round 4: [p, {sl3, yf, sl same 3 stitches back to left needle tip, yb} x2, k, p, k] to end of round Rounds 5-7: [p, k] to end of round Round 8: p, k, move these 2 stitches onto Needle 2. Then work as for Round 4. When you next work rounds 1-3 you will need to rearrange stitches back to the original needles so that the gathered stitches for Round 4 will occur in the correct places. Setup for Flap: K1, move this stitch to Needle 2. Cast off next 14 stitches knitwise. 18 stitches remain, which will be worked back and forth for the flap. Flap: Work in stocking stitch, slipping the final stitch of every row with the yarn on the wrong side of the work. Measure your work against the knitting needles to go in the case, and start chart when the flap is long enough to bend around the needle ends without needing to be stretched. Work rows 1-23 of chart. After working chart, finish as follows: Next Row (wrong side): p2, k2tog, [p, k] to last 2 stitches, p, slwyif. Final Row: k2, [p, k] to last stitch, slwyb Cast off purlwise. Break yarn and weave in ends. Lining: Turn the needle case inside out. Take one end of the ribbon and fold about 5mm to make a hem. Pin the folded end of ribbon to the inside of the stitches you cast off before starting the flap (the front of the case). Lay the ribbon out flat down the front of the case, and fold over on itself at the cast on stitches, so that there are 2 layers of ribbon on top of the case (see diagram).
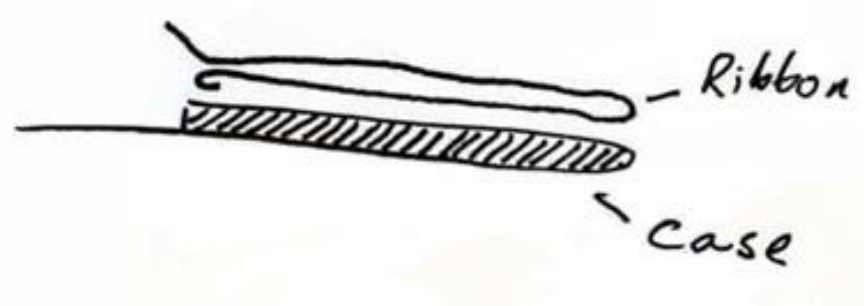
Pin the ribbon to the case securely and cut off any excess length, leaving about lcm for the back hem. Oversew the sides of the ribbon to the sides of the case, the lower fold to the cast on stitches, and the upper hem to the cast off stitches, using black thread. I found it helpful to insert a ruler into the case while doing this, to make sure I only sewed through one layer of knitted fabric. When you have attached the ribbon, turn the case back inside-out (or should that be outside-in, or maybe inside-in?). The ribbon will now be enclosed inside the case. Fold the cut end of the ribbon between the ribbon pocket and the back of the needle case so that it is hidden, then sew along the fold. Take a little time to make sure that the corners of the lining are securely anchored to both the front and back of the case, as most wear will occur here. Ta-da! Chart:
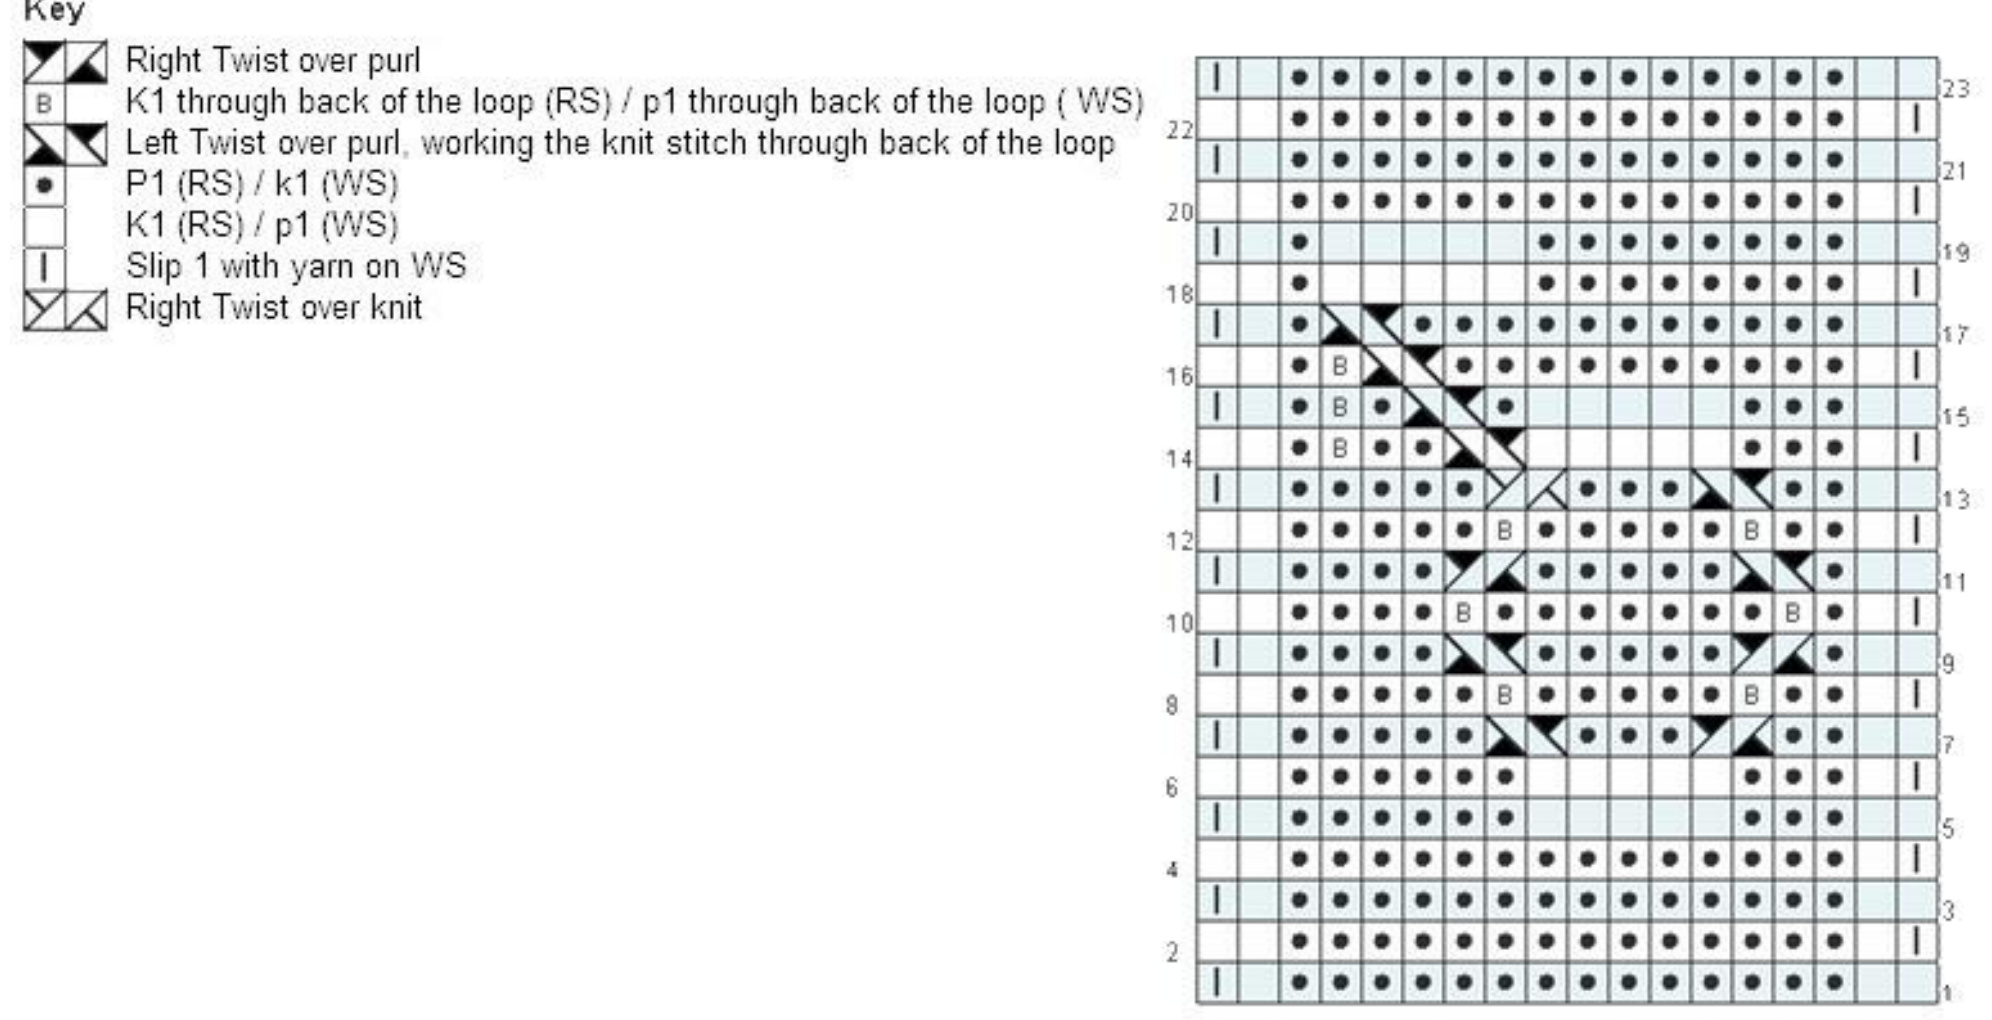
This chart shows the Alchemical symbol for 'Night'. If using the chart on another project you may need to turn it upside down - the bottom of the chart is for the top of the symbol as on this pattern you are knitting top-down. for personal use only. You may not sell items made using the pattern, or sell the pattern


