ByJenyStaiman Difficulty level: Intermediate
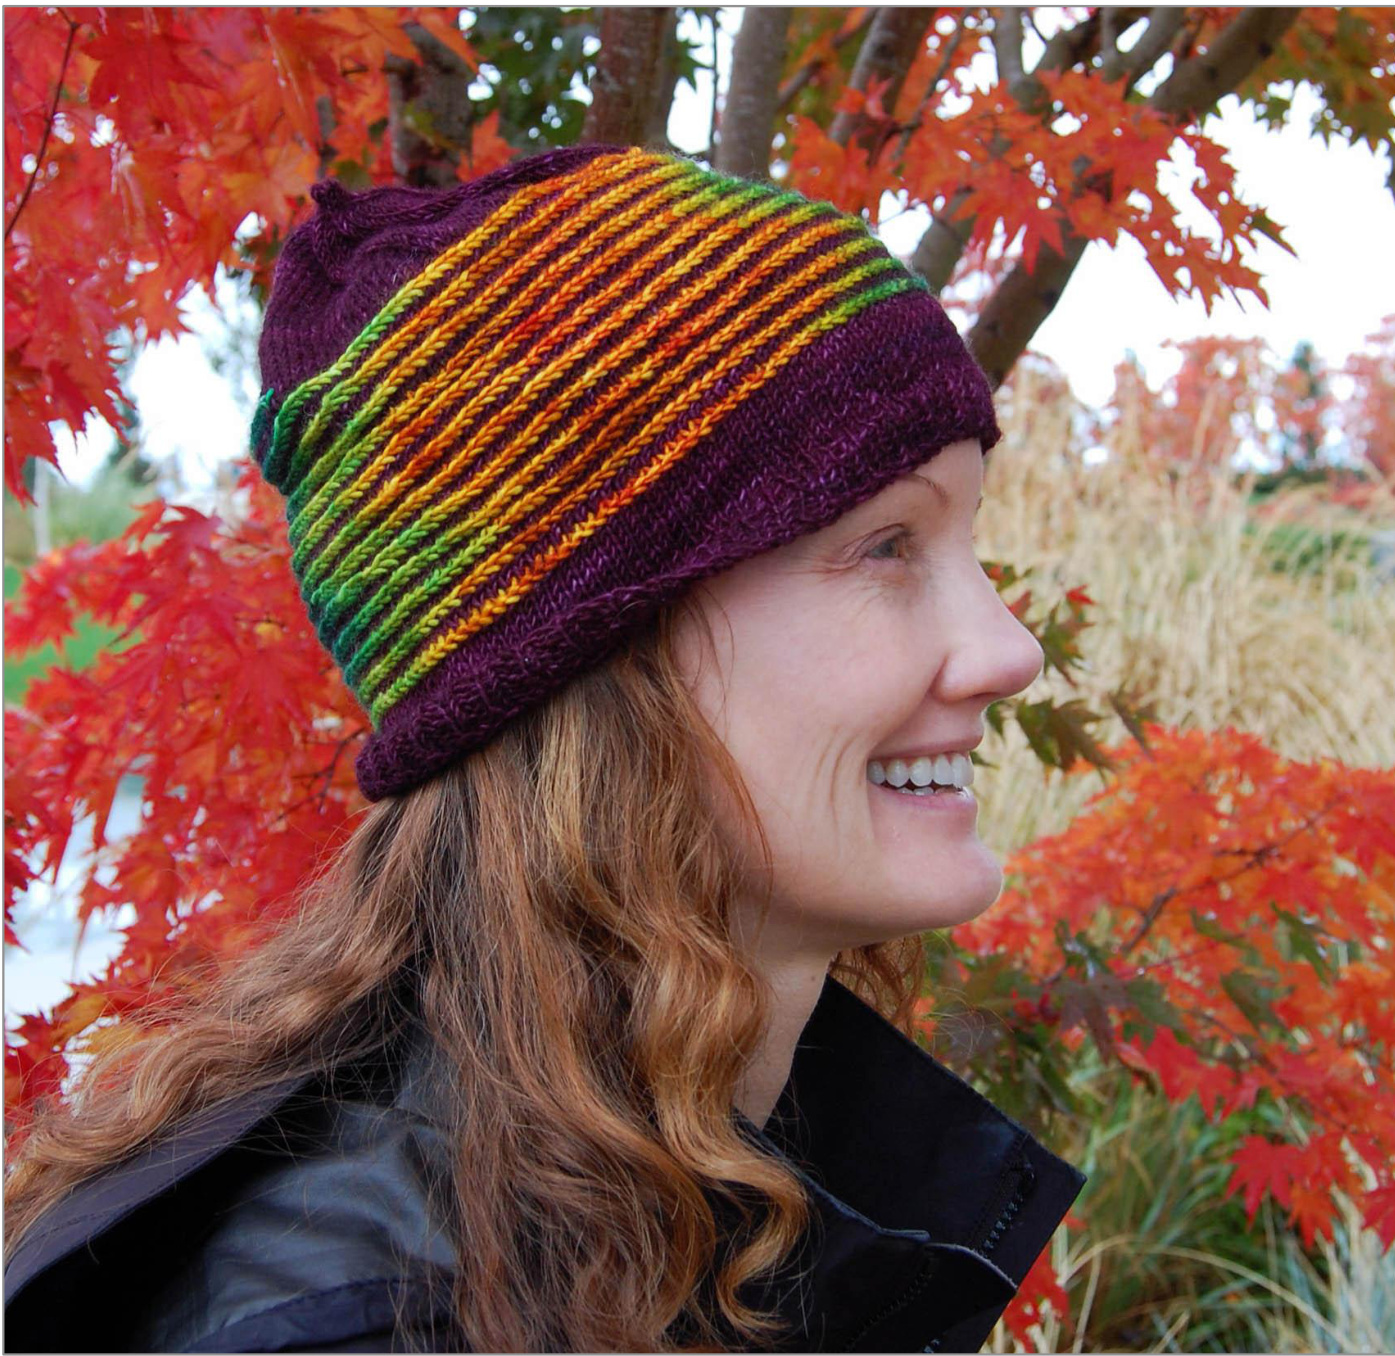
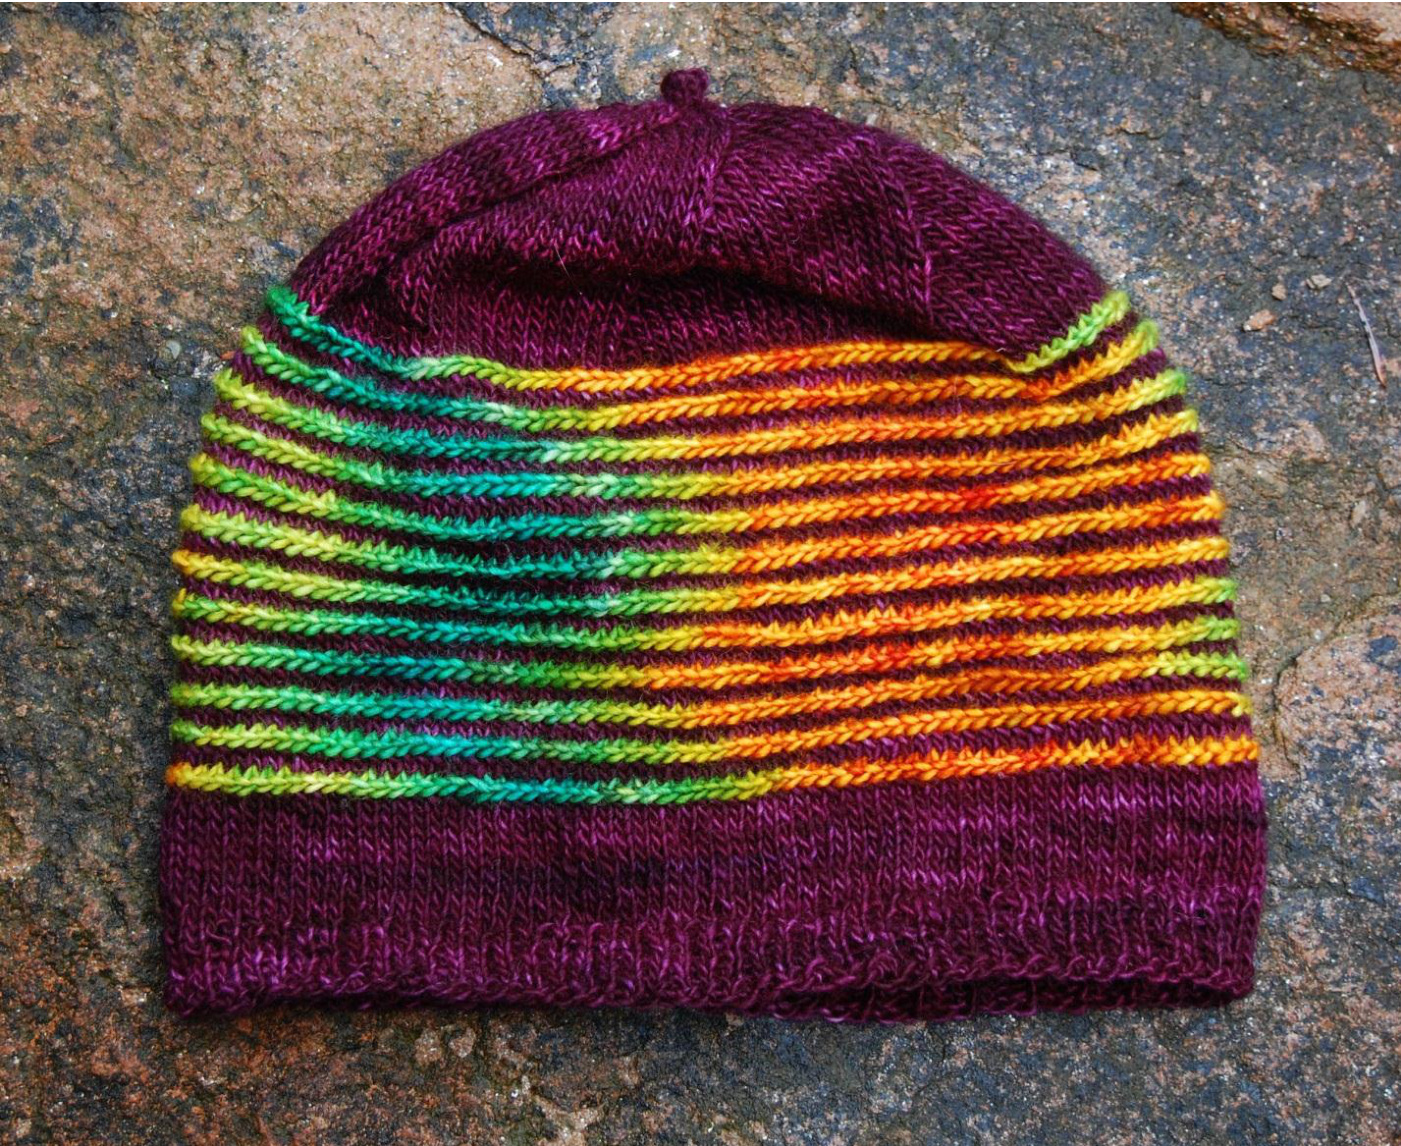
I've always felt that the variegated yarns made by Dragonfly Fibers cry out to be worked in patterns that will pool the color families. When making a hat, this is particularly challenging because head circumference determines your stitch count, and that stitch count may or may not stack up the colors in the way you want. So the trick is to find a stitch pattern that uses up just the right amount of yarn over the right number of stitches. The Horizontal Herringbone Stitch by Barbara Walker has long been one of my favorites, because it creates an attractive, strong horizontal motif. It also happens to eat up just the right amount of yarn to pool the colors as you work around. Using a helix knitting technique allows you to have an uninterrupted flow from beginning to end.
Size
One size. Circumference: 18 inches; Height: 8.5 inches from cast-on to bind off. The hat pictured here comfortably fits me (21"), my husband (23") and our 4 Y0 daughter (20"). The model is a small adult. The pattern can easily be scaled to any number of stitches over any number of rounds, but bear in mind that if you change the stitch count, the colors will pool differently.
Materials
Yarn
Pixie 100% superwash merino single ply, 475 yards to a 4 oz skein. Main color (MC) - solid color, about 2 oz. Contrasting color (CC) - variegated, about 1 oz.
Needles
Needle size: Use US #3/3.25mm in any of the following formats: 1 12" circular needle, or 1 set of US #3/3.25mm DPNs, or 1 36" or 40" circular needle, of appropriate length for magic loop.
Notions
Stitch marker Tapestry needle Measuring tape
Gauge
29 sts/39 rounds = 4 inches in pattern stitch
Pattern Notes
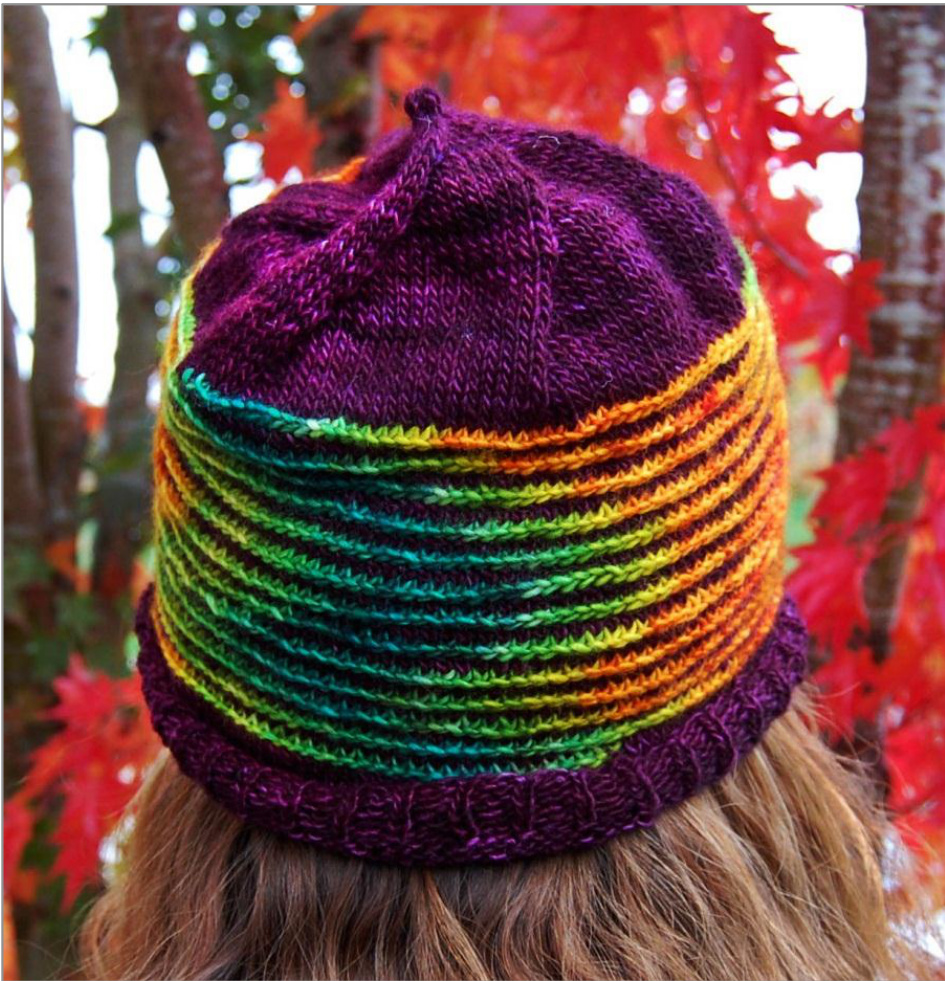
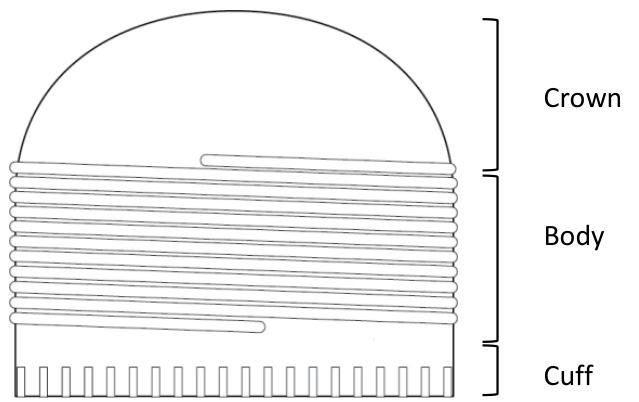
Think of the hat as having 3 sections:
The pattern on the body is what gives this hat its distinctive character. This is the part that combines helix knitting and Barbara Walker's horizontal herringbone stitch.
What's a helix? How do I knit one?
A helix is simply a spiral in 3D; for example, a spring.
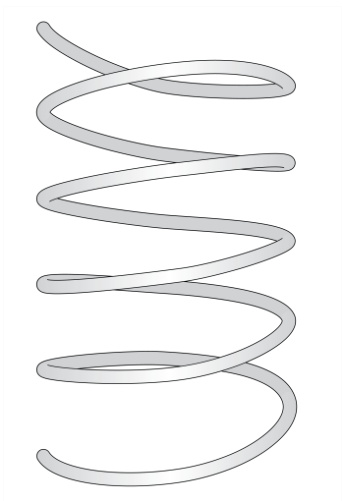
Knitting in the round with a single strand of yarn is technically helix knitting. But in the knitting vernacular, "Helix knitting" typically refers to working with two or more strands.
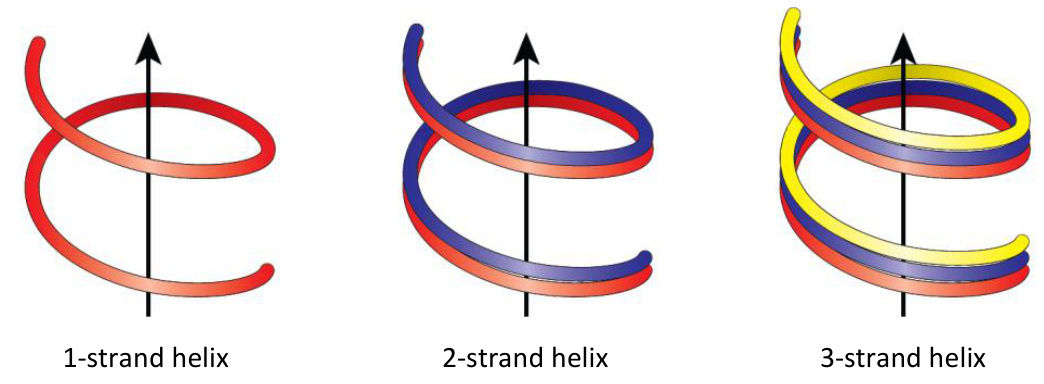
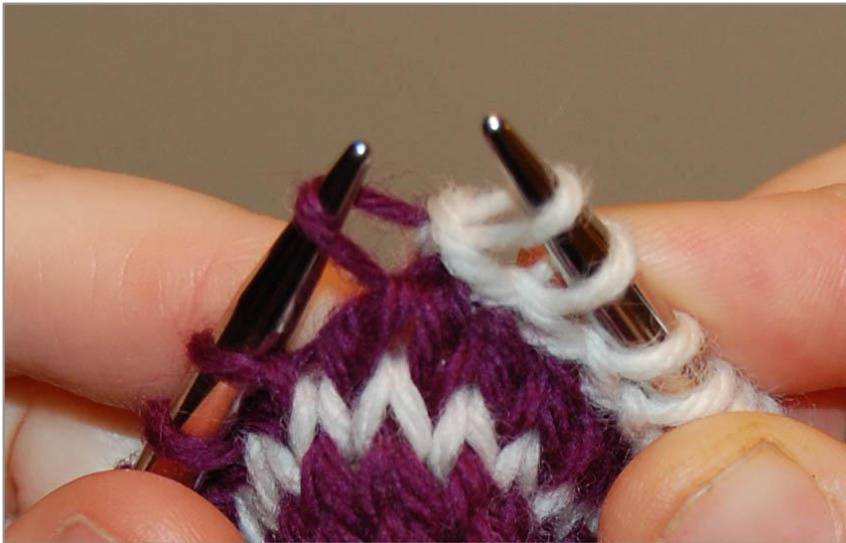
If you are knitting a straight tube without any increases or decreases, helix knitting is very straightforward - at least conceptually. Say you're knitting a 3-strand helix. You knit 1 round with strand #1, then 1 round with strand #2, then 1 round with strand #3, and then repeat these 3 rounds until your tube is the length you want. In practice, however, there are a few pesky issues I encounter when knitting a helix. First, it's easy to accidentally grab the wrong strand, especially if two or more strands are the same color (as is the case with this pattern):
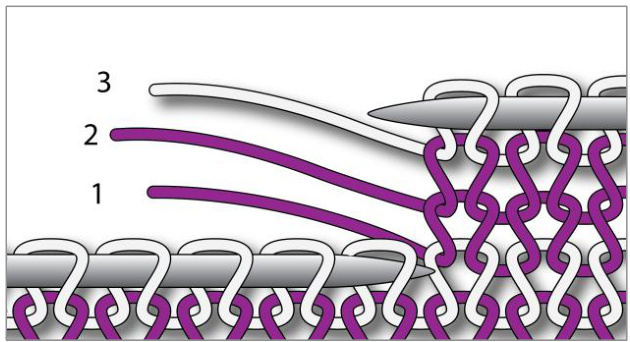
To continue the helix, you would pick up and knit with the bottom strand in the stack (strand #1). In this diagram, you can clearly see which of the2 purple strands is on the bottom. In actual fabric, it can be difficult to tell them apart. Second, it's hard (at least for me) to maintain even tension at the point where I switch strands. Iend up with something that looks like this:
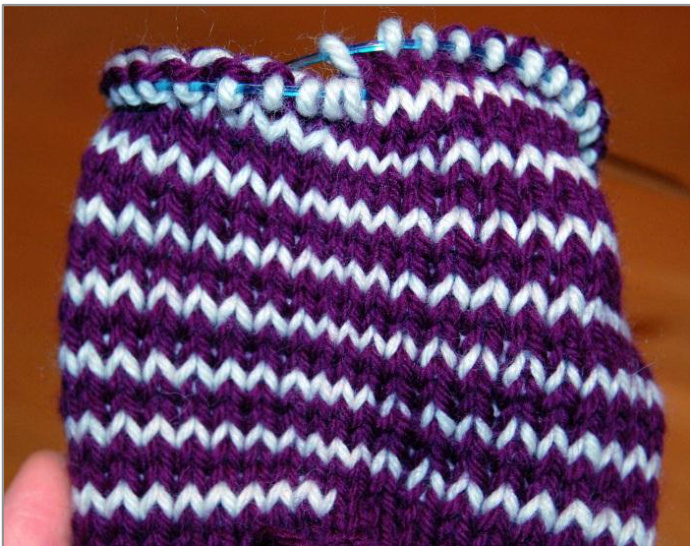
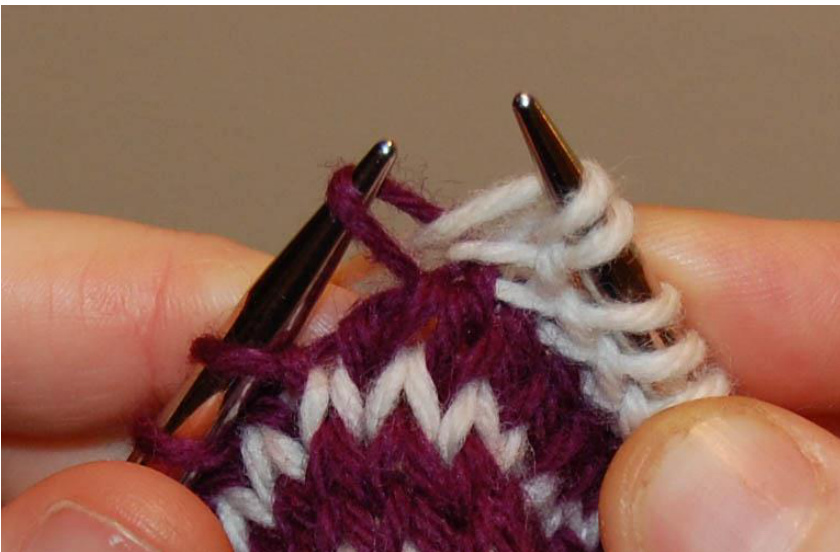
See how the tension changes in the middle of the round? When I'm knitting a helix, this is what I get if I knit a full round with each of my strands. Your mileage mayvary. So I have devised a simple workaround that addresses both of these issues. Each time I work a round, I stop two stitches short of where I started. This makes the strands stack up something like this:
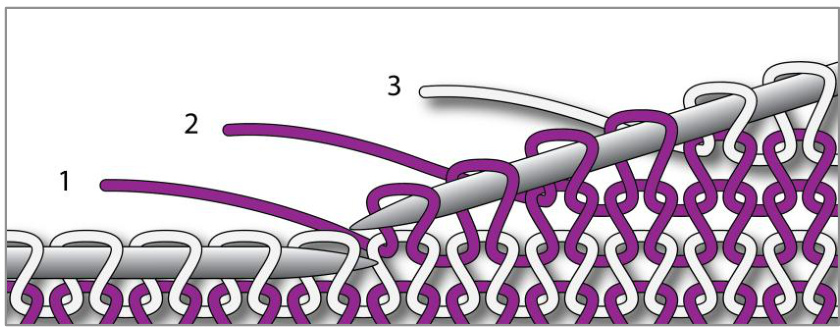
Now that thestrands are not stacked upin a verticalline,it iseasierto discern strand #1fromstrand #2. This method of offsetting the strands by 2 stitches is incorporated into the instructions below. Using it means that the location of your starting point is constantly changing. But if you're working the same pattern continuously around, as you are in this pattern, then this shouldn't matter.
Horizontal Herringbone Stitch
Here are my basic instructions for Barbara Walker's Horizontal Herringbone Stitch: 1. Move last-worked st from R back to L needle without twisting it. Do not pull out R needle once the st has been placed on L needle, but continue straight into step 2... 2. Insert R needle tip into the back of the next st on L needle and k2tog tbl - but don't drop them off the L needle as you normally would. Drop only the first st from this k2tog off the L needle tip. 3.K tbl the remaining st again, then drop it off L needle. This stitch can be very tricky to troubleshoot. I offer you these few tips in case they are helpful: Because each stitch in horizontal herringbone is worked together with the sts on either side of it, flaws cannot be fixed from several rows above. If you see a flaw after you have knitted over it, you must decide between accepting it, or frogging back to its point of origin. When starting a new helix round, always start by slipping the last-worked st in CC from R to L needle (Step 1). When ending a new round, always end with Step 3. It's easy to lose one's place between Steps 2 and 3, especially if there are children, spouses, or other distractions in the knitting environment. So it's very handy to be able to tell the difference at-a-glance.
Here's what it looks like after Step 2. From here, k tbl the next st on L needle.
Here's what it looks like after Step 3, right before you drop the st off the L needle. From here, you'll drop the red st off the L needle and continue to Step 1 (place that CC st onto the L needle and k tbl with the next red stitch).
Pattern
Cast On & Cuff
Cast-on and cuff are worked entirely in MC. Cast on 129 sts using an elastic cast-on of choice. Join sts in the round, taking care that they do not twist around theneedles. Rounds 1-6: [k2, p1] continuously. Rounds 7-18:Knit.
Body: Herringbone Helix
Setup 1: Place marker. Pick up and knit with second strand of MC (we will call this strand “MC2" from here out). Knit to 2 sts before marker; sl last 2 sts. Remove marker. Setup 2: [CC] Pick up strand of CC and k1. Then begin working the Horizontal Herringbone stitch. Repeat Steps 1-3 as outlined above. Work the herringbone in CC until 4 sts from where you started it, then drop CC strand. Round 1: [MC1] Sl 4. Pick up and knit with the MC strand that emerges from this spot. Knit around until 2 before the last CC stitch, then drop strand. Round 2: [MC2] Sl 4. Pick up and knit from the MC strand that emerges from this spot. Knit around until 4 before the last CC stitch, then drop strand. Round 3: [CC] Sl4. Pick up and knit from CC strand. Work herringbone around until 4 before the last CC stitch, then drop strand. Repeat rounds 1-3 until your hat measures about 6" in length from cast-on cuff. This should be about 12 revolutions of the helix.
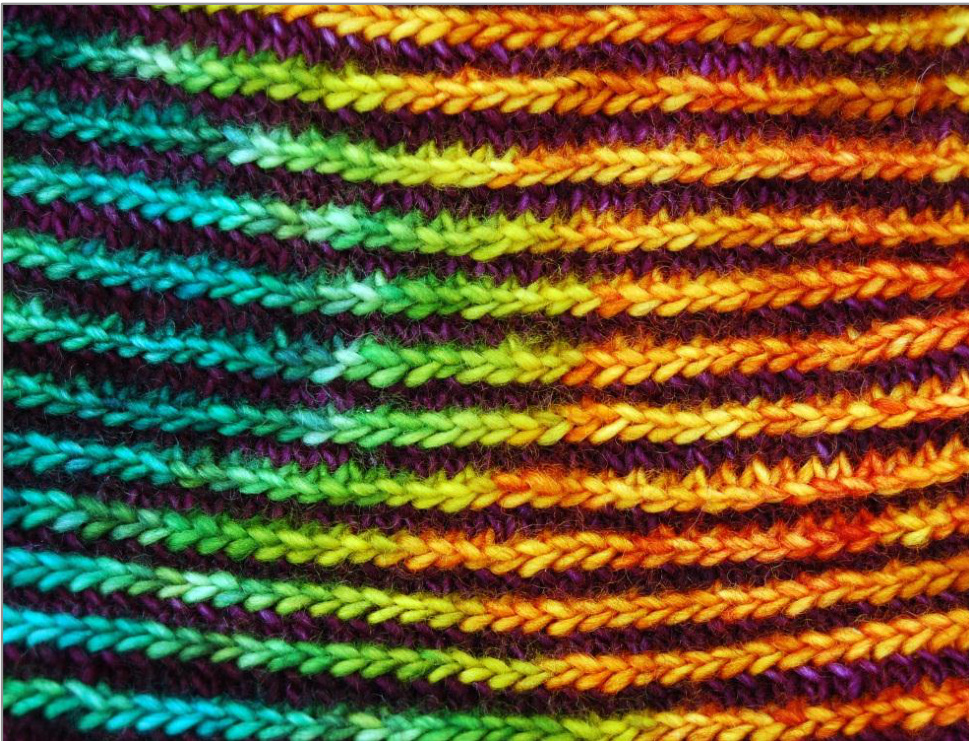
Pictured here is a detail shot of the horizontal herringbone stitch pattern. The pooling reflects the personalityoftheindividual hand-dyed skein. Every hat will pool a little differently. hat reaches the target height, follow these steps to transition back to single-strand knitting IF you want your CC helix to end somewhere other than its present location, then do the following. (This is optional - skip if you are happy with the current end position of the CC helix). 1. Decide on the exact point where you want your helix to end. 2. Sl 4; pick up MC1 and knit to 4 sts beyond your chosen end point. Place marker here. 3. Slip back or forward (whichever is closer) until you reach MC2 strand; knit with MC2 to 2 before marker. 4. Slip back until you reach CC strand; work herringbone stitch in CC to 4 sts before marker. Cut CC strand.Removemarker. Once you are happy with the end point of your CC helix, do the following: 1. [MC1] Sl 4 sts. Pick up MC1 and knit to 2 sts before last CC st, then stop. 2. [MC2] SI 4 sts. Pick up MC2 and knit 10 sts. Cut MC2. 3. [MC] Sl 12 sts back to remaining MC working strand. Pick up and continue knitting around.
Crown: Decrease Shaping
At this point you should have the same stitch count you started with: 129 sts. If you have a few more or a few less, that's ok, but I leave it to you to figure out how to best adjust your stitch count to align with the decrease pattern. Overview: The first shaping round adjusts the stitch count to be a multiple of 6. From there, the crown is shaped by decreasing 6 times every other round over about half the stitches, then decreasing 6 times every round to the end. Row-by-row instructions with stitch counts are listed below. Rounds 1-3: Knit. Round 4: Place marker. [k41, k2tog] 3 times until you reach the marker. (126 sts) Round 5: Knit. Round 6: Slip marker. [k19, k2tog] 6 times until you reach the marker. (120 sts) Repeat rounds 5 and 6, decreasing by 6 sts every other round, until you have decreased down to 60 sts. Round 8: Slip marker. [k18, k2tog] 6 times until you reach the marker. (114 sts) Round 10: Slip marker. [k17, k2tog] 6 times until you reach the marker. (108 sts) Round 12: Slip marker. [k16, k2tog] 6 times until you reach the marker. (102 sts) Round 14: Slip marker. [k15, k2tog] 6 times until you reach the marker. (96 sts) Round 16: Slip marker. [k14, k2tog] 6 times until you reach the marker. (90 sts) Round 18: Slip marker. [k13, k2tog] 6 times until you reach the marker. (84 sts) Round 20: Slip marker. [k12, k2tog] 6 times until you reach the marker. (78 sts) Round 22: Slip marker. [k11, k2tog] 6 times until you reach the marker. (72 sts) Round 24: Slip marker. [k10, k2tog] 6 times until you reach the marker. (66 sts) Round 26: Slip marker. [k9, k2tog] 6 times until you reach the marker. (60 sts) From here to the end of the hat, skip the plain round between the decrease rounds: Round 27: Slip marker. [k8, k2tog] 6 times until you reach the marker. (54 sts) Round 28: Slip marker. [k7, k2tog] 6 times until you reach the marker. (48 sts) Round 29: Slip marker. [k6, k2tog] 6 times until you reach the marker. (42 sts) Round 30: Slip marker. [k5, k2tog] 6 times until you reach the marker. (36 sts) Round 31: Slip marker. [k4, k2tog] 6 times until you reach the marker. (30 sts) Round 32: Slip marker. [k3, k2tog] 6 times until you reach the marker. (24 sts) Round 33: Slip marker. [k2, k2tog] 6 times until you reach the marker. (18 sts) Round 34: Slip marker. [k1, k2tog] 6 times until you reach the marker. (12 sts) Round 35: Slip marker. [k2tog] 6 times until you reach the marker. (6 sts)
Bindoff & Finishing
Work 2 rounds, then cut working yarn. Kitchener remaining sts together (or simply draw the tail through the remaining 6 sts). Weave all ends in (there should be 6 ends).
Appendix: Reverse Engineering
If you prefer to knit your hat crown-down, this is an easy reversal.
Cast-on & crown
1. Cast on 6 sts; join in the round and work for 2 rounds. 2. [k1, increase 1] 6 times. 3. [k2, increase 1] 6 times. Note that I am deliberately not specifying what increase to use. This is entirely up to you. Continue to increase 6 times every row, adding another stitch between the increases with each round, until you have 60 sts. Then, knit a plain round between each increase round until you have 126 sts. End with a plain round. Last increase round: [k42, increase 1] 3 times. Knit 3 rounds.
Body (Helix)
Follow the exact same instructions in the section above for starting, working, and ending the helix.
Cuff & Bindoff
After you transition out of the helix, work 12 rounds in plain stockinette. Work 6 rounds in [k2, p1] ribbing. Bind off with method of choice.
About the Designer

I am hopelessly curious about how things work and how people think. This curiosity has served me well in my career as a usability researcher in the high tech sector, as well as in my hobbies which generally all have to do with making functional items of one kind or another. I've had several patterns and articles published in knitty, and I run a blog at www.curiousknitter.com. Come and visit me there!