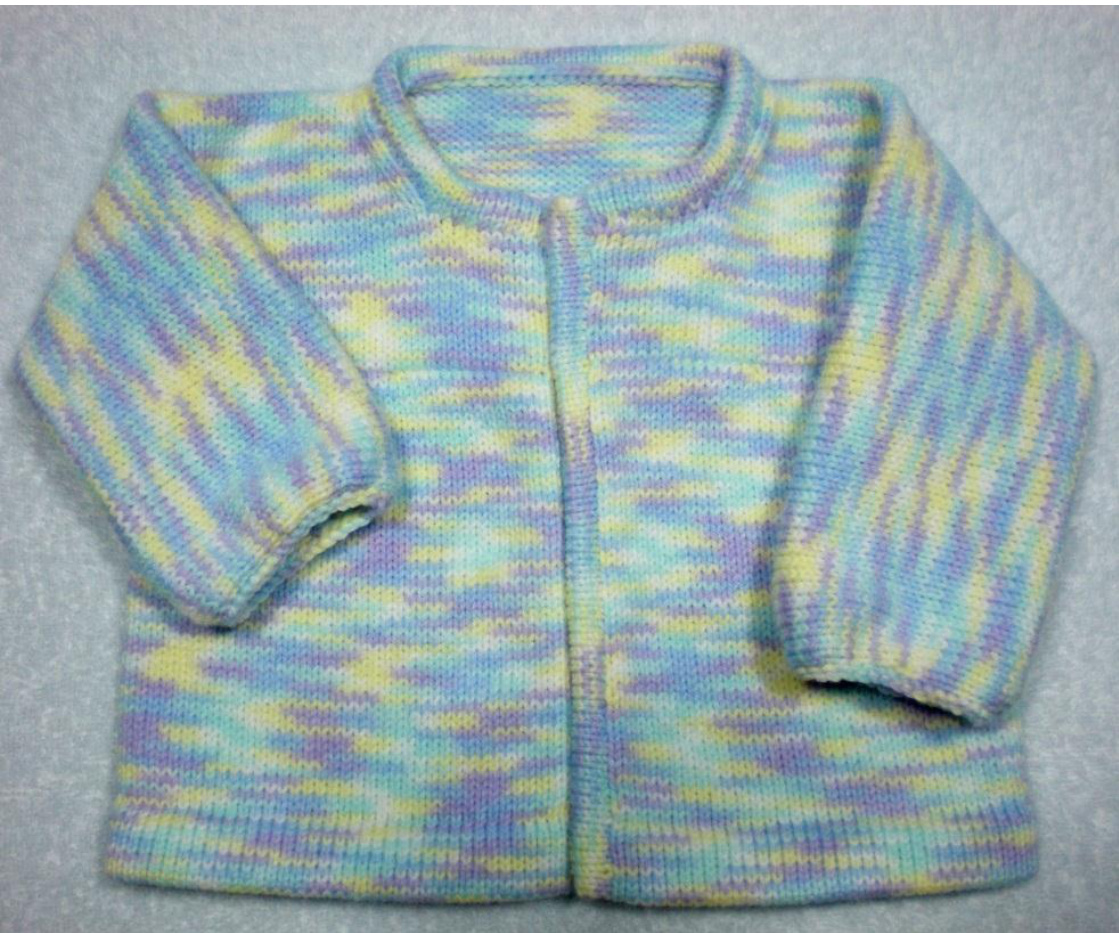
BABY KIMONO for the 4.5mm Standard Knitting Machine
Jane Niemi for the Midwest Machine Knitters’ Collaborative Service Projects
Baby Kimono Standard 4.5mm
Yarn suggestions: 4 - 5 ounces of Patons Beehive Baby Sport; Bernat Baby Jacquard, Bernat Softee Baby; Lion Baby Soft; Sensation Cuddle or Cuddle Muffin, or any similar yarn. This pattern is for standard machines based on an average gauge of 6.82 stitches and 9 rows per inch, at Tension 10 on a 4.5mm machine; stitches and rows may have been adjusted up or down to facilitate knitting. Please note that all the mentioned yarns may not knit to this gauge and may knit with more ease on some machines than on others. However with the same stitches and rows mentioned you should still have a very nice kimono to donate to charity. Your charitable donations are needed and appreciated.Thankyou! r to page 4 for alternate beginnings, trims & directions for double marker row Hem and Body: Carriage on the right: Bring 150 (L75-0-R75) needles into working position, and bring every other needle all the way out; e-wrap onto these needles. Hang cast on comb. T 8: Knit 1 row to the left, and then carefully pull all stitches all the way out again and knit back to the right. Knit to RC 9. T10: Knit 1 row for a turning row. T 9: Knit to RC 20. Remove the cast on comb and weights; from the cast on, pick up the loops and hang onto every other needle; pull all needles all the way out, re-hang the weights. T 10: Knit 1 row to enclose the hem and continue knitting to RC 74, ending with the carriage on the right. Yoke and Sleeves: Note to move the carriage from one side of the needle bed to the other: physically remove the carriage and replace it at the other end of the needle bed; or pass the carriage across the work using part and/or hold buttons - refer to your manual please. RC 000: Put all stitches to hold except 40 stitches (L75-L36) on the left (opposite side of the carriage). Move carriage to the left side and set it to hold; knit 6 rows with scrap yarn of contrast color, 1 row with ravel cord, or fishing line, and 6 rows with scrap yarn and leave the scrap yarn on the needles. Move the carriage back to the right side, remove from hold, thread with the main yarn, and knit 1 row to the left over all the stitches including those with the scrap yarn. Put all stitches to hold, except 40 stitches (R36-R75) on the right (opposite side of the carriage). Move carriage to the right side and set it to hold, and knit 6 rows with scrap yarn of contrast color, 1 row with ravel cord, or fishing line, and 6 rows with scrap yarn and leave the scrap yarn on the needles. Move the carriage back to the left side, remove from hold, thread with the main yarn, and knit 1 row to the right over all the stitches including those with the scrap yarn. RC 2 (adjust the row counter to RC 2): Knit the back sleeve and back yoke section to RC 36. Mark each side at this point to indicate the center of the sleeves. Keeping the center 30 stitches in work put all other stitches into hold position. Neck Shaping, Bodice and Sleeves: Center 30 neck stitches: Scrap off the center 30 stitches for the back neck and drop from the needles, or off center neck stitches with a separate piece of yarn, for a crochet trim later. Put the empty needles out of work. Carriage on the right, set the carriage to hold, and carefully put the stitches on the right side of the machine into work position, to allow them to knit. ng on one side of the garment have weight on only the side you are working RC O: Shape front neck - knit 5 rows straight. Use a 2 or 3 prong tool for a full fashion increase, on the neck edge, increase 1 stitch on the following rows: RC 5, 8, 11, 14. RC 17: e-wrap 11 stitches to 0. Carefully put these needles into work position and knit across. Either add weight at this point or watch carefully for a few rows to make sure they knit, then add weight. Continue knitting the front sleeve and front bodice section to RC 36. Cut the main yarn 5 times the length of the needles in work to use later to latch tool bind off 75 stitches. Scrap off and drop from the machine. Repeat for the other side, reversing the neck shaping and knit to RC 36 for the left sleeve and front bodice section, scrap off, leaving a tail of main yarn 5 times the length of the needles in work. Pull the ravel cord from the scrap yarn and separate the sleeves from the bacl Cuffs: do this before continuing. You willbe picking up a selvedge and double up to gather in; the first row of knitting may be difficult and you may have to hand knit it. Hang the sleeve, purl side toward you, doubling up stitches to 36 stitches tota 1. Carefully knit 1 row and bind off with a double strand of yarn; or 2. Carefully knit 1 row and remove onto scrap to trim with crochet Refer to Schematic on page 5, to origami the kimono together as follows: With purl side facing you, (garment inside out) on the first section knit, fold the front sections, B-1 & C-1 in toward the center, the front edges meeting. Next, fold the last section knit down from the neck and shoulder so all the scrap sections meet. Hang A & B, (sleeve and bodice) right side facing you, onto 75 needles. With right sides facing each other, hang A-1 & B-1, remembering that B-1 will be gathered by doubling up 5 stitches to fit to the bodice. Double up the 36th stitch from the front edge to close the underarm gap (3 stitches on this needle). For a more pleated look, double up the 15th, 16"h, 17th, & 18th stitches from the front edge, having 3 stitches on those 4 needles. For a less pleated look, double up the 15, 20", 25", & 30" stitches from the front edge, again 3 stitches on those needles. Bind off with the yarn piece you left long. Repeat with C & D to C-1 & D-1. Neck and Front Band Trim: Double Strand Bind Off: Neck Trim: hang, purl side toward you, the neck edge, from one front neck edge to the other front neck edge onto 76 needles. You will be picking up raw stitches from the back neck and selvedge stitches around the neck to the front section of increases and e-wraps on the front neck. Knit 1 row and latch tool bind off with a double strand of yarn. Front Bands: do as above for both front bands, picking up the selvedge along the front edges, making sure to pick up the same number of stitches for each front.
Stockinette Bands:
Neck Trim: hang, purl side toward you as above, all of the neck stitches onto 76 needles. Knit a double marker row at T9. See page 5 for directions for double marker row. Knit 5 rows at T 9; 1 row at T 10 for a turning row; or transfer every other stitch to its neighbor, for a picot, keeping the empty needles in work, knit 1 row at T 9 and continue as follows: Knit 5 rows at T 8. Pick up the up and down loops from the double marker rows, knit 1 row and bind off. Front Bands: do as above for both front bands, picking up the selvedge along the front edges, making sure to pick up the same number of stitches for each front.
Crochet:
Do a simple crochet from one front edge up and around the neck and down to the other front edge. Hide all ends, lightly block and sew snaps onto the front edge bodice pieces. Use your imagination and skills to embellish.
Beginning Hem Options:
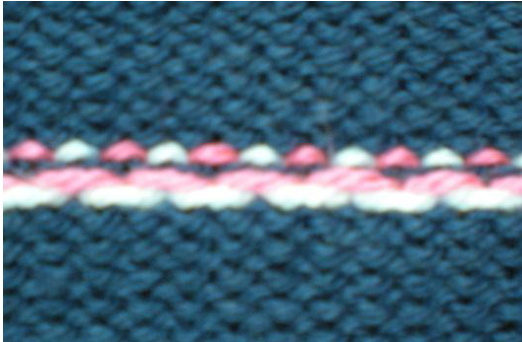
Option 1 Double Stranded Cast On: Carriage on the right T 9: Bring 150 (L75-0-R75) needles all the way out and e-wrap with two strands of yarn. Cut the second strand and knit throughout with one strand. Knit 1 row to the left, and then carefully pull all stitches all the way out again and knit back to the right. Knit to RC 64, ending with the carriage on the right. Continue directions from RC 000 where you knit the scrap yarn for the sleeve section. Option II Picot Hem: Carriage on the right T 8: Bring 150 (L75-0-R75) needles into working position, and bring every other needle all the way out; e-wrap onto these needles. Hang cast on comb. T 8 Knit 1 row to the left, and then carefully pull all stitches all the way out again and knit back to the right. Knit to RC 9 transfer every other stitch to its neighbor, keeping the empty needles in work for a picot trim. T 9 Knit to RC 20. Remove the weights, and pick up the loops from the cast on and hang onto every other needle; pull all needles all the way out, re-hang the weights, and knit 1 row to enclose the hem. Double Marker Row: use this for stockinette hems for the neck and front bands This technique is two passes of the carriage, resulting in 1 row knit on alternate needles. Put every other needle to hold position, and set the carriage to hold. Knit 1 row. The needles in work position knit, those in hold did not. Remove the carriage from hold and set to part or slip. Knit 1 row. The needles that were in work position did not knit, but those in hold did, resulting in one row knit on each stitch. You will see upward (white in photo) and downward (pink in photo) loops that will be easier to pick up to enclose a hem.
By Jane Niemi, Midwest Machine Knitters Collaborative Service Projects
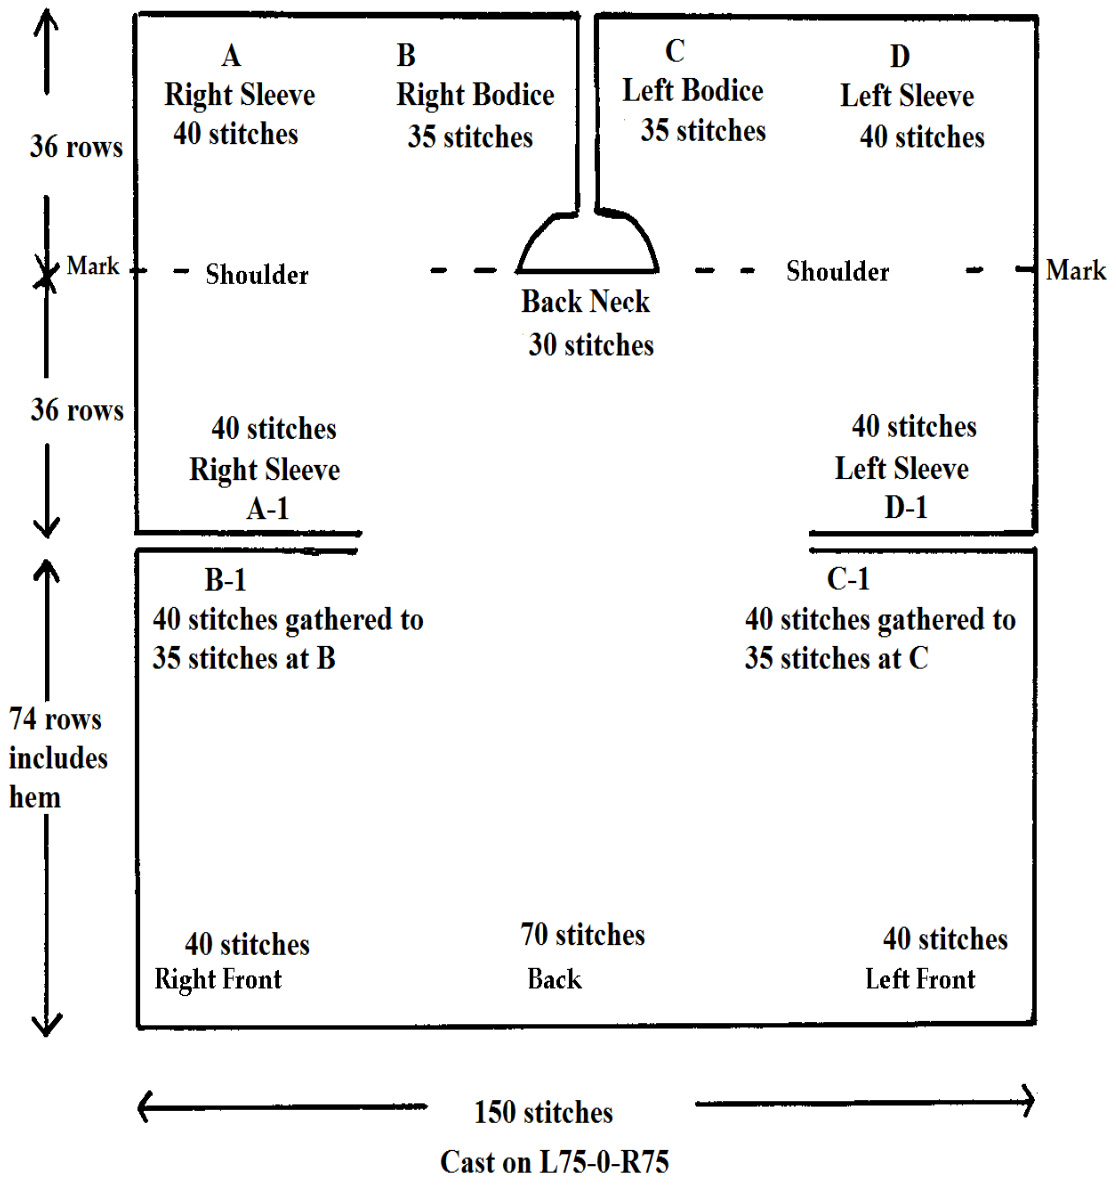
Baby Kimono Schematic
Standard 4.5mm