
Broken Chocolate Bar Socks \*a sock recipe\*
Once upon a time I tried to make some chocolate bar socks. I had the perfect yarn, and I actually measured a Hershey bar to make the blocks the right size and shape. (Yes I am that person). But it did not work out as I envisioned. I felt thwarted and dejected. But one fine day I was thumbing through one of those stitch-pattern-aday- type dealie-bobs and I saw it. It was perfect - it was simple, but interesting. And it looked like broken bars of chocolate. The best part is that it's only a 3-stitch pattern. So you can make socks of any size or shape. SoI decided to do something different. Instead of telling you how many to cast-on and exactly when to do A, B, and C- you get to decide. This is a recipe, not a pattern.
Since this is a recipe, I'm not giving you set numbers for the cast-on and the like. You will pick that. If you have socks you've made in the past you will know some numbers for yourself. For example the average size 8 footed gal can do 64 sts on size one or so needles. This is a 3-st repeat so you will want to do 63 or 66. But more on that later. So grab some yarn, grab some appropriate needles (dpns or circs for magic loop or however you like to work) and grab one solitary removable stitch marker and a tapestry needle. That is all you need. That and a bit of free time. But this is an on the go pattern, one you can take anywhere - it's simple to memorize and easy to keep track of. Bon appétit!
Ingredients Used - Yours will vary:
Claudia Handpaints Fingering Yarn, 2 skeins, Chocolate Colorway (50 grams, 175 yards) Size One $40^{\prime\prime}$ Addi Circular Needles (2.5mm) One removable stitch marker Tapestry Needle
Abbreviations/Stitch Dictionary:
k-knit p-purl st - stitch rnd- round sl- slip k2tog- knit 2 stitches together p2tog - purl 2 stitches together ssk- slip, slip, knit - Slip two stitches knitwise one at a time to the right needle. Insert the left needle into the front of the stitches and then knit the 2 stitches together.
Getting Ready to Cook
How many stitches will you cast on?I don't know. There is one rule and one rule only, your cast-on number has to be divisible by three. Three is the magic number. Yes it is. It's the magic number. I cast on 72 sts. Ihave size 10 wide boat-type feet. You may want to use sport or dk weight. Maybe you willonly cast on 48 or 60 sts. Pick a number that is divisible by three that works for your yarn and your needles and most importantly your feet. For fingering weight you willprobably want at least 54 sts for tiny feet - sport or dk or worsted and you can go Smaller. If you don't know how many to cast on look at other socks you have knitted. You should see a trend. Pick the number closest that is divisible by three. These socks are pretty stretchy so if in doubt, go down in numbers. Use a calculator if you need to. No shame here. Note: If this is your very first pair of socks you can e-mail me at corrina@picnicknits.com and I willhelp you pick a cast on number. Um, but this is not a traditional sock pattern. But good on you for being adventurous! So you have your ingredients, you know your cast-on number, right? Let's cook! Cast on YOUR NUMBER of sts. Join to work in the round, being careful not to twist.If you are working magic loop, divide the sts roughly in half.If on dpns, divide them roughly into four. Don't worry about perfect - this stitch repeat is that easy. We'll rearrange the sts for the heel later.
Ribbing
Work 12 rounds of ribbing in this pattern: k1, p1, $\ast_{\mathsf{k}2}$ ${\mathsf{p}}1^{*}$ , repeat from \* to \* till end of rnd, end k1. Work one final round in this pattern: p1, k1, $\ast_{\mathsf{p}2}$ $k1^{*}$ , repeat from \* to \* tillend of rnd, end p1.
Broken Chocolate Bar Recipe
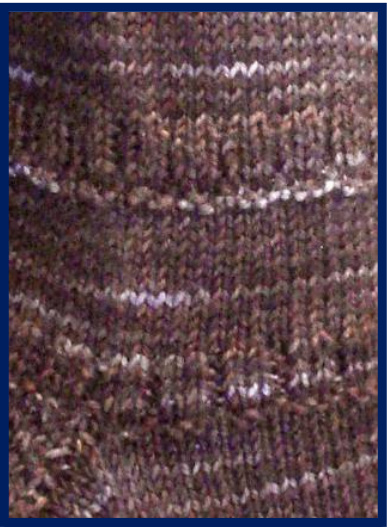
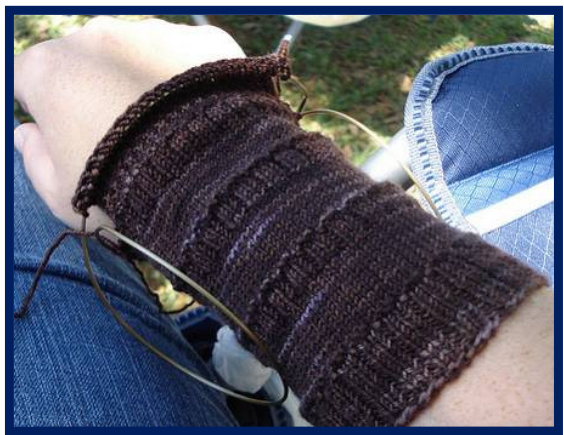
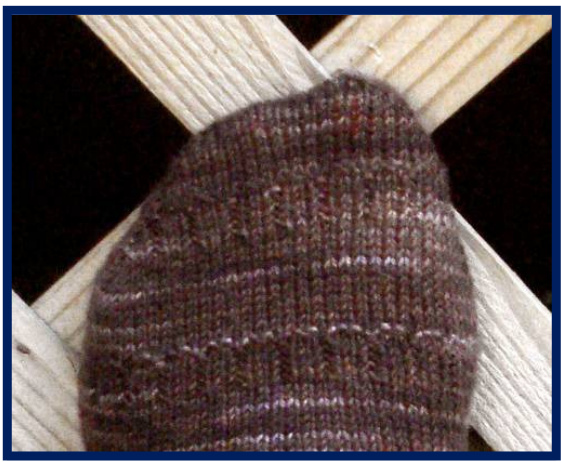
Work the 18 round broken chocolate bar pattern until leg is however long you want it to be! Generally I recommend 6 inches or more. If you make longer socks, you willneed more of your main ingredient - yarn. Forewarned means your socks won't turn into frogged spaghetti! I like to end with the last rnd (rnd 18) because it makes it easier for me to remember after I work the heel. Rnds 1-12: k all sts Rnds 13-17: k1, p1, $^{*}{\mathsf k}2,\,{\mathsf p}{\mathsf1}^{*}$ , repeat from \* to \* till end of rnd, end k1 Rnd 18: p1, k1, $\star_{\mathsf{p}2,\,\mathsf{k}1^{*}}$ , repeat from \* to \* tillend of rnd, end p1 Yes you read that right. Yes it is that easy. It stillooks pretty darn cute, doesn't it? To recap, you work 12 knit rounds, you work 5 rounds of ribbing, and one round of "reverse" ribbing. Easy peasy lemon squeezy.
Heel Prep Work!
Before starting the heelflap, stitches must be rearranged. If you are working on magic loop or two circs, you just put the heelflap stitches on one side of the needle(s).If you are working on dpns, you need to put all of the heel sts on one dpn so that you can work the heel flap back and forth. How many sts for the heel flap? That's an awfully personal question. For myself, I usually do half the sts as the heel. And for me, having worked 72 sts total, 36 sts is perfect and I can easily divide both halves by 3. So what's the answer for you? You want the instep stitches AND the heel stitches to be divisible by three. For example, if you had 63 sts, you would have 33 sts for the instep and 30 sts for the heel. So if your cast-on number was even, you can just divide your sts in half. If your cast-on number was odd, arrange things so that your heel has 3 less sts than your instep. Oh and hey - keep your beginning of round in the same place. We don't want to monkey around with tradition! (Yet).
Eye of Partridge Heel Flap
So you're ready to work the heel flap - and here it is! Row 1: $\bf{\ast}_{S l1}$ , $k1^{*}$ repeat from \* to \* end of row Row 2: Sl1, p to end Row 3: Sl1, k1, $^{\ast}\mathrm{k}1$ , $s|1^{*}$ repeat from \* to \* till 1 st remains, end k1 Row 4: Sl1, p to end Hmmm, how many times should you work these rows? For 36 sts I usually work around 31 rows. If you are doing 30 sts I might recommend around 27 rows or so. The only "rule" for this part of the recipe is that you end with an odd (right-side row). Because the heel turn is written to start with a purl row.
Again with the prep work - this fime the heel furn!
Ok people, now you need your removable stitch marker. If you have an even number of sts on your heel, just place it in the center.If you have an odd number of sts mark the center st. In the instructions below when it says "to the marker" if you have an odd st count make sure you work the actual center st. Capiche?
Heel Turn
Row 1: Sl1, p to the marker, p2, p2tog, p1 Row 2: Sl1, k to the marker, k2, ssk, k1 Row 1: Sl1, p to the marker, p to one st before the gap, p2tog, p1 Row 2: Sl1, k to the marker, k to one st before the gap, ssk, k1 Continue inthis manner, working untilonest beforethe gap,and thenclosing the gap withadecrease, and then working one more stitch, until all sts have been worked.
Pick Up Stitches
If you are using dpns, move half (give or take one st to a spare needle. Use the dpn holding the working yarnto pick up sts on the first half of the heelflap. Making sure the right side of work is facing you, pick up and knit sts along the side of the heel. If you are using magic loop you will just continue using the same needle half that you are working with for the heel flap. The slipped sts will make it easy to see where to pick up stitches from. If your heel flap was 30 rows, you should have 15 slipped sts to pick up - half as many slips as rows. Basically you will pick up one st for each slipped st of the heel flap, and I \*always\* pick up one extra st in the corner of the gusset to avoid a hole. Switching to the instep sts, work in pattern as established. Pick up and knit the same number of sts along the other side of the heel. On dpns use the spare to pick up the sts and knit the other half of the heel sts right onto that same needle. On magic loop, move these sts to the bottom needle half. The instep stitches will rest on the top needle half, and the bottom/gusset stitches willrest on the bottom needle half. Work around (in pattern as established) until ready to work the bottom stitches, and then begin the gusset decreases. This is the new beginning of the round. Notice that as work the instep it will be using the exact same pattern as before. Start with k1, end with k1. That way your pattern is balance and you don't end up with purls on one side that are not mirrored on the other.
Gusset Decrease Rounds
MagicLoopStyle: Rnd 1: k1, ssk, kto 3 sts remaining on bottom needle half, k2tog, k1, knit instep in pattern. Rnd 2: Knit all sts on bottom needle half, knit instep in pattern. DPNStyle: Rnd 1: k1, sk, k all sts on $1^{\mathrm{{st}}}$ needle, kto3 sts remaining on 2nd needle, k2tog, k1, knit instep in patter. Rnd 2: Knit all sts on sole needles, knit instep in pattern. Repeat these 2 rnds until you are back to your original st count. Important:If you have an odd number of sts on your instep, work one extra decrease if necessary to get an odd number on your sole as well. This makes toe decreaseseasier. Continue to work in the round, keeping the instep stitches in pattern, and the sole stitches knit plain until the sock is 1.5 inches shorter than the length of the foot.
Final Prep-Work Session - for the toe!
So let's say you have more sts on the instep than on the sole. We need to fixthat before we can go any further. If they are the same, you are ahead of the game. Ease on down the road to the toe decrease rounds section. If you have 4 more sts on top than on bottom, then work this decrease rnd twice: on the instep needles work a k1, sk, kto 3 sts before the end of the instep, k2tog, k1. Knit the sole sts plain. Now you're ready to keep going.
Toe Decrease Rounds
I opted to keep the pattern going all the way down the foot. So I did the k sts of the instep in pattern. You can do whatever you want. This is a sock recipe, not an edict! But hey, this leads me to a very important thing. Nearly all sock recipes can do with a bit of tweaking. So don't be afraid to make sock recipes your own. Change the heel, do a different toe, make it yours! Presumably they are going on your feet. And your feet are special. Ok, I'm stretching it there. But the point is you are going to find styles and pieces of sock patterns that make you happy - they will be more fun to work - or they will fit your very cute tootsies better. Don't be afraid to mix and match!
Magic Loop Style:
Rnd 1: $\ast_{\mathsf{k}1}$ ssk, kto 3 sts remaining on needle half, k2tog, $k1^{*}$ , repeat from \* to \* on other needle half. Rnd 2: Knit all sts
DPN Style:
Rnd 1: $\ast_{\mathsf{k}1}$ ss, toendof needle,t3sts rmainngnneedle, , $k1^{*}$ , repeat from \* to \* on $3^{\mathsf{r d}}$ and $4^{\mathrm{th}}$ needles. Dd 2. Vni+ -ll c+c Repeat these 2 rnds until you have approximately half of your original st count. It doesn't have to be perfect; if you started with 63 sts you might work them until you have 30 sts. Then work the first decrease round (round 1) every single round until you have about a fourth of your original st count. If you are using fingering weight yarn you should have 20 or less sts total. If you are using heavier weight yarns you might only want 12-16 sts total. Make sure you have the same number of sts on the instep portion of the toe and the sole portion of the toe. Graft the top and bottom stitches together using the kitchener stitch. Weave in ends.
Bonus Recipe: Buckeyes
Now that you've finished your lovely broken chocolate bar socks, how's about a delicious chocolate candy recipe?
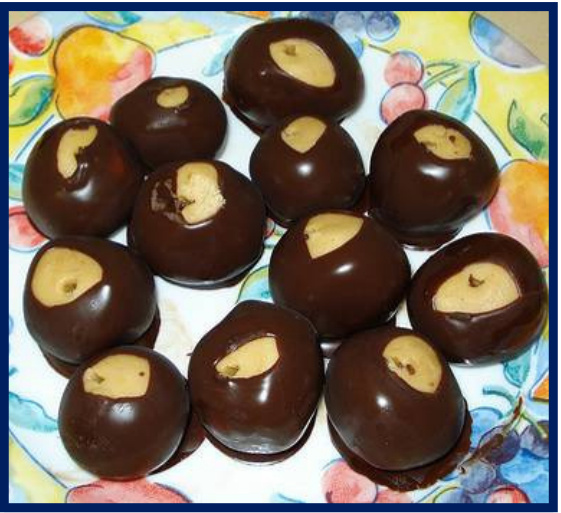
1 c. melted butter 1.5 Ibs. confectionary sugar 1 tsp. vanilla 2 c. peanut butter Notes - Do not get fancy, natural peanut butter. Cheaper peanut butter makes better buckeyes. I have tested this theory. ·12 oz. semi-sweet chocolate chips 1/2 bar of paraffin wax Mix melted butter, peanut butter, vanill, and sugar in a large bowl. You will probably have to use your hands for this. Form into 1 inch balls and refrigerate for at least 20 minutes - Ilike to do about an hour in the fridge. Using a double boiler, slowly melt together the wax and the chocolate. Line a cookie sheet or two with wax paper. When the balls are hard, use a toothpick (ora plastic fork with albut one tine broken off)to dip the balls in chocolate, twirling to let the excess drip off. Place on wax papered cookie sheets. Refrigerate until firm.


