Please Read Before Knitting
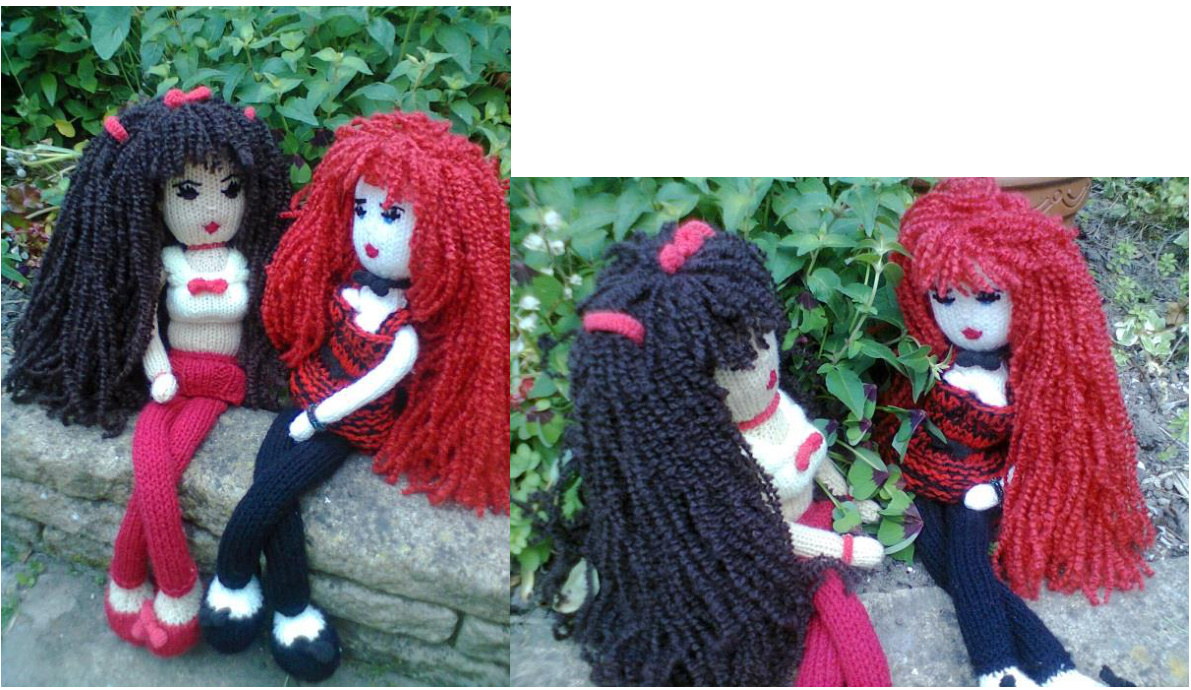
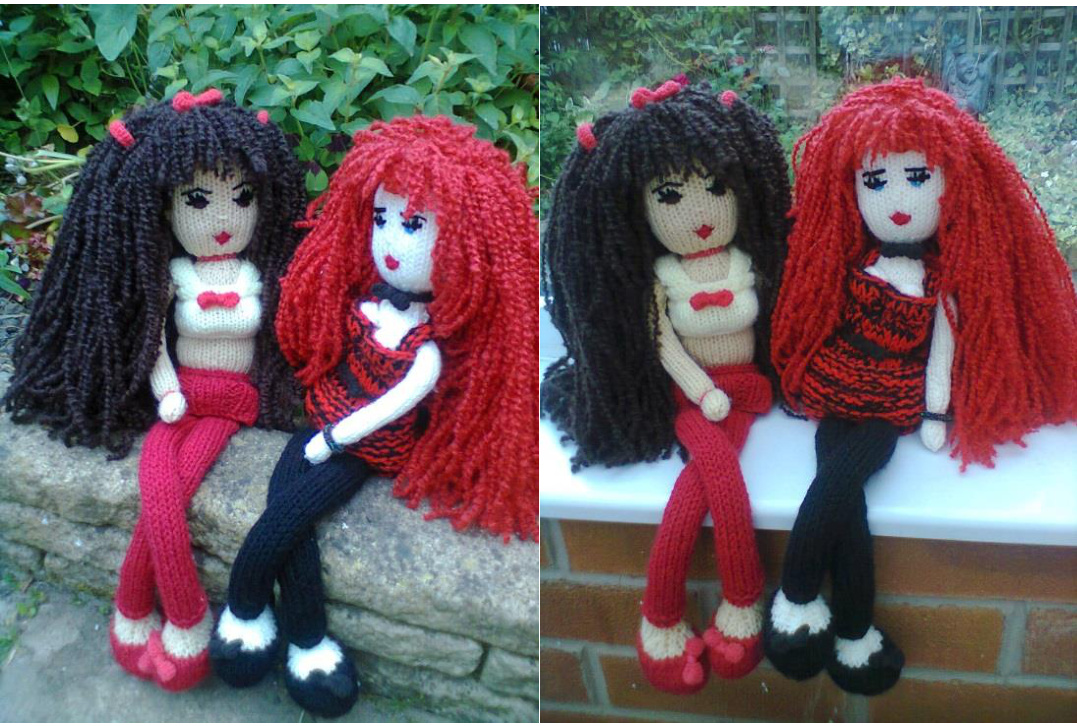
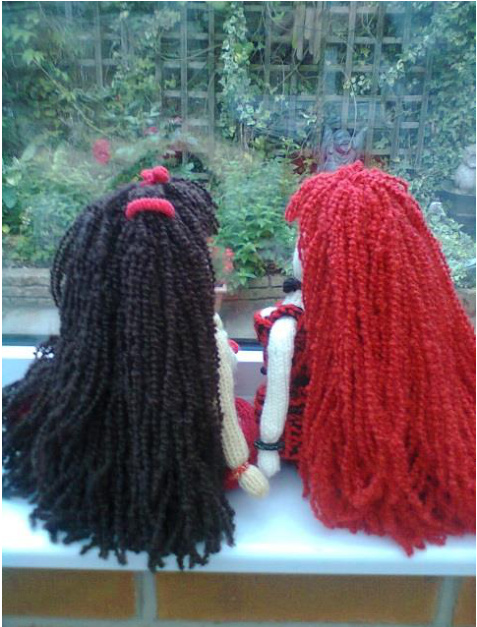
This knitted doll has lots of hair, so the head and body needs support or the doll will flop. The support used is a jumbo straw. The straw is put inside the dolls head and body and then surrounded by the toy stuffing. This is just a precaution, but if this doll is being knitted for a small child then the straw needs to be omitted. Also any accessories, such as beads, jewellery, hair bobbles or clips etc., anything in fact that the child could choke on. The main focus on the doll is the hair, lots of it! The hair that can be styled in many different ways, bunches, plaits, ponytail etc. with hair slides, bobbles and ribbons added. The hair can also be cut shorter or layered. If this doll is for an older child, teenager or adult, they could be shown how to add the hair, instructions on how to do this are given in the pattern. Hair can be added, or taken away and replaced again with long hair. Different colours can also be added. The possibilities are endless. The main focus on the doll, as mentioned above, is the hair, not dressing and undressing the doll. She also has long legs, and is designed to sit on window sills, shelves etc.
Abbreviations and Instructions
cast on cast off ws = wrong side rs = right side k = knit p = purl st(s) = stitch(es) kfb = knit in front and back of stitch (this increases a stitch) k2tog = knit 2 stitches together to make one stitch ss = stocking stitch (knit a row, purl a row) gs = garter stitch (knit all rows) The dolls on the photos have the same basic head and body pattern. The pattern below is for Joanne, brown haired doll, any colour difference for Scarlet, Red haired doll, is given in brackets. A few of the photos with the instructions are taken from a variety of my knitted dolls, as some photos are clearer than others. The colours may be different but the instructions are exactly the same. Joanne's and Scarlet's clothing is given at the end of the pattern. Finished length of doll is approx. 45cms (18 inches), sitting position approx. 22cms (9 inches)
Materials used for Joanne
Yarn and Toy Stuffing used for Both Dolls is only Approximate Yarn used:- Double Knitting Yarn (DK) also known as Light Worsted and 8ply This is used throughout the pattern (apart from the hair, see below) rn used for the hair:- Sirdar Persia Chunky Yarn - Shade 0401 - Brown 50grams to 100grams or Brown Double Knit yarn (yarn used depends on how thick you would like the hair to be) Lemon - 7 grams - for the top Red - 20 grams - for shoes, leggings, pants, skirt and mouth Skin coloured - (For this doll I used a Light Beige coloured yarn) - 20 grams Black and Brown - Tiny amount - for eyes Toy Stuffing - 40 grams Knitting needles - 3mm (USA 2) 4mm (USA 6) Crochet hook - 3.50mm (USA E/4) for attaching the hair Tapestry needle Jumbo straw - “bendy' bit cut off Nine Red very small hair bobbles (optional) - for hair, top and shoes necklace and bangles. Materials used for Scarlet Yarn used:- Double Knitting Yarn (DK) also known as Light Worsted and 8ply This is used throughout the pattern (apart from the hair, see below) Yarn used for the hair:- Sirdar Persia Chunky Yarn - Shade 399 - Empire Red 50grams to 100grams or Red Double Knit yarn (yarn used depends on how thick you would like the hair to be) Skin coloured yarn - 20 grams - for this doll I have used a light cream yarn Red - 15 grams - dress and mouth Black - 35 grams - Dress leggings, shoes and eyes Toy stuffing - 40 grams Knitting needles - 3mm (USA 2) 4mm (USA 6) 6mm (USA 10) Tapestry needle Jumbo straw - “bendy' bit cut off Eight Black very small hair bobbles (optional) - for hair, neck choker, dre bangles and shoes Copyright @ 2013 Linda Howard
Joanne and Scarlet
Shoes (make two the same)
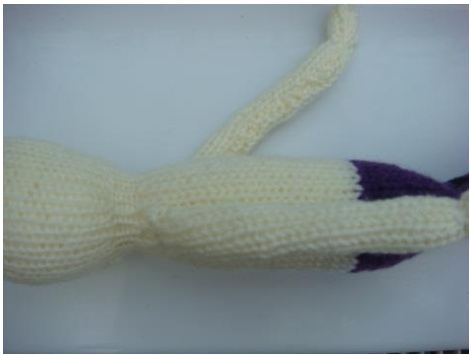
using 4mm needles (US 6) and Red yarn (Black) cast on (18sts) row 1: p row 2: k1, kfb in next 16sts, k1 (34sts) row 3: p row 4 - 7: ss for 4 rows row 8 - 9: gs for 2 rows Skin change to 3mm needles (US 3) and Skin coloured yarn row 10: k5, k2tog 12x, k5 (22sts) row 11: p row 12: k5, k2tog 6x, k5 (16sts) row 13: p row 14: k5, k2tog 3x, k5 (13sts) row 15: p Break off Skin coloured yarn Leggings change to 4mm needles (US 6) and Red yarn (Black) row 16 - 19: gs for 4 rows row 20 - 65: ss for 48 rows castoff
To Stuff the Shoes
Turn each shoe inside out and oversew the bottom of the shoes. Turn right side out and mattress stitch up the back of the shoes. Push the stuffing down into the end of the shoe, shaping the shoe as more stuffing is added.
Stuffing the Legs
Mattress stitch an inch or so, then stuff lightly, continue until all the leg is stuffed, but leave the last four rows with no stuffing in. Two of these rows will be inserted into the dolls body. Oversew the top of the leg, making sure the back seam is straight.
Bows (make four, two for shoes, one for top and one for hair)
Tie a knot in the middle of a Red (Black) small hair bobble to make a bow shape and attach to the top of the shoe. Ribbon, strands of yarn could also be used. Body using Red yarn (Black) cast on (30sts) row 1 - 12: ss for 12 rows (pants) change to Skin coloured yarn row 13 - 36: ss for 24 rows Neck row 37: k2tog to end of row (15sts) row 38: p row 39 - 42: ss 4 rows
Head
row 43: kfb in every st to end of row (30sts) row44:p row 45 - 64: ss 20 rows row 65: k1, \*(k2,k2tog)\* repeat from \* to \* to last st, k1 (23sts) row66:p row 67: k1, \*(k2,k2tog)\* repeat from \* to \* to last 2sts, k2 (18sts) Leaving a long piece of yarn, thread the 18sts onto a tapestry needle and pull the yarn, closing the top of the head.
To Make up the Body and Head
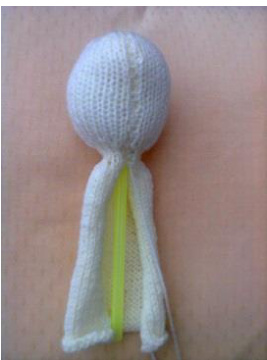
Using a tapestry needle mattress stitch the head together, but not the neck, and stuff using the toy stuffing. Then insert the straw, pushing and twisting it into the head, (or if you find it easier, put a small amount of stuffing in the top of the head, then add the straw, and while holding the straw in place add the stuffing). Continue mattress stitching, stuffing the neck and body as you go, make sure the straw is kept in the middle and the stuffing surrounding it. Cut the straw about an inch from the bottom and continue stuffing, cushioning the end of the straw. Once the doll is stuffed body measurements should be approx. 6 inches wide, all the way down the body, head not included.
Copyright @ 2013 Linda Howard
Attaching the Legs to the Body
Using a running stitch insert the last 2 rows of the legs into the opening of the body. Stitch the gap in between them. Finished length of doll is approx. 45cms (18inches), sitting position approx. 22cms (9inches)
Arms (make two the same) using Skin coloured yarn cast on (10sts) row 1 - 32: ss for 32 rows (arm) row 33: k2tog to end (5sts) (wrist) row 34: p row 35: kfb in every st to end of row (10sts) row 36: p row 37 - 40: ss for 4 rows (hand) row 41: k2tog to end of row (5sts) Thread 5sts onto a tapestry needle, pull sts together. Stuff lightly, but do not stuff the ‘wrist’ (decrease and increase rows). Mattress stitch for about an inch and stuff lightly, continue in this way until the whole of the arm is stuffed. Oversew the ends of the arms making sure the seam is straight. With the seam facing the side of the body, attach the arms, just at the base of the neck area.
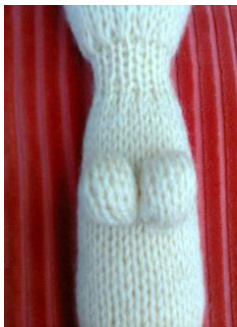
(Boobies' (make two the same) using Skin coloured yarn
cast on 8sts row 1 - 8: ss for 8 rows cast off With right sides together, stitch around the knitting, leaving a small opening to insert the stuffing. Turn right side out and gather the stitches, pulling all the sides together. Sew the opening and attach to the body, placing them underneath the arms.
Attaching the Hair
Using a long piece of Brown yarn (Red) measure how long you would like the hair to be, and then double it. Cut several strands. Using the crochet hook, hook on about two stitches from the top of the head.
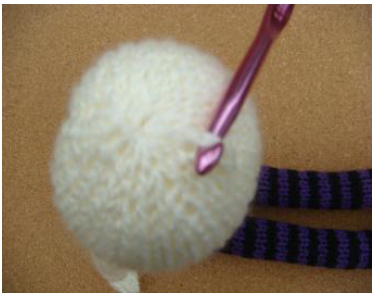
Fold two strands of yarn in half and hooking the middle of the folded yarn, pul the loops through the stitches.

Hook the four ends of the strands of yarn and pull them through the loop, pulling them tighter will create a knot at the base of the dolls head.
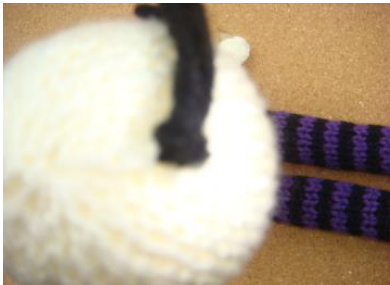
There are now four strands of hair. This method makes really thick hair, but if you prefer, just use one strand of folded yarn, making two strands of hair. Continue in this way until all the hair area on the head is covered. Once the hair is all in place, then a few strands of Red (Black) or any other colour can be added. Trim the hair to the length required and enjoy styling it.
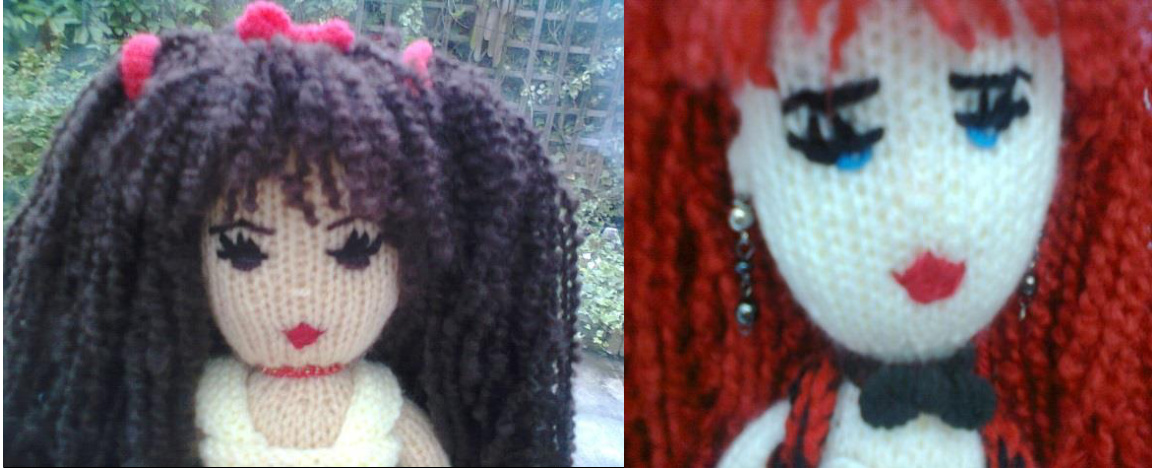
Ears (make two the same)
Using Skin coloured yarn make 2 or 3 loops over the top of each other at both sides of the head, and fasten off securely. For the earings use a plastic bead or a piece of jewellery, you can use anything as long as there is a hole to thread the yarn through and then insert into the ear.
Copyright @ 2013 Linda Howard
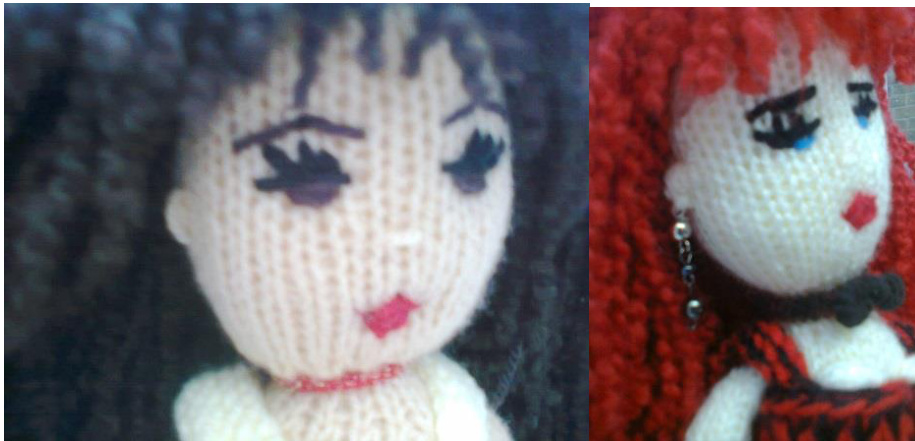
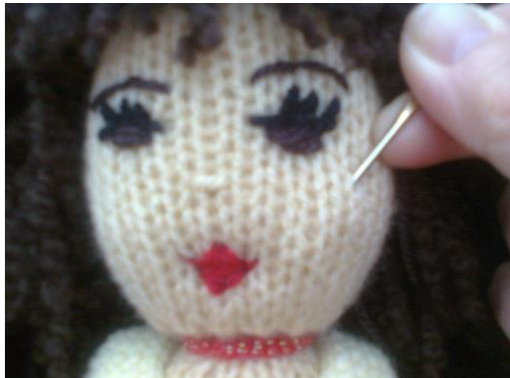
Adding Features to the Face
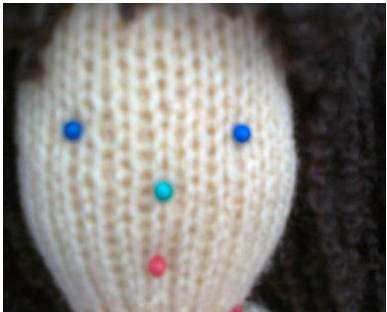
Before you start, mark the face, using coloured pins, where the eyes, nose and mouthwill be.
Eyebrows - using Brown (Black) yarn make two arched shaped stitches or a straight stitch. Eyes - using Black yarn make one straight stitch (small or large) underneath the eyebrow, three small upward or slanting stiches for eyelashes. Using Brown yarn (Blue), for the eye colour, make a stitch or two. Nose - make one stitch going across the face in Skin coloured yarn. Mouth - using Red yarn make a diamond shape (small or large) and then fill in with the Red yarn. If you want to give your doll a smile, then add a small upward stitch at the corners of the mouth.
Sculpturing the Face
Insert a tapestry needle between the stiches and manoeuvre the stuffing around to give the doll cheeks, forehead, chin etc. Design your own unique features on the doll.
Copyright @ 2013 Linda Howard
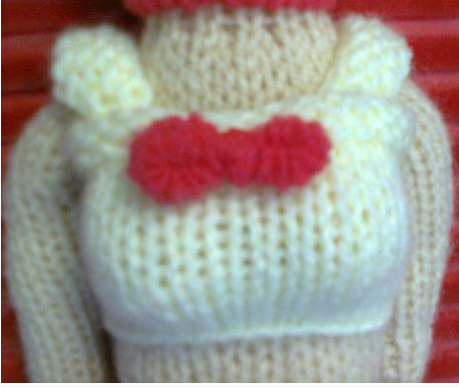
Joanne's Top and Skirt
Top using 3mm needles (US 3) and Lemon wool cast on 36 sts row 1: k (ws) row 2 - 4: gs for 3 rows row 5: p row 6 - 15 ss for 10 rows cast off Straps (make two the same) using 3mm needles (US 3) and Lemon wool cast on 15 sts row 1: k (ws) row 2 - 7: gs for 6 rows Cast off
Making up the Top, Straps and Bow
Before wrapping the top around the doll, make sure firstly, the garter stitches are at the top of the garment, and also the back seam will be in line with the seam on the back of the doll. Mattress stitch the seam to fit the doll, and then add the straps. Sew the Red bow to the top.
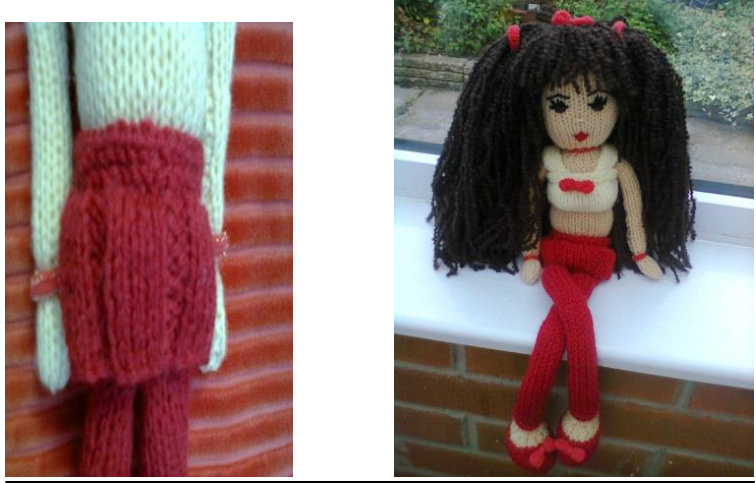
Skirt
using 4mm needles (US 6) and Red wool cast on (36sts) (lower edge of skirt) row 1: \*(k4, p2) to end of the row (rs) row 2: (k2,p4) to end of the row\* (ws) row 3 - 10: repeat from \* to \* 4x = 10 rows in total row 11 - 14: gs for 4 rows (top of skirt) Leave a long piece of yarn and thread onto a tapestry needle, fit the skirt onto the doll and mattress stitch in place, making sure the seam is in line with the back seam on the doll. Stitch the skirt to the body, along the middle of the garter rows, to keep the skirt in place.
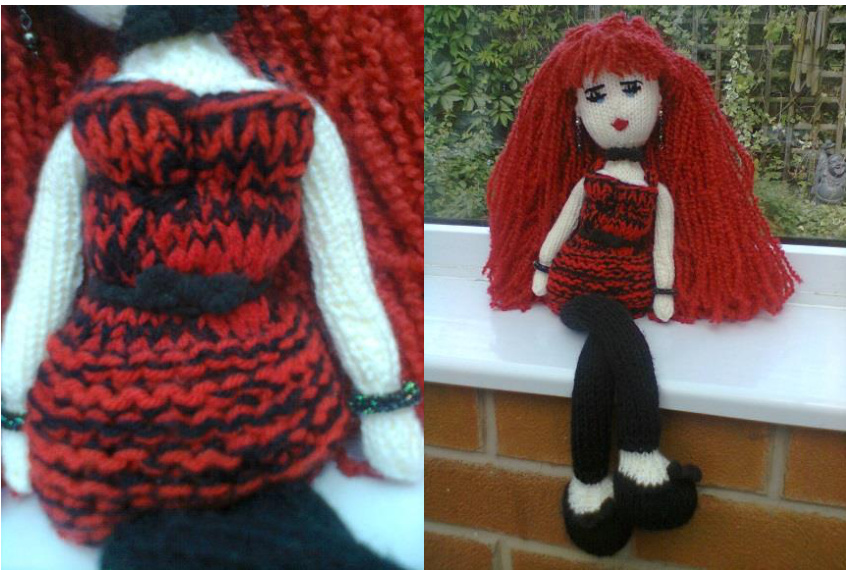
Scarlet's Dress
Dress
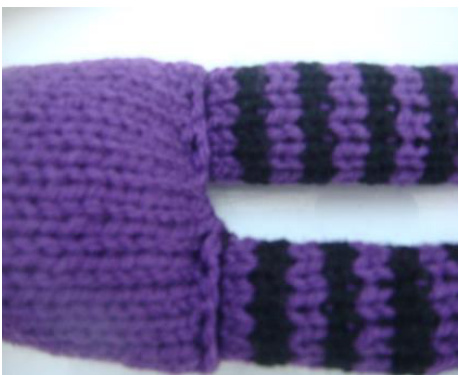
For the dress, I have knitted with two strands of yarn, one strand is Red yarn and one Black yarn. This gives the dress a mottled appearance. using 6mm needles (US 10) and Red and Black yarn Cast on 30sts (lower edge of dress) row 1: k (rs) row 2: k (ws) row 3 - 16: gs for 14 rows change to 4mm (US 6) needles row 17 - 30: ss 14 rows (or more depending on how much of the ‘boobies′ you want to show, (if any) so before casting off wrap the dress around the doll to check for length) Cast off Straps for the Dress (make two the same) using 4mm (US 6) needles and Red and Black yarn Cast on 10sts Cast off 10sts
Making up the Dress
Wrap the dress around the doll, opening at the back, mattress stitch the seam, keeping it in line with the back seam on the doll. Decide on how much “boobies′ are going to be on show (if any) and then stitch in between them, and also around the bottom of each one to give them shape. Stitch on the straps.
Making the Waist Smaller
Stitch around the waist and pull the yarn tight giving indentation to the waist, fasten off at the back of the dress.
Adding the Bow to the Dress
Put the small hair bobble around the waist, make tighter if necessary, and then stitch one of the Black bows to the hair bobble, making a belt.
Bow Necklace
Put the dolls legs through the hoop of the small Black hair bobble and over the body and arms, up onto the neck. Once in place, get one of the Black bows and sew the bow to the hair bobble.
Accessories
For the bangles I have use two small sparkly hair bobbles._ You will be surprised looking through old broken jewellery, beads, lace, oddments of material etc., what can be used to decorate your doll. Please bear in mind that if this doll is for a young child then nothing should be added to the doll, for fear of choking.
Have fun!
This is a copyright design. All rights reserved. No part of this pattern may be copied or sold. Copyright ? 2013 Linda Howard


