2-in-1 Easy Swaddler
by Corinne's Knits
Descziption
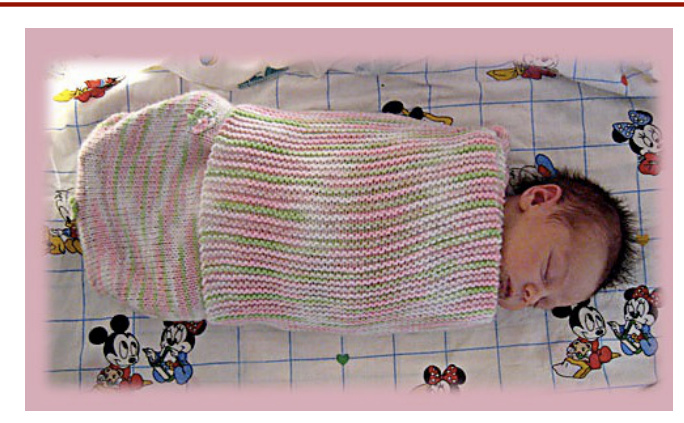
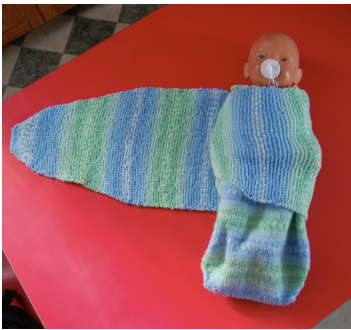
When my boys were babies, I tried using swaddling blankets, but they just wouldn't stay on. So, I bought a couple of specially shaped swaddling blankets, which inspired me to design this pattern. The idea of the pattern is to be able to use the item when the baby doesn't need swaddling anymore. So, it's in two pieces; one independent sleeping bag, onto which the "wings" attach to create an easy swaddling blanket.
Ditticulty
Easy
Yarn
Total about 500 m/550 yards of DK yarn Sleeping bag: 247 m/270 yards Wings: 253 m/280 yards Recommended: Bernat Baby Jacquards
lotions
Needles
4mm (US 6) circular needle, 60cm/24" length or less or size needles needed to obtain gauge Darning needle
Accessories
2 stitch markers 2 buttons, approximate diameter 2cm/0.8"
Iecessazy Skills
Knitting in the round, Turkish cast on or Kitchener st (optional)
Gauge
22 sts x 30 rows / 10 cm - 4" in stocking st Baby: birth to 6 months approximately
About Corinne
I'm the mum of two boys and I take great inspiration in them for my designs. I love to design for babies and children.

Ravelry on the Corinne's Knits designer page or on my blog; http://corinnesknits.wordpress.com/. Do not hesitate to contact me if you experience any problem with my patterns or if you find errors: corinnesknits@googlemail.com
Ilotes
You don't have to use Turkish cast on, but it is the method that gives the best results. I learnt it here; http://fluffyknitterdeb.blogspot.com/2005/10/knitting-madeeasier-turkish-cast-on.html. I think it's a great tutorial. Another alternative is to use a provisional cast on (http://www.youtube.com/watch?v=aqWfea8o0H8) and then graft the bag at the end using the Kitchener stitch. Of course, if you are not comfortable with any of these methods, you can use a simple cast on method and sew the bottom of the bag together at the end. For the M1, I recommend using Cat Bordhi's method (http://www.youtube.com/watch?v=SYOYMJBGxrw)
Sizes
Stitch Pattezn
3 stitches are used: Stocking St (stockinette) in the round: K every rd Garter St on straight needles: K every row 2x2 ribbing on straight needles: row 1: \*K2, P2\*, repeat across row 2: \*P2, K2\*, repeat across
Dizections
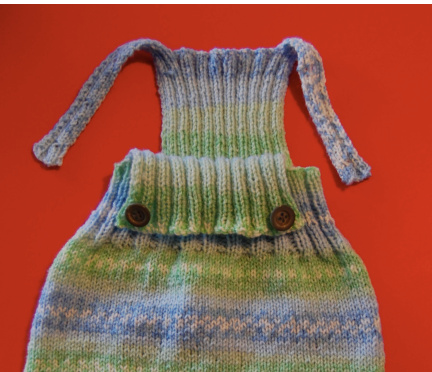
SLEEPING BAG
Cast on 70 sts using Turkish cast on or provisional cast on (35 sts on each needle). Being careful not to twist, join in the rd. PM to mark beginning of rd. Rds 1 & 2: K to end Rd 3: K1, M1, K33, M1, PM, K2, M1, Kto last st, M1, K1 (74 sts) Rd 4: K to end Rd 5: K1, M1, K to M, M1, SM, K2, M1, K to last st, M1, K1 (78 sts) Rd 6: K to end Continue in this manner, repeating rds 5 & 6 another 10 times (118 sts) K until you reach 25cm/10" total height Next rd: \*K10, K2tog, K9, K2tog\*, repeat 4 times, K3 (108 sts) Next rd: \*K2, P2\*, repeat to end of rd Continue in 2x2 ribbing until you reach 33cm/13" total height Next rd: K 96 sts in pattern, cast off 12 sts in pattern 2x2 ribbing for 42 sts, cast off 12 sts in pattern, continue in 2x2 ribbing to end From this point on, you will finish each side individually, knitting back and forth, continuing in 2x2 ribbing.
Back
Continue until you reach 43cm/17" total height, ending with a WS row Row 1: K 8 sts, cast off 26 sts, K 8 sts Rows 2-11: K in 2x2 ribbing Row 12: K 3 sts, cast off 2 sts, K 3 sts Row 13: K3 sts, cast on 2 sts, K3 sts Repeat rows 2-13 another 2 times K 3 rows and cast off Repeat from row 1 on the other 8 sts to make second strap
Front
Continue in 2x2 ribbing until you reach 38cm/15" total height and cast off
WINGS
Made in garter st for elasticity Cast on 9 sts Row 1 (RS): K Rows 2 & 4: Kto last st, M1, K1 Rows 3, 5 & 7: K Row 6: K1, M1, K to last st, M1, K1 Repeat rows 2-7 another 9 times (49 sts) K until you reach 34cm/131/2" total height, ending with WS row [Next row: \*K to last 3 sts, turn and K back to end\*, repeat 3 more times Work on the 3 sts left on hold: K 8 rows ceunite the two parts by K to the end of the row, this will create a vertical slit.] K another 9cm/31/2" from this point, ending with WS row and repeat instructions to create a secondslit K another 20cm/8" \*Next row: K1, K2tog, K to last 3 sts, K2tog, K1 (47 sts) K5 more rows\* Repeat \*\* another 4 times (39 sts) Next row: K1, K2tog, K to last 3 sts, K2tog, K1 (37 sts) K7rowsNext row: K1, K2tog, K to last 3 sts, K2tog, K1 (35 sts) \*K 9 rows K1, K2tog, K to last 3 sts, K2tog, K1 (33 sts)\* Repeat \*\* another 2 times (29 sts) K5rowsNext row: K1, K2tog, K to last 3 sts, K2tog, K1 (27 sts) \*K 3 rows K1, K2tog, K to last 3 sts, K2tog, K1 (25 sts)\* Repeat \*\* another 8 times (9 sts)
FINISHING
Weave in the ends Sew 2 buttons on the sleeping bag, on the front, in each of the two top corners. I sewed mine on the inside, because the straps have 3 buttonsholes to let the sleeping bag grow with the baby. If the buttons are on the outside, there will be a long piece of strap hanging there when using the shortest setting. But, ultimately, it is your choice. You might want to reinforce with some fabric to cope with frequent use.
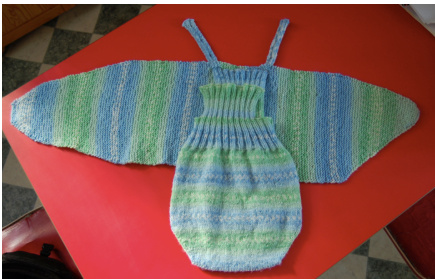
If you used a standard cast on, sew the bottom of the sleeping bag together, from the inside. If you used provisional cast on, graft both sides together using Kitchener st. Block if desired. Lay wings flat. Take sleeping bag and put straps through slits and lay it on top of the wings. It's now ready for baby.
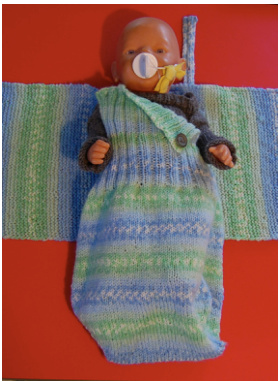
Put baby in the sleeping bag and close the straps. There are three buttonholes, so that you can adjust the height to your baby's size. Take shorter end (left wing) and tuck it tightly under baby's right shoulder.
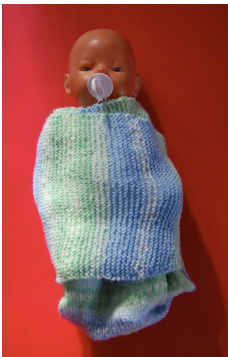
You can now take the longer wing and wrap it tightly over and under baby. When baby outgrows swaddling, the sleeping bag can be used independently and the size adjusted with the different buttonholes.
Abbreuiations
| Circ - Circumference | Kfbf - Knit in the front, back & | Sl - Slip |
| unstretched | front of the stitch (inc 2 sts) | SI M - Slip marker/s |
| Dec-Decrease | M - Marker/s | SSK - Slip, Slip, Knit |
| DPN(s) Double pointed | M1 - Make 1 | st(s) - Stitch(es) |
| needle(s) | P - Purl | st st - Stocking Stitch |
| Inc - Increase | P2tog - Purl two stitches | (Stockinette) |
| K - Knit | together | tbl - through back loop of st |
| K2tog - Knit two stitches | PM - Place marker | WS - Wrong side |
| together | pw - purl wise | wiyb - with yarn in back |
| Kfb - Knit in the front and back | PU - Pick up | wiyf - with yarn in front |
| of the stitch (inc. 1 st) | Rd - Round | YO-Yarn over |
| RS - Right side |


