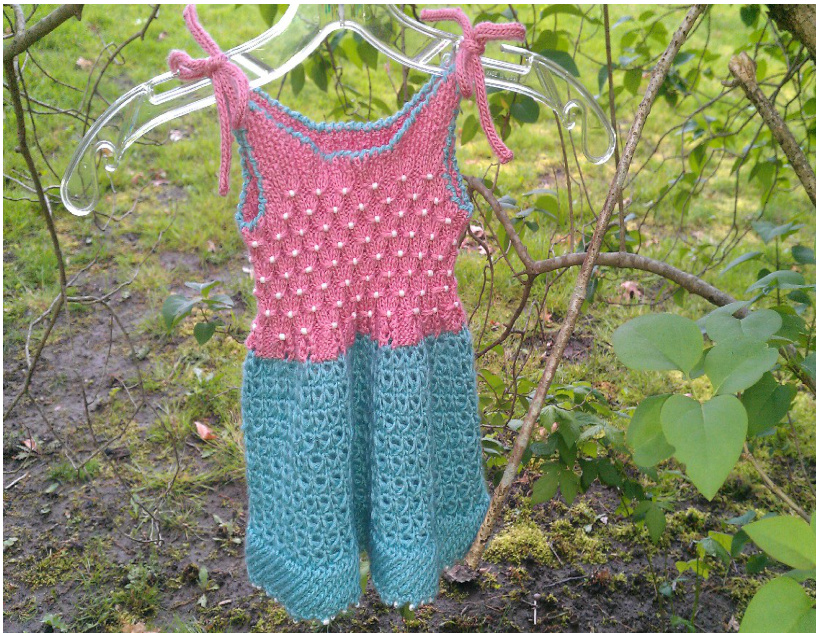
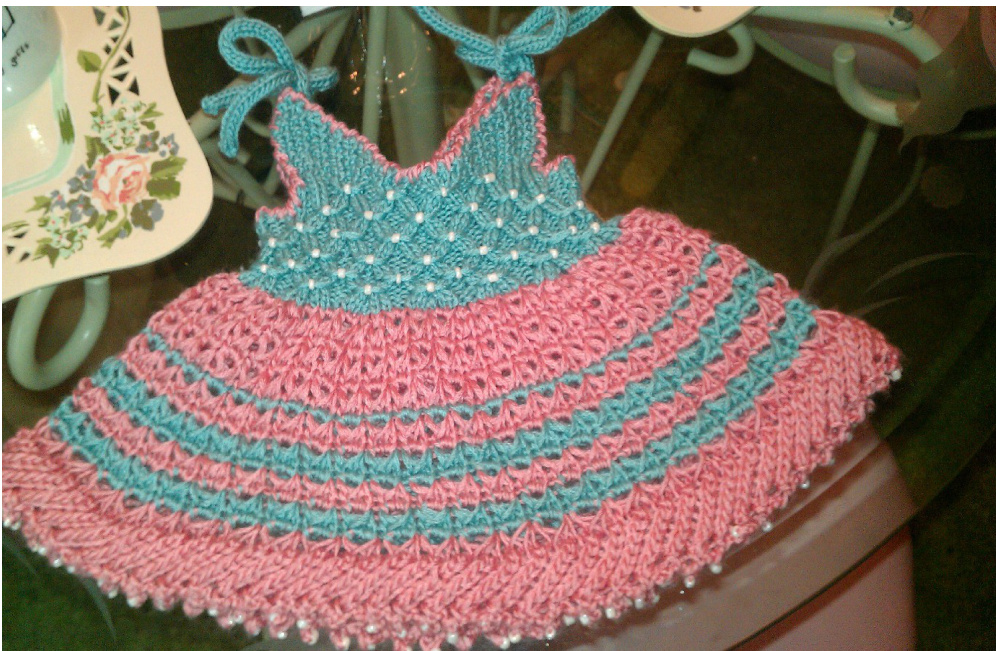
Summer with Love,
Hugs & Kisses
Materials:
#6 US (4.0 mm) circular 32" knitting needle if using DK wgt use needle #7 US (4.5 mm) #3 US (3.25 mm) circular 32" knitting needle if using DK wgt use needle #4 US (3.5 mm) 1 - #3 US (3.25 mm) DPN for I-cord (if using DK wgt #4 DPN) 1 - #6 DPN (if using DK wgt #7 DPN) 2 - #6/0 mm beads (sizes 3 mo to 4 will use <1 container of beads) crochet size #11 used for beading crochet size #F(5) 24 stitch markers approximate (optional) Row counter Measuring tape
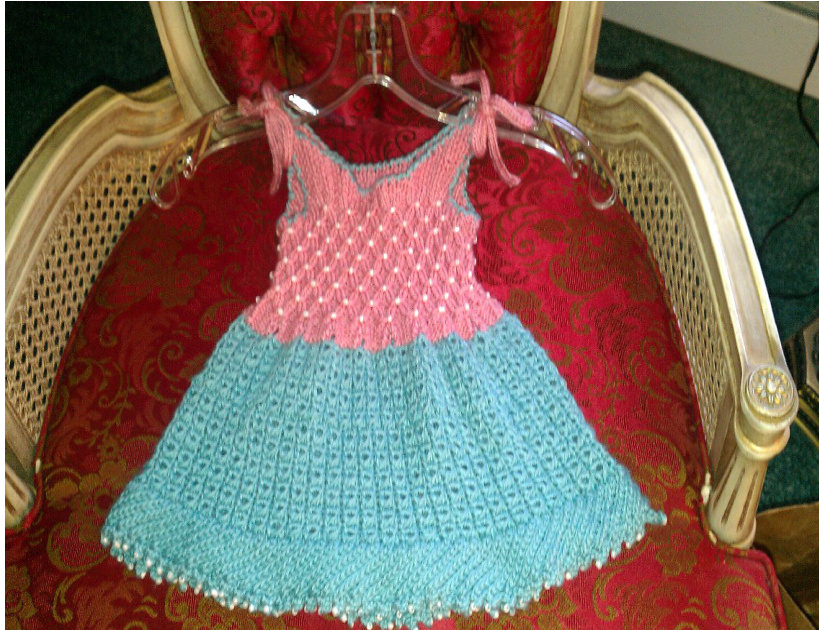
Illustration 1: Size 2 - for my Grand Daughter #3 light Wgt. - Naturally Caron - Spa - 251 yds each skein (1)(CA) Ocean, (1)(CB) Rose Bisque skeins of yarn for the Size 2 pictured. Light worsted yarn or DK wgt had been tested and would be suitable for this project. Only if using DK weight yarn your needle sizes will be: #7 (4.5 mm) circular 32" and #4 circular(3.5 mm) circular 32" Estimated amounts were determined (rounded up) if using the Naturally Caron Spa skeins:
| TOP | DRESS | |
| 3 mo,6 mo,9/12 mo | 251 yards | 753 yards |
| 18 mo,24 mo,& size 2 | 502 yards | 753 yards |
| size 4 | 753 yards | 784 yards |
| size 6 | 753 yards | 784 yards |
| size8&size 10 | 784 yards | 850 yards |
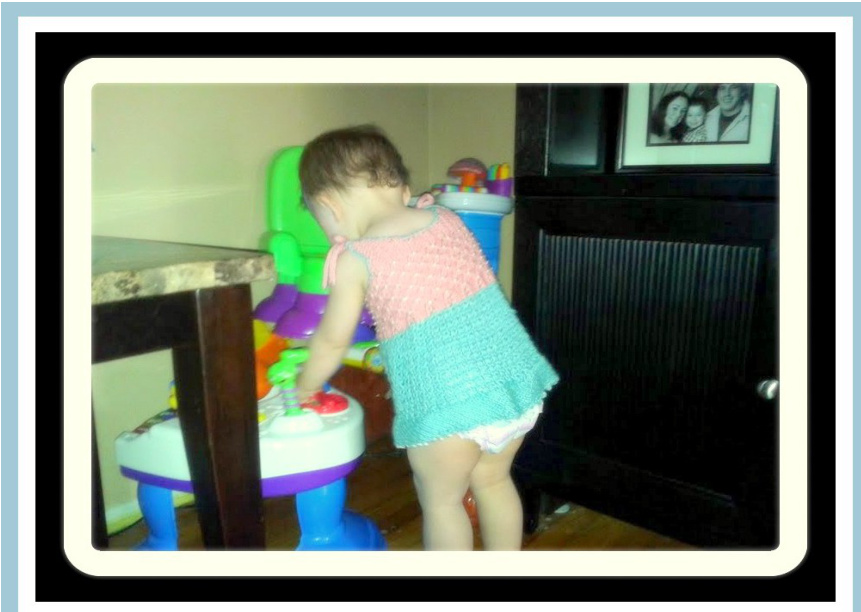
llustration 2: Back view
Gauge:
22 stitches and 30 rows = 4" in stockinette stitch on #6 US (4.0 mm) needles or size needed to obtain gauge. If using DK (sport) yarn - A size #7 US needle will allow you meet gauge, and size #4 US needle will be needed for the remainder of thepattern. SIZE CHART
| Top | Dress | ||
| Sizes | Chest | Length | Length |
| 3 mo. | 16" | 8" | 12" |
| 6 mo. | 17" | 9" | 13" |
| 9/12 mo. | 18" | 9.5" | 13.5" |
| 18 mo. | 19" | 10" | 14" |
| 24 mo. | 20" | 10.5" | 14.5" |
| 2T | 21" | 12" | 16" |
| 4T | 23" | 14.5" | 18.5" |
| 6 | 25" | 16" | 20" |
| 8 | 26.5" | 18" | 22" |
| 10 | 28" | 20" | 24" |
Abbreviations
st(s) - stitch(s) k- knit rnd1 -round # pm -place marker r-Row “B" - Beading slp - slip stitch Ih - left hand needle RS - right side pub - Pick up bead and load on crochet hook rh - right hand needle WS - wrong wide pu- pick up yo - yarn over sl1kw - slip 1 knit wise
Video References:
1. This particular video demonstrates both threaded dental floss or crochet hook,methods: http://www.youtube.com/watch?v=fbGy8HwVqxA 2. Twisted picot stitch Demonstration without beading: Video will show how to do the stitch w/o beading. http://www.youtube.com/watch? V=ANdskJZYWk Optional beading: Requires adding the bead to the 1st stitch before knitting it. 3. Smocking video shown for a sweater pattern that is done without beading. http://www.youtube.com/watch?v=51Mg6EmADyk 4. Crochet - Crab Stitch: http://www.youtube.com/watch?v=-C11Vz60ylg
Special Stitch Instructions
(Refer topage 2-video referencesfor beading &TwistedPicot Stitch).
Picot Twisted Cast On - W/o Beading: To do the picot twist you'll use one point of the circular as your LH needle and the DPN needle as your right-hand needle. 1. Cast on 5 stitches using the knit cast on method. 2. BO 2 times, (2 sts will be on left hand needle, 1 st on DPN) 3.BEFORESLIPPINGTHELONESTITCHFROMYOURDPNONTOTHELHNEEDLE, rotate your DPN 360 degrees, by turning the point of the needle clockwise (by moving it away from you). Thus creating a twist. This will cause the beads to lie in the front instead of behind the knitting. 4. Slip the stitch from the DPN onto the left-hand needle, (Your completed Twisted Picot on your LH will display 3 stitches, with a space after the first two stitches, which reflects the bound off 2 sts that made the picot. 5. The last stitch slipped off of the right-hand needle will count as the 1st stitch of your next grouping of five stitches. Cast on 4 stitches so you'll have a 5 stitches. Repeat steps 2 through 5 until you have the required number of stitches cast on for your pattern size.
Twisted Picot w/Beading: To do the picot twist you'll use one point of the circular as your LH needle and the DPN needle as your RH needle. 1. Cast on 5 stitches using the knit cast on method. 2.Beading with crochet hook: Crochet#11 pick up bead(PUB)by pulling the 1st stitch through the bead, and knit that same stitch. \*K the next stitch and BO. Repeat from \* 1 more time. (Youl now have 2 stitches on the LH needle and 1 stitch on the RH needle.) 3. BEFORE SLIPPING THE LONE STITCH FROM YOUR DPN ONTO THE LEFT HAND NEEDLE, rotate your DPN 360 degrees, by turning the point of the need clockwise( by moving it away from you). Thus creating a twist. This will cause the beads to lie in the front instead of behind the knitting. 4. Slip the stitch from the DPN onto the left-hand needle, (You'll have 3 stitches on the left-hand needle, with a space after the first two stitches, which refle the bound off two stitches that made the picot. The last stitch slipped off of the right-hand needle will count as the 1st stitch in your next grouping of five stitches). Cast-on 4 more stitches so you'll have a total of 5 stitches from your last picot. 5 until you have the required number of stitches cast on for your pattern size.
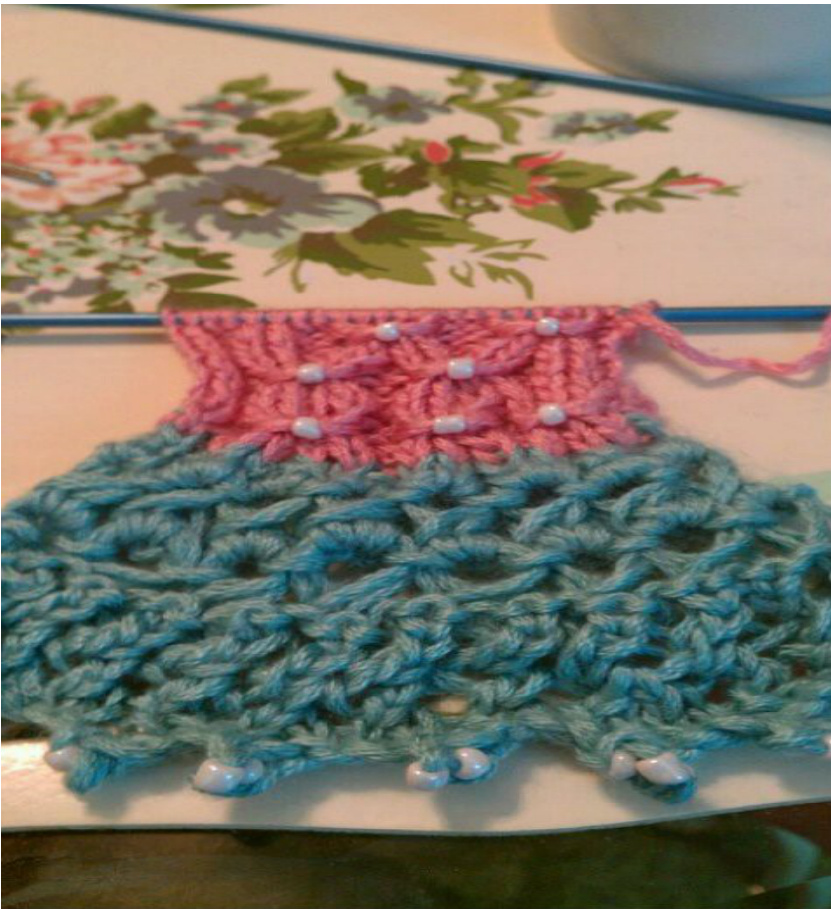
Sample of what the stitches used in this pattern look like: From the bottom of screen to needle. 1. picot w/beading (pattern calls for 1 bead in picot cast on, this was a test only using 2 bead Picot.) 2. rib lace 3. eyelet smocking 4. smocking w/beading
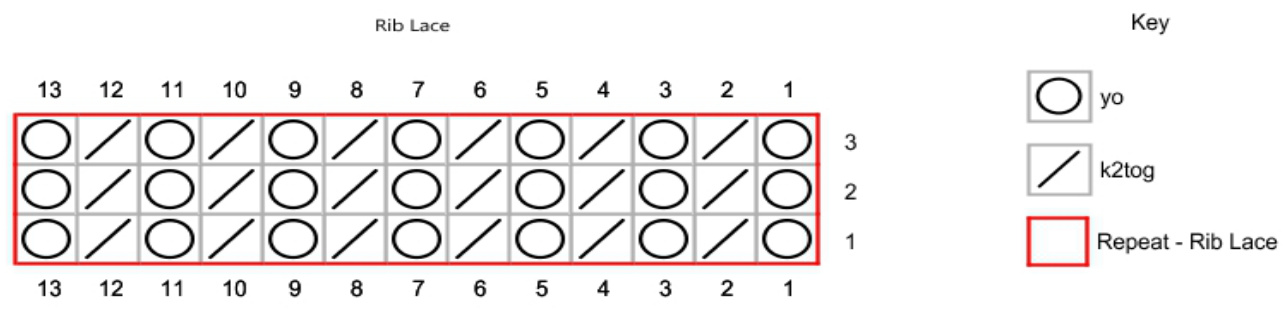
Rib lace:
\*Yo, k2tog; repeat from \* to end of the round.

Sample pic of Picot cast on without beading, Rib Lace & Eyelet Pattern.
Eyelet Pattern: 3 st count
Rnd1: \*K1, yo 2x's; repeat from \* to end of round, ending with k1. Rnd2: \*Pu knit wise the following 3 knit stitches, dropping each of the yarn overs and slip (slp) them to the right-hand needle (the knit sts will be elongated). Transfer these same 3 long sts back to the left hand needle (k3tog, p3tog, k3tog) to the same sts, repeat from the \* to end of round. (the last k1 will not have ayarnover.) Rnd3: knit

Key grey no stitch Repeat - Eyelet Pattern yo 2 times knit sl3kw,(k3tog, p3tog,k3tog)
Pic 1 of Eyelet:
Pic 2 Eyelet: The above displays how you will take the with your RHneedle and pick up the 3 knit sts and drop the yo's between the knit sts, creating 3 elongated sts that you will (K3tog, P3tog, K3tog) in those 3 elongated sts. The above displays the final lookofthose elongated sts creating the eyelet, after you have done the (K3tog, P3tog, K3tog). Ladder to the Sky - 8 sts count stitch markers at this point can be used as a guide in keeping 8 stcount. Rnd1: \*P2, k2tog, yo, k2, p2; repeat from \* to end of round. Rnd2: \*P2, k2, yo, sl1kw, k1, psso, p2; repeat from \* to end of round.
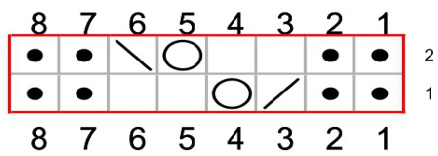
Key knit purl k2tog V0 sl1, k1, psso Repeat - Ladder to the Sky "B" = place RH needle between the 6th & 7th st from the tip of LH needle; wrap yarn around RH needle for knit and pull loop through to front of work. Place bead on crochet hook, pick up loop formed on RH needle, pulling knit loop through the bead. Place knit stitch loaded with bead onto LH needle. Pull yarn snug to gather in smocking, then k2tog (loop with bead and 1st k1),k1, p2, k2.
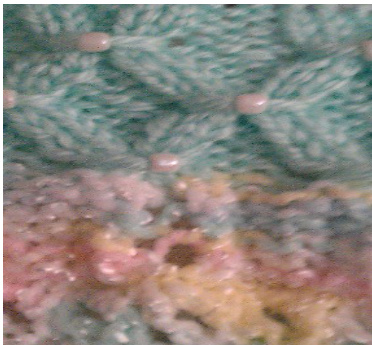
Looking at pic from bottom to top: Is a sample of Ladder to the sky stitch, and beaded smocking RS. Rnd1 & 2: \*P2, k2; repeat from \* to end of round. Rnd3: \*P2 "B", repeat from \* to end of round.
Beaded Smocked Pattern: (Beading is optional for stitch)
SummerwithLove,Hugs&KissesBeadedSmocking Rnd4 & 5: repeat round 1 & 2. Rnd6: \*P2, k2 repeat from \*, till last 4 sts before PM, then P2 sts and start working "B: (comprised of remaining 2 sts of round 6 and beginning 4 sts from the start of round 7. Rnd7: After completion of "B" started from round 6, work (the p2, and “B") repeat to last to sts, ending with k2. Rnd8: Repeat round 1& 2. Tip: Feel free to move the PM back 4 sts for each repeat of Rnd6 and Rnd7.
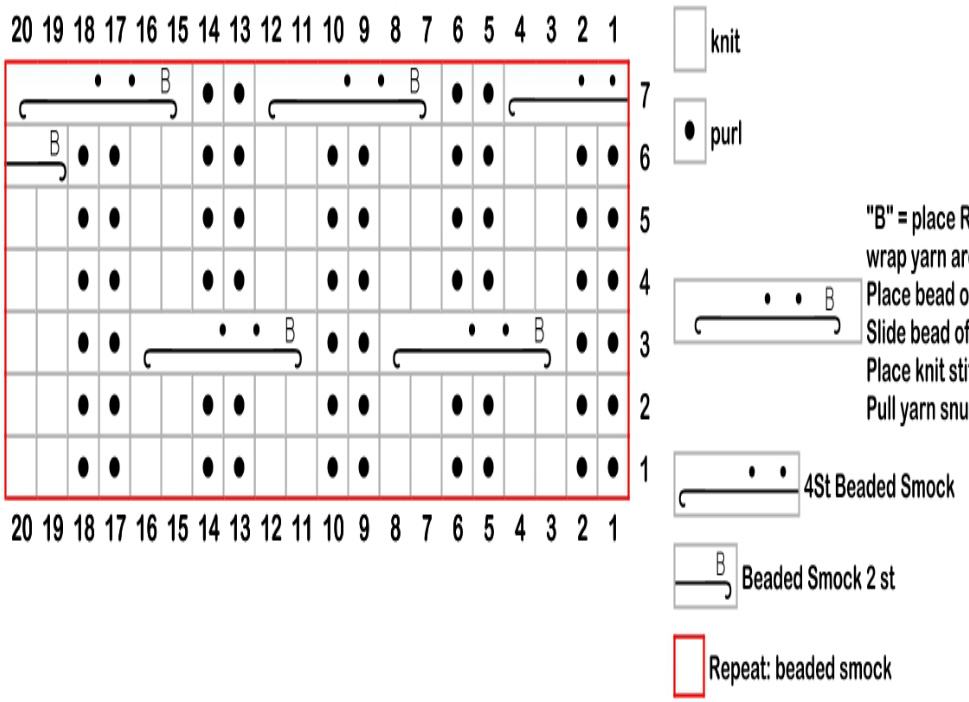
"B"= place RH needlebetween the 6th&7th st from the ipof LH needl; wrapyarn around RH needleforknit and pulloopthrough tofront of work. PacbedrhetopkuplopfodHdleandwitlddcroht Slidebeadoffcrochethok&mount ontokitstithpullng kni loop throughthebad. Place knit stitch loaded with bead onto LH needle. Pullyarn su to gathr in king,then ktog (th loop with bead and st 1),, .
| PatternInstructions: | |||||
| 3 month | 6 month | 9/12 month | 18 month | 24 month | |
| C/O -162 sts | |||||
| cotTwistedCastOn: efertotheSpecialStitch | C/O - 122 sts Caston5stsusingthe | C/O - 132 sts Caston5stsusingtheknitted castontilltherequirednumber | C/O -142 sts Caston5stsusingtheknitted castontilltherequirednumber | C/O - 152 sts Caston5stsusingtheknitted castontilltherequirednumber | Caston5stsusingtheknitted |
| ructions-PicotTwisted st On page 3. eoInstructionsareavailable eededintheVideo | knittedcastontillthe requirednumberofstitches. You will end with anodd # | of stitches. Youwillendwithanodd#stitch | of stitches. Youwillendwithanodd#stitch | of stitches. Youwill endwithanodd#stitch | castontilltherequirednumber of stitches. Youwill endwith anodd# |
| ference-page 1. st count. on completion of the required # of sts, join the ends to start knitting in the round by: | stitchcount,k1additional stitchtobringyou toneeded | count,k1additionalstitchto bringyoutoneededst count. | count,k1additionalstitchto bringyoutoneededst count. | count,k1additionalstitchto bringyou toneeded st count. | stitchcount,k1additionalstitch tobringyou toneeded st count. |
| 1st .Verify that the picots are not twisted. 2nd .When joining the round Cross over the Last st and the 1st stitch. This will alleviate any gap. Rnd1:PM beginning round | |||||
| Lace: sstitchwillcontinuetill you | Rnd1:PMbeginning round- Rnd1:PMbeginning round- knit 1round. knit 1 round. | Rnd1:PM beginning round- Rnd1:PM beginning round- knit 1 round. | |||
| re reach the length for your | Rnd2:*YoK2tog,repeatfrom *till you havereachedthe length of 1.5"from the | Rnd2: *Yo K2tog, repeat from till youhavereachedthelength of 1.5" from the beginning off | knit 1 round. Rnd2:*YoK2tog,repeat from till youhavereachedthelength of1.5”from thebeginning of | Rnd2: *Yo K2tog, repeat from till youhavereachedthelength of 2" from the beginning of | knit 1 round. Rnd2: *Yo K2tog, repeat from till youhavereachedthelength of2"fromthebeginning of |
| beginning of garment. garment. garment. IFUSINGDKWEIGHTYARNCHANGETO#4USneedleatthistimeforremainderofproject | garment. garment. | ||||
| upforEyeletpattern: k1 round. | Allotheryarn#3weightwillChangetoa#3USneedleforremainderofproject | ||||
| k1 round. k1 round. | k1 round. k1 round. | ||||
| eletPattern: | The given pattern length does not exceed past bottom of the hip. Starttheeyeletpatternand Starttheeyeletpatternand Starttheeyeletpatternand continueinthepatternstitchtill continueinthepatternstitchtill of garment. | Starttheeyeletpatternand | Starttheeyeletpatternand continueinthepatternstitch | ||
| fer to Special Stitch ruction-EyeletPatternpage f the deciding to make a ss, refer to Sizing Chart on e2. | continueinthepatternstitch till it measures5"from it measures 5.5"from beginning beginning of garment. of garment. | continueinthepatternstitchtill it measures 6"from beginning it measures 6"from beginning till itmeasures6.5"from of garment. beginning of garment. | |||
| PatternInstructions: | ||||||
| Sizes: | 3 month K2tog, k4 *k2tog, k6, repeat | 6 month K2tog, *k5, k2tog, repeat * till last 4 sts k2, k2tog | 9/12 month K2tog,*k2tog, k3; rep from * | 18 month *k5, k2tog, 20 times, then last 8 | 24 month *k5, k2tog,repeat from *, then | |
| Setup for ladder to the Sky: Decreasing round for sizes: | from * till last 4 sts, | then last 4 sts k2tog.(2x's) | sts, k2tog (4x's). | last 10 sts, k2tog (5x's). | ||
| 3 mo.-24 mo. | k2tog(2x's). (3 mo) 18sts = 104 | (6 mo) 20 sts = 112 sts | (9/12 mo.) 30 sts = 112 st | (18 mo.) 24 sts = 128 sts | (24 mo.) 26 sts = 136 sts | |
| Ladder to the Sky stitch: Referto special stitch instruction | Rnd1: *P2, k2tog, yo, k2, p2; repeat from *to end of | Rnd1: *P2, k2tog, yo, k2, p2; repeat from * to end of round. | Rnd1: *P2, k2tog, yo, k2, p2; repeat from *to end of round. | Rnd1: *P2, k2tog, yo, k2, p2; repeat from * to end of round. | Rnd1: *P2, k2tog, yo, k2, p2; repeat from*to end of round. | |
| - Ladder to the Sky page 4. Thisstitchwillberepeatedthe | round. Rnd2: *P2, k2, yo, sl1kw, k1, psso, p2; repeat from *to | Rnd2:*P2,k2,y0, s/1kw,k1, psso, p2; repeat from *to end of round. | Rnd2: *P2,k2,yo,sl1kw,k1, psso, p2; repeat from * to end of round. | Rnd2:*P2,k2,yo,sl1kw,k1, psso, p2; repeat from * to end of round. | Rnd2:*P2,k2,y0,sl1kw,k1, psso, p2; repeat from *to end of round. | |
| designated#of timesdepending onthesizeofyourgarment. Optional:Stitchmarkersat | end of round. | |||||
| this point may guide you in keeping with8 st count. Smocking “Beading is | Sizes3mo.-9/12mo:Totalof2setsofrounds1&2. | Sizes 18 mo.- 24 mo. Total of 2 sets of rounds 1 & 2 + 1 repeat of rnd1. | ||||
| Optional": Refer to special Stitch instruction | Rnd1&2:*P2,k2;repeat from*toend of round. Rnd3: *P2 "B", repeat from * to end of round. | |||||
| -Smocking page 5. VideoInstructionsareavailable ifneededinVideoReference- | Rnd4&5:Repeat round1& 2. Rnd6: *P2, k2 repeat from *, till last 4 sts before PM, then P2 sts and start working "B: (comprised of remaining 2 sts of round 6 and beginning 4 sts from the start of | |||||
| round 7. page 1. | Rnd7: After completion of "B" started from round 6, work (the p2, and "B") repeat to last to last sts, ending with k2. | |||||
| Tip:Feelfreetomovethe PMback4stsforeach repeatofRnd6andRnd7. | Rnd8:Repeat Rnd1& 2,to end of round. | |||||
| Repeat rounds 1-8 of “beaded" smocking for a total of 3 pattern repeats. After completing the 3 pattern repeats, you will do Rnd1, and place a 2nd PM. | ||||||
| (Refer to the bind off st count below that corresponds to your size pattern.) and continue knitting Rnd1: *p2, k2; repeat from * to end of round. (24 mo) 68 st | ||||||
| (3 mo) 52 sts (6 mo.) 56 sts (9/12 mo) 56 sts (18 mo) 64 sts RND2(beaded smockedpattern):Continue inestablishedBeadedsmocking,working tothesecond marker.Start yourbind off of ChangetoStraightNeedles#3Next | ||||||
| the6sts.This3stbindoffoneachsidewillbeforsizes3mo.to6months. After1stbindoff6sts,removethemarker,andcontinuewiththebeadedsmockedpatternasestablished,bindoff thenextsetof6stsforyoursizepattern | ||||||
| The front &back from this point forward on will beknitted separately.Leave the back stitches on your circularneedles. | ||||||
| NOTE:Place aPM somewhere on backstitchesof smocking,thiswill help you later to differentiatefromfront andbackwhen starting the finishing edge. StraightNeedles#4IfUsingDkYarn | ||||||
| OR | ||||||
| PatternInstructions: | |||||
| Sizes: FRONT/BACK | 3 month Row 3 (Rs): Complete across the front of the dress, in pattern as established. | 6 month | 9/12 month | 18 month | 24 month |
| Using your straight #3 needles, work the front half. | Odd numbered rows(RS) areworked inestablished beaded smockedstitchpattern. Row 4 (WS): Turning and work the wrong side (WS) row. | ||||
| Repeat the sameforBack. Begin working in Rows not | Evennumbered rows areworked (WS)K2 andP2(byknitting thepurls and purling theknit stitcheswhileworking onthewrong side. You willcontinue working to complete the rows of 1-8 pattern repeat of the beaded smocking pattern while decreasing along the armholes. And will continue to work onemorefullpatternrepeat rowsof 1-8whilestill decreasing along the armhole. | ||||
| Rounds from this point on. NECKLINE:Seed Stitch | This willbegin with the next row (RS), decrease 1 st at start and finish for the next row until you've reached the required number of stitches for your size: (3 mo.) - 44 sts | (6 mo.) - 44 sts | (9/12mo.)-44 sts | (18 mo.) - 48 sts | (24 mo.) - 48 sts |
| Sizes3mo.-24mo. | Uponreaching desired decrease st count,start the neck line decrease.Start seed stitch on(RS). | ||||
| Work both sides of the neckline at same time using 2 balls of yarn. | |||||
| R1(RS): k1, p1 for 17 sts, attach 2nd ball of yarn and bind off center 10 sts, k1, p1, to end of row. R2 (WS): Continue with seed stitch *k1, p1; repeat from * across row. All decreasing on WS will be | *K1,p1for 18 sts,attach2"dball of yarn andbind off center 12 | ||||
| P2tog at neck line. | sts, then k1,p1 for 18 sts to end of row. | ||||
| R3 (RS): *K1, p1; repeat from * to neckline and all RS decreasing will be K2tog. Continue to decrease at the neckline in this way till you have 4 sts remain on each needle. | |||||
| STRAPS:I-Cord | Knit 2 rows of seed stitch working the 4 sts on each needle. | ||||
| Finishing-CrochetCrab | RS:Begin making theI-Cord forthe strapsusing#3DPN.Makeyour straps 8"-12"or desired length. | ||||
| StitchEdging | Crochet hook F(5)The crab stitchwill be continuous fromstart to finishwith 2 single crochet(sc) around each strap. Start at the left front neckline, going down the front of the neckline, work 2 sc's around strap at right front, right side, right back (2 sc's around strap), left back (2 sc's | ||||
| Video instruction-page 2 is availableforthisstitch. | around strap),continue in crab stitch till you end at the left front strapwith2 sc's,ending whereyou started.Bind off. | ||||
| PatternInstructions: | ||||||
| Sizes: | 2 | 4 | 6 | 8 | 10 | |
| PicotTwisted CastOn: RefertotheSpecialStitch instructionsforhowtodothe Picot Twisted Cast On.-page 3 VideoInstructionsareavailableif | Size 2- 168 sts Caston5stsusing the knittedcastontillthe | Size 4-180 sts Caston5stsusingtheknitted castontill therequirednumber | Size 6-192 sts Caston5stsusingtheknitted castontill therequirednumber | Size 8- 204 sts Caston5stsusingtheknitted | Size 10-216sts Caston5stsusingtheknitted | |
| required number of stitches. | of stitches. You'll endwithanodd#stitch | of stitches. You'll endwith an odd #stitch | castontill therequirednumber of stitches.. You'llendwithanodd#stitch | castontill therequirednumbe of stitches. You'llendwithanodd #stitch | ||
| needed in theVideoReference - page 1. | You'llendwithanodd# stitchcount,k1additional stitch to bring you to needed st count. Upon completion of the required # of sts, join the ends to start knitting in the round by: | count,k1additionalstitchto bring you to needed st count. | count,k1additionalstitchto bring you to needed st count. | count,k1additionalstitchto bring you to needed st count. | count,k1additionalstitchto bring you to needed st count. | |
| 1. Verify that the picots are not twisted. | ||||||
| 2. When joining the round Cross over the Last st and the 1st stitch. This willalleviate any gap. | ||||||
| Rib Lace: Continue in this stitch till you reach the length for your size: | Rnd1:PMbeginninground - knit 1 round. | Rnd1:PMbeginninground- knit 1 round. Rnd2: *Yo K2tog, repeat from till youhavereachedthelength | Rnd1: PM beginning round - knit 1 round. Rnd2: *Yo K2tog, repeat from tillyouhavereachedthelength | Rnd1:PM beginning round knit 1 round. Rnd2: *Yo K2tog, repeat from till youhavereachedthelength | Rnd1:PM beginning round knit 1 round. Rnd2: *Yo K2tog, repeat from till youhavereachedthelengt | |
| Rnd2: *Yo K2tog, repeat from*till youhavereached the lengthof 2"from the beginning of garment. | of 2” from the beginning of | of 4” from the beginning of | of 4” from the beginning of | |||
| garment. | garment. | garment. | of 5" from the beginning of garment. | |||
| IFUSINGDKWEIGHTYARNCHANGETO#4USneedlefor remainder ofproject Allotheryarn#3weightwillchangetoa#3USneedleforremainderofproject | ||||||
| Setup for Eyelet pattern: K1 Round Eyelet Pattern: | K1 Round | K1 Round | K1 Round | K1 Round | ||
| Refer to Special Stitch instructions - Eyelet Pattern stitch. | continueinthepatternstitchtill it measures 8.5" from beginning of garment. | continueinthepatternstitchtill it measures 9.5" from beginning of garment. | beginning of garment. | continueinpatternstitchtill it measures11.5”frombeginnin | ||
| Start the eyelet pattern and | Starttheeyeletpatternand | Start the eyelet pattern and | Start the eyelet pattern and continueinthepatternstitchtill itmeasures10.5"from | Start the eyelet pattern and | ||
| continueinthepattern | ||||||
| Ifthe deciding to make a dress, refertoSizingChartonpage2. | stitch till it measures 7.5" from beginning of garment. | of garment. | ||||
| PatternInstructions: | ||||||
| Sizes: | 2 | 4 | 6 | 8 | 10 | |
| Setup for Ladder to the Sky: | K2tog, k9; rep from * ending with k1. | *K2tog, k8, rep from *ending with k2tog(2x's). | *K11, k2tog rep from *till last 4 sts K2tog (2x's). | *K8, k2tog, rep from * till last 4 sts, k2tog(2x's). | *K8;k2tog rep from * till last 8 sts k2tog (4x's).. | |
| Decreasing round for: sizes 2-10 | (2) 16 sts = 152 sts: | (4) 20 sts = 160 sts: | (6) 16 sts= 176 sts: | (8) 20 sts = 184 sts | (10) 24 sts = 192 sts | |
| Ladder to the Sky: | Rnd1: *P2, k2tog, yo, k2, p2; repeat from * to end of round. | Rnd1: *P2, k2tog, yo, k2, p2; repeat to end of round. | ||||
| Refertospecialstitchinstruction- Ladder to the Sky page 4. | Rnd2: *P2, k2, yo, sl1kw, k1, psso, p2; repeat from *to end of round. | Rnd2: *P2,k2, yo, sl1kw,k1, psso,p2; repeat from *to end of round. | ||||
| Thisstitchwillberepeatedthe designated#of timesdepending | ||||||
| onthesizeofyourgarment. | Foratotalof2setsofRounds1&2+rnd1. | Foratotalof3setsofRounds1&2 | ||||
| Optional:Stitchmarkersatthis point may guideyou inkeeping with 8 st count. | ||||||
| Smocking “Beading is Optional": | Rnd1&2:*P2,k2;repeat from*to end of round. Rnd3: *P2 "B", repeat from * to end of round. | |||||
| Refertospecialstitchinstruction - Smocking page 5 round 7. | Rnd4&5:Repeat round1&2. | |||||
| Rnd6: *P2, k2 repeat from *,tillast 4 sts before PM, then P2 sts and start working “B: (comprised of remaining 2 sts of round 6 and beginning 4 sts from the start of | ||||||
| Rnd7:After completion of "B"started from round 6,work(thep2,and“B")repeat tolast to last sts,ending withk2. | ||||||
| Rnd8: Repeat Rnd1 & 2, to end of round. | ||||||
| Repeat rounds 1-8 of “beaded" smocking for a total of 3 pattern repeats.After completing the 3 pattern repeats,you will doRnd1, and place a 2nd PM. | ||||||
| (Refer to the bind off st count below that corresponds to your size pattern.) and continue knitting Rnd1: *p2, k2; repeat from * to end of round. | ||||||
| (2) 76 sts (4) 80 sts (6) 88 sts | ||||||
| (8) 92 sts | (10) 96 sts | |||||
| Sizes: | 8 | 10 | |||
| 2 6stbindoffwillbefor | 6stbindoffwillbeforeach | 6 8stbindoffwill beforeach | 10st bindoffwillbeforeach | 12stbindoffwillbeforeach | |
| each side. RND2(beaded smocked | side. RND2(beadedsmocked | side. RND2(beaded smocked | side. RND2(beadedsmocked | side. RND2(beadedsmocked | |
| pattern): Continue in Beadedsmocking as established, working to 2nd marker.Startbindoffof 6 sts. stsforyoursizepattern. | pattern): Continue in Beaded smocking as established, working to 2nd marker. Start bind off of 6 sts. After1stbind offofsts,remove the marker,and continuewith thebeaded smockedpattern asestablished upto2stsbeforethe,castoff thenextsetof | pattern):Continue inBeaded smocking as established, workingto2ndmarker.Start bindoffof8sts. | pattern):Continue inBeaded smocking as established, workingto2ndmarker.Start bindoffof10sts. | pattern):Continue inBeaded smockingas established, workingto2ndmarker.Start bindoffof12sts | |
| FRONT/BACK: Straight #3 needles, work the | The front and back from thispoint forward on willbeknitted separately.Leave theback stitches onyour circular needles. StraightNeedles#4IfUsingDkYarn OR ChangetoStraightNeedles#3Next Row 3 (RS): Complete across the front of the dress, in established pattern. | ||||
| Front half. And later you will do the samefor theBack. BeginworkinginRowsnot Rounds from this point on. | Oddnumberedrowswillbe(RS) and areworked inestablished beadedsmocked stitchpattern. Row 4 (WS): Turning and work the wrong side (WS) row. Even numbered rows will be worked (WS) K2 and P2 (by knitting the purls and purling the knit stitches while working on the wrong side.) You will continue working to complete the rows of 1-8 pattern repeat of the beaded smocking pattern while decreasing along the armholes. And will continue to work onemorefullpatternrepeatrowsof1-8whilestilldecreasing alongthearmhole. | ||||
| NECKLINE: | notedbelowforyoursize: (2) - 48 sts *K1,p1 for 18 sts, attach *K1,p1for 18 sts, attach | (4) - 53 sts *K1, p1 for 21 sts, attach another | (6)- 59 sts | Thisdecreasingrowwillbeginwith thenext row(RS),decrease1st at start andfinishfor thenext row until you'vereached therequired numberof stitchcount (8) -64 sts *K1,p1 for 24 sts, attach | (10)- 68 sts *K1,p1for25sts,attach |
| another ball of yarn and bind off center 12 sts, then k1, p1 for 18 sts to end of row. You will continue to decrease at the neckline in this way till you have only 4 sts on both needles. Then you will do 2 more rows of seed stitchworking only 4 sts on each needle. | another ball of yarn and bind off center 17 sts, then k1, p1 for 18 sts to end of row. | ballofyarnandbindoffcenter 17 sts, then k1, p1 for 21 sts to end of row. | anotherballofyarnandbindoff center 16 sts, then k1, p1 for 24 sts to end of row. | anotherballof yarnandbind offcenter18sts,thenk1,p1 for 25sts to end of row. | |
| STRAPS:I-CORD Changeto#3DPneedles | Thenext rowyou will start on theRS and start making your I-Cordforthe straps using#3DPN. Straplength will be from 8"-12"or desired length. | ||||
| Pattern Instructions: | |||
| Sizes: | 2 6 | 10 | |
| BACK Finishing-CrochetCrabStitch | RefertoFRONT/BACKINSTRUCTIONS | ||
| Edging | |||
| Startat theleftfrontneckline,goingdownthefrontoftheneckline,work2sc'saroundstrapatrightfront,rightside,rightback(2sc'saroundstrap),leftback(2 | |||
| Videoinstruction-page2is | |||
| availableforthisstitch. |
Ideas on how to determine front from back when the child or parent helps puts the top on: Optional suggestions: A. Place an applique. B: By using the darn stitch to create a heart in CC on the front C. Run ribbon thru waist area tying in front D. When doing the straps you could make the front a CC from the back. Bottom Line BE CREATIVE, and have fun making it your own.


