Tadpoles and Lily pad Crochet
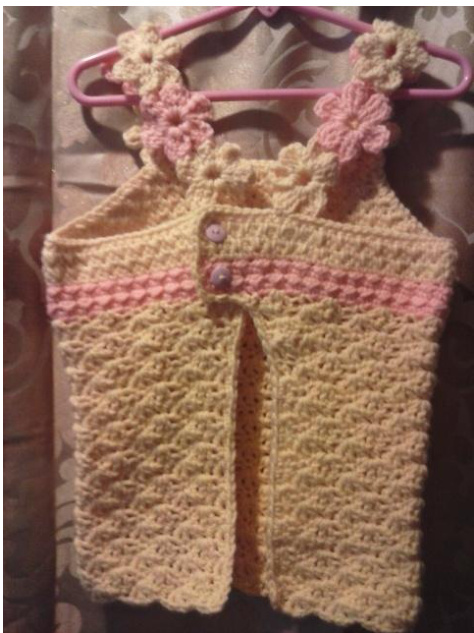
Hlutter Back Fop
Materials
Hook: G (4.5 mm) or size needed to obtain gauge and H (5.0 mm) 2 colors Needle to weave in ends Tape measure Scissors 2 buttons 2 Stitch markers
Finished Sizes
Size Small (4) 24" wide when open 12 V2 inches long Shoulder straps: 10" Bodice: 10 1%2 Flowers: 2" Size Medium (6x-8) 26" wide when open 14" long Shoulder straps: 13 Bodice: 11 %" Flowers: 2" Size Large (10) 28" wide 16" long Shoulder straps: 13" Bodice 13 1/2 “ Flowers: 2" This pattern is written with in the smallest size first and larger size in the parenthesis. Basic knowledge is needed for this pattern. A dedicated beginner should be able to complete this pattern. I have included a list of common abbreviations used in this pattern below. This pattern is written in US terms. Gauge is critical. You may need to go up or down a hook size depending on your tension. Use appropriate hook size to get the correct measurement. This pattern has been tested!
Abbreviations
| Tr: Trebel (triple) | Hdc:half double |
@Tadpoles and Lily pad Crochet
| crochet | crochet |
| Sl st: slip stitch | Ch: chain |
| CC: contrasting color | RS: right side |
| WS: wrong side | Inc:increase |
| Sc: single crochet | St(s):stitches |
\* Long single crochet: insert the hook in a stitch of one of the rows below, yarn over, pull up a long loop, yarn over, pull through 2 loops on hook, long sc made. \* Working between posts: To work between crochet stitches, the hook is inserted underneath all of the horizontal threads of the stitch and between the posts. G hook 4.0mm With Color B Ch 95 (101, 108) Row 1: Sl st into 2nd ch from hook, \*hdc into next ch, sl st into next ch; rep from \* to end, turn. 94(100, 107) Row 2: Ch1, sc across (94). Row 3: Ch 1, sl st in next st, \*hdc into next ch, sl st into next ch; rep from \* to end, turn. 94(100, 107) Row 4: repeat row 2, Fasten off. 94(100, 107) cach MC to the opposite side of row 1. SC across. Turn. 94(100, 107 , Hdc in both loops of previous row across to end. Turn. 94(1o0, 107 Row 7: Ch 1, \*sc between posts of Hdc in previous row (see note), long sc in next sc of row 5\*, repeat from \* to \* across to end. Turn. 94(100, 107) @Tadpoles and Lily pad Crochet Rows 8 and 9: repeat rows 6 and 7. Fasten off. Weave in ends. 94(100, 107)
Yoke
\~With right side facing you, count 30 stitches to the right and mark with a stitch marker. Skip 39 (45, 52) sts and place 2nd stitch marker. You should have 24 (25, 25) stitches left after the 2nd marker\~ Row 1: Sl st to attach MC in the 1st marked st, sc in the next 39 sts, sl st in the 2nd marked st. 39 (45, 52) Row 2: Turn, Sk 1st st, sl st in the next st, sc in the next 37 sts, sk next st, sl st in the last st. 37 (43, 50) Row 3: Turn. Scin the 2nd st, hdc in the next, \*long sc in stitch below of previous row, sc between posts of next\*, repeat from \* to \* until there is 3 sts remaining, hdc in next sk next st and place a sl st in top of last st. Turn. 35 (41, 48) Row 4: Turn. Ch 1, sk 1st st, Hdc in next 33 sts. Skip next st, hdc in next, sl st in last st remaining. 33 (39, 46) Row 5: Turn. Skip first st, Sl st in the next st, sc in next st. \*Sc between posts, long sc in next\*. Repeat from \* to \* until 2 stitches remain. Skip the next st and sl st in last. 31 (37, 44) Row 6: Turn. Ch 1. Sk first st. sc in the next st. Hdc in the next 29 sts, skip next st and sl st in the last. 29 (35, 42) Row 7: Turn. Skip first st, Sl st in the next st, sc in next st. \*Sc between posts, long sc in next\*. Repeat from \* to \* until 2 stitches remain. Skip the next st and sl st in last. 27 (33, 40) Row 8: Turn. Sk first st. sc in the next st. Hdc in the next 31 sts, skip next st and sl st in the last. 25 (31, 38) Row 9: Turn. Skip first st, Sl st in the next st, sc in next st. \*Sc between posts, long sc in next\*. Repeat from \* to \* until 2 stitches remain. Skip the next st and sl st in last. 23 (29, 36) For Sizes Medium and Large only Row 10: Turn. Sk first st. sc in the next st. Hdc in the next 27 sts, skip next st and sl st in the last. 27 (34) @Tadpoles and Lily pad Crochet Row 11: Turn. Skip first st, Sl st in the next st, sc in next st. \*Sc between posts, long sc in next\*. Repeat from \* to \* until 2 stitches remain. Skip the next st and sl st in last. 25 (32) Row 12: Turn. Sk first st. sc in the next st. Hdc in the next 24 sts, skip next st and sl st in the last. 23 (30) For Size L only: Row 13: Turn. Sl st in the next st, sc in next st. \*Sc between posts, long sc in next\*. Repeat from \* to \* last st sl st. Fasten off. (28) Row 14: Turn. Sk first st. sc in the next st. Hdc in the next 24 sts, skip next st and sl st in the last. (26) Row 15: Turn. Sl st in the next st, sc in next st. \*Sc between posts, long sc in next\*. Repeat from \* to \* last st sl st. Fasten off. (24) Change to an H kook. Turn your piece upside down so that the yoke is now at the bottom and the right side facing up. With color A, Attach yarn in the corner. Row 1: sk next st, sc. \*skip 2 sts, (dc, 1ch, dc, ch 1, dc) into next st. Skip 2 sts, 1sc into next st; rep from \* until there is 3 sts remaining. Do not work these last 3 sts. Row 2: 4ch (count as 1dc, 1ch), dc into next sc, skip next dc, sc into next dc, \*(dc, ch 1, dc, ch 1, dc) in the next sc, skip next dc, sc into next dc; rep from \* to last sc, into last sc work [dc, ch 1, dc] turn work. Row 3: 1ch, sc into 1st dc, \*(dc, ch 1, dc, ch 1, dc) into next sc, skip next dc, sc into next dc; rep from \* to last sc. Sc into the 3rd st of ch of previous row. Turn work. Row 4: 4ch, dc into next sc, skip next dc, sc into next dc, \*(dc, ch 1, dc, ch 1, dc) into next sc, skip next dc, sc into next dc; rep from \* to last sc [dc, ch 1, dc] turn work. Row 5: 1ch, sc into 1st dc, \*(dc, ch 1, dc, ch 1, dc) into next sc, skip next dc, sc into next dc; rep from \* to last sc [dc, ch 1, dc] turn work. Repeat 5 until piece measures 12 %2" or until desired length is reached. Do not fasten off, (you will now be working the trim) ch 1 sc up side and around to the opposite side placing 2 sc in each corner. Sl st to join. Fasten off @Tadpoles and Lily pad Crochet
Hlower molfs for the straps
Size G hook First flower Round 1: Ch 6. Sl st into 1st ch to form a ring. Round 2: \*Ch 3, 2 tr into ring, ch 3, sl st into ring\* 6 times. Fasten off For the next 5 motifs you will be joining as you go to the 1st and 2nd petal of the previous flower. There is a right side and a wrong side to the flowers. Make sure that the right side is facing up when you join together. Round 1: Ch 6. Sl st into 1st ch to form a ring. Round 2: \*Ch 3, 2 tr into ring, ch 3, sl st into ring\* 2 times. [Ch 3, tr, draw up a loop, remove hook and insert into a tr of the previous flower and back into the loop, and pull loop through, tr, draw up a loop, remove hook and insert into a tr of the previous flower and back into the loop, and pull loop through]\* twice. Repeat from \* to \* to complete flower. Fasten off For the second strap your first flower will be joined to the 3rd and 4th petal of the previous straps first flower Round 1: Ch 6. Sl st into 1st ch to form a ring. Round 2: \*Ch 3, 2 tr into ring, ch 3, sl st into ring\* 2 times. [Ch 3, tr, draw up a loop, remove hook and insert into a tr of the previous flower and back into the loop, and pull loop through, tr, draw up a loop, remove hook and insert into a tr of the previous flower and back into the loop, and pull loop through] twice. Repeat from \* to \* to complete flower. Fasten off The next 5 flowers repeat as above but attach to the 1st and 2nd petal. Finishing: Weave in all ends and attach buttons to the left side. Align the buttons close to the edge. The tab should overlap. Buttons will fit through the sts.
oellishments that you would like to the front of the top or leave it as ir Thank you for purchasing this pattern ? Due to the nature of this sale there are NO returns or refunds. If you need additional help or find any errors: tadpolesandlilypadcrochet@gmail.com @ This pattern is Copyrighted it cannot be reproduced in any way or form! You may not sell the pattern itself or share it with others. If someone is interested in purchasing this pattern please refer them to tadpoles and lily pad crochet so they may purchase it themselves. You MAY sell finished items and I encourage you to do so! @Tadpoles and Lily pad Crochet


