SKANDIUM
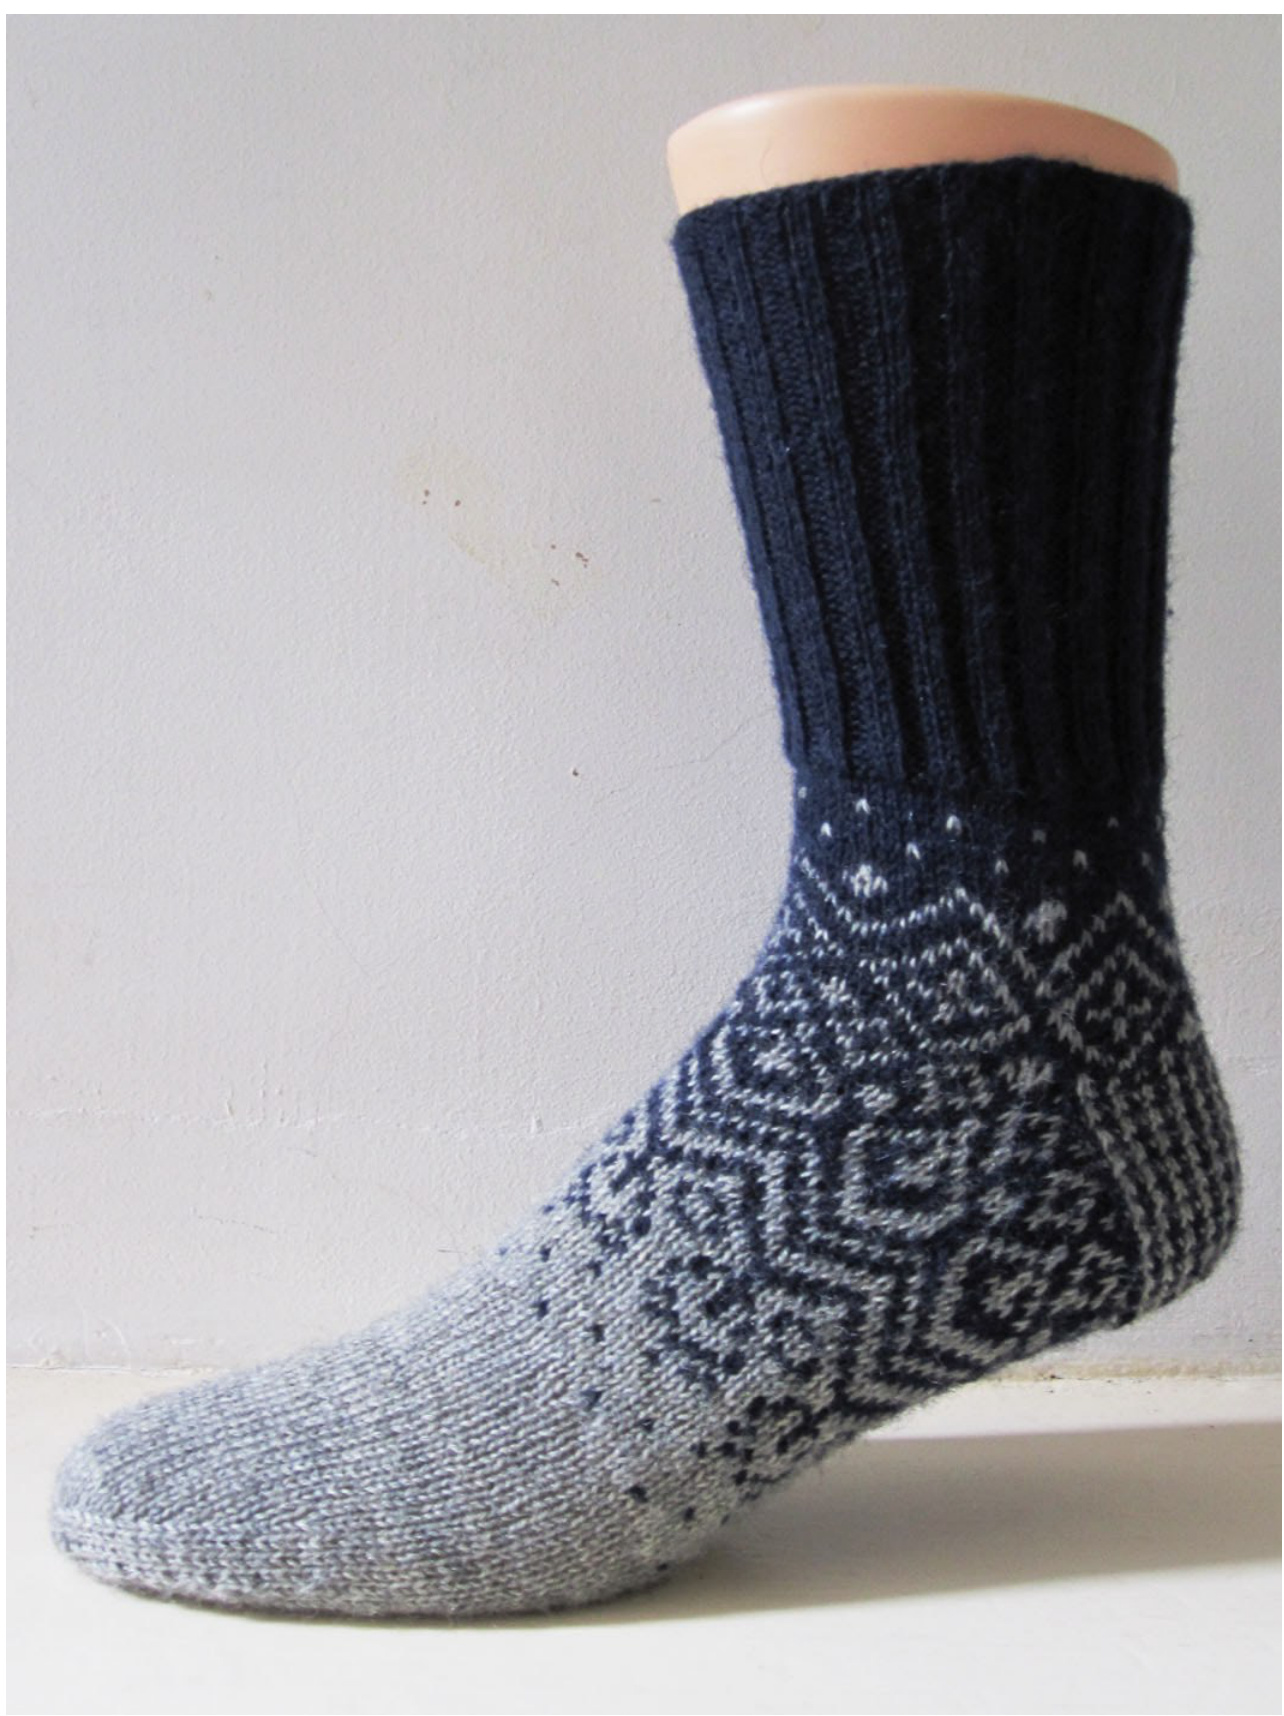
This design takes its main inspiration from the traditional Scandinavian yoked sweaters, particularly some of the famous Icelandic Lopi sweaters. It struck me at some point that the typical way these yokes and their patterns are used to decrease the stitch count almost invisibly could very well work for the gusset part of the foot. Rather than decreasing 2 stitches every 2 rounds at the side of the foot, a very similar shape can be achieved by decreasing 8 stitches every 8 rounds, equally distributed. Not only does this hide the decreases pretty well, it also allows the pattern to be uninterrupted all around the foot.
Size:
The downside of the principle behind this sock is that it involves a bit of math, and for this reason I can only supply one size, with 72 sts around the leg and foot over the stranded portion. From experience I would say that this is probably the size that most people will fit into; with a bit of adjustment of the needle size and/or yarn thickness if necessary.
Material:
There are various options to work the leg, these will impact quite a lot on yarn usage. I have knitted my sample socks with an 80 sts ribbed leg; this takes quite a lot of yarn, and with only 50 g of each colour to play with, I decided to work the socks fraternal. If you want to work this variation but with identical socks I would suggest you have at least 60 g of colour A to play with. I have not tried any of the other variations, and the length of the leg and the foot is obviously also a factor, but for these I would guess 50 g of either colour should be just enough for most people.
Gauge:
On my sample, I was getting 33 sts x 45 rows over plain stocking stitch with the smaller needles and 33 sts x 42 rows over stranded stocking stitch with the bigger size needles, but take this as a guide line only, make sure that the sock fits you well and that you are happy with the drape of the fabric you are creating first of all.
Needle size:
You will need needles in two consecutive sizes: the size that you would be most happy to knit your chosen yarn with in a normal sock (I used 2.5 mm) and then one size bigger (I used 2.75 mm). There is scope here to adjust to your personal preference and to fine-tune the size of the finished sock, use what works best for you. I have written the instructions for circular needles and/or magic loop; if you prefer to work with DPN's please note that "needle 1" and "needle 2" may mean different things for you, other than that there should be no issues.
Further requirements:
Tapestryneedle - Stitch markers (although you could do it without if they irritate you)
Cuff:
As I said in the introduction, there are various options that would all work for the leg. On my sample, I have opted for variant A.
Variant A:
With the smaller needle and yarn A, cast on 80 sts and work in K2 P2 rib until you are about 2 inches / 5 cm from where you would like to start the heel. On my sample, I worked 40 rounds. Work 1 round in K, decreasing evenly to 72 sts. K 2 plain rounds. You could work this section with 72 sts and omit the decrease round, but this will only work if your legs do not widen much towards your calves or if you keep the leg quite short. I also wanted to have the rib fairly chunky to emphasize the design connection to traditional sweaters.
Variant B:
Cast on and rib as above, but only work a regular rib (around 20 rows) and then work the rest of the leg in plain knit over 64 sts until you are about 2 inches / 5 cm from where you would start the heel. Work 1 round increasing evenly to 72 sts. K 2 plain rounds.
Variant C:
Cast on and rib as for variant B. With 72 sts, K 2 plain rounds. Change to the bigger needle size and introduce yarn B. Work the leg in the lice' pattern, repeating rows 1 - 6 of the chart until you have reached the desired length. Make sure you end with row 6, ready to start the chart again with row 1.
Leg:
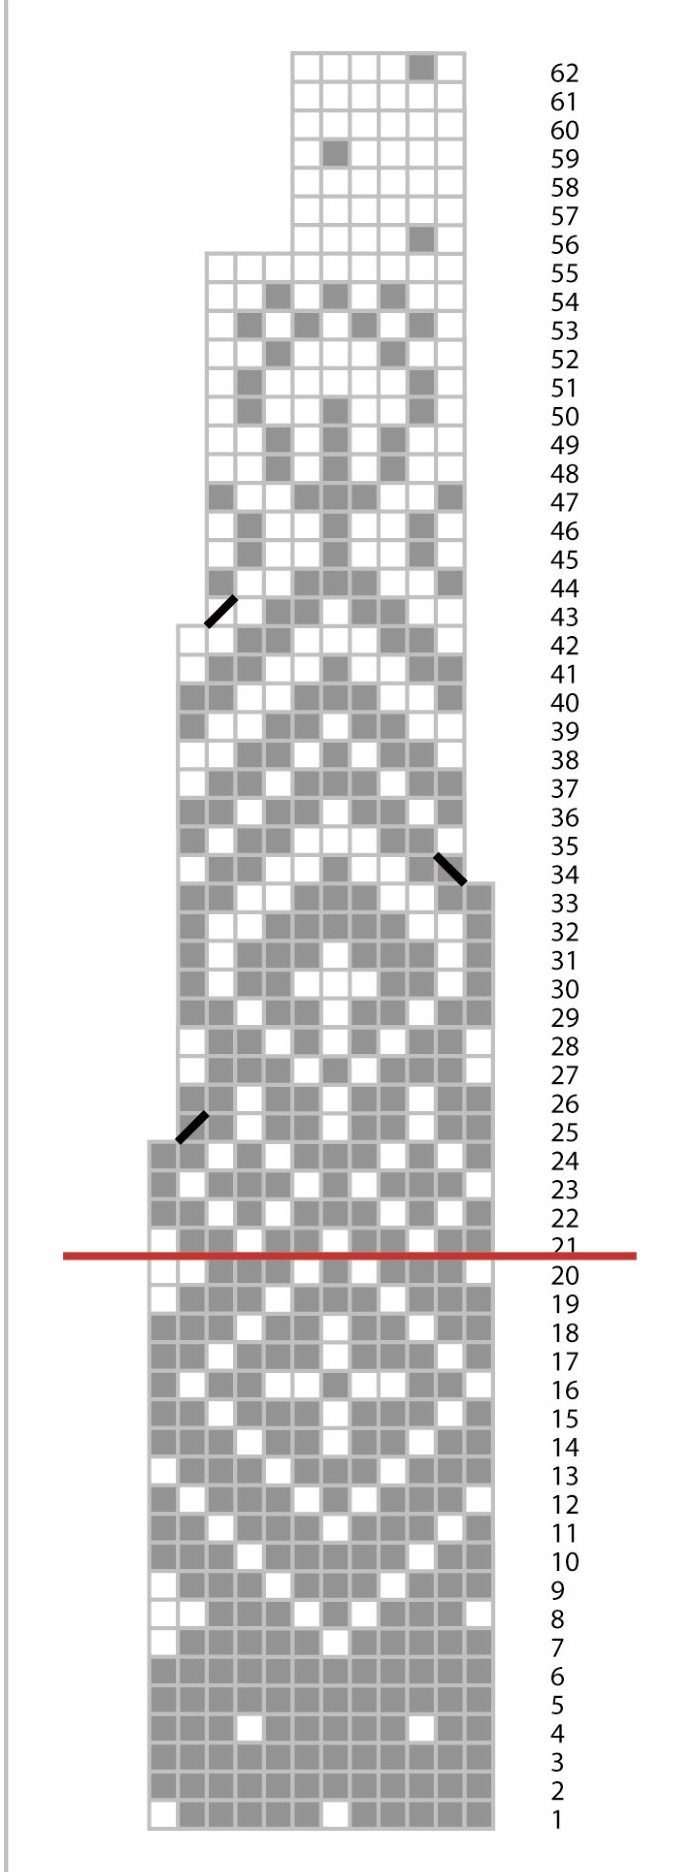
Change to bigger needles and introduce yarn B (unless you are working variant C) and work rows 1 - 20 of the chart; this willfit 6 times around your leg.
Heel:
I have designed both the heel flap and the heel turn to be stranded, this will involve some stranded purling unfortunately, but only very little, and I would urge you to persevere. It has the following advantages: 1. I did not want to have a solid heel section at this point as I felt it would jar with the pattern; the two colour flap and turn blends in fairly well. 2. The effect of the eye of partridge heel worked in simple two-row stripes is quite surprising. 3. using both colours all the way through the heel section means they are in the right place to start the gusset, so less ends to darn in later. 4. In a stranded sock, the heel turn very often is the only part that has no re-inforcement, even though this is one of the areas where most people would need it. The heel is worked over the first 35 sts on needle 1, work these according to row 21 of the chart and slip the last st onto needle 2 for the instep, turn. Sl1, purl across the remaining 34 sts, alternating between yarn A and yarn B, turn Row 1: Sl1, with yarn A [sl1, K1] to end, turn Row 2: Sl1, P to end, turn Row 3: Sl1, with yarn B [K1, sl1] to last 2 sts, K2, turn Row 4: Sl1, P to end, turn Repeat these 4 rows until you have worked a total of 38 heel flap rows, including the first 2 stranded rows. I have worked the heel turn in a 1/1 checker board, so always work each st in the opposite colour it appears from the row before (from row 2 onwards). Alternatively, you can work the heel turn 1/1 striped, in this case always work each st in the colour it appears. So stranding alternately between yarn A and yarn B throughout, turn the heel as follows: Row1: Sl1, K19, SSK, K1, turn (leaving 12 sts unworked) Row2: Sl1, P6, P2tog, P1, turn (again leaving 12 sts unworked) Row3: Sl1, K to 1 st before gap, SSK, K1, turn Row4: Sl1, P to 1 st before gap, P2tog, P1, turn Repeat rows 3 and 4 until you have used up all the sts either side. You should be ready to work a K row, with 21 sts on your needle. Sl1, K10 still in the 1/1 pattern. This is the centre back and the new beginning of your rounds.
Gusset:
With needle1, K 10 according to row 21 of the chart. Pick up and K 19 sts, one in each of the slipped stitches all the way down the heel flap to the instep, always maintaining the pattern repeat of the chart, K across 19 of the instep sts in pattern. With needle2, K across the remaining 18 instep sts, pick up and K one st in each of the slipped sts up the second side of the heel flap, taking care to pick up 19 sts again and maintaining pattern repeat throughout. K remaining 11 sts to centre back in pattern. You should now have 21 sts from heel, 19 from heel side, 37 from instep and 19 from second heel side = 96 sts, 48 per needle. Work rows 22 - 60 of the chart, this willfit 8 times around the foot. At the end of the chart, you will be back with 72 sts. IMPORTANT: please note that there is no decrease in row 56 of the chart, instead the repeat changes from 9 sts to 6 sts, so you will work the chart 12 times around the foot instead of 8 times as for rows21-55.
Foot:
Change to smaller needle, drop colour A and work a plain K round, decreasing evenly to 64 sts. Work the foot in plain stocking stitch until you are 5 cm / 2 inches short of your desired total foot length. Alternatively, you may wish to continue the "lice' pattern along the foot, especially if you have worked variant C for the leg. In this case, stick with the bigger needles and both yarns, work in the established pattern until you are 2 inches / 5 cm short of your desired foot length and do the needle change and decrease row then.
Toe:
To place your markers for the toe decreases (if you prefer to use them), work first round as fol lows: K 13, K2tog, K1, place marker, K1, SSK, K 13. Repeat on Needle2 Round2: K Round3: K Round4: K Round5: [K to 3 sts before marker, K2 tog, K1, sl marker, K1, SSK, K to end] on each needle Round6: K Round7: K Round8: as Round 5 Round9: K Round10: K Round11: as Round5 Round12: K Round13: as Round5 Round14: K Round15: as Round5 Round16: K Round17: as Round5 Keep working Round 5 until you have a total of 16 sts. With a DPN, K 4 sts from needle1. Move the remaining 4 sts from needle1 and the first 4 sts from needle2 onto a second DPN. Move the last 4 sts from needle2 onto the first DPN. Cut yarn, leaving about 10 inches / 25 cms and graft the toe closed. Turn sock inside out and darn in the 4 loose threads.
Further suggestions:
With this design, substituting heel types is not as easy, sorry.. You could, however, easily substitute your favourite type of toe construction. If you have experience in stranded designs, it should be fairly easy for you to develop an all over design from the first 20 rows of the chart to be worked over the leg, if that's what you would prefer. Having one of the yarns as a variegated or a self striping yarn could look very good, just make sure the other is a solid and has a good contrast with ALL of the shades that are in the variegated/striped yarn.
Glossary:
St, sts stitch, stitches K knit P purl SI slip M1 Make one new sts by lifting the strand between two sts and knitting it tbl tbl through the back loop K2tog knit 2 stitches together SSK slip, slip, knit. Slip 2 stitches separately as if to knit, insert left needle into these two stitches from the right and knit onto right needle. P2tog purl 2 stitches together WS, RS Wrong Side, Right Side
Glossary of symbols used:

knit on right side, purl on wrong side knit 2 together slip, slip, knit
SKANDIUM


