FOLK ART OWL!
A Pattern By YarnPaint (Megan Antoniak) · ? 2012 www. YarnPaint.com For personlusenfyou ldlie to sellismadefrmthispate please aileat: aaint@mailm.
Materials Needed:
Main color worsted weight yarn Two contrasting colors of fabric Three contrasting colors of thread Three colors of perle cotton size 5 Black for eyes Yellow for beak Light contrasting color for eyelashes Two buttons Stuffing Size E crochet hook Small straight pins Stitch marker (optional) Scissors Sewing needle Yarn needle
Gauge: Not important for folk art owls! Size: If using worsted weight yarn like suggested, owl generally is about 4 inches. This size willvary, though, depending on the yarn used, your own tension and how tall you decide to make the body.
Key:
Sc = single crochet Dc = double crochet Decl = single crochet two stitches together to make a decrease BLO = back loop only Ch = chain Slst = slip stitch
Some Tips:
While gauge is not important, the size of your yarn is. Smaller, thinner yarn will make a smaller owl, while bulkier yarn will make a lager one. Use a hook appropriate for your yarn size, but make certain that your stitches are neat and tight. Too loose will make the stuffing show through the holes in the stitches, but too tight will make it inflexible, “uncuddly” and appear to be chain-mail! Try and maintain a stitch tension between these two extremes to make your owl look the best! For example: If your yarn is soft and cuddly, but when you crochet with it the result is stiff, try relaxing your tension or moving up a hook size.
"Folk Art Owl" by YarnPaint · Page 1 of4
Generally, I would recommend a yarn that has a little bit of plushness to it. This will make it appear more like feathers and give the owl more texture. This is why I recommended worsted weight as it would give the best impression of this, without making the owl too large. You may use whatever colors you like best for this owl. I used natural colors, but I think it would be adorable in any combination of fun colors. Even outlandish fabric and bright yarns! Also, please realize, this pattern isn't about being perfect, it's about having fun and making it unique. So it doesn't matter if you aren't a great at crochet or an amazing seamstress -—- I'm certainly not! What matters is making it fun. If it's crooked, that's okay. If it's unusual, that's great! Do whatever you like. I designed this pattern specifically to be a simple crochet project with lots of room for expression. Go wild. Have fun. And let me know how it turns out!
Pattern:
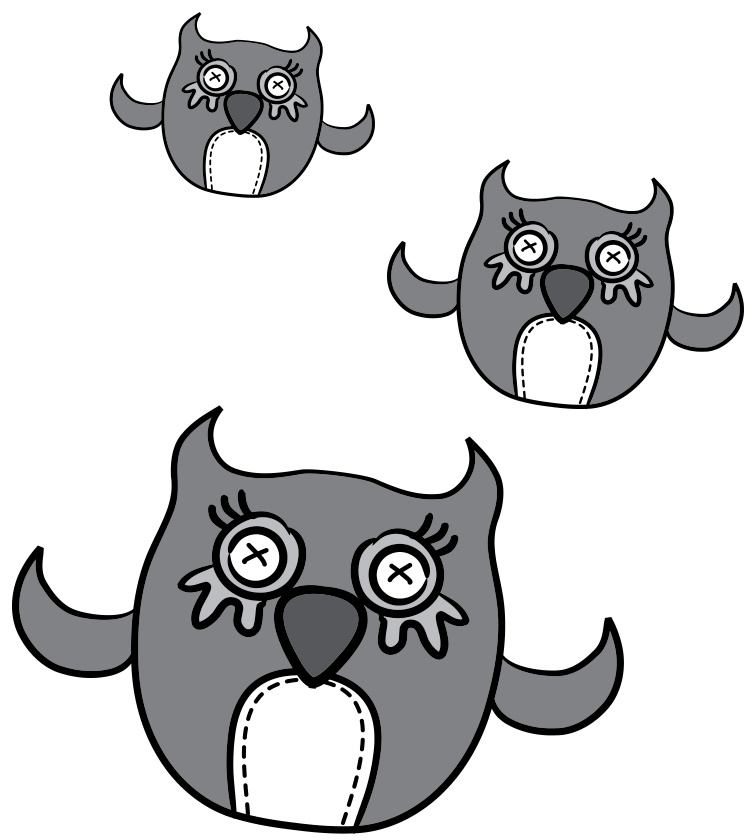
Owl Body-- (Pattern is worked in the round.) 1) Using main color ch18 2) Ch1 (counts as 1sc this time only), 1sc in third chain from hook, sc across to last ch, 3sc in last ch, do not turn work, continue to sc across backside of ch to last ch, 2sc in last ch, slst into first ch1 of this row (38sc, counting the ch1 as a sc) (Optional: place stitch marker in first stitch in each row now and for every row in body.) 3) Sc around (38sc) 4) Repeat Row 3 5) \* Sc in BLO of first sc, dc in BLO of next sc, rep. from \* around (creates a ridge) 6) Dcl, scl across 7) Sc1, dc1 across Repeat rows 6-7 until owl is desired height. My owl in the example is about 4 1%4 inches tall. Bind off owl body by cutting yarn but leaving a tail. Pull tail through last stitch then weave intobody to hide the end. Leave top open, we will close it up later. Wings-- (Worked fat, not in rounds. You will also need to make two of these.) 1) Using main color ch7 2) Chl, turn, scl, dcl across 3) Rep. Row 2 4) Rep. Row 2 5) Chl, turn, decl, scl, decl, scl, decl 6) ch1, turn, decl, scl, decl 7) ch1, turn, decl, scl 8) ch1, turn, decl Bind off owl wings by cutting yarn but leaving a tail. Pull tail through last stitch then weave into wing to hide the end. Details -- Now it's time to add the details! There are five templates below for you to print out. Trace their designs onto the backside of the fabric with a pencil and carefully cut out. It's best to work slowly, especially since it isn't any fun to have to cut out pieces of fabric a second time.
"Folk Art Owl" by YarnPaint · Page 2 of4
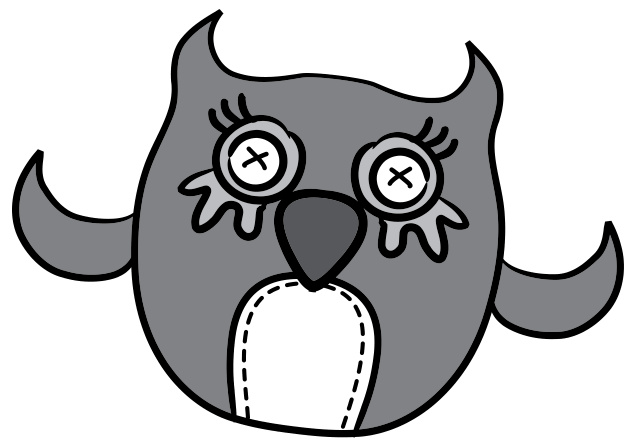
For the chest pieces, I folded the edges under before pinning to give a smoother edge. You could also baste them or use fabric glue to keep them in place. If this sounds like too much work, feel free to skip it. But I would strongly recommend pinning the pieces in place as it keeps them straighter. When you are sewing the pieces and the details on, use whatever stitch style you like. They can be basic or complex. When I did my sewing, I tried out a variety of stitches and thread colors. I used contrasting colors to stitch on the chest and feather pieces so as to make them stand out more. For the eyelashes, I used a light brown and just did three simple straight stitches of different lengths. The beak is perle cotton in yellow and stitched in a traditional triangle design, but could be easily altered to whatever you desire. While you are working on your sewing, it does work best to pin all your pieces onto the owl every so often to check your placement. (If this isn't important to you, just skip it!) Sometimes when working on amigurumi projects, I even stuff it to get the full effect before removing the stuffing and continuing. Just a warning: if you sew with the stuffing in the project, it is a mess and sometimes your stitches will be too loose from having gotten caught on the filling. For my eyes I used two vintage metal buttons. You can duplicate this idea or stitch your own eyes completely freehand. Or make them out of more fabric. I like the look of the buttons and it gives the owl a different texture from it just being fabric. The “eye whites" underneath the buttons give the owl some additional pop without causing it to look crazy eyed.
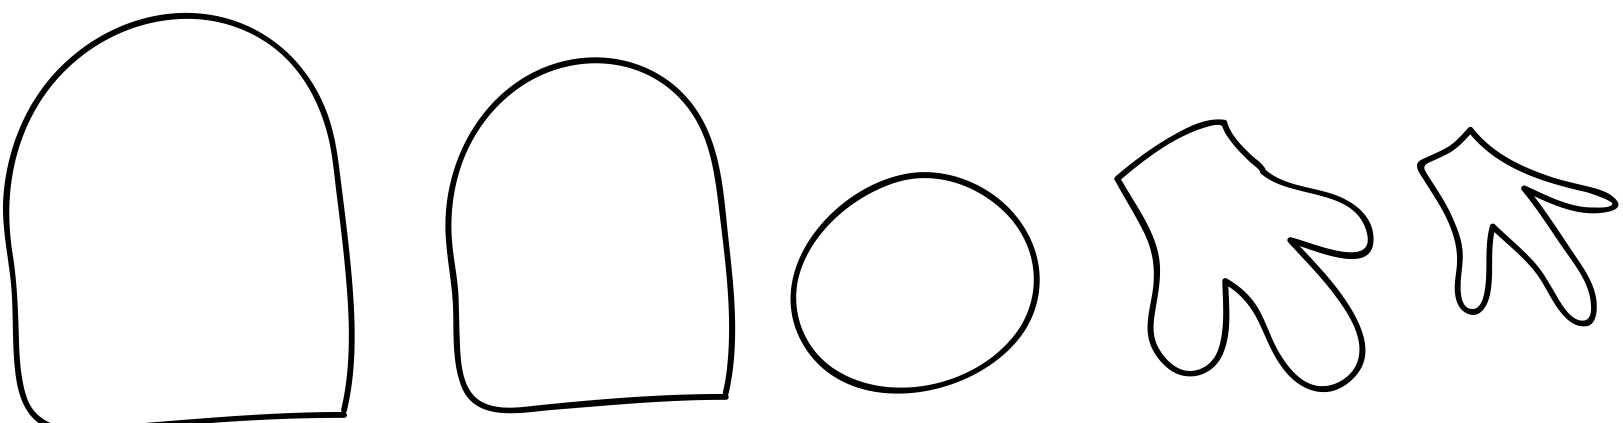
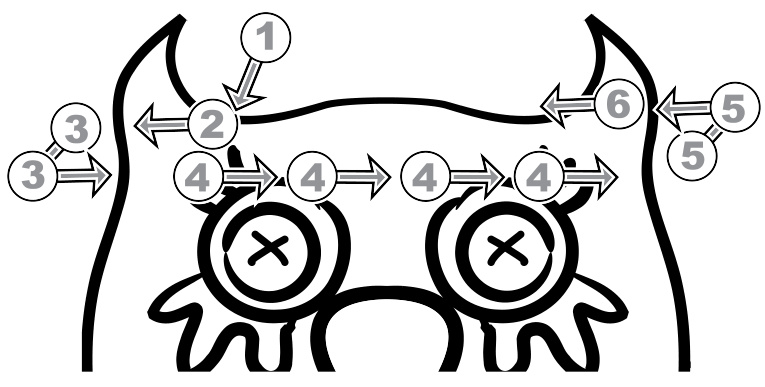
Above: Sample templates - Outer stomach piece, inner stomach piece, eye whites, outer eye feathers and inner eye feathers. Your pieces do not need to be exactly the same as these - try changing them for added quirkiness! Finishing-- After you have added all the details you desire, it is time to finish up your owl! Taking a long piece of main color, thread it onto the yarn needle and tie a knot at one end. Going from the inside of the owl to the outside (so that the knot stays on the inside where no one can see it) whip stitch the wings in place. They should go on the side of the owl near the middle. Tie off and weave into owl body to hide ends. Once the wings are attached, add stuffing to the owl. Don't stuff it too firmly, leave it squishy and keep it Hat on the front so it isn't rounded. Take another piece of main color, knot it at one end and thread it on the needle. Pinch the top two sides of the owl together so that it forms a ridge. (Remember to sew from the inside to the outside to hide the knot frstl) Carefully match up the stitches on both side of the owl and sew through the top two strands of both stitches (where you would have put the crochet hook.) Do this across the top so that there is a definite ridge on the top of the owl's head. To make the ear bumps, take the yarn still attached to the top of the head and pass the needle through the top (just a little to the side of the corner) and out the side of the owl so that it emerges just a little below the corner. Then pass the needle complete through one side of the owl to the opposite side; this will make it have a bit more definition to the ears by pulling in the sides of the owl. Finally, pass the needle (now on the opposite side) up through to the top of the owl again in the same corner areas, only mirroring what you did before. I know this sounds complicated, but it really isn't. However there is an illustration below to show what I mean. Weave in end of the yarn and hide it in the body of the owl.
You're all done!! Now it's time to sit and enjoy your new quirky folk art ow!! I would love to see what you do with your owl! Either post project pictures on Ravelry.com or email me at yarnpaint@gmail.com!
Check out more great patterns and finished projects for sale on my website, www.YarnPaint.com!


