TRADE BEADS SoCKs
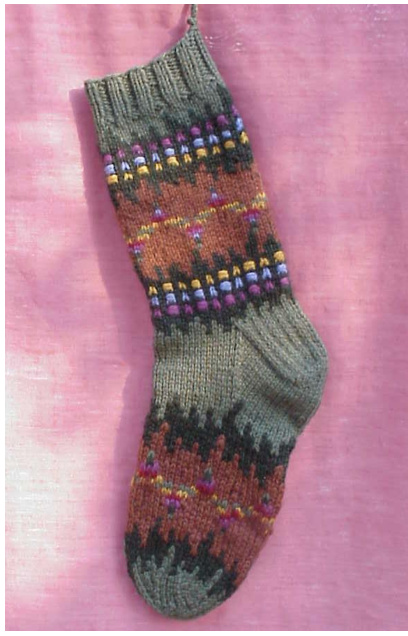
Trade Beads Sock The beatifal shapes & colors created bu glass bead makers of $\mathbf{18}^{\mathrm{th}}\pmb{\&}\ \mathbf{19}^{\mathrm{th}}$ c. Earope saggested the patterns in tbis sock. Mana of these arresting beads re-sarface at namerous Moantain Man Rendezvous annaalia re-enacted tbroughoat the American West. 2-handed Fairisle techniqae recommended. Are qoa readu to knit Crows, Ponies, flames, & Chevrons? Materials: 2 balls of DK wt. sock yarn in Sage green (color A), and 1 ball of each of dk. green (color B) & md. brown (color C). You willalso need small amounts of periwinkle (color D), Raspberry (color E), dk. red (color F) and gold (you guessed it, color Gi) -or colors of your choice · 2 st markers, 1 yarn darner Double-point needles in sizes 2 and 3 (for smaller stockings) or in sizes 3 and 4 (for larger ones) -keep in mind that the over-all fabric will be more or less dense depending on which gauge you use. Gauge: 6 sts and 7.5 rows $=$ 1" on #4 needles 6.5 sts and 8 rows $,=$ 1" on #3 needles Gauge is measured over stocking stitch- hereafter, stst. Pattern is written in smallest size with larger sizes following in parenthesis. Begin at the top of the cuff with smaller ndls, long tail cast-on and color A. Co 40(44,52)sts. Divide evenly onto 3 needles and join in a circle being careful not to twist. Place Marker at join, this join will mark the center back of your sock and the beginning of each new rnd. Work a cuff of 12 rnds in 2x2 rib. Now switch to larger sized ndls & stst and wk 0(6, 8) incs evenly spaced in next rnd. There are now. 40(50,60) sts and you are ready to attach color B & begin following the chart from rnds 1-5. After completing chart rnd 5, attach color E and with both wk next 2 rnds as follows:
"Button Stitch" rnd 1-\*K 1 B, K 1 E, K1 B, K 2 E\* Rep from \*to\* to end of rnd.
“ButtonStitch" rnd $2-{}^{\star}\mathsf{R e p}\;1^{\mathfrak{s t}}\,3$ sts of rnd 1, then do button st over next 2 sts as follows: Using E, bring RH ndl in front of next 2 sts. Insert it between these 2 sts & next st, under LH ndl. Wrap wking yarn clockwise (opposite of usual wrap) around RH ndl & draw through. Now wrap wking yarn around RH ndl clockwise & draw the yarn through the loop. Place the RH ndl into the 2 wrapped sts on LH ndl and slip them onto RH ndl. Pass the new st over the top of these 2 sts and drop it off. \* Rep from \* to \* to end of rnd. (seelast page of pattern for more info on buttonst) After completing button st rnd 2, wk 1 rnd even in B, then rep the 2 button st rnds this time using B as before and color D in place of color E, then wk 1 rnd even in B again before a $3^{\mathsf{r d}}$ pair of button st rnds using color G in place of color D, then 1 more rnd of B only before resuming chart at rnd 6. Now follow Chart from rnd 6 to rnd 29, Then rep entire button st sequence as before but this time using accent colors in reverse order (start with F and end with E) then 1 rnd B only before resuming chart at rnd 29. After completing chart, wk 1 rnd A only, then switch to smaller sized ndls to complete sock. At this point you are ready to divide for heel flap as follows: With ndl #3, k the 1st 10(13,15)sts from ndl#1. Stop kniting. Shuttle the next 20(24,30)sts to 2 empty ndls until needed to work the instep. The heel sts should now all be on what was ndl #3. The heel flap will be worked back and forth on 2 needles over these back 20(26,30)sts. Wk the heel flap in heel stitch as follows:
Heel flap
Row 1 (Wrong side facing you) $\;^{\star}{\sf s}|1$ , p1. Cont from \* across row.
Row 2 (Right side facing you) sl1, $\kappa$ all remaining sts across row.
Repeat these 2 rows 10(13,15)x for a total of as many rows as there are heel flap sts. You should have 10(13,15) links'in your heel flap edge chain. Place a marker on ndl at center of heel sts and end having completed a row 2. You are now ready to turn the heel with short row shaping.
To turn heel-
Row 1: sl1, p1 to center, p 2 more, p2tog, p1. Turn Work. (Do not work to end of row). Row 2: sl1, k5, ssk, k1, Turn work. Row 3: sl1, p1 to 1 st before 'gap' from last turn, p2tog, p1, turn. Row 4: sl1, k all sts until you are 1 st before 'gap') ssk, k1, turn. Row 5: As for row 3..
Row 6: As for row 4.
Continue on in this manner until all sts have been worked, end having completed a right side row. 10(12,14) sts remain on heel ndl. The next step is to pick up into the heel fliap edge chain. Here you can use another ndl or the one with the heel sts already on it. You should be ready to go up the right side edge. (Look at the sock as worn on a foot). Pick up and knit into the 10(13,15) links'. Then, with a 2nd ndl, K across all 20(24,30) of the reserved instep sts, then with a $3^{\dot{\mathsf{r}}{\mathsf{d}}}$ needle, pick up and k down the remaining links' on the left side edge. With these 10(13,15)sts, k half of the remaining heel sts, the other half begins needle #1(so re-place rnd marker here).There should now be 15(19,22) sts going up the right side of the sock (needle #1), 20(24,30)sts across the instep (needle #2) and 15(19,22)sts going down the left side (needle # 3). You are again working in rnds, with center bottom of foot marking beginning of each new rnd. Now Begin instep gusset shaping.
Instep Gussets
Rnd 1: kto last 3 sts of ndl #1, k2tog, k1. K allsts across ndl #2. At the beginning of nd #3, k1, ssk, k to end of rnd. Rnd 2: k even. Repeat these 2 rnds alternately until there are 10(13,15) sts on needles #1 and #3, resuming a total of 40(50,60) sts. Now attach color B and resume following chart, but this time follow it completely from beginning to end, eliminating the button stitch accents, At the same time (for smaller sizes) begin toe shaping when about 1.5-2" from tip of toe (you may or may not stil be on the chart- if you are, stay in pattern while shaping toe, if not, finish toe in color A. lt Toe Shaping-The toe willbe shaped with a series of alternating mirror image decreases on alternating rows, similar to instep gussets, as follows: Rnd 1: Work to last 3 sts of needle #1, make a dec to the right $({\bf k}2{\bf\{o g\}}){\bf k}1$ ${\sf K}^{\mathrm{\st}}$ st on ndl # 2, ssk. K to last 3 sts on ndl #2, k2tog, k1. K $1^{\mathrm{st}}$ st on $3^{\mathsf{r d}}$ ndl, sk. K to end of rnd. Rnd 2: Work even all sts. Repeat these 2 rounds altenately,until there are a total of 445) sts remaining onboth the 1st and the $3^{\mathsf{r d}}$ ndls, and 8(8,10) sts remaining on $2^{\mathsf{n d}}$ ndl- 16(16,20) in all. With ndl #3, across all sts from ndl #1 so there are 8(8,10,10,12) sts on both needles facing each other, half on top and half for sole. Break off yarns, leaving about $18"$ to graft toe. Wash, block and enjoy your new socks!
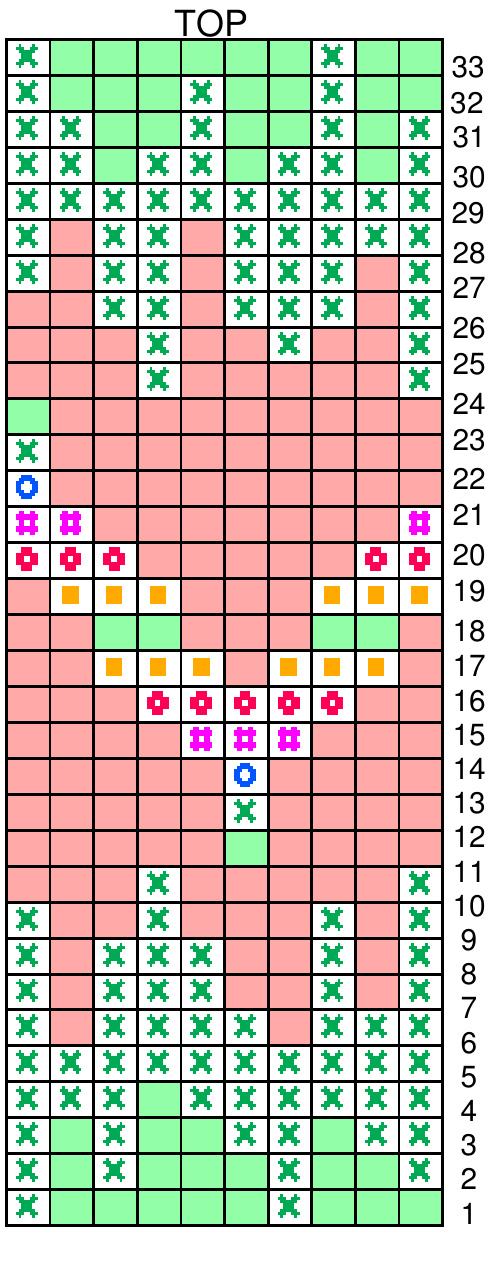
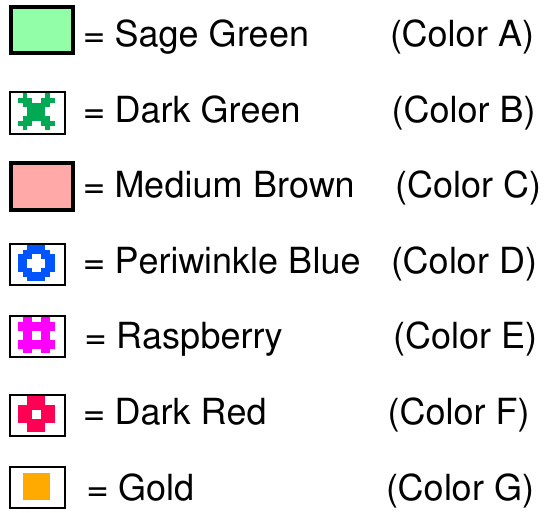
(Read chart from bottom to top, right to left.) Chart Key:
More on Button st: This delightful litle texture st was first brought to the attention of American Knitters by Nancy Bush, in her Great American Afghan square (see knitters # 45, Winter 1996, page 41).She used it as “Nupp Stitch" in her terific Book Folk Knitting in Estonia (Interweave Press, 1998) and I learned it knitting samples for that book. It is being used here with her endorsement and gracious permission. (It is also fullyillustrated in both of those publications). rade Beads socks Copyright 2002byAne Carrol GilmourNot tobe knit for realeAllrghts reserved


