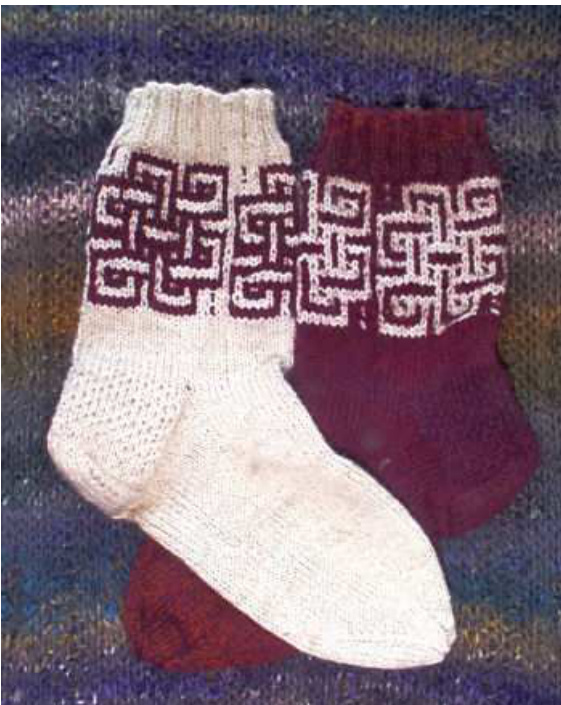
The Endless Knot Socks
by Robbyn Kenyon
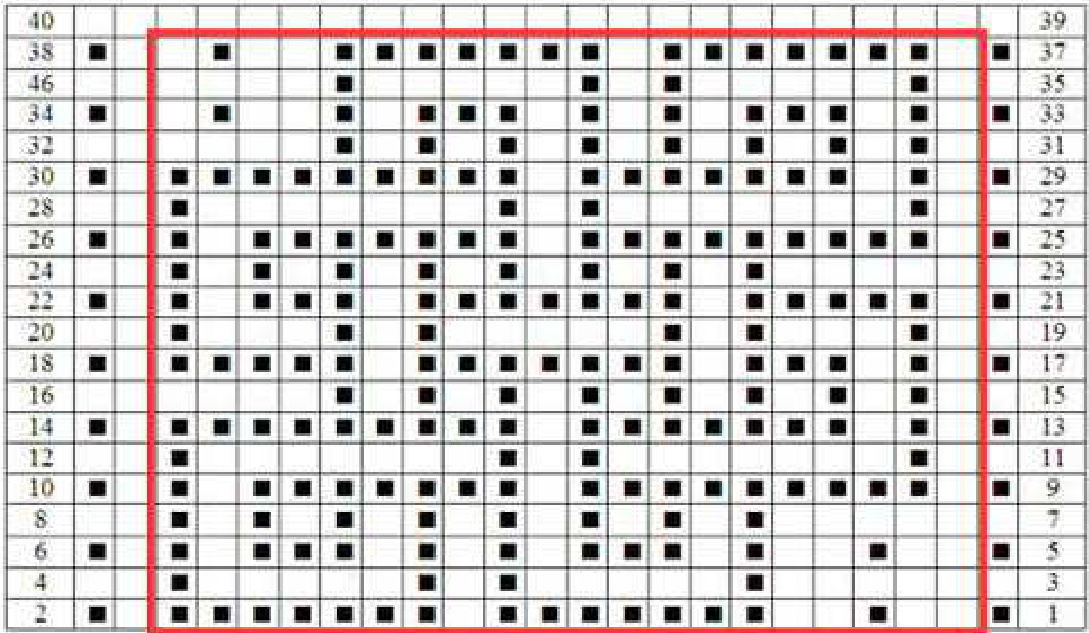
I have always been fascinated with this design - with any design, in fact, that though it appeared to be complex turned out to be a single line with no beginning or end. Such is my view on life, the universe and everything :) Not to mention that knitting itself also takes a single line and turns it into the most wonderful things! Well, there is usually a beginning and an end point but in the case of a Moebius scarf, the line gets pretty vague :) I do not claim to be a Buddhist, but many of my views and leanings coincide with Buddhism. This symbol is called the Auspicious or Endless Knot and, among other things, represents the connectedness of all things as well as the union of compassion and wisdom. The design is rendered in mosaic knitting which is an intriguing technique for color knitting that doesn't involve carrying two (or more) yarns, nor does it create floats on the wrong side of the work. The finished fabric retains a good deal of stretch. On the chart, the repeat is indicated by the red outline. Each repeat is 20 stitches wide and you will have three repeats around the circumference of the leg. The boxes on the chart represent your colors. The empty boxes are your main color and the filled boxes are your contrast color. Notice that after the number that tells you what line of the chart you're working, there is either an empty or a filled box. This tells you which of your colors you should be working with. If it is an empty box, then you will be using your main color. If it is a filled box, you will be using your contrast color. Each line of the chart represents two rounds which are worked in exactly the same way and with the same color. So for round 1, note that you're working with your contrast color. Drop the main color for now. Written out, round 1 would look like this: S12, kl, sl2, k7, sll, k7. You will repeat this on each needle (three repeats) until you are back at the beginning and ready to commence round 2 - which is exactly the same as round 1 - same color and same pattern. Now you're ready to start round 3. Note that this is worked with your main color, so pick that up and drop your contrast color. Written out, round 3 looks like this: K5, sll, k5, sll, k1, sll, k5, sl1. And round 4 will be exactly the same as round 3. Work through the chart, always reading from right to left (since this is worked in the round) until you complete the design. Then proceed with the rest of the sock. Materials Sport weight yarn - 400 yards Color A (main sock), 150 yards Color B (knot design) or 200 yards of each color if you decide to do yin/yang type socks :) Size2 US $(2.75\;\mathrm{mm})$ needles - 4 double points, one or two circulars - as you prefer. The pattern is written for four DPNs but magic loop fanciers should have no problems adapting. For those who prefer two circulars, one of the pattern designs will be split between the needles. Scissors, tapestry needle for ends, stitch markers if you find them helpful, et.. Leg With Color A, cast on 60 stitches, 20 on each of three DPNs. Join and knit in $2\textup{x}2$ ribbing for about 1.75 - 2 inches. Knit 2 rounds plain. Join color B and begin mosaic pattern. There will be one pattern on each needle.
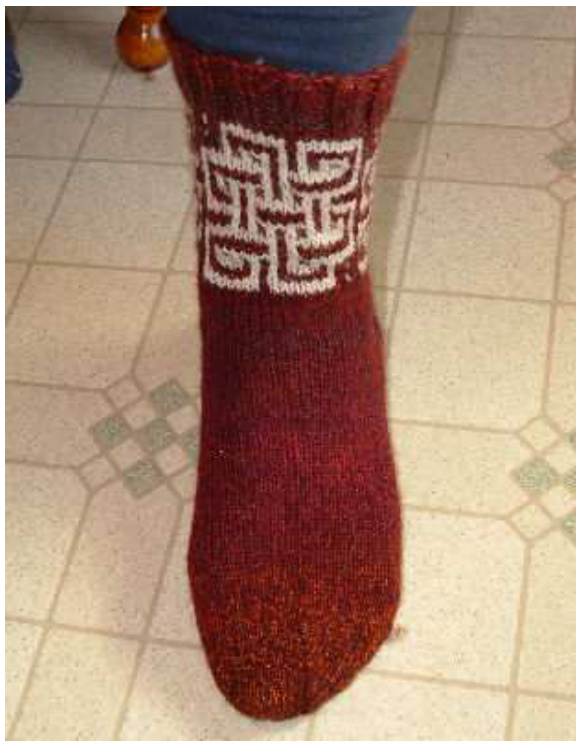
When the chart is complete, cut color B and proceed with your main color in plain stockinette) for about 2 more inches (more if you like a longer leg). Preparation for heel flap This centers one of the symbols over the front of the leg. Knit 15 stitches off needle 1. Move the last 5 stitches of needle 1 to needle 2. Move the last 15 stitches of needle three to needle 1. You now have 30 heel stitches on needle 1. Arrange the remainder of the stitches so there are 15 sts each on needles 2 and 3. Turn work and purl back across needle 1. Heel flap, Eye of Partridge Row 1: $^{*}\mathrm{Sll}$ , $\mathrm{K}1^{*}$ , across. Row 2: Sl1, Purl across. Row 3: Sl2, K1, \*sl1, $\mathrm{K}1^{*}$ across; end K2. Row 4: Sll, purl across. Repeat these four rows 7 times for a total of 28 heel flap rows. Knit 1 row. Turning the Heel Next row: P19, P2tog, turn. Next row: Sl1, K8, SSK, turn. Next row: Sl1, P8, P2tog, turn. Next row: Sl1, K8, SSK, turn. Continue as above until all edge stitches have been taken up. 10 stitches remain on needle, having ended on a right side row. Gusset Pick up 15 stitches down the side of the heel flap. With a new needle, knit across the instep, combining the stitches from needles 2 and 3 onto one needle. With a new needle, pick 15 stitches up the other side of the heel flap and knit 5 stitches off of needle 1. Needle 1: 20 stitches Needle 2: 30 stitches Needle 3: 20 stitches Decreases Row 1 Needle 1: Knit to within 3 stitches of the end; K2tog, K1. Needle 2: Knit across Needle 3: K1, SSK, Knit to end. Row 2 Knit around Repeat the above two rows until needles 1 and 3 have been reduced to 15 stitches each. Foot Knit around even until fot is as long as you want - generally about 2 to $2.5^{\bullet}$ shorter than the total length of the foot. Star Toe Next round: \*K2tog, $K13^{*}$ around. Next round: Knit Next round: \*K2tog, $K12^{*}$ around Next round: Knit Continue decreasing this way until needles 1 and 3 have 8 stitches each and needle 2 has 16 stitches. Repeat round one only until needles 1 and 3 have 2 stitches each and needle 2 has 4 stitches. Cut yarn, leaving several inches. Thread yarn end through tapestry needle. Pass needle through the remaining 8 stitches, removing them from the needles. Pull tightly to cinch the stitches up. Draw yarn through to inside and weave the end in. Weave in any other ends. Make another and you're done! Wear with compassion and wisdom. Notes Making these socks with the stated yarn type and needle size willfit a size 10 foot attached to a heavy calf :) Fingering weight (sock yarn) on size 1 needles should scale this down for more normal sizes. In any case, the leg will be a bit loose because, aside of the cuff, there's no ribbing. Another option might be to rib from the bottom of the symbols until you're ready to start the heel flap. Finally - as always, I made these for myself and I made an inverse color pair to add the idea of Yin Yang - balance - to the project. If you decide to try these socks, make them for yourself! A sock is a collection of pieces - cuff, leg, heel, foot and toe. I used an Eye of partridge heel flap - amusingly enough since it is absolutely invisible on the red sock because of the darkness of the yarn! You can use that, or regular heel stitch or plain stockinette - whatever you like and are comfortable with. I made a Dutch heel and a star toe - but you can make any kind of heel or toe that you like. Because if you decide to make these, they're going to be your socks :)