Easy Cuff-Down Worsted Weight Socks
The perfect introduction to sock knitting is a pair of socks in worsted weight wool. These socks knit up quickly and the instructions are chatty enough to answer most beginners' questions. After you have learned the basics, you can add color and texture to create your own fancy socks. I've made over 50 pairs using this pattern, in all types of yarns and in many sizes. Betcha can't make just one!

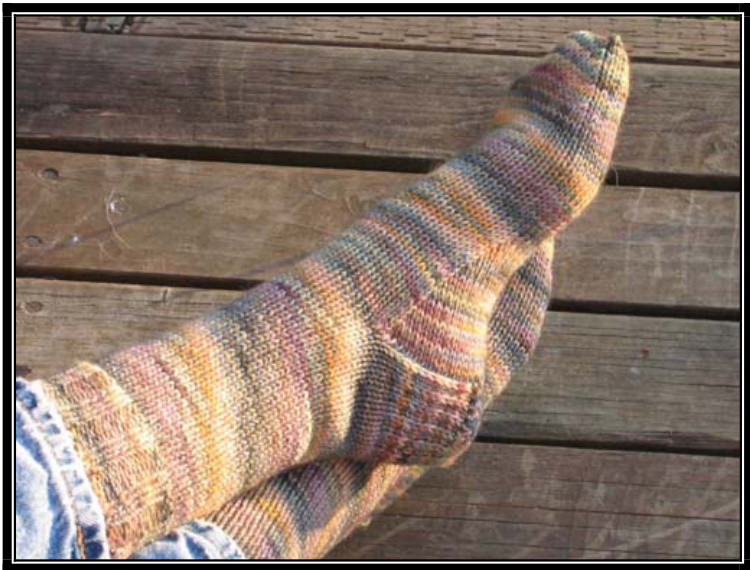
Yarn: 220 yards of worsted weight wool. The socks pictured above were knit from Deluxe Worsted Magic yarn by Universal Yarn Company in color 901, shades of orange. 220 yards will be plenty to knit a pair of Women's Medium socks with a 9 V2" leg and a 9 12" foot. If your feet are larger you will need more yarn. If they're smaller, rejoice in your good luck, confident that you'll have yarn left over. With yarn of this weight the socks willfit in Birks or loose shoes or other sandals, or just wear them around the house - it all depends on how loose you wear your shoes. Gauge: 5 stitches per inch with a US #3 bamboo needle. That's not a typo - you want to knit socks at a tighter gauge than you would knit a sweater so they will wear well and last for years. A personal note about needles: I prefer a wood or bamboo needle to knit socks. They are warmer to my always-cold hands, they "give" a little as I knit, making them more comfortable, and they are lighter, making them less likely to fall out of your knitting, especially in those first awkward rounds. These instructions assume that you are familiar with Double Pointed Needles (DPN from here on out) and that you know how to knit and purl. I place the stitches on three needles and knit with the fourth, using the fifth needle of the set for a short time while decreasing for the gusset. You may, of course carry the stitches on four needles and knit with the fifth, dividing the instep stitches onto two needles until the gusset pick-up, where they wil have to be put on the same needle for a short time unless you happen to have a set of 6 needles @ Cast 45 stitches onto a single needle several sizes larger than the needles you plan to use to knit the socks, or cast on over two needles so the cast on edge is nice and LoosE - there's nothing worse than putting on a sock only to have it cut off your circulation because the top is too tight. Remove the extra needle before beginning the ribing. Start the first row of ribbing: Knit 2, Purl 2 until there are 14 stitches on DPN needle 1. Start the 2nd needle Purl 2, Knit 2 until there are 20 stitches. Start the third needle Purl 2, Knit 2 until there are 10 stitches on the needle. There will still be one stitch left on the 4th needle. Put this last stitch on the beginning of the 1st needle so that when you join in the round you will Knit 2 together for the first stitch. If you are familiar with DPN's you will be able to visualize this when you get there. Knit 2 together, knit one needle 1 to needle 2, so that needles 1 and 3 have 12 stitches each, and needle 2 has 20 stitches. Those first two Knit stitches will be awkward as the stitches are tight with only three needles, but persevere. Be sure your stitches are not twisted when joining in the round. Starting each needle with a Purl stitch will help to eliminate the “ladders" that can form when knitting in the round on DPN needles. Be aware that your knitting will look like, well, like nothing at all good, for the first five rounds. Once those first five rounds are done you will start to see the cuff of the sock, so don't be discouraged @ Knit 20 or so rounds of Knit 2, Purl 2 ribbing, or however much you like at the top of your socks, or until you're tired of it. Some people like to knit the whole leg in ribbing - I find this boring and tedious prefer to knit only a little ribbing at the top, and then stockinette (knit every round) for the rest of the leg. Remember that you are working with a limited amount of yarn, so be a little conservative on the rib and leg. You can always use a contrasting color for the rib, heel, and toe if you experience any YSO (Yarn Shortage Anxiety) Knit about 30 rounds stockinette after the ribbing for short socks as shown, or as many rounds as you like, assuming you have more than 220 yards of yarn. Rearrange the stitches on the needles so that there are 22 stitches on needle 2, and 11 stitches on needles 1 and 3. The beginning of each round is where the two needles with fewer stitches come together - this should be directly above the cast-on tail and will soon become the center of the heel flap. Now for "hard" part, the heel flap and turn. I like the feel of a "Dutch" heel. In order to get to the heel, we have to knit a flap. I like to use a "heel stitch" for the heel flap because it makes a firmer fabric, and it pulls in, making the heel flap narrower. I have a narrow heel, so this fits me just right. If you have no problems with a narrow heel, you can work stockinette stitch for the same number of rows, instead. The heel flap is knit on half of the foot stitches - 22. Leave the other 22 stitches (the instep stitches) alone or put them on a holder. Knit the stitches from Needle 1 onto Needle 3 - it's easier to knit the heel flap if all of the stitches are on one needle. Turn and Purl 22 stitches back, putting you at the end of Needle 3. When I say “turn," I mean to turn your work around so it faces the other direction - you will be knitting back and forth on Needles 1 and 3, leaving the instep stitches on Needle 2 unworked for now. To knit the heel stitch - Row one - \* Slip 1 stitch, Knit 1 stitch\* repeating from \* to \* across. Row 2 - Slip the first stitch and Purl across. By slipping the first stitch of each row, you will make a series of loops on each side of the heel flap which will make it easier to pick up stitches for the gusset. Repeat these two rows 10 times, or about 2.5 - 3". It will depend on how deep you need your heel flap. Measure from your anklebone to the floor to get a rough idea of how far you need to knit. The only sure way to know is to knit a sock and try it on, but this guesstimate is a good place to start. Whether or not you knit the heel stitch, be sure to slip the first stitch on each row to keep that nice chain along the sides of the flap. If you choose to knit plain stockinette, work the same distance asdescribedabove. Now to turn the heel: It sounds scary at first, and confusing, and illogical, but if you follow the instructions blindly, without letting your brain argue, and have faith that everything will turn out fine, you'll be able to do it will little or no hair pulling. You will be working with the stitches of the heel flap - 22 stitches. It goes like this - Set Up Row - Slip the first stitch, Knit 14, Knit 2 together, turn. Row One - Slip the first stitch, Purl 8, Purl 2 together, turn. Row Two - Slip the first stitch, Knit 8, Knit 2 together, turn. Repeat rows one and two until there are 10 stitches left on the needle. To work the final two rows, you will be knitting and purling the last two stitches of the row together. You will not be knitting every stitch on each row - you will be creating short rows that will form a cup that will follow the shape of your heel. The stitch count will decrease with each row. ig 10 stitches across so that the working yarn is at the left side of the finished heel tu With a crochet hook, pick up one stitch in each of the slipped stitches on the sides of the heel flap. The number willvary, and that's okay. It's always good to "fake it" and pick up a couple of extra stitches at the beginning and end of the heel flap - this will help eliminate any holes. You will be working from the heel turn down towards the instep stitches. I picked up 15 stitches on the first side of the heel flap, knit across the stitches previously neglected on Needle 2 (the instep stitches), then picked up another 15 stitches on the other side of the heel flap, and knit across the heel stitches to thebeginning. This brought my total stitch count to 60 stitches. This may vary, so don't be too worried about it. The important things are these: 1. Its always better to pick up more stitches than fewer - this way your socks won't have gaps at the sides 2. Be sure that you pick up the same number of stitches on each side of the heel flap. If you can't, it's not a big deal, just make sure that you decrease on the side with more stitches in the first round, so that the numbers end upeven. Now for the gusset decreases: Knit one round even - this will even out the picked-up stitches and make the decreases easier to perform - picked-up stitches sometimes are tight and don't like to be knit together. Put the stitches on four needles: The picked-up stitches on the left side of the gusset on Needle 1, the instep stitches on Needle 2, the picked-up stitches on the right side of the gusset on Needle 3, and the heel stitches on Needle 4. This will change after the gusset decreases. Each round begins at the left side of the heel turn after knitting the stitches on the bottom of the heel. Decrease round: Knit to the 3rd stitch from the end, Knit 2 together, Knit the last stitch on Needle 1. Knit the instep stitches even. Knit 1, Knit 2 together, Knit to the end of Needle 3. Knit even across needle 4 to the end. Next round: Knit even. Repeat these two rounds until you reach 44 stitches, alternating a decrease round with an even round. This works for most feet. If you have a narrow heel or foot, you may need to do two decrease rounds, followed by one even round until you reach the number of stitches you need. Knitter's choice. If your socks are regularly loose around the ankle, you may want to try this way, if not, consider yourself lucky and continue on to the foot. Rearrange the needles so that there are 22 stitches on needle 2 (the instep stitches,) and 11 stitches on needles 1 and 3. The beginning of the round is once again at the center of the bottom of the foot - this is important for the toe decreases, sodoublecheck!
After the gusset decreases are done, its time for the foot. This is just endless rounds of stockinette stitch, around and around. It helps to make a mark on a scrap of paper or use a row counter if you are as anal as I am about making the socks identical. That way you only have to measure one sock, and the second becomes very meditative - just stockinette stitch and marks on the paper. Stop knitting when the sock measures 1 1/2" less than the length of your foot from the back of the heel to the tip of your longest toe. Measure the sock from the back of the heel flap to the bottom of the current round of stitches to check your progress. This may vary slightly depending on your row gauge. If you measure how far 11 rows is, you can subtract that from your foot measurement, and calculate how soon to start the toe decreases. Once you reach this point, it's time for the toe decreases. Needle 1 - Knit until 3 stitches from the end, Knit 2 together, Knit 1. Needle 2 - Knit 1, Knit 2 together, Knit until 3 stitches from the end, Knit 2 together, Knit 1. Needle 3 - Knit 1, Knit 2 together, Knit to the end. Next round - Knit even. Repeat these two rounds 6 times - 20 stitches remain. Knit the stitches from Needle 3 onto Needle 1 so that the stitches are now on two needles - the stitches on the bottom of the foot on one needle and the instep stitches on the other. Graft the two together, run in all the loose ends on the inside of thesock, and you're done! There are many sites on the web for the Kitchner stitch, and every good knitting reference has instruction and pictures, so I won't include them here. If you're in a hurry and not too picky, a 3-needle bind off works just as well and doesn't require a needle. Yes, the 3-needle bind off will leave a little ridge on the outside, but it willvirtually disappear with a few wearings and I find it convenient when I don't have the time to sit down and Kitchner for whatever reason. Put the sock on and see if it fits. If it's a little off, that's okay - make the appropriate changes on the second one. Put your foot up on a coffee table or low stool, and admire your work. While the heady feeling of making your own sock is still with you - and before you get up to do anything else (some arcane superstition, but I stilldo this ;-) cast-on for the secondsock. Send me a picture, and I'll post it on my website - with credit to you, of course. I am happy to answer any questions you may have via e-mail - just drop me a note at sofialeo2013@gmail.com. Happy Knitting! Mary in Lebanon, Oregon www.startingoverdesigns.com


