6
Araucania Itata Multy (3.5 ozs/430 yds) - Color #1022. Or any fingering weight yarn that meets gauge. Finished Size: 6.25 inches in circumference and 7 inches in length to ft hands measuring up to 7.5 inches around. Note: This mitt fits like a second skin. 150 yards 36 sts and 48 rows = 4 inches in stockinette stitch Size 1 US (2.25mm) double pointed needles (DPNs) or size to obtain correct gauge Fourteen 3/8 in. buttons. Stitch markers Scrap yarn or stitch holder Tapestry needle Note: There is a differencebetween right and left mit instructions. Please read through the entire patenbefore you start to knit.
Left-hand Mitt:
Setup:
CO 54 sts and divide over 3 DPNs in multiples of 2 sts. Taking care not to twist sts, join to begin working in the round by moving the first stitch cast on Needle 1 to Needle 3. Pass the last stitch cast on Needle 3 over this stitch and onto Needle 1. The first and last stitches have been switched.Prepare to begin to work in the round, working the cuff as follows: R1: [k1, p1 ] repeat for entire round. Repeat this rnd until cuff measures 2.25 inches. Reorganize the stitches so that there are 27 sts on Needle 1, 14 sts on Needle 2, and 13 sts on Needle 3
Begin hand and thumb gusset shaping:
Next rnd (inc rnd) On Needle 1, knit 14 sts, slip marker over 14th st to mark button placement, knit remaining 13 sts; Nedle 2 - knit 14 sts; Needle 3 - k6, PM, m1, k5, m1, PM, k2. [ 7 thumb sts between markers ] The position of the thumb gusset has been established. Increase every 3 rounds as follows: R1, R2: Knit across all needles. R3 (inc rnd): Knit across Needle 1; knit across Needle 2; on Needle 3, k6, slip marker, m1,knit to next marker, m1, slip marker, k2. [9 thumb sts between markers J. Repeat these three rnds 8 times more. [74 sts total; 25 thumb sts ]
| k =knit | s1 = slip 1 | k(p)2tog-knit(purl)2togetherasone |
| μnd = d | m1=make1 | psso=passslipstitchover |
| st(s) = stitch(es) | PM=placemarker | SSK=s1kw,s1kw,thenknit those2 sts tog as one |
Copyright 2011 Kathleen Cox. Pattern and garments made from pattern are for personal use only and not be used to produce items for resale.
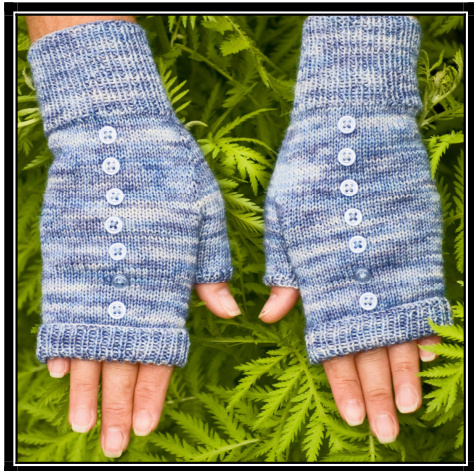
Bachelor Button Mitts
Next rnd: Knit across all needles. Next rnd: Knit across Needle 1; knit across Needle 2; on Needle 3, k6, slip 25 thumb sts to a piece of scrap yarn or stitch holder, CO 5 sts using the backward loop method, k2. [ 54 sts total; 25 thumb sts are held aside to be worked later ] Next rnd: Knit across all needles. Repeat this rnd until 0.75 inches from desired length.
Top Edge:
Next rd [ atfrentrer.Rat thisdfortotalfinch. ndoffnatlyextdinrbpaestalshd
Thumb:
Place 25 sts from yarn hold onto needles as follows: Place the first and last stitch from holder onto Needle 1, so that the “gap" is between them; dividing the remaining sts onto Needles 2 and 3. Next rnd: On Needle 1, k1, pick up and knit 7 sts in the “gap", k1; knit the remaining sts around. [32 sts ] Next rnd: On Needle 1, SSK, k5, k2tog; knit the remaining sts around [ 30 sts ] Next rnd: Knit entire round. Next rnd: On Needle 1, SSK, k3, k2tog; knit the remaining sts around [28 sts ] Next rnd: Knit entire round. Next rnd: On Needle 1, SSK, k1, k2tog; knit the remaining sts around [26 sts ] Next rnd: Knit entire round. Next rnd: On Needle 1, s1, k2tog, psso; knit the remaining sts around [24 sts ] Knit 7 more rnds, or until 0.25 inches from desired length. repeat for entire round. Repeat this rnd for a total of 2 rows. Bind off neatly on next round in rib patterm establishe
Right-Hand Mitt:
Work the same as the left-hand mitt, adjusting the thumb gusset position and increases as follows: Reorganize the stitches so that there are 27 sts on Needle 1, 13 sts onNeedle 2, and 14 sts on Needle 3. The gusset increases willthen be worked on Needle 2 instead of Needle 3, and Needle 3 will be worked straight. Next rnd (inc rnd) On Needle 1 - knit; on Needle 2- k2, PM, m1, k5, m1, PM, k6. [7 thumb sts between markers ]; knit across Needle 3. Continue as established; following directions for the left-hand mitt.
Finishing:
Weave in all loose ends on WS of fabric. Icenter stitch marking as a guideline, evenly space 7buttons permit verticllybetween the mitcuffand top edgir oak pieces inlukewarm water with wool soap. Squeeze out excess moisture and layfat to dry without stretching When completely dry, fold Top Edge in half to form cuff. Enjoy!
| k =knit | s1 = slip 1 | k(p)2tog-knit(purl)2togetherasone |
| μnd = d | m1=make1 | psso=passslipstitchover |
| st(s)=stitch(es) | PM=placemarker | SSK=s1kw,s1kw,thenknit those 2 sts tog as one |
Copyright ? 2011 Kathleen Cox. Pattern and garments made from pattern are for personal use only and not be used to produce items for resale.


