Fit Forever Longies - Tester Version
Thank you for being interested in my pattern. This is a tester version and I have not yet finished knitting all my cuff examples or my photo tutorials. However, if you do use one of the cuffs that do not have a picture yet, I'd love to get one from you! Also, if you do use this pattern while it's free, please fill out the tester questionnaire. Thanks so much! -Marie
Ravelry/Diaperswappers Username and/or Email:
Size Made:
Age/Size of Child:
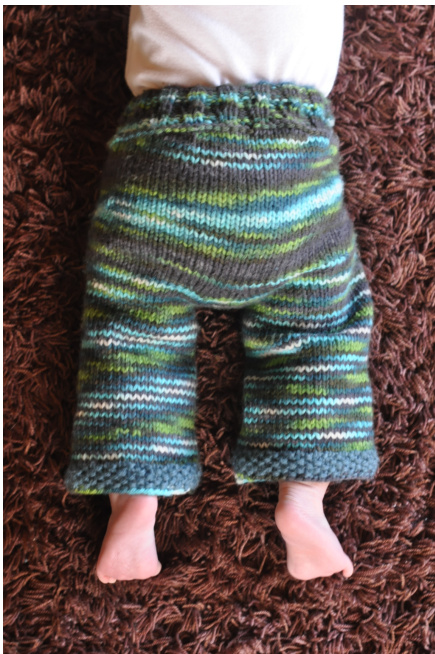
The finished project should be slightly big on the lower size range (for example size xs should be big on a 1 mo old) and fitted on the higher size range. How does your project fit? What do you like about the fit? What would you change? How does the pattern flow? What makes sense/doesn't make sense? What was the most confusing section? Do you have any suggestions for improving it? What do you like about the pattern? What do you not like about the pattern? What changes would you make?
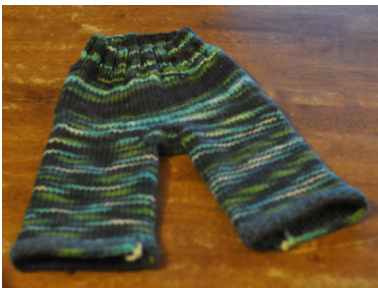
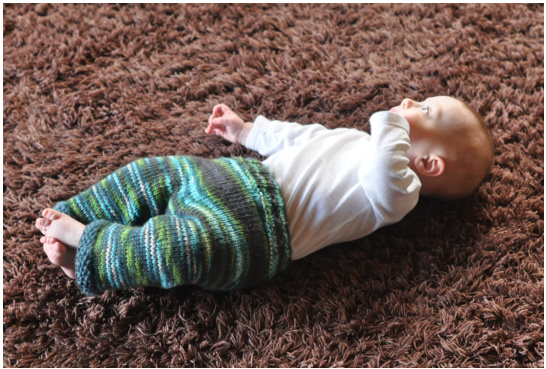
FIT FOREVER LONGIES
a comfy casual fit with room to grow
GAUGE: 4.5 sti on Worsted (10ply) with 5mm needles (Us size 8)
SUPPLIES
XS - Small: up to 4oz yarn Medium-Large: up to 8oz Large-XL: up to 120z
5mm/Us 8 (or gauge) circular needles in lengths 16" & 12" (or) 5mm double pointed needles 16" Circular needles 2 sizes smaller than what is needed to obtain gauge AND/OR 16" Circular needles 1 size smaller than what is needed to obtain gauge 5mm (or gauge) double pointed needles for gusset and i-cord or a 5mm crochet hook
ABBREVIATIONS:
k = knit p = purl st = stitch sts = stitches m1f = make 1 front m1b = make 1 back mc = main color cc = contrast color yo = yarn over kfab = knit front & back dpn = double pointed needle sti = stitches per inch Size small (3-6mo) on a 6 month old. BCM - back center marker FCM - front center marker LHM - left hip marker RHM - right hip marker FM1 - front gusset marker 1 FM2 - front gusset marker 2 BM1 - back gusset marker 1 BM2 - back gusset marker 2
MEASUREMENTS
Hip: measure 2-3" below the waistband, at the widest part of the diaper Rise: measure from the top of the diaper in the front, under the legs, and to the top of the diaper in the back. Add 1" for the waistband.
| Size | Age | Hip Inches | Rise Inches | Cast On |
| Newborn | Newborn | 11-13 | 13 | 56 |
| Extra Small | 0-3 months | 13-15 | 13 | 64 |
| Small | 3-6 months | 15-17 | 14 | 72 |
| Small-Medium | 6-9 months | 15-17 | 15 | 72 |
| Medium | 6-12 months | 18-20 | 16 | 80 |
| Medium-Long | 9-18 months | 18-20 | 17 | 88 |
| Large | 18-24 months | 19-21 | 18 | 96 |
| Non diapered Toddler | 24-3T | 19-23 | 15 | 96 |
Custom Calculation -- Use this if you have a thicker or thinner yarn, or if you know the measurementsofthechild To determine how many stitches to cast on, do the following: Gauge x Hip = Round up to the nearest number that can be divided by eight. Gauge: Hip: Rise: CO: Example: Gauge = 6st/inch, Hip = 17 inches, 6 x 17 = 102 (round up to 108) C0 = 108 sts
WAISTBAND
Cast On: NB=64 (XS=72, S=72, M=80, ML=88, L=96, T=88) Join in the round and place the Center Back Marker (CBM). Be careful not to twist stitches. Use contrasting color yarn if desired.
Waistband Options
A) Classic ribbed with drawstring
Rounds 1-5 (or 1 inch): k2, p2 to end of row Round 6: k2, yo, p2tog to end of row
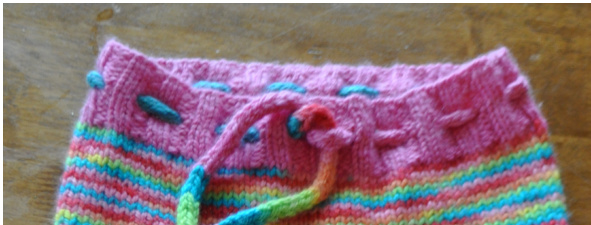
Rounds 7-10 (or 1 inch): k2, p2 to end of row Switch needles to gauge size and do one more k2, p2 round. (Switching needles before starting the rest of the body make the difference in needle sizes less obvious around the Waist.) Round 6 can be omitted and the drawstring threaded through the ribbing without holes. B) Fold Over / Yoga: use needles 2 sizes smaller than gauge needle. Join to knit in the round. (k1, p1) for 3 inches. This will allow the waistband to be tight enough to not need a drawstring and be folded down to adjust for size and rise. Switch needles to gauge size and do one more k1, p1 round. (Switching needles before starting the rest of the body make the difference in needle sizes less obvious around the Waist.) C) Encased elastic or drawstring Use needles 1 size smaller than gauge Rounds 1-8 (or 1.5"): Knit all Round 9: Purl Rounds 10 - 17 (or 1.5"): Knit all
D) Ribbed Encased
Use needles 1 size smaller than gauge Work the same regular encased, but use either k1, p1 or k2, p2 for all rows needing knitting (Round 9 is still purled) After finishing the encased waistband, use one of the following options before starting the body. Option 1 - Whipstich: (most common) after finishing your longies, go back to the waistband, fold to the inside at the purled row, then whipstitch the cast on edge to the inside at the last row of the waistband. Switch to larger needles and main color. Option 2 - Knit Together: After finishing your waistband, knit one more row to join the cast on edge with the last row of the waistband. Fold at the purled row and hold the two edges together. Insert your needle into the first stitch of the round and the first loop on the cast on edge, then knit through both loops. When you get to the last 4 stitches, bind off. Switch to larger needles and main color. Option 3 - Encased drawstring tying on the outside: on row 5 divide your cast on stitches in half, then subtract 4. Knit to that number, yarn over, k2tog twice, yarn over, and knit to the end of the round. This creates openings through which your drawstring can be tied. Switch to main color and larger needles. Option 4 - encased drawstring or elastic fastening on inside: On row 14 Divide your CO stitches in half, then subtract 2. Knit to that number, yo, k2tog yo, knit to end of round. This makes an opening for the elastic to be threaded & sewn together. Leaving an opening lets that the elastic can be adjusted later.
BODY
Working with the main color and gauge needles: Round 1 (Increase Round): m1b every 7 (8, 9, 10, 11, 12, 11) stitches until you have added 8 stitches total. Final stitch count is: NB = 64, XS = 72, S = 80, M = 88, ML = 96, L = 104, T = 96.\* ecause toddlers tend to be long and thin and do not have the extra bulk of a diaper, there is no need for an increase roun
Short Row Set 1 - Zigzag (see tutorial for yarn over method):
To do the zigzag set, knit to the first stop, turn work using your short row method of choice, purl back to the center back marker, continue to purl to the next stop, turn work, knit back to the CBM, knit to the second stop closing the gap as you come to it. Turn work, purl back to the CBM, continue to purl to the next stop closing the gap as you come to it. Turn work, knit to the third stop, etc. (The last stop is 1 stitch less than your CO divided by four)
NB: Stop and turn at 4, 7, 11, 15
For example: k4, turn, purl back to CBM, p4, turn, knit back to CBM, knit 7, closing the gap as you come to it, turn, purl back to CBM, p7, closing the gap as you come to it, turn, etc. Extra Small: stop and turn at 6, 10, 14, 17 Small: stop and turn at 7, 11, 15, 19 Small-Medium: stop and turn at 7, 11, 15, 19 Medium: stop and turn at 8, 12, 16, 21 Medium-Long: stop and turn at 9, 14, 18, 23
Large: stop and turn at 14, 18, 23, 25
BODY SHORT ROWS
After zigzag set, knit one round, closing gaps as you come to them, and place a marker every 16 (18, 20, 22, 24, 26, 24) stitches. Knit for 1.5" measured from last short row turn. For newborn/small size, you may want to space short rows 1" apart. For toddler pants you may want to space up to 2" apart. Use the short row technique of your choice. Yarn over short rows are explained in the tutorial. Short Row Set 1: Knit to 1 st before RHM 15 (17, 19, 21, 23, 25, 23), turn, purl to 1 st before LHM, turn using the short row technique of your choice, knit back to CBM. Knit for 1.5" measured from this short row turn. Short Row Set 2: knit to 2 sts before RHM, 14 (16, 18, 20, 22, 24, 22), turn, purl to 2 sts before LHM, turn, knit back to CBM. Knit for 1.5" measured from this short row turn. Short Row Set 3: knit to 3 sts before RHM, 13 (15, 17, 19, 21, 23, 21), turn, purl to 3 sts before LHM, turn, knit back to CBM. Knit until work is 1.5" less than desired total length. Optional Short Row Set 4: knit to 2 sts before RHM 14 (16, 18, 20, 22, 24, 22), turn, purl to 2 sts before LHM, turn, knit back to CBM and continue your rounds. Make sure to measure your entire rise from the top of the waistband in front to the top of the waistband in back. For a fuller bum, place short rows 1" apart. If you are doing a yoga waist (and will be folding it over), measure from the middle of the waistband. \*For custom sizing: Divide your cast on by 4. Place a marker after that number of stitches so that you have a front, back, and two hip markers. Short Row 1, knit to 1 before marker/purl to 1 before marker. Short Row 2, knit to 2 before marker/purl to 2 before marker. Short Row 3, knit to 3 before marker/purl to 3 before marker, optional Short Row 4, knit to 2 before marker/purl to 2 before marker.
GUSSET
Round 1: Knit until 2 stitches before the FCM, removing the hip marker as you pass it. Place the front gusset marker (FM1), knit 4 stitches, removing the center marker, and place the FM2. Knit until 2 stitches before the BCM, removing the hip marker as you pass it. Place the back gusset marker (BM1), knit 4 stitches removing center marker and place the BM2. Round 2: Knit to FM1, slip marker, m1f, knit to FM2 , m1b, slip marker. Knit to BM1, slip marker, m1f, knit to BM2 , m1b, slip marker. Round 3: Knit the round. 2peat rounds 2 & 3 until you have the desired stitches between the gusset marker. For wider legs, stop when you have 6 stitches between the gusset markers. Recommendedfortoddlersize. · For regular legs, stop when you have 8-10 stitches between the gusset markers. · For thin legs, stop when you have 12 stitches between the gusset markers. This is good for newborns or pants you want to look more like leggings. If you do not have enough length for the rise, repeat rnd 3 until work is the desired length.
LEGS
Grafting Gusset & Splitting for the Legs
Using a tapestry needle slip all the stitches from the second back gusset marker to the first front gusset marker onto waste yarn. Slip all the stitches between the front gusset markers onto a double pointed needle in the same size as the main body needle (5.0 mm). Slip all the stitches between the back gusset markers onto a second double pointed needle. Kitchener the stitches on the double pointed needles together. (See Tutorial)
Picking up stitches for the legs
Change to your 12" circular needles (or double pointed needle set, or long circular fo magic looping) With your MC yarn, pick up and knit 4-6 stitches along the edge of the gusset. The number of stitches picked up affect the width of the pants. For wider legs, pick up morestitches. Make sure to pick up two strands of yarn from the gusset where possible. This helps with wear and stability. To pick up, insert your new needle into farthest right gusset stitch, wrap your new yarn around the needle and knit. Continue along the edge of the gusset, then start knitting the stitches from the original 16" needle. When you get to the last stitch, place a marker. This is the beginning of the leg rounds. For the second leg, transfer the stitches on the waste yarn onto your 16" needle. Pick up the same number of gusset stitches as the first leg. Knit until you reach your inseam length minus the length of your cuff. If you are going to change colors for your cuffs, knit 1 round with the new color before beginning your cuff.
FINISHING
Drawstrings:
I-cord: Using a dpn, cast on 3 stitches and knit. Slide these stitches down to the other end of the needle, but do not turn the needle. Bring the yarn from behind the work to the first stitch, and knit a second row. Repeat until it's the desired length. Then - k2tog,k2tog
Cut the yarn leaving a tail of 4-5 inches. Thread it onto a tapestry needle. Insert the needle into the middle of the drawstring for 3-4 inches, pull tightly, cut yarn close to drawstring, and loosen. Repeat for other end. (A tutorial: http://www.wikihow.com/Knit-an-l-Cord) Crochet: For a thin drawstring, do a simple chain stitch. For a thicker drawstring, chain desired length, single crochet back along the length of the drawstring. Twist: Measure a length of yarn about 4 times as long as you want your final drawstring length to be. Fold it in half, and tie it onto a chair, doorknob, etc. Twist the yarn until it gets so tight that it wants to start folding by itself. Keep going a bit more. Fold the yarn in half and let it twist back on itself. Tie a knot at both ends. Braid: Cut 6-12 lengths of yarn as long as you want your drawstring to be. Tie them together and then onto something else like a chair, doorknob, etc. Making sure you have an equal number of strings, divide into 3 and braid. Tie a knot at both ends.
Weave in Ends and Block
To weave in the ends, use a large, blunt tapestry needle. In general, once you've started, you can follow the track of the yarn on one of the rows, after going about 1-2", turn and come back a short distance and then cut. Blocking is similar to ironing a sewn project; it creates a more professional, finished look. For pants being used as cloth diaper covers, it also provides an opportunity to lanolize.
To Block:
Get project completely wet in luke-warm water. Squeeze excess water out. Do not wring. · Lay on a towel, roll up, and (my way) walk up and down on the towel for a while Lay it on a second, dry, folded towel and gently smooth the longies into the shape you would like them to have, smooth out wrinkles, make sure legs are straight and even. If you have ruffles or another type of embellishment that needs extra work, use pins to hold it in the shape you want it. When it dries, it dries in the shape it was pinned. Block embellishments like pockets separately, then add. Blocking gives your work a more professional, finished look, similar to ironing a sewn project.
OPTIONS (INSTRUCTIONS COMING)
Cables Seed stitch strip Stripes Attached ruffles/ruffle butt/skirty
CUFF OPTIONS

\*Seed Stitch: (Round 1) knit 1, purl 1 through end of round. (Round 2) purl 1, knit 1 through end of round. To make sure the pattern continues, you need to knit the purls and purl the knits. Bind off in pattern. This is the most common and "standard"cuffstitch.
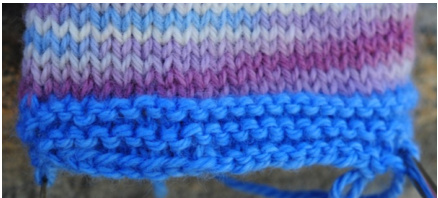
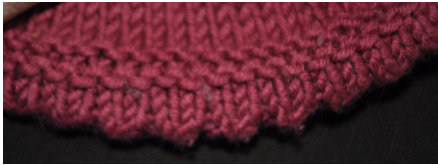
\*Garter: (Round 1) purl all stitches (Round 2) knit all stitches. Repeat rounds 1 & 2 until desired length. You can also purl all rounds, which makes a tighter look. (Left side is BO knit wise, right is BO purl wise).
\*Half Linen: (Round 1) knit. (Round 2) K1, bring yarn to front, slip 1, bring yarn to back. Repeat to end. (Round 3) Knit. (Round 4) Bring yarn to front, slip 1, bring yarn to back, knit 1. Repeat to end. (Round 5) Knit. (Round 6) k1, bring yarn to front, slip 1, bring yarn to back. Repeat to end. (Round 7) Knit. Bind off loosely. Make sure on Round 4 that you are knitting the stitch above the one that you slipped in round 2.
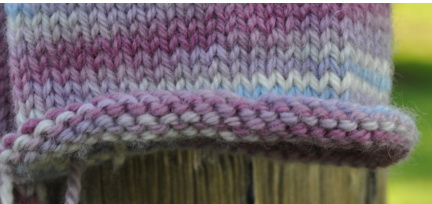
\*Rolled: Knit to the desired length, then add another 8 rows and bind off. The edge will naturally roll. This is a fun way to add length because when the child grows, you can add on another cuff to give another 1-2 inches.
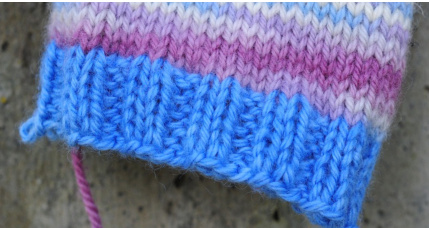
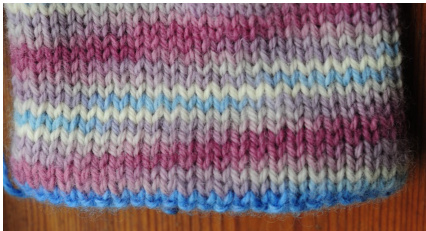
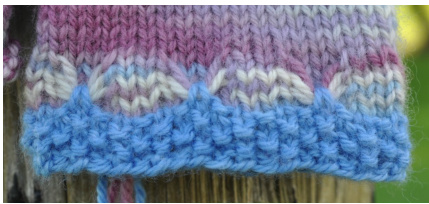
\*Ribbed: Knit 2, purl 2 for the whole round. Continue until desired length.
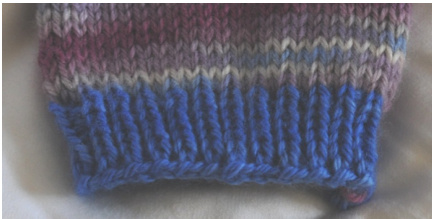
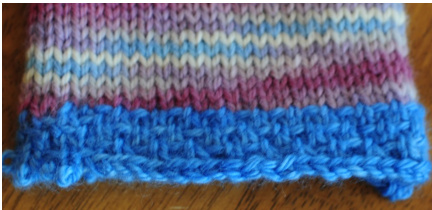
For a tighter ribbing (similar to sweat pants) use k1, p1. For even tighter ribbing, go down 1-2 needle sizes. This is a great cuff if you are making longies to be used as pajama pants or for littlebabies. \*Basketweave: (Round 1) knit (Round 2&3) K2, P2, repeat to end. (Rounds 4-5) P2, K2, repeat to end. (Round 6 & 7), K2 P2. Bind off in pattern. \*Bamboo: (Rounds 1 & 2) knit. (Round 3) yo, k2, pass yo over the kw sts and repeat to end. (Round 4) knit. Repeat rounds 3&4 for desired cuff length, ending on a knit round. Bind off loosely
\*Hemmed: Knit until you get to the final length of the inseam. Purl one round. Knit another 5 rows and bind off. Fold the last 5 rows under at the purl round and whip stitch closed. Tip: To make 2 hem lengths, purl 1 round at first length, then add another inch stockinette, then add a second purl round, knit another 5". For the shorter pants, turn at the first purl round, then when the child grows, let it out and turn at the second purl round.
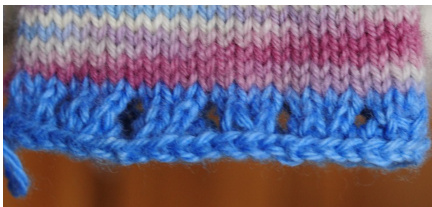
Picot: Knit until you reach the desired length. K2tog, yo to the end. Knit 5 rounds on smaller needles. Bind off. Fold the yo row in half and whip stitch the 5 rows to the inside of the cuffs. You may need to block.
Simple Lace Hem: Knit to %" less than desired length. (k2tog, yo, yo, k2 tog) till the end of the round. Knit one round. Bind off. Feather and Fan: start with a multiple of 12 stitches. (Round 1) Knit (2) Purl (3) k2tog, k2tog, (yo, k1) 4x, ssk, ssk, and repeat to end. (4) Knit. (5) Purl. Bind off loosely knit wise. Butterfly: Knit 5, bring yarn to front, slip 5, repeat to end. (2) knit. (3) k5, slip 5 with yif - same as first round - to end. (4) knit (5) k5, slip 5 with yif. (6) knit (7) k5, slip 5 with yif. (8) knit (9) switch to cc if desire and knit 7, insert left needle through 4 yif stitches and knit together with live stitch through back loops, knit 9, repeat to end. Bind off loosely knit wise. This makes a scalloped edge. Crochet Scalloped: Knit until you are %" short of the desired length. Bind off loosely. Switch to a similar sized crochet hook. Single crochet into each loop of the bound off stitches. (Chain 2, double crochet, slip stitch Convertible: Use this in order to add length onto your project. For example, you can make capris, but add on length tomake them pants length. Step 1: Knit until 1" less than the desired inseam. (1) Change colors if desired, knit. (2) Purl. (3) Knit. (4) k2, yo, k2tog, yo, k2tog to end. (5) knit (6) purl. Bind off knit wise. When binding off, count the # of stitches. Step 2: CO the same number of stitches that you bound off. (1) Purl. (2) Knit. (3) k2, yo, k2tog, yo, k2tog to end. (4) knit (5) purl. Knit until you reach the desired additional inseam, but add 1" for overlapping with first BO edge. Also subtract for the desired cuff. You can also add any cuff style after the yarn over round in step 1. Just remember to alter the length of the stockinette knitted section of the inseam to accommodate the length of the additional cuff.
Combination: You can put many of these techniques together. This hem is a butterfly stitch using a multiple of 3 (rather than 5) and 4 more rows of seed stitch with a B0 in pattern.
RUFFLES
Ruffle: Knit. (2) kfab every stitch. (3) Knit. (4) Kfab every stitch (5-6) Knit. Bind off loosely Flat Ruffle: (Round 1) knit. (2) m1f, k1 to end. (3-8) Knit. (9-12) seed stitch OR garter stitch. Bind off loosely knit wise. Stockinette Ruffle: (Round 1) Knit. (2) Kfab every second stitch and repeat to end. (3-7) Knit. Bind off loosely knit wise. This may curl, so in order to stay flat, you will need to block. Bell Ruffle: (Round 1) knit. (2) p3, k1 to end. (3) p3, m1f, k1, m1b to end. (4) p3, k3. (5) p3, m1f, k3, m1b to end. (6) p3, k5 to end. (7) p3, m1f, k5, m1b to end. (8) p3, k7 to end. Repeat Row 8 until the cuff reaches the desired length. Bind off loosely in pattern.
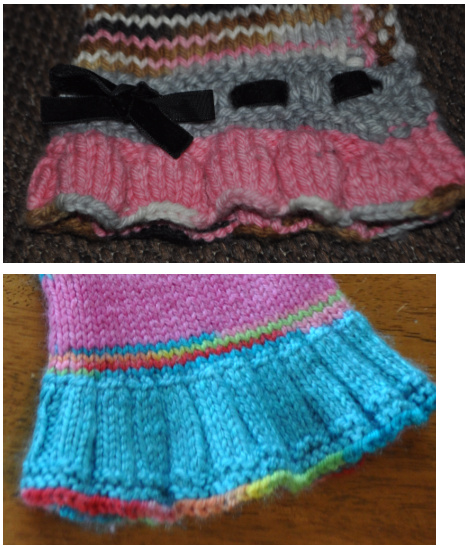
Eyelet (Ribbon) Ruffle: Start at least 2.5" before the desired inseam length. (Round 1) Switch to CC if desired. Knit. (2) Purl. (3) Knit. (4) k2, yo, k2tog, yo, k2tog to end. (5) knit (6) purl (7) switch to mc if desired and knit. (8) p3, k1 to end. (9) p3, m1f, k1, m1b t0 end. (10) p3, k3. (11) p3, m1f, k3, m1b (12) p3, k5 t0 end. (13) p3, m1f, k5,m1b.(14) p3,k7.(15) switch to CC if desire and p3, k7 to end. (16) p3, k7 to end. Bind off loosely in pattern. Flared Ribbing Ruffle: (Round 1) knit. (2) Purl. (3) k1, m1b to end (4-7) k3, p2. Continue as long as you desire or until ruffle reaches 1.5" or desired length. Bind off loosely in pattern. (The ones pictured are 3" long) Seed Stitch Ruffle: (Round 1) Knit. (2) Kfab every second stitch. (3+) Work seed stitch pattern until desired length. Bind off loosely in pattern. Pinwheel Ruffle: Knit. (2) K4, yo repeat to end. (3) Knit. (4) K5, yo to end. (5) Knit. (6) K6, yo to end. Continue in pattern until you reach your desired length. End on a plain knit row. Bind off loosely knit wise. You may need to block this for it to lay properly. Triple Ruffle: Knit to about %" before the desired length. (Round 1) purl. (Rounds 2&3) Knit. (Round 4) Purl. (Rounds 5&6) Knit. (Round 7) k1, kfab to the end of the round. (Round 8-9) knit. Cast off in purl. Pick up the stitches at the bottom purl ridge, one stitch picked up for each purl bump. (Round 2) k1, fab to the end of the round. (Rounds 3&4) Knit. Cast off in purl. Repeat for the second purl round. If you want ruffles of different colors, change yarn when picking up stitches.
TUTORIALS AND LINKS
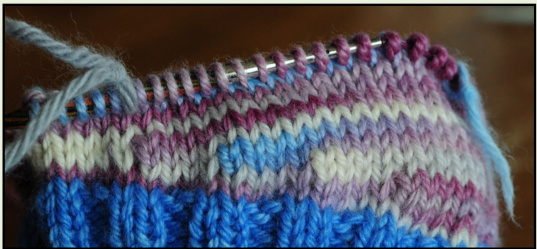
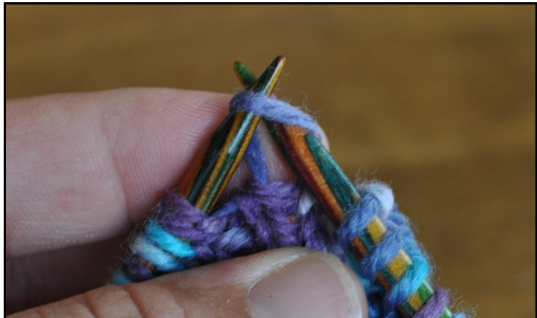
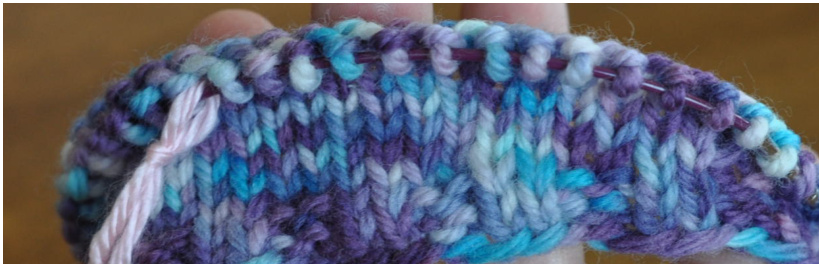
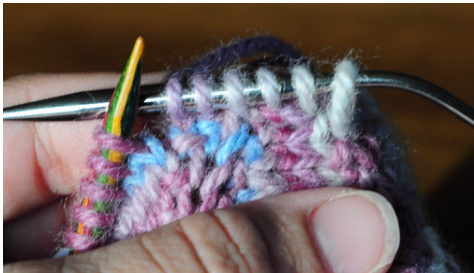
ADDING / CHANGING YARN:
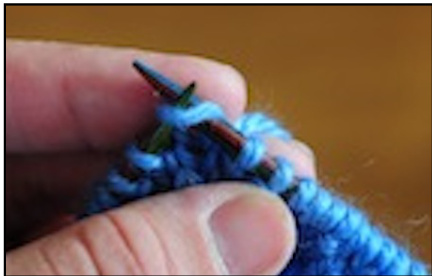
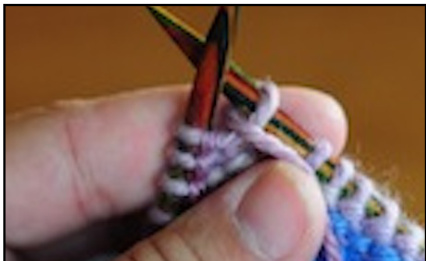
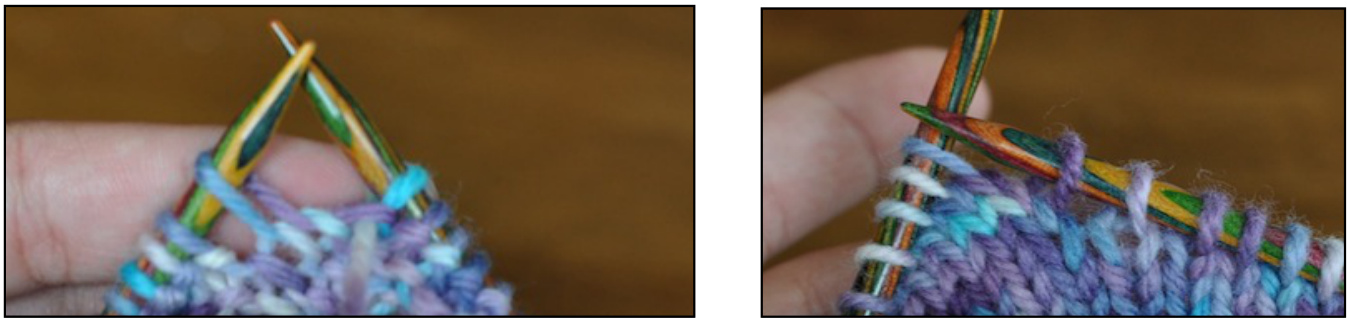
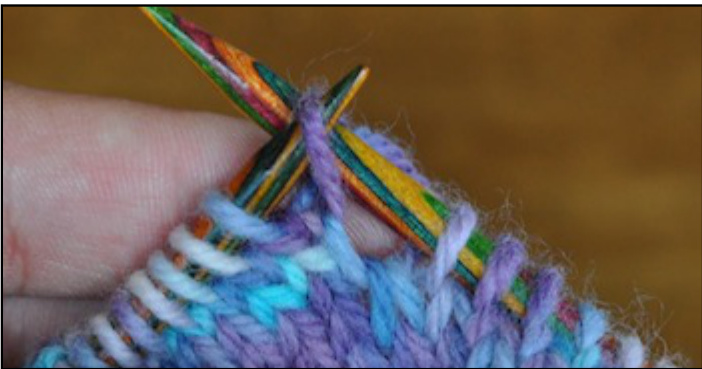
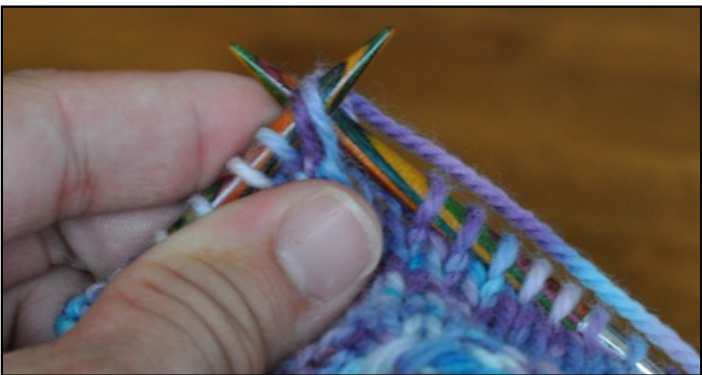
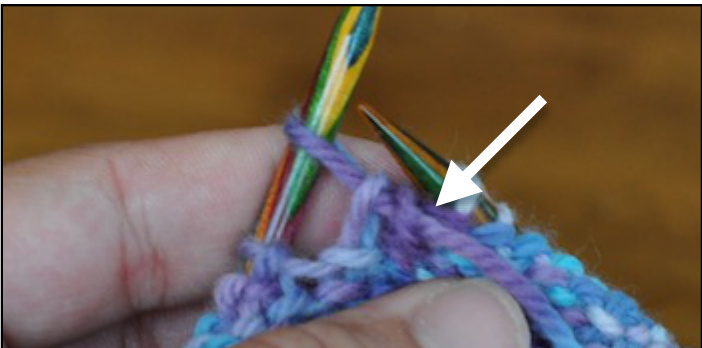
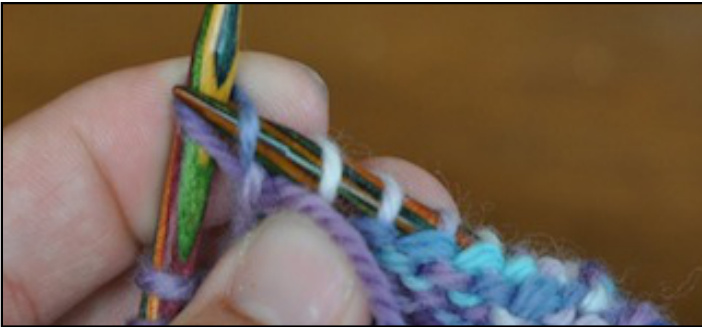
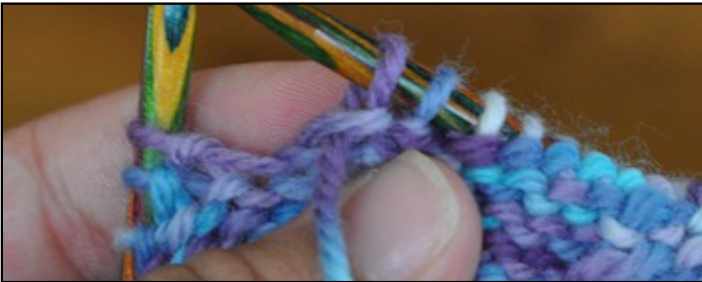
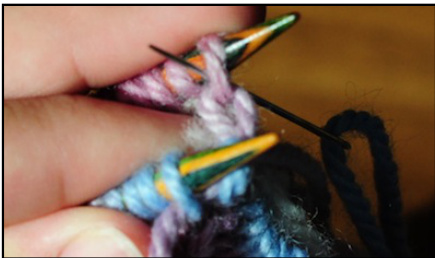
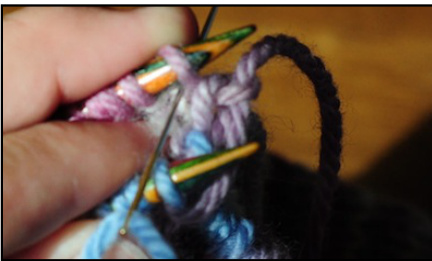
Knit into the first stitch, but do not slide off
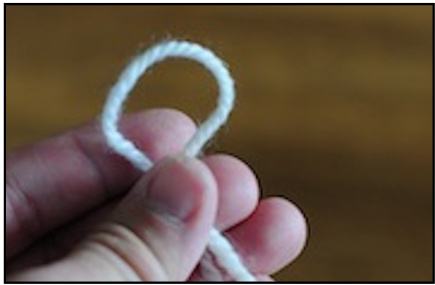
Make a loop with your new yarn
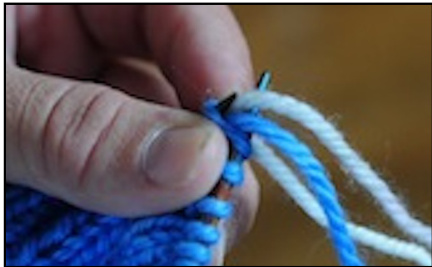
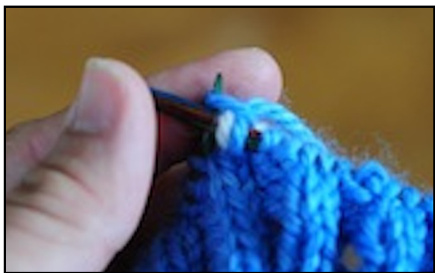
5op onto the right needle and knit both yarns tof
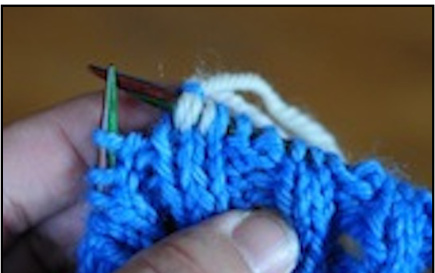
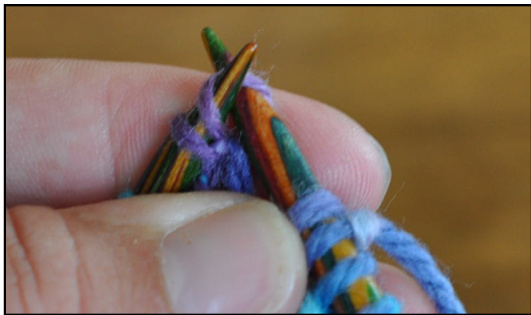
For the next stitch, knit both the yarn attached to the ball and the tail together.
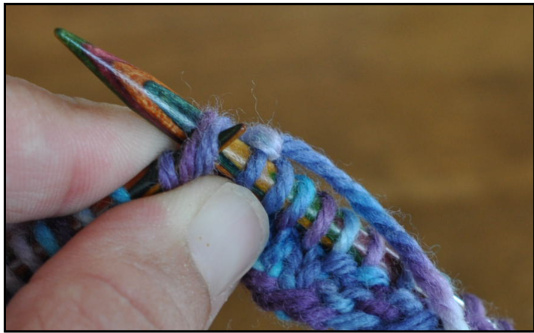
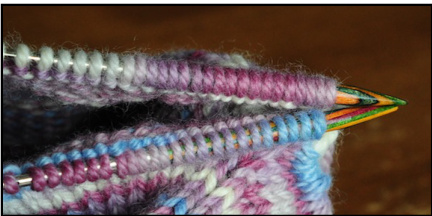
For these two stitches you will have 2 loops per stitch. When you come back around, make sure to knit both loops together so that you do not add more stitches to your round. (Picture also shows switching needles).
ZIG ZAG SHORT ROW (YARN OVER):
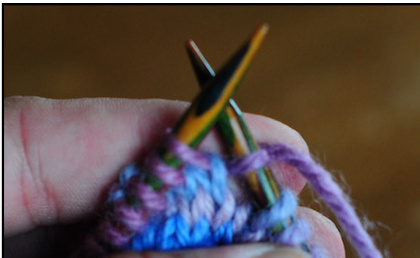
Knit to first stop. Turn over to see purl side. Bring yarn to front.
Yarn over, bringing the yarn back to the front.

Purl to the second stop. Turn work keeping yarn in the back. (Example: for size L, knit 9, turn, purl back to CBM, purl 9, turn.)
Yarn over with yarn in back. Make sure the yarn finishes in the back. Knit until you get to the first gap and close it.
Knit this together with 1st stitch on the left side of the gap. Knit to the next stop, turn, yarn over, purl back past CBM until you get to the gap created by the purl side yarn over.Do a purl side closure.This canbe tricky!
Purl Side Closure for Yarn Over Short Rows Make sure to look at the pictures to double check and read through the instructions
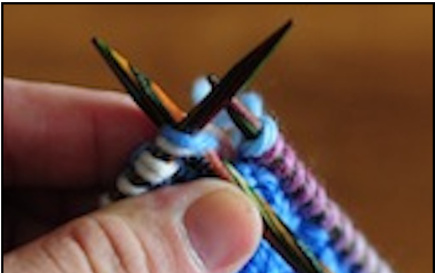
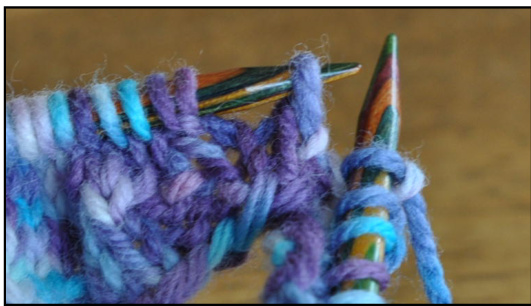
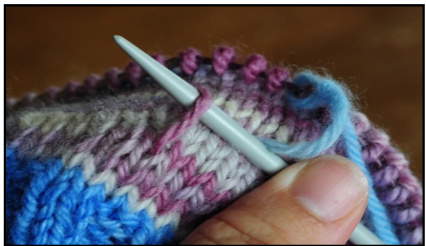
Purl to the yarn over and then turn your work to the knit side keeping your yarn in back. STEP 1: Slip the two stitches off of the right needle and onto the left needle. (This is opposite to the regular direction of knitting, directions below)
With your left needle, pick up the loop on the right needle by sliding the tip from the front to the back, under the yarn from the outside to the inside. Do NOT put your needle into the middle of the stitch to slip. Slip the next stitch from the back to the front. (Put the left needle under the side of the loop closest to the left and up through the middle of the stitch and slide off) Do not put the needle into the middle of the stitch to slip. This is how it looks after stitches have been slipped
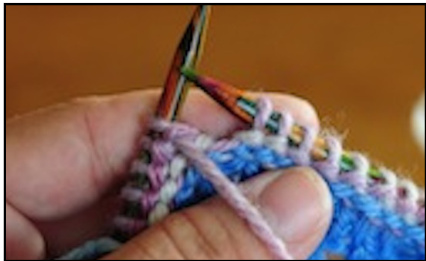
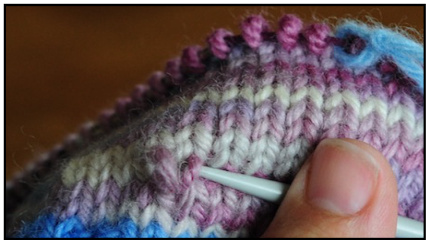
STEP 2: Knit the slipped stitches together through the back loops. 3: Slip the knitted stitch back onto the left needle so that you can keep going. (Directions belov
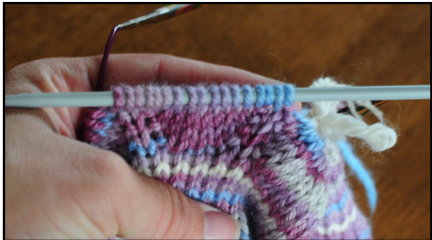
Turn the work back to the purl side and check that the stitches are not tangled or overlapping. Slip the stitch back to the right needle by picking up the back loop. (Put the right needle behind both the left needle and the yarn to slip, working from the outside in; do not put the needle into the middle of the stitch) Keep purling until the next turn. This is how it looks from the knit side. Note, when you come back to the stitch you just made, the mount is reversed. Knit into the back loop or switch themount so that you do not get a twisted stitch. you get to the gap made by the last purl-side yar
Knit-side Purled Gap Closure
Stop 1 stitch before the gap created before the yarn over.
Slip stitch from the left needle to the right by as if to knit.
Slip yarn over from left needle to the right as if to purl
Knit through the front loops (slip slip knit)
Finished zig zag set
LINKSTOOTHERSHORTROWTUTORIALS
Yarn 0ver: http://sameknit.blogspot.com/2007/04/yarn-over-short-rows.html rap and Turn: http://www.knotions.com/techniques/short rows/how to knit short rows.aspx http://cottonandcloud.com/blog/wrap_and turn/ http://idahostixandstrings.com/2011/08/18/short-row-closures/
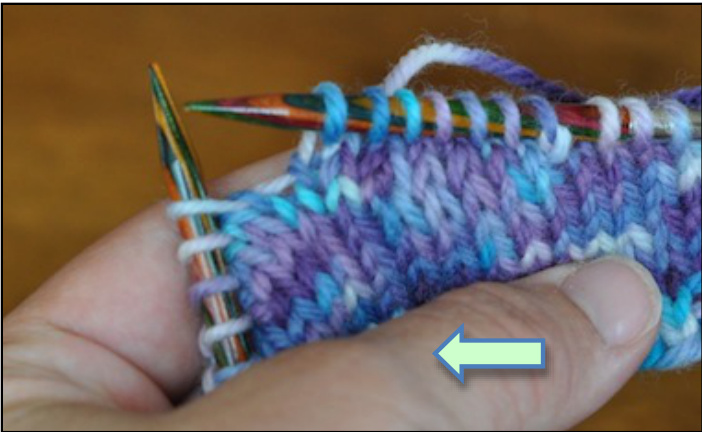
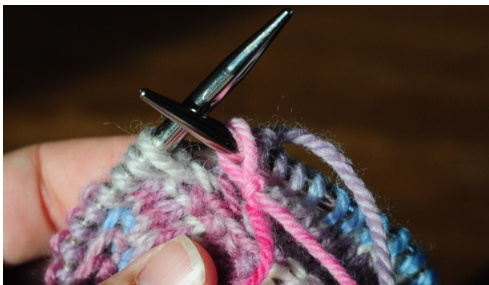
ADJUSTING TENSION ONSHORT ROWS
Sometimes yarn-over short rows are obvious because the stitches are a little loose. You can go back and adjust the tension on the stitches and the short rows are almost invisible. Find your short row turn
Using your needle, lift one side of the loop.
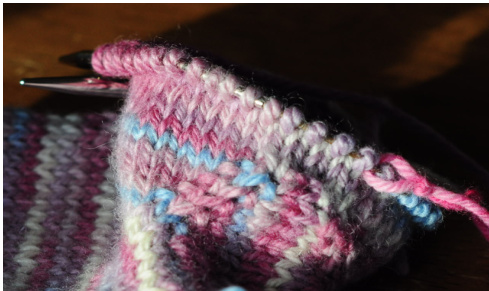
Working away from the turn, lift and pull another loop, but not quite as tightly as the first. Continue working along the row, lifting each loop and drawing it slightly less tight as the one before, and ease the extra yarn along the row until it is all absorbed. The row will look slightly different, but it disappears after blocking.

Finished short row set with adjusted tension.
MAKE1FRONT/ MAKE1BACK/KNITFRONTANDBACK
m1f: To "make 1 front" insert the point of the left needle under the "bar" of yarn that stretches between the last stitch on the right needle and the first stitch on the left needle, entering from the front. Then using the right needle, knit above the criss cross that is formed on the left needle. You've made a tight loop on the left needle, so it can be a bit difficult to get your right needle into it, just do not knit under the criss cross. This is also known as “make 1 right" (m1r). m1b: To "make 1 back" do the same, except insert the left needle from the back to the front of that bar. This is also known as “make 1 left" (m1l) kfab: To knit front and back (kfab), knit one stitch, but do not slide it off of the left needle. Insert your right needle into the back of the loop of the stitch you just knitted, knit, and slide the two stitches off together.
KITCHENER
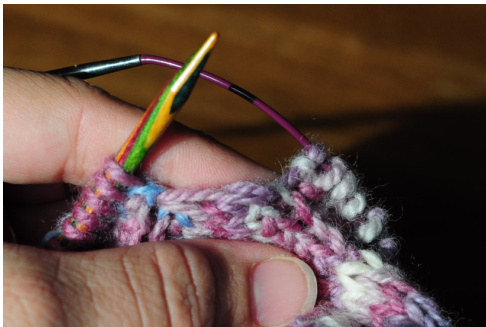
Thread a blunt tapestry needle with a long length of yarn
Place the gusset stitches on two double pointed needles
Hold the two needles close.
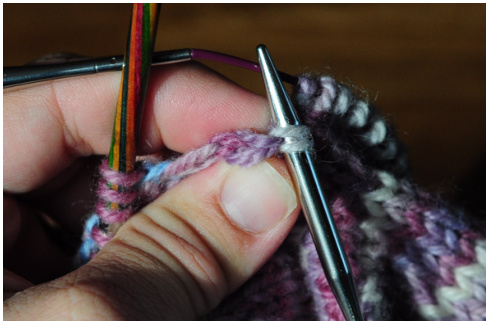
Set Up:
A. Insert the tapestry needle into the first stitch on the needle closest to you - as if to purl. Pull a long length of yarn through, but do not remove the stitch from the needle.
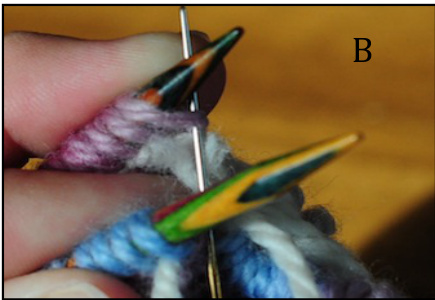
B. Insert the tapestry needle into the first stitch on the needle farthest from you - as if to knit. Pull the length of yarn through, but do not remove the stitch from the needle. You do not need to pull tightly because you will adjust later.
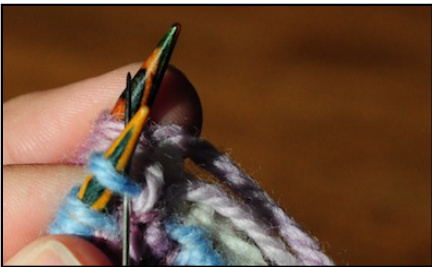
1. Insert the tapestry needle into the first stitch on the front needle as if to knit, remove the stitch and draw the yarn through.
2. Insert the tapestry needle into the next stitch on the front needle - as if to purl. Leave this stitch on the needle.
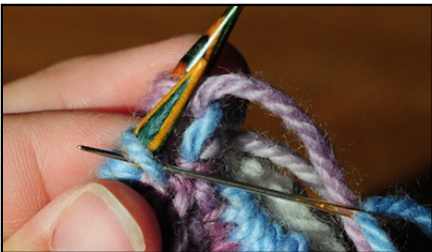
3. Insert the needle into the first stitch on the back needle - as if to purl, remove the stitch and draw the yarn through.
4.Insert the needleinto the next stitch on thebackneedle-as if toknit.Leave the stitch on theback needle. Repeat steps 1-4 until you reach the last two stitches - do steps 1 & 3. Say: Knit off, Purl on -- Purl off, Knit on to help you stay on track. Here is another excellent tutorial: http://knitty.com/ISSUEsummer04/FEATtheresasum04.html
BINDING OFF
Bind Off Knit the 1 stitch.Knit the 2 stitch. On the right needle, bring the first stitchup and over-lft wisethe second stitch and off the right needle. Continue around. Bind Off Loosely: Change the right needle for one 2 sizes larger or, when knitting, adjust your tension to create a nice, large, loose loop. Bind Off In Pattern: Do the first two stitches required in the pattern. Bring the first stitch over the second stitch. Do the next stitch required in the pattern, etc. For example, in the Seed Stitch pattern: k1, p1, bring the knit stitch over the purl stitch, k1, bring the purl stitch over the knit stitch, etc. For Ribbing, knit 2, bring 1st stitch over 2d stitch. Purl 1, bring knit stitch over purl stitch, purl 1, bring purl stitch over second purl stitch, etc. Bind off Purl wise: Purl first stitch, Purl second stitch, pass first stitch over second stitch and off the right needle.Continue toend.
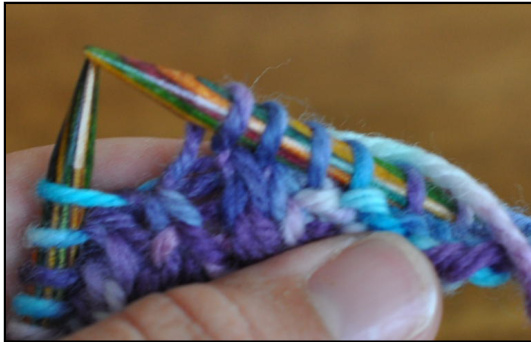
PICKINGUPLEGSTITCHES-M1F/M1BGUSSET
Turn the work so that you are looking at the side of the gusset
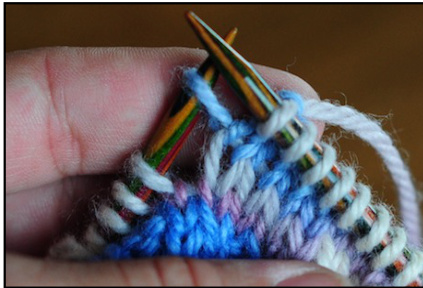
Insert your new needle (not the one holding the leg stitches) into the first two loops on the side of the gusset. Take your yarn, wrap it around and knit that stitch, drawing the yarn through both loops. This will make the stitches stronger.

Continue along the side of the gusset, trying to pick up two loops with each stitch. Then begin knitting the leg stitches from the needle.
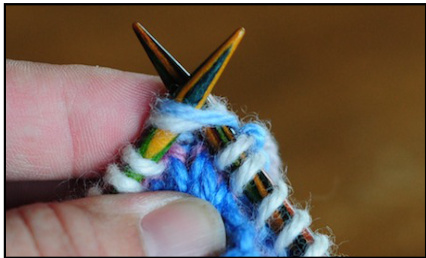
Continue to stitch around the leg until you come to the first stitch you picked up and place a marker to start counting rounds.
Finished gusset and leg started. After you have finished your longies, you will need to come back and weave in the ends. If you leave a length of yarn, you can go back and reinforce this area and tighten any loose stitches. Another tutorial on picking up stitches: http://www.stitchdiva.com/custom.aspx?id=183


