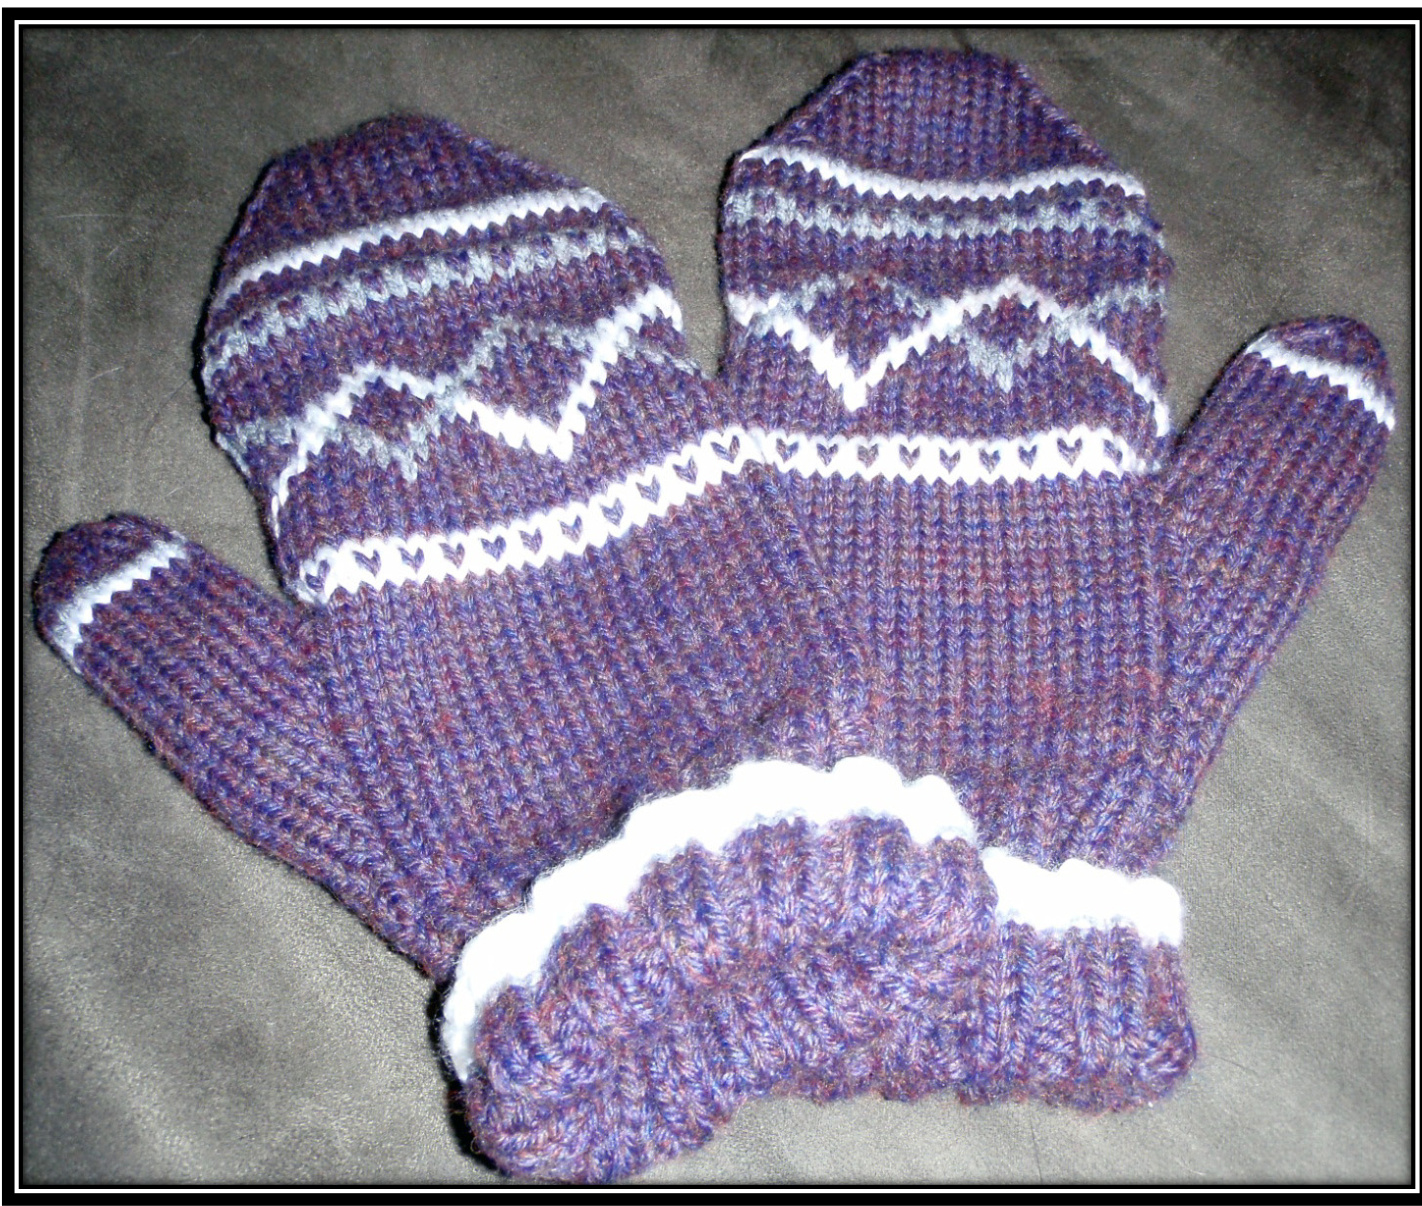
Annie's Mitts
Created by: Conception Libellule 2012
Annie'S Mitts - Option 1 - One Colour Mitts Option 2 - Mitts with three ColourS-- followS
Materials:
· 4 double pointed needles - size 2.75mm (2 Us) or size used to obtain proper gauge. · 1 small crochet hook (to pick-up stitches) ·Row counter ·Yarn needle
Gauge:
23sts & 30 rows = 4 inches OR 12sts & 15 rows = 2inches
Legend:
CO-CastON RND-Round or Rounds M1 - Make 1 or Increase by 1 (there's many ways to do this...) Sl - Slip the stitch on the needle on the right PSSO - Pass Slipped Stitch Over (the knitted one) I recommend viewing the KnittingHelp.com site: http://www.knittinghelp.com/videos/knitting-glossary
Let's Start
Cast on 48sts, Divide into 16 stitches on 3needles. Join and start \*K2, P2\* ribbing. Continue until the work measures 4 inches. Knit 2 RNDs in stockinette stitch (Stop the ribbing \*K2, P2\*)
Making the thumb...
1st RND: Place marker, P1, M1 in the next stitch, M1 in the next stitch, P1 - finish the RND. 2nd to 5th RNDs: Purl all purled stitches, and knit all knitted stitches. 6th RND: P1, M1 in next stitch, knit until last knitted stitch, M1, P1 - finish the RND. 7th & 8th RNDs: \*\*Purl all purled stitches, and knit all knitted stitches. gth RND: P1, M1 in next stitch, knit until last knitted stitch, M1, P1 -finish the RND\*\*. Continue the pattern indicated between the \*\* until there's 14 stitches between the 2 purled stitches. Next 2 RNDs: Purl all purled stitches, and knit all knitted stitches Place the next 16 stitches on a piece of yarn (The thumb will be completed later on) CO 4 stitches on the needle, on the"right", before joining the RND. You should end-up with 48 sts age
Making the remainder of mitt
Continue to knit 26 RDNs
Let'S finiSh the thumb!
Take the 16 stitches that are on the thread and place them on your 3 dp needles Knit those stitches with on the "right side" (the knitted side facing you). Pick-up, with a small crochet hook, 4 stitches at the base of the thumb. Slip them on you needle. Divide those 20 stitches on your 3 dp needles Knit 17 rounds RND 18: (K3, K2tog) repeat 'till end of RND RND 19: (K2, K2tog) repeat 'till end of RND RND 20: (K1, K2tog) repeat till end of RND Cut the yarn and pullit through the 8 stitches - secure it with a knot. Trim and weave-in the yarns ends, in order to hide them
Annie'S Mitts - Option 2 - MittS with three ColourS
Materials:
· 4 double pointed needles - size 2.75mm (2 Us) or size used to obtain proper gauge. · 1 small crochet hook (to pick-up stitches) ·Row counter ·Yarn needle
Gauge:
23sts & 30 rows = 4 inches OR 12sts & 15 rows = 2inches
Legend:
CO-Cast ON RND - Round or Rounds M1 - Make 1 or Increase by 1 (there's many ways to do this...) Sl - Slip the stitch on the needle on the right PSSO - Pass Slipped Stitch Over (the knitted one) MC -Main Colour CC1 - Contrast Colour #1 CC2 - Contrast Colour #2 I recommend viewing the KnittingHelp.com site: http://www.knittinghelp.com/videos/knitting-glossary With CC1, Cast on 48sts (Divide into 16 stitches on 3needles. Join and start \*K2, P2\* ribbing. RND 6 - Break yarn, \*K2, P2\* with CC2 RND 7 - Break yarn, \*K2, P2\* with MC Continue until the work measures 4 inches. Knit 2 RNDs in stockinette stitch (Stop the ribbing \*K2, P2\*).
Making the thumb...
1st RND: Place marker, P1, M1 in the next stitch, M1 in the next stitch, P1 - finish the RND. 2nd to 5th RNDs: Purl all purled stitches, and knit all knitted stitches. 6th RND: P1, M1 in next stitch, knit until last knitted stitch, M1, P1 - finish the RND. 7th & 8th RNDs: \*\*Purl all purled stitches, and knit all knitted stitches. gth RND: P1, M1 in next stitch, knit until last knitted stitch, M1, P1 -finish the RND\*\*. Continue the pattern indicated between the \*\* until there's 14 stitches between the 2 purled stitches. Next 2 RNDs: Purl all purled stitches, and knit all knitted stitches Place the next 16 stitches on a piece of yarn (The thumb will be completed later on) CO 4 stitches on the needle, on the"right", before joining the RND. You should end-up with 48 sts again.
Making the remainder of mitt
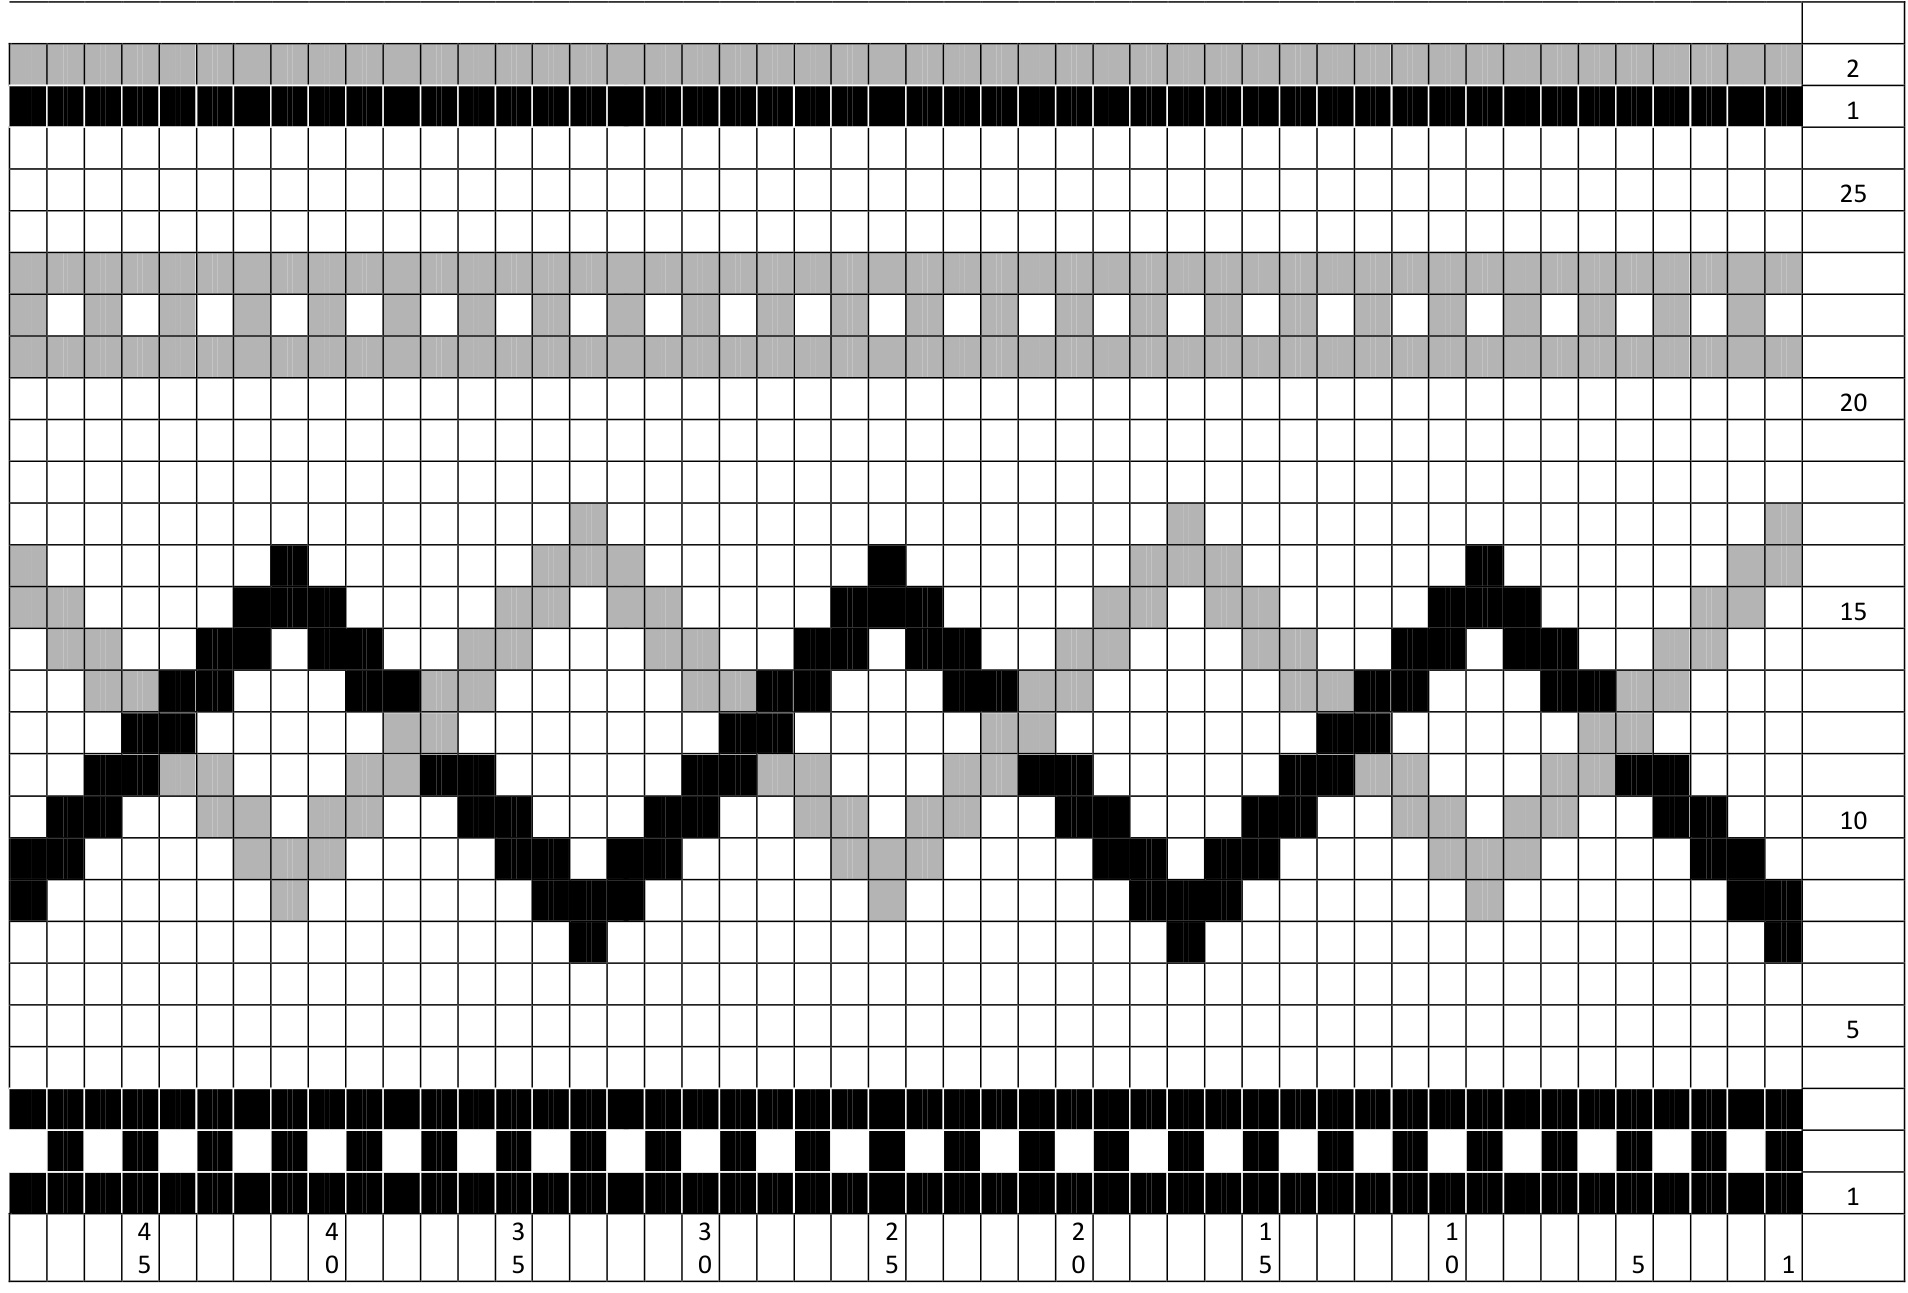
Start the Chart Pattern, shown on page 6, until you reach RND 26 Reset your counter RND 1: SI1, K1, PSSO. K20. K2tog; SI1, K1, PSSO,K20, K2tog. RND 2 & pair numbers - Knit all. RND 3: SI1, K1, PSSO. K18. K2tog; S1, K1, PSSO,K18, K2tog Bind off (or Cast off) and leave a long tail to sew the opening.
Let'S finish the thumb :)
Take the 16 stitches that are on the thread and place them on your 3 needles Knit those stitches with on the "right side" (the knitted side facing you). Pick-up, with a small crochet hook, 4 stitches at the base of the thumb. Slip them on you needle. Divide those 20 stitches on your 3 needles Knit 12 rounds RND 13: Switch the MC for CC1 RND 14: Switch CC1 for CC2 RNDs 15-17: Continue with MC. RND 18: (K3, K2tog) repeat 'till end of RND RND 19: (K2, K2tog) repeat 'till end of RND RND 20: (K1, K2tog) repeat 'till end of RND Cut the yarn and pull it through the 8 stitches - secure it with a knot. Secure your coloured yarn ends by knitting them. Trim and weave-in the yarns ends, in order to hide them