Happymaking Designs
by Jacqui Harding
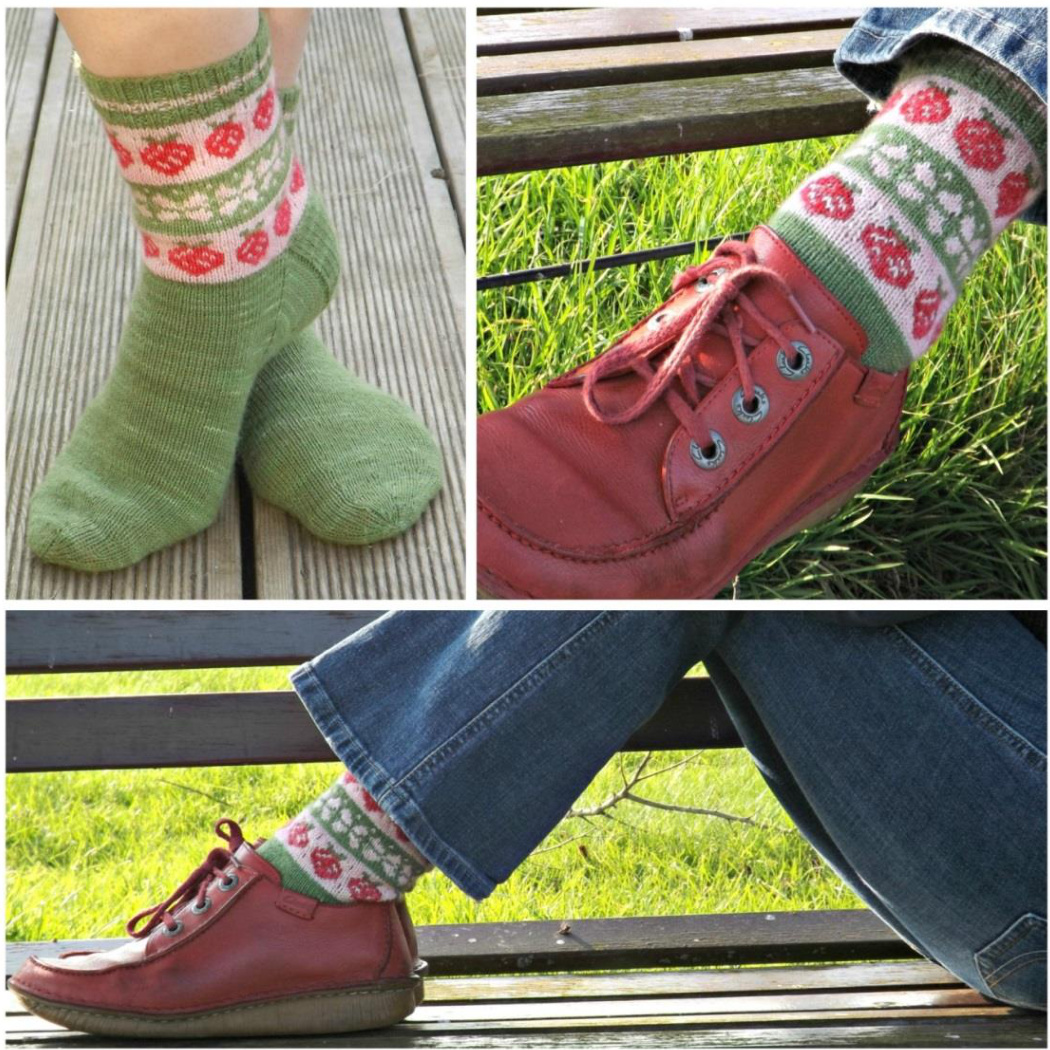
Strawberry Socks
I designed these socks to have show-off stranded colourwork on view at the cuff, and a simple stocking stitch foot for comfort and speedy knitting! Thinking of my friends who hate grafting toes, I used a star toe which is closed rather like a hat. It is quick and easy to work. These instructions are written for the magic loop technique, using one long circular needle. If you prefer to use dpns, needles 1&2 will be the top of the foot, 3&4 will be the bottom.
MATERIALS:
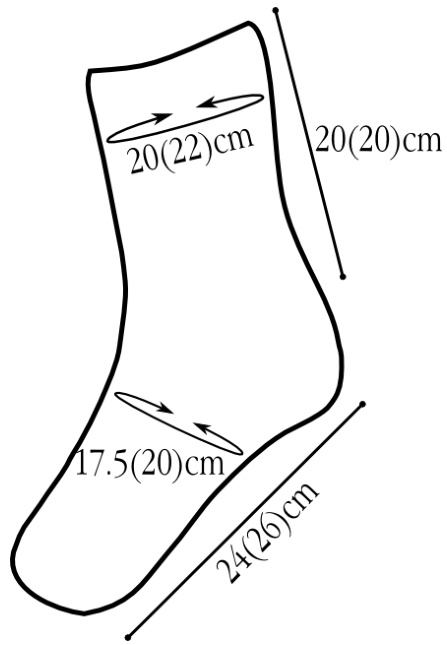
Yarn: Skein Queen Crush (75% merino, 25% nylon. 400m per 100g) in Fern (MC), Rosewater (CC1) and Red (CC2) Needles: 2.5mm long circular needle(s) or size to obtain gauge Sizes: Adult small(low instep)/Adult large (high instep) Tension: 34 sts & 48rnds to 10cm over stocking stitch Blocked size: See schematic
Happymaking Designs by Jacqui Harding
Notes: Where there are more than five stitches of the same colour in the colourwork section of the cuff, remember to twist the yarns around each other after three or four stitches to secure the floats. Be especially careful at needle changes. The leg is worked in stranded knitting which is less stretchy than plain stocking stitch. As a result, the leg is worked over more stitches than a standard stock. These extra stitches are removed during the gusset decreases. Therefore, I would advise you to choose your size based on your heel-instep size. Try the sock on when you have worked a few inches to check that it fits over your heel. The foot is worked in stocking stitch to a star toe, which works decreases around the toe and doesn't need grafting.
CUFF:
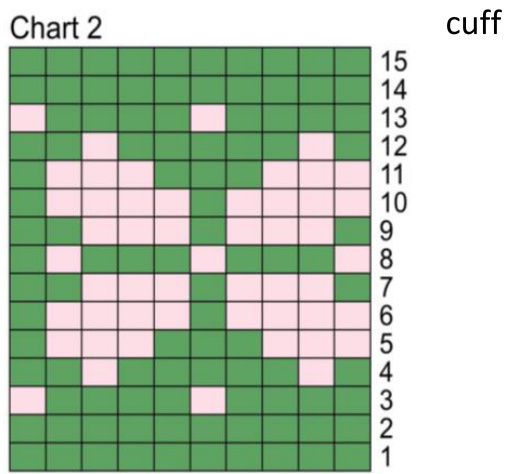
With MC, cast on 68 (80) sts Working in 2x2 rib (K2,P2 around), work 6 rounds in MC. Switch to CC1 for two rounds, then work another 5 rounds in MC1. Change to CC1. K 1 round. Small only: Increase 1 st at either side of sock; 70st Work Rows 1-15 of Chart 1, then work Rows 1- 15 of Chart 2, then work Rows 1-15 of Chart 1 once again. Pattern is repeated 7(8) times per rnd. With MC, knit 2 rnds. Continue with MC only.
HEEL:
The heel is worked over half the stitches for the foot - not the cuff. K 37(43), work heel over next 30 (34) stitches, move the last 3st to the front needle. Row 1: Sl1, k1,\*sl1 wyib, k1; rep from\* to end. Row 2: Sl1, p to end Rep these rows for 5.5(6.5)cm, ending with a WS row. Short row 1(RS): Sl1, k 16(18), ssk, k1, turn Short row 2: Sl1, p5, p2tog, p1, turn Short row 3: Sl1, k to st before gap, ssk, k1, turn Short row 4: Sl1, p to st before gap, p2tog, p1, turn Continue in this way until all sts have been worked. Knit across heel, pick up 1 st in each sl st along side of heel flap, plus 1 between heel& top of foot. Knit across top sts, pick up 1 st between top & side of flap, then 1 st in each sl st of heel flap. Arrange the stitches so that the top 40(46) stitches are on one side of the needles. The decreases are worked on the heel side of the needle(s).
GUSSET:
Rnd 1: K to last 2 sts on heel side, k2tog. K across foot, ssk, k to end Rnd 2: Knit Rep rows 1&2 six more times, then work 1st row until 60(68)sts remain. Arrange the stitches so there are 30(34) on each needle. Knit even for 18(20) cm, or until you are approx. 5cm less than the desired length.
TOE:
The decreases are distributed all around this toe, rather than at the sides only. It looks longer than a standard toe closed with Kitchener stitch - but it fits nicely. It also avoids having to graft. Rnd 1: [K2tog, k26(30), k2tog] twice. 56(64) Rnd 2: \*K2 tog, k6; rep from \* to end. 49(56) Rnds 3-8: Knit Rnd 9: \*K2tog, k5; rep from \* to end. 42(48) Rnds 10-14: Knit Rnd 15: \*K2tog, k4; rep from \* to end 35(40) Rnds 16-19: Knit Rnd 20: \*K2tog, k3; rep from \* to end 28(32) Rnds 21-23: Knit Rnd 24: \*K2tog, k2; rep from \* to end 21(24) Rnds 25-26: Knit Rnd 27: \*K2tog, k1; rep from \* to end 14(16) Rnd 28: Knit Rnd 29: \*K2tog; rep from \* to end 7(8) Cut the yarn, pull the yarn through rem sts to close, pull tight & fasten.
FINISHING:
Weave in ends and block.
Happymaking Designs by Jacqui Harding
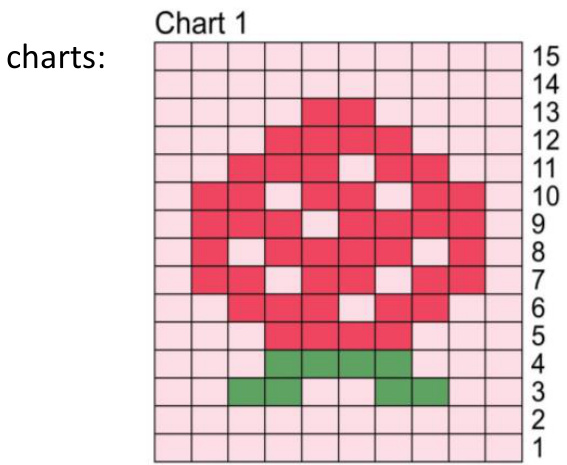
Colourwork
Schematic:
rjoy making and wearing your Strawberry socks. Jacqui Thanks to: SkeinQueen for supplying the gorgeous yarn. http://www.skeinqueenshop.co.uk/ Joeli Caparco for Tech Editing the pattern http://joeliskitchen.com/
Happymaking Designs by Jacqui Harding
Want to follow me? You can catch me on Ravelry (www.ravelry.com) and twitter (www.twitter.com) as Curvyjax and on my Happymaking Facebook page (www.facebook.com/happymaking)


