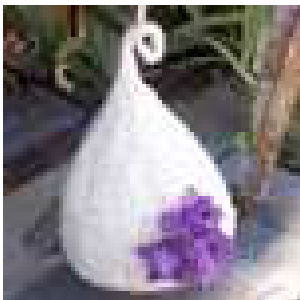
Makayla's Blossoms Baby Hat by twiddle knits
Materials: Approx. 2.5 oz Lion Brand Homespun Cream Size 7 (4.5mm) x 12" or 16" circular needles Size 7 double-pointed needles Stitch marker Silk Flowers Yarn needle Pin backs (optional) Glue (optional) Sewing needle Cream thread Sizes: Newborn (0-6, 6-12, 12-24) Gauge: 20 stitches and 28 rounds = 4 inches Finished Circumference: 12 (12 , 14 , 16, 17 ) inches
Directions:
With yarn and circular needles, cast on 56 (64, 72, 80, 88) stitches, place marker, and join to begin knitting in the round. Work in Knit 1, Purl 1 rib for 1". Work in stockinette (knit every round) for 5 (5, 5 , 6, 6 ) inches from cast-on edge. (I remove stitch marker after the 1" of ribbing is complete and pin a safety pin into the hat where the marker had been. After completing the necessary amount of stockinette rounds I put the stitch marker back on my needle approximately straight up from the safety pin). Decreasing: Round 1: \*knit 2, knit 2tog\* continue to end of round. Round 2: Knit to end of round. Repeat rounds 1 and 2 until eight stitches are left. Switch to double-pointed needles when too few stitches remain to easily knit on circulars. Next round: \*knit 2tog\* continue to end of round. Place all four stitches on one dpn and I-cord for one inch (for instructions on Icord please see below). After one inch, knit 2tog, twice (2 stitches remain). Continue to I-cord remaining two stitches until desired length, approximately 2-4 inches. Cut yarn, leaving a 6" tail, and using a yarn needle thread tail through stitches, pulling tightly to close. Pull tail down through I-cord to hide, then cut remaining yarn. Blocking: After hat is complete, dampen entire hat under running water. Lightly squeeze out excess water. Lay hat flat on a thick towel. Slightly pull hat to form "Hershey kiss" shape. Twist I-cord around fingers and clip to towel with a clothespin to hold in place while drying (before twisting the I-cord I lightly spray just the I-cord section with spray starch to help hold the twist). Viola! Congrats! Greatjob! Oh ya, the flowers.. The first dozen or so of these hats I made I sewed the silk flowers (which I purchased from walmart and pulled off the plastic stem) directly to the hat. There are three flowers, but you decide. I have used one really big one instead...whatever the hat told me it wanted at the time. Then I got to thinking about how the flowers would hold up during washing. Now I use a little glue (I prefer something like E6000 over hot glue, as hot glue will melt or pop off) and put pin backs on the flowers so they can be removed for cleaning.
Washing:
This hat, without the flowers, is very washable. Yes, the twist will go away after wear too. So, either wash it or if you just want the twist back, lightly dampen and shape as before.
a few twiddle tips..
which yarn to use: I don't always have the yarn a pattern calls for and often wonder what can be substituted for it. I live in a small town with very few knitting resources..yes, its sad...so I use a lot of lion brand. While most people are at least familiar with it, as opposed to some of the more rare yarns out there, I still like to let people know what my chosen yarn can be substituted with. Homespun is rated as bulky. Yes, its wider than worsted weight, but worsted weight could be substituted without affecting the size of the hat greatly. I chose homespun because of the nubby appearance it gives the hat. Its not the funnest yarn to knit with and tends to grab the needle a little, but I like the look in the end. to rib or not to rib: I, personally, do not like to knit ribbing. This hat calls for 1" of ribbing at the beginning and while it does create a snugger fit it is not necessary. If ribbing causes you stress than jump right into stockinette after casting on and create a rolled brim.
i-cord:
There are tons of videos on the net to show how this is done if my instructions leave you confused. Originally called "idiot" cord because of how simple it is..his actually leaves me feeling like an idiot because it is not as simple for me. With 2-4 stitches on one dpn, knit 1 row. Keeping the dpn in the same hand and WITHOUT turning it, slide the stitches to the other end of the needle and knit them again, slightly tugging after the stitch is made to close the gap in back. Continue knitting like this until the desired length. THANKS FOR BUyING MY PATTERN =O) \~heidi Yates


