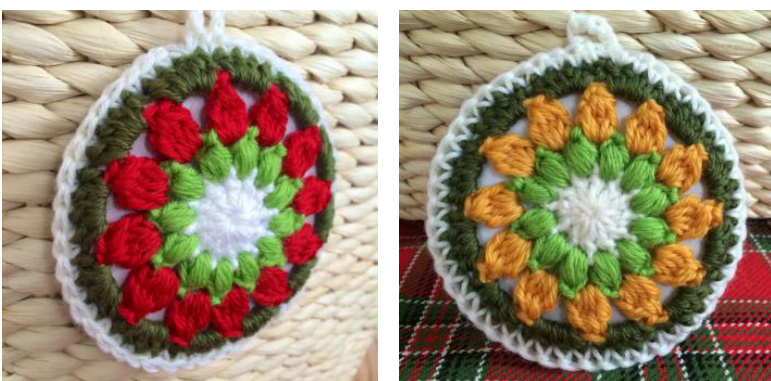
Star Flower Ornament Crochet Pattern Designed by Jackie Evans @December 2015
#NCG120415
Pattern written in US terms.
MATERIALS:
· Yarn of choice. Samples shown are in DK weight (or light worsted weight). · Crochet hook size: 4mm (G) for DK weight yarn · Scissors · Yarn or tapestry needle · 3 locking stitch markers (optional) · Cardboard, white paper, glue FINISHED SIZE: Sample is approx. 4" in diameter. ABBREVIATIONS: beg = beginning CA = color A; CB = color B; CC = color C; CD = color D CL = cluster stitch ch = chain dc = double crochet hdc = half double crochet puff st = puff stitch sc = single crochet sl st = slip stitch st(s) = stitch(es) \* = Repeat the instructions following the single asterisk as directed. Hint: If you are unfamiliar with any of these stitches, you can do a web search and watch a video tutorial.
INSTRUCTIONS - Text Onlv
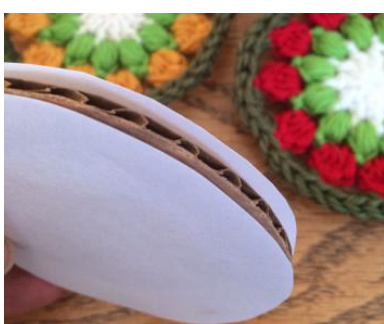
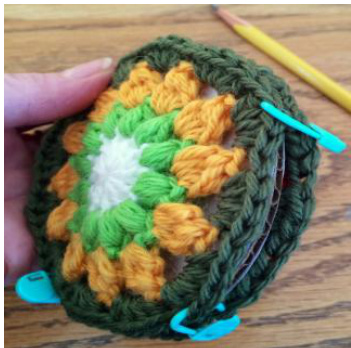
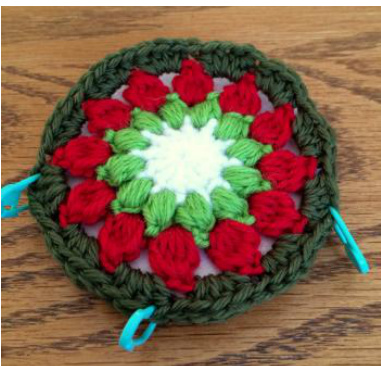
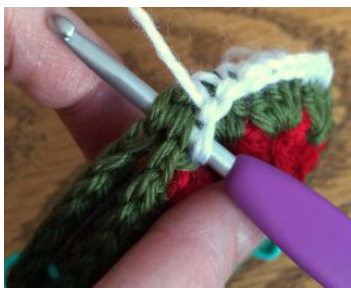
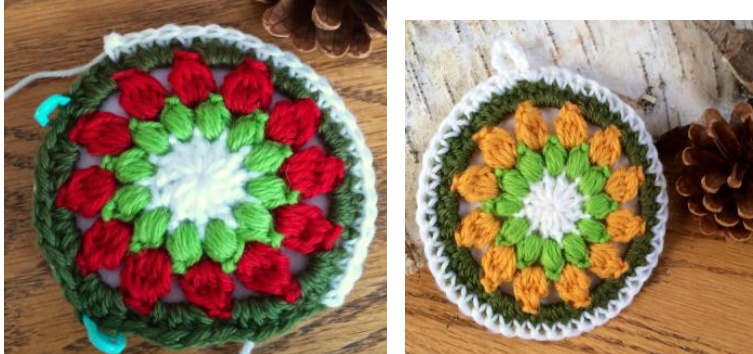
Seefollowingpageforinstructionswithphotos. Round 1: With CA (color A) - Begin with a magic circle, ch3 (serves as 1t dc), then dc11 into magic circle, cinch yarn tail then sl st to top of beg ch 3 to close circle while changing to CB. Option for smaller center:Startwithch2,thenhdc11intomagiccircle. Round 2: With CB - Ch2 (as part of 1st puff st) & puff st in beg st of round, ch1, \*puff st in next, ch1, \* repeat to end, sl st to top of 1st ch2, then sl st in 1st ch1 space while changing to CC. Note: Another option is to work the puff st(s) between the dc st(s). The 1st round will look like spokes when using this option. Round 3: With CC - Ch2 (as part of 1st CL), CL in ch1 space, ch2, \*CL in next ch1 space, ch2, \* repeat to end, sl st to top of 1"t ch2, then sl st in 1"t ch2 space while changing to CD. Round 4: With CD - Ch1, hdc4 into 1st ch2 space, \*hdc4 in next ch2 space, \*repeat to end, sl st in 1st ch1 space. Break yarn, finish off join, & weave in all yarn ends in back of work. Note: Repeat instructions to make 2. Next: Cut out a cardboard circle a little smaller than the ornament circles. Cut out 2 more circles this size using white paper. Use a glue stick and glue the white paper circles on eithersideof the cardboard circle. Then: Place the crocheted circles together, wrong sides facing in. Use locking stitch markers (or tie some waist yarn on) to 3 points on the circles to secure them together, leaving enough room at top for the cardboard circle to fit through. Round 5: Insert the cardboard circle and join the two ornament circles together with a sc using color A. Continue to sc into both ornament circles around. Remove the stitch markers as you come to them. Sl st to 1st sc, ch6, sl st to base of ch6 (this provides a loop to use with an ornament hanger), fasten off and secure. Break yarn and weave in yarn ends. Thank you for your interest in this pattern! If you are on Instagram, please post a photo of your ornament and use the hashtag #mystarflowerornament. I would love to see it! \~ Joyfully, Jackie -- IG name: joyfuljaxcrochets.and.knits

INSTRUCTIONS - with photos
Please note that the photos in this pattern only reference a few steps. The rest of my patterns have more comprehensive photos to help clarify steps. Round 1: With CA (color A) - Begin with a magic circle, ch3 (serves as 1st dc), then dc11 into magic circle, cinch yarn tail then sl st to top of beg ch 3 to close circle while changing to CB. Option for smaller center: Start with ch2, then hdc11 into magic circle. Round 2: With CB - Ch2 (as part of 1st puff st) & puff st in beg st of round, ch1, \*puff st in next, ch1, \* repeat to end, sl st to top of 1st ch2, then sl st in 1st ch1 space while changing to CC. Note: Another option is to work the puff st(s) between the dc st(s). The 1st round will look like spokes when using this option. Round 3: With CC - Ch2 (as part of 1st CL), CL in ch1 space, ch2, \*CL in next ch1 space, ch2, \* repeat to end, sl st to top of 1st ch2, then sl st in 1st ch2 space while changing to CD. Round 4: With CD - Ch1, hdc4 into 1st ch2 space, \*hdc4 in next ch2 space, \*repeat to end, sl st in 1st ch1 space. Break yarn, finish off join, & weave in all yarn ends in back of work. Note: Repeat instructions to make 2. Next: Cut out a cardboard circle a little smaller than the ornament circles. Cut out 2 more circles this size using white paper. Use a glue stick and glue the white paper circles on either side of the cardboard circle. Then: Place the crocheted circles together, wrong sides facing in. Use locking stitch markers (or tie some waist yarn on) to 3 points on the circles to secure them together, leaving enough room at top for the cardboard circle to fit through. Round 5: Insert the cardboard circle and join the two ornament circles together with a sc using color A. Continue to sc into both ornament circles around. Remove the stitch markers as you come to them. Sl st to 1st sc, ch6, sl st to base of ch6 (this provides a loop to use with an ornament hanger), fasten off and secure. Break yarn and weave in yarn ends. Thank you for your interest in my free Star Flower Ornament Crochet Pattern! If you are on Instagram, please post a photo of your ornament and use the hashtag #mystarflowerornament. I would love to see it! \~ Joyfully, Jackie -- IG name: joyfuljaxcrochets.and.knits

For more patterns please visit my Etsy shop: www.NorthernCottageGifts.etsy.com or my Ravelry shop: www.ravelry.com/stores/northern-cottage-crochetdesigns


