EISERN
COPYRIGHT ? GENERAL HOGBUFFER 2014
Welcome to the March 2014 Mystery Sock for Sock Knitters Anonymus!
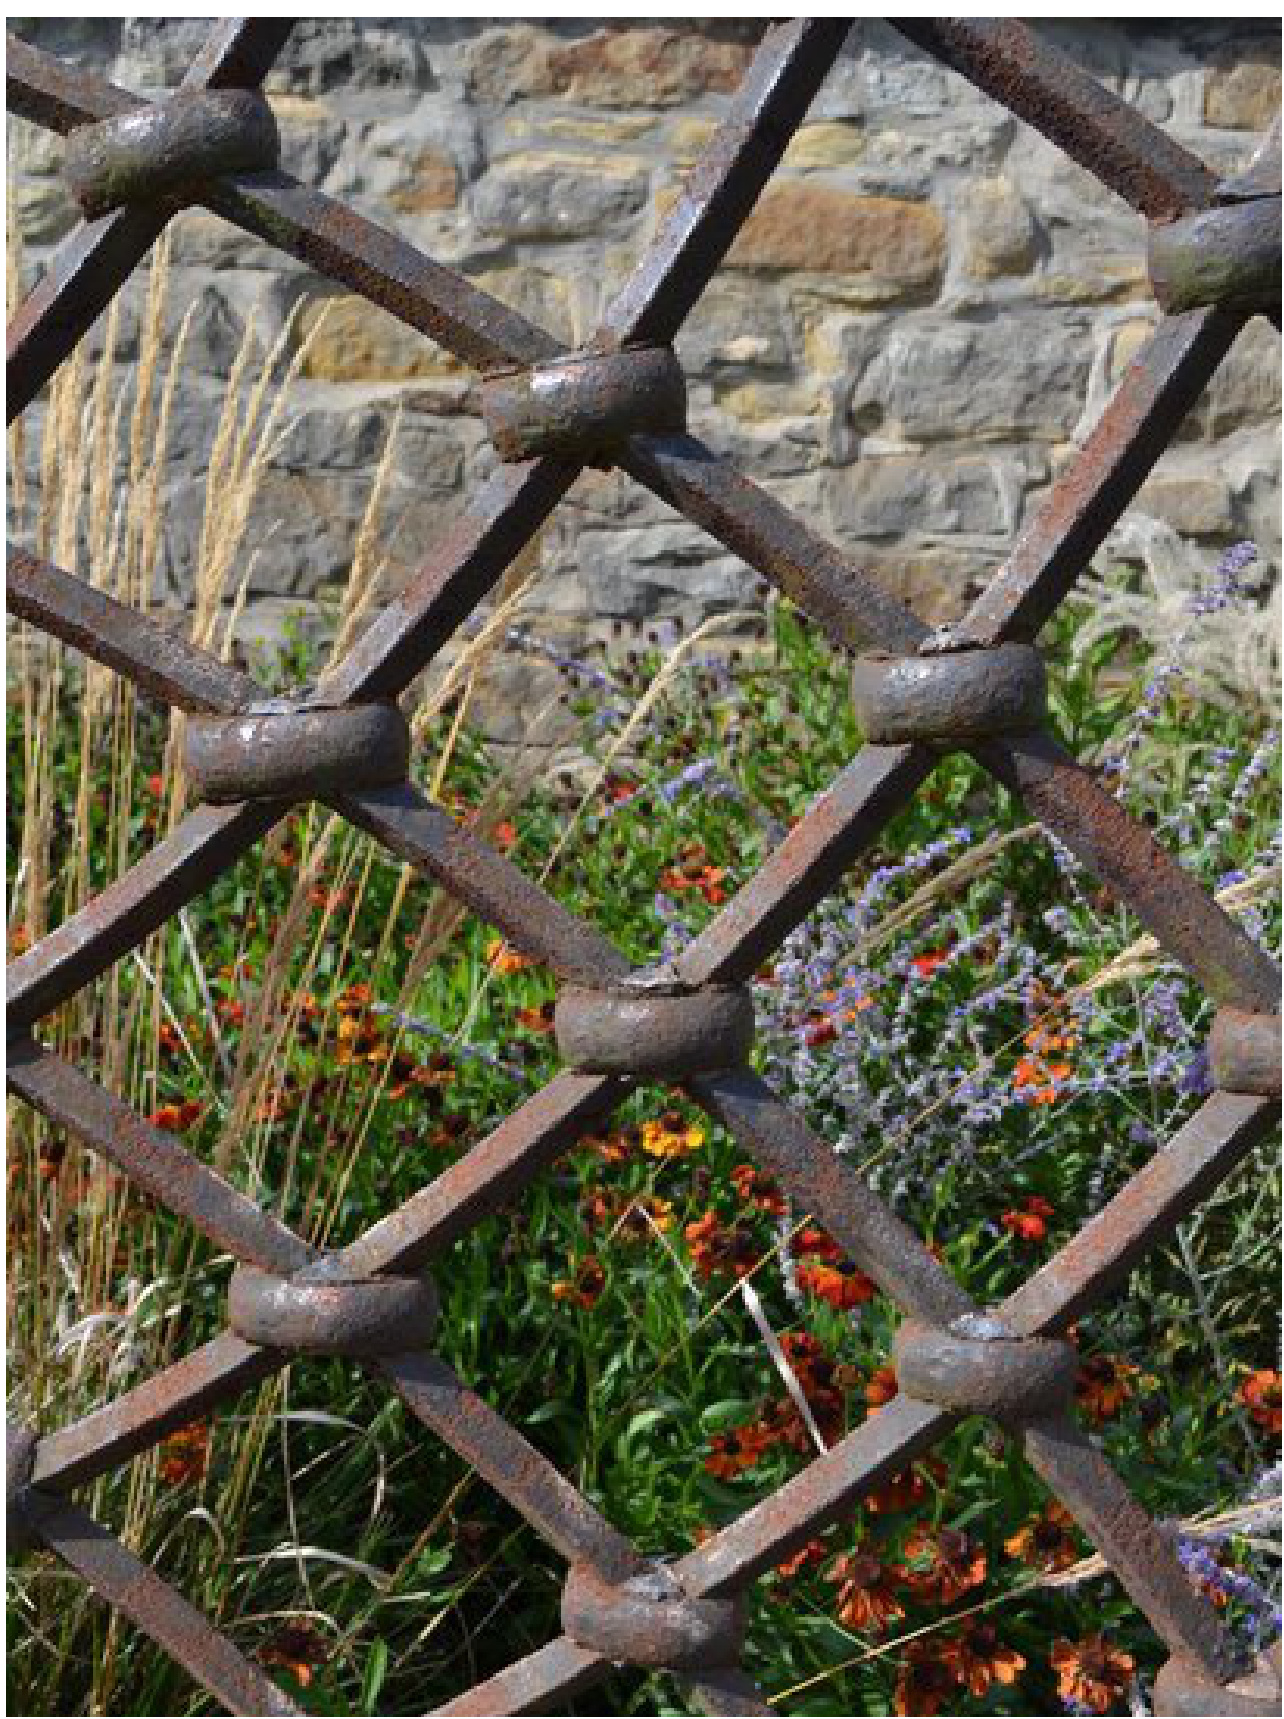
The theme for this month was architecture and/or architectural elements, more precisely ornamental wrought iron in this case. For this and all following clues, please read the whole of the instructions to the end before you start working; it will be helpful for you to have some kind of idea of where you are going before you get towork.
Size:
There are instructions for 3 sizes, small, medium and large. However, due to the nature of the patterns used, both the small and the large size had to include some compromise / allowance in respect of the design. I would imagine that the vast majority of knitters will be able to make the medium size work for them, and I would encourage you to try and do so before you select to work either the small or the large. There is always the option to move your needle size up or down, and if you can make Clue 1 fit over your heel and not be too loose on the leg, you should be fine with the rest of thesock. As always, there will also be plenty of help, advice and encouragement on SKA in the dedicated thread to assist you should there be any problems.
Material:
You will need two colours of sock yarn with a strong contrast. My original sample used a very light stone colour as a main with a dark charcoal as the contrast, but feel free to follow your personal preference. In my personal opinion, this is unlikely to work well with a very strong variegation or a self striping yarn, but I have been proven wrong before... You will need about 100 gr for the main colour (MC) and around 30 gr for the contrast (CC). However, if you prefer to switch MC and CC on each sock and work opposites, you should be ok with 50 gr of each colour, unless you are working a very large sock.
Gauge:
On my sample, I was getting 33 sts x 45 rows over 10 cm / 4 inches of plain stocking stitch with the smaller needles and 33 sts x 42 rows over stranded stocking stitch with the bigger size needles, but take this as a guide line only, make sure that the sock fits you well and that you are happy with the drape of the fabric you are creating first of all.
Needle size:
You will need needles in two consecutive sizes: the size that you would be most happy to knit your chosen yarn with in a normal sock (I used 2.5 mm) and then one size bigger (I used 2.75 mm). There is scope here to adjust to your personal preference and to fine-tune the size of the finished sock, use what works best for you. I have written the instructions for circular needles and/or magic loop; if you prefer to work with DPN's please note that "needle 1" and "needle 2" may mean different things for you, other than that there should be no issues.
Further requirements:
-Tapestry needle -Cable needle, although I would encourage anyone to use this as an opportunity to try cables without a cable needle. -Stitch markers (although you could do it without if they irritate you) -Waste yarn with a very smooth texture in contrasting colour, thin crochet cotton works very well for me. This is for life lines, so feel free to skip this and live dangerously ...
CLUE 1:
Cuff:
Using MC, the smaller needles and your cast on method of choice, CO 64/72/80 sts, 32/36/40 sts on each needle. Work K2,P2 rib for 24 rounds.
Leg:
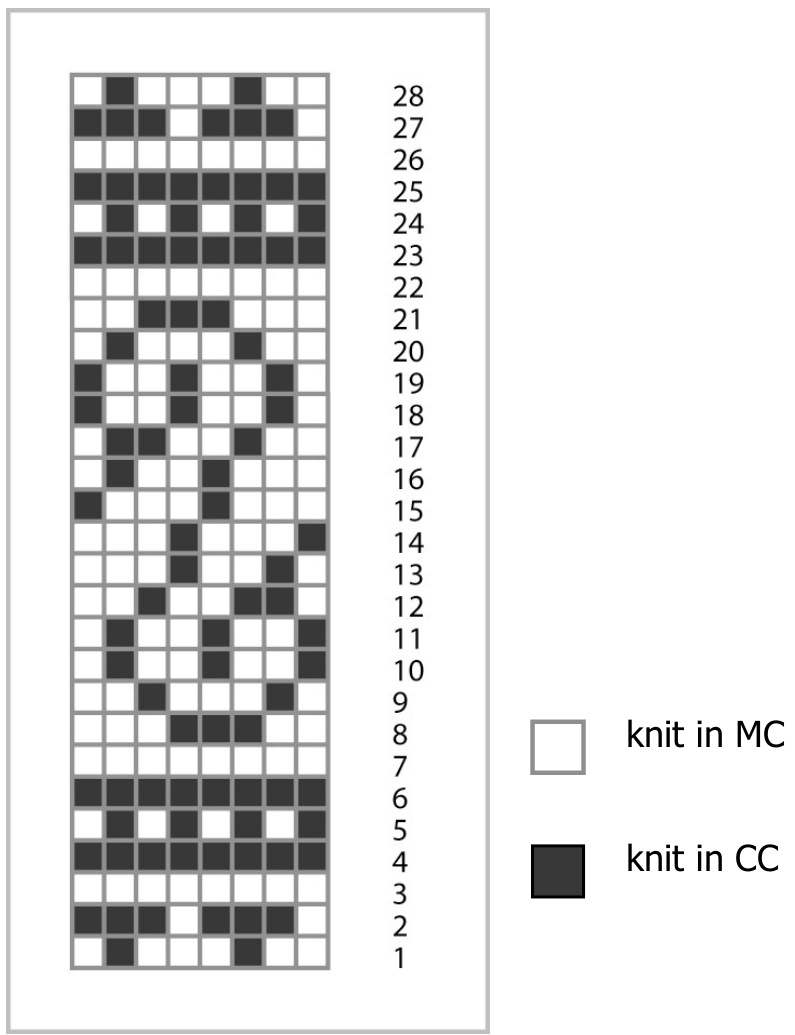
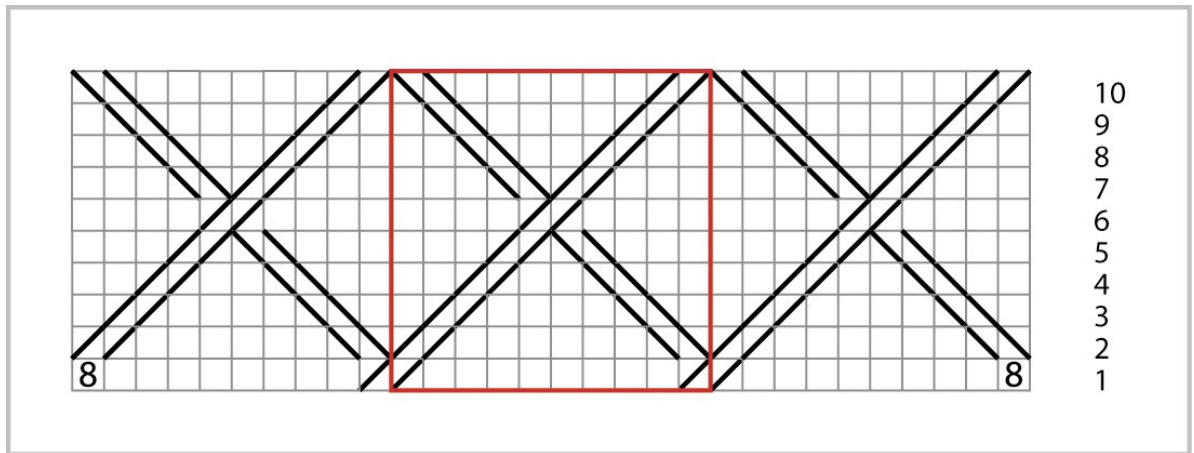
K one round. Switch to the bigger needles, introduce the CC and work the 28 rows of Leg Chart 1. You will fit 8/9/10 repeats of this around your leg. I would suggest that you insert a life line now and try on your work. If you can fit the cuff over your heel ok, and if it is not too roomy on your leg you should be ok, otherwise you may have to re-adjust your needle size or the sock size, sorry. To help you judge the fit better please be aware that the leg length excluding cuff and heel will be about 15 cm / 6 inches. THIS CONCLUDES CLUE 1 !!!
LEG CHART 1
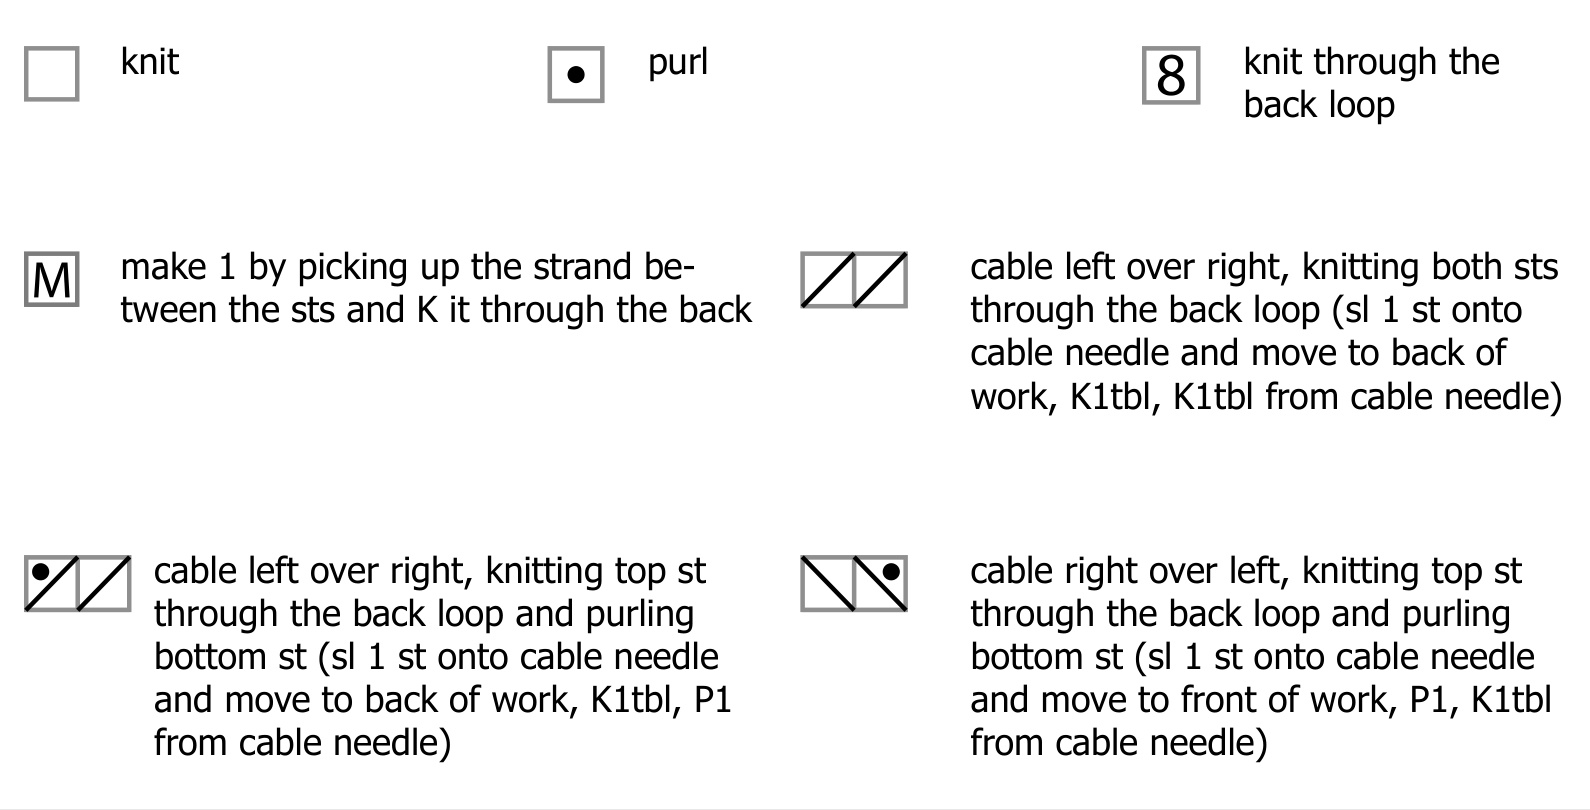
Glossary:
St, sts stitch, stitches K knit P purl SI slip K2tog knit 2 stitches together SSK slip, slip, knit. Slip 2 stitches separately as if to knit, insert left needle into these two stitches from the right and knit onto right needle. P2tog purl 2 stitches together M1 Make one. Increase 1 stitch by picking up the strand between stitches and knitting it through the back loop WS, RS Wrong Side, Right Side MC, CC Main Colour, Contrast Colour tbl through the back loop
CLUE 2 :
Leg (cont.):
Break the CC and switch back to the smaller needle size. For size small only: K2tog, K to end of round (63 sts) For size medium only: K to end of round (72 sts) For size large only: M1, K to end of round (81 sts) Now work the 33 rows of Leg Chart 2. Row 1 will increase your st count to 70/80/90 sts; for row 2 re-arrange your sts so you have 40 sts on needle 2 for all sizes. You will fit 7/8/9 repeats of the chart around your leg. The cable symbol in red needs some special attention at the beginning of the round only, as you need to cable across the line between rounds: Work rounds 7 and 29 as follows: Sl the first st onto needle 2, work the rest of the round according to the chart until you have 2 sts left on needle 2 (the last st of the round plus the one you have slipped at the beginning of the round). Cross these two sts as per the instructions, but do not work the second st, only slip it onto needle 1. Now work the next row as per the chart. Stop after row 33 of the chart.
THIS CONCLUDES CLUE 2!!!
Glossary of symbols used:
LEG CHART 2
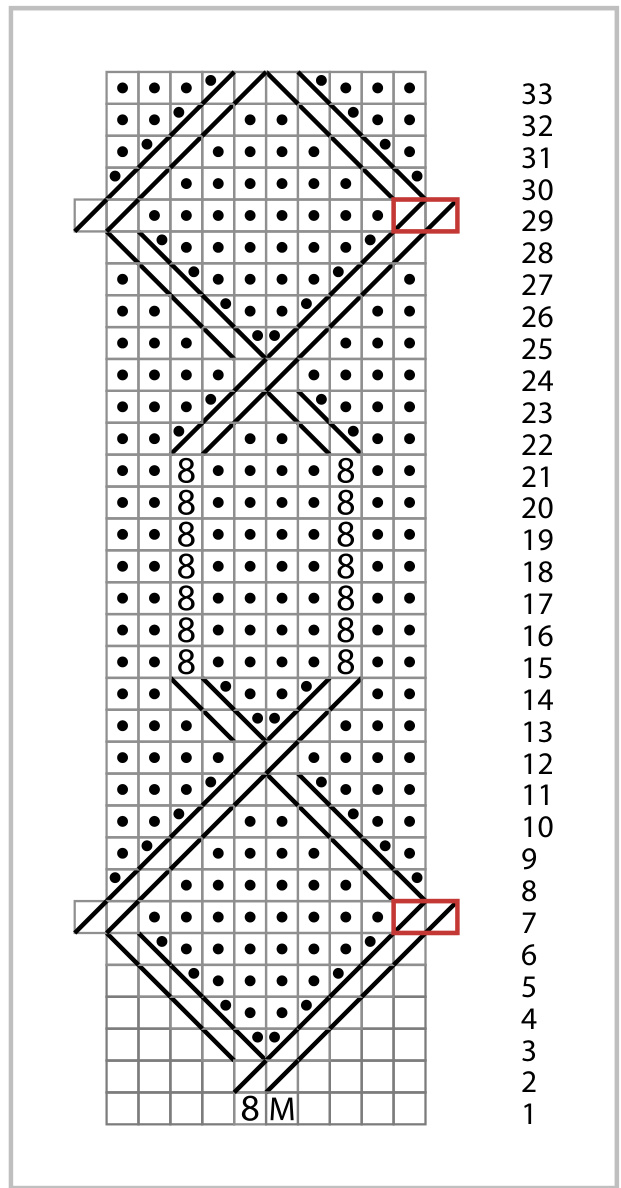
work following special instructions in the text
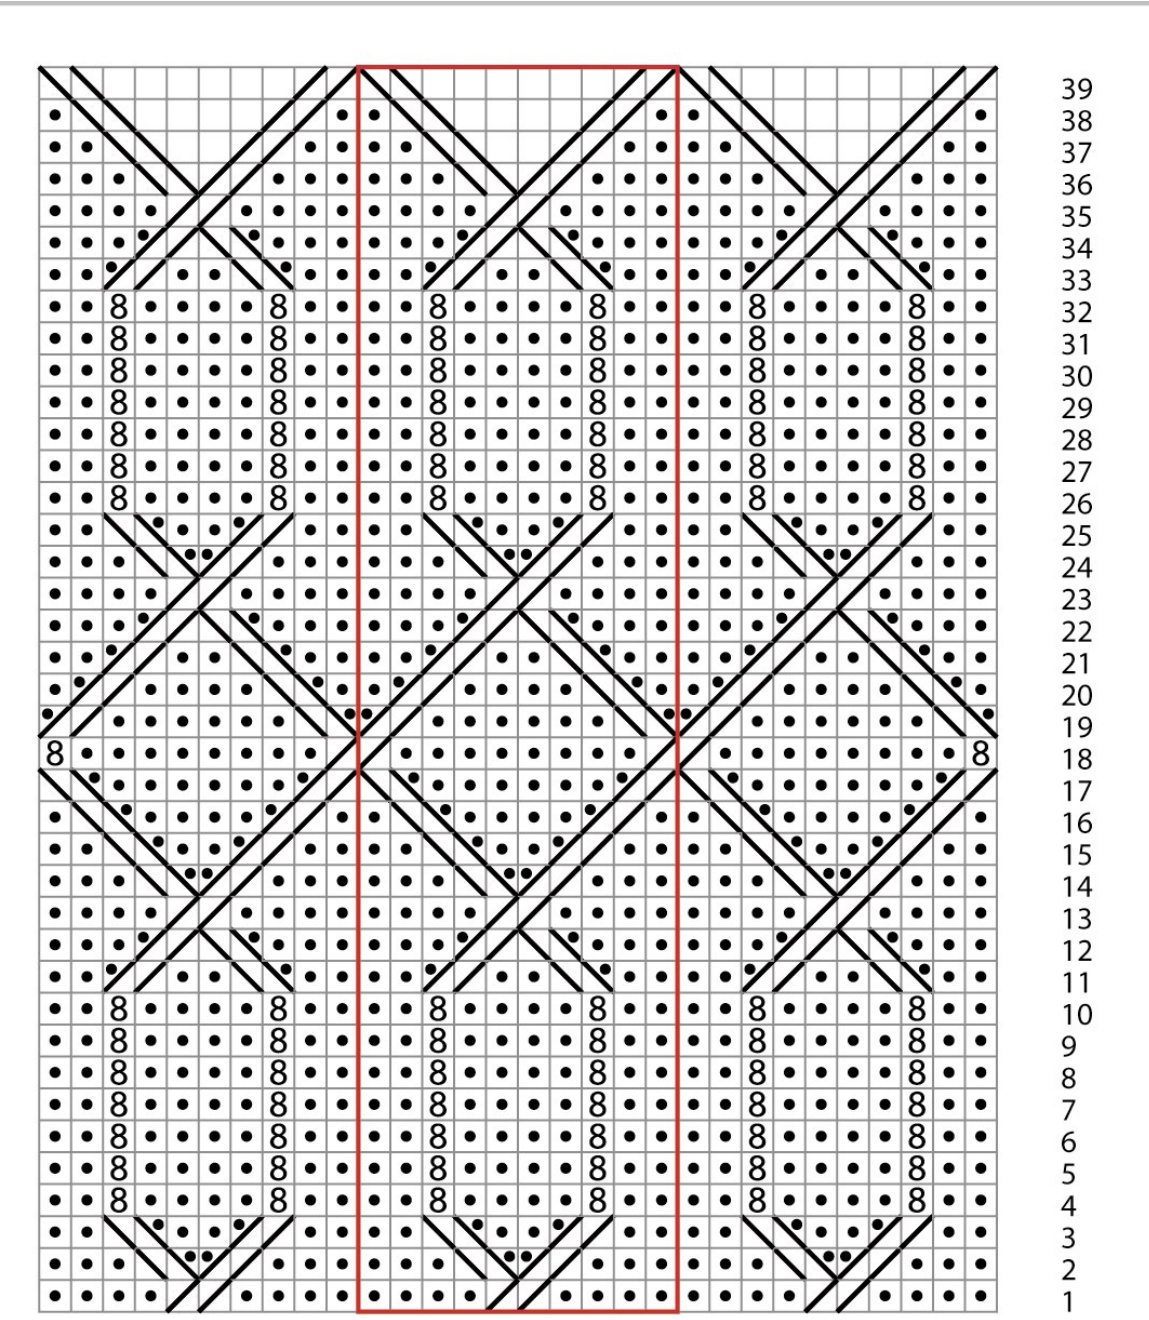
CLUE 3 :
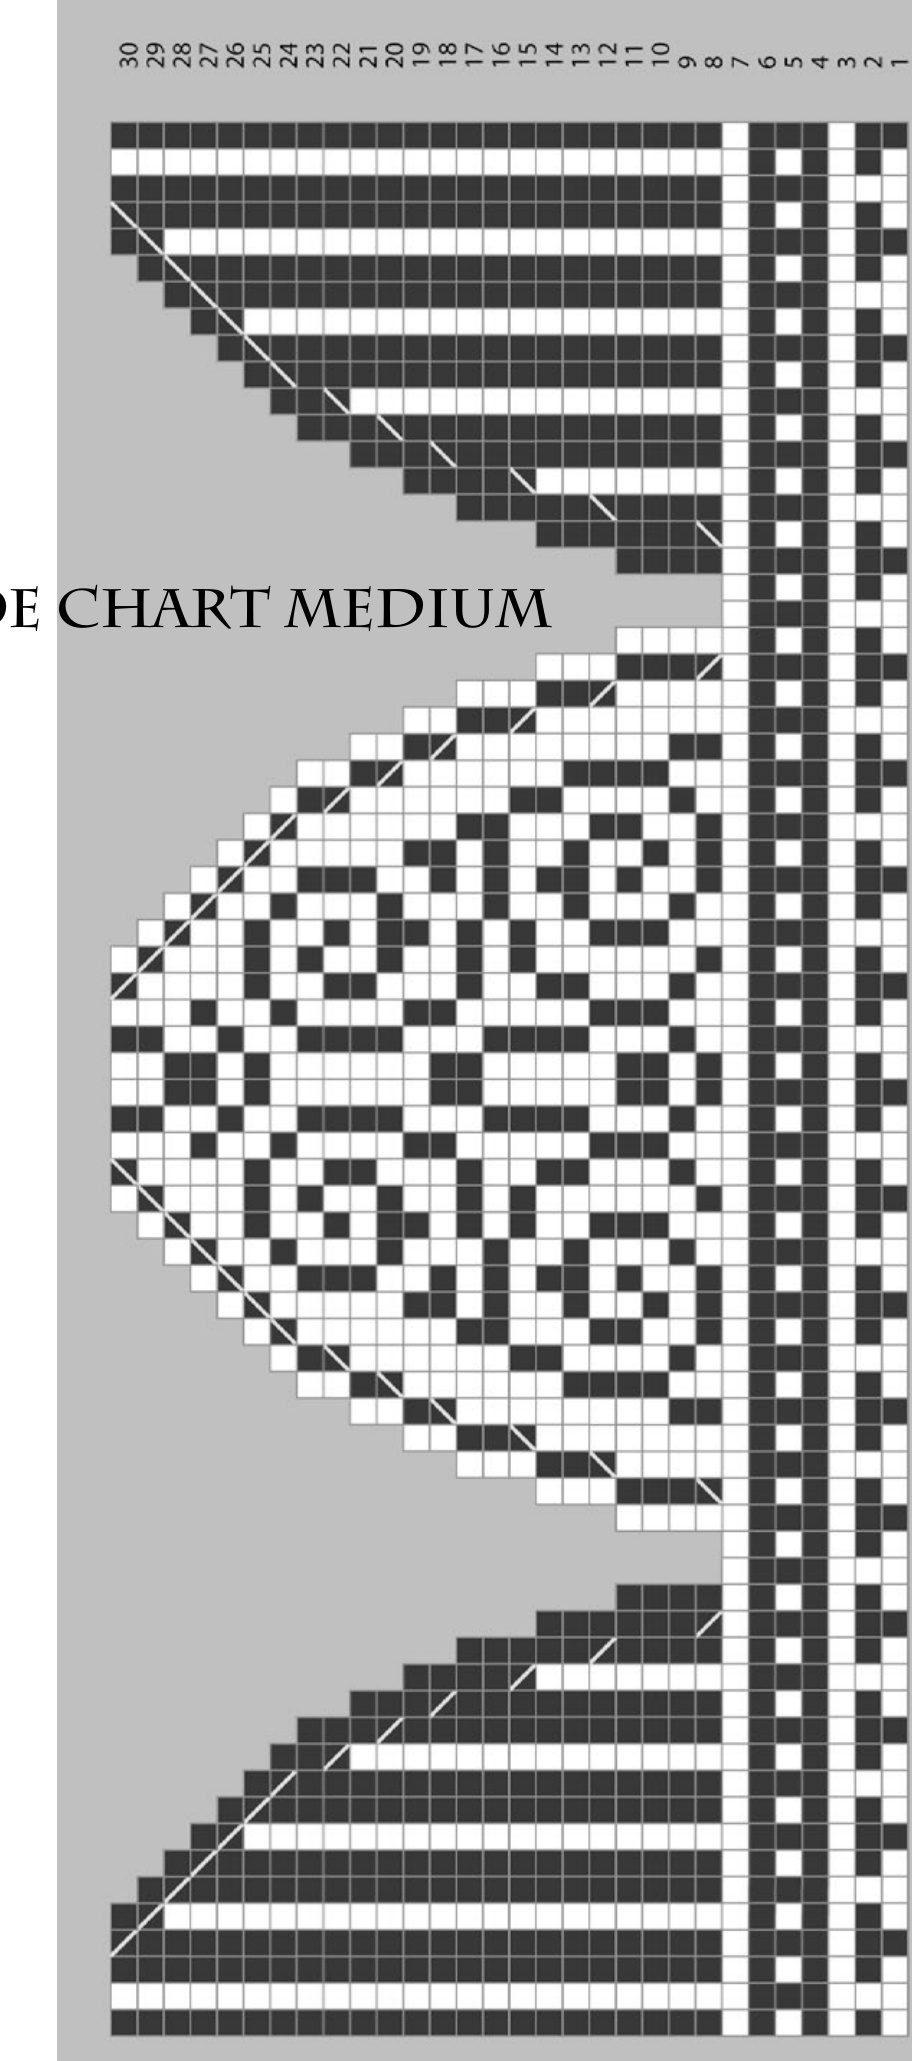
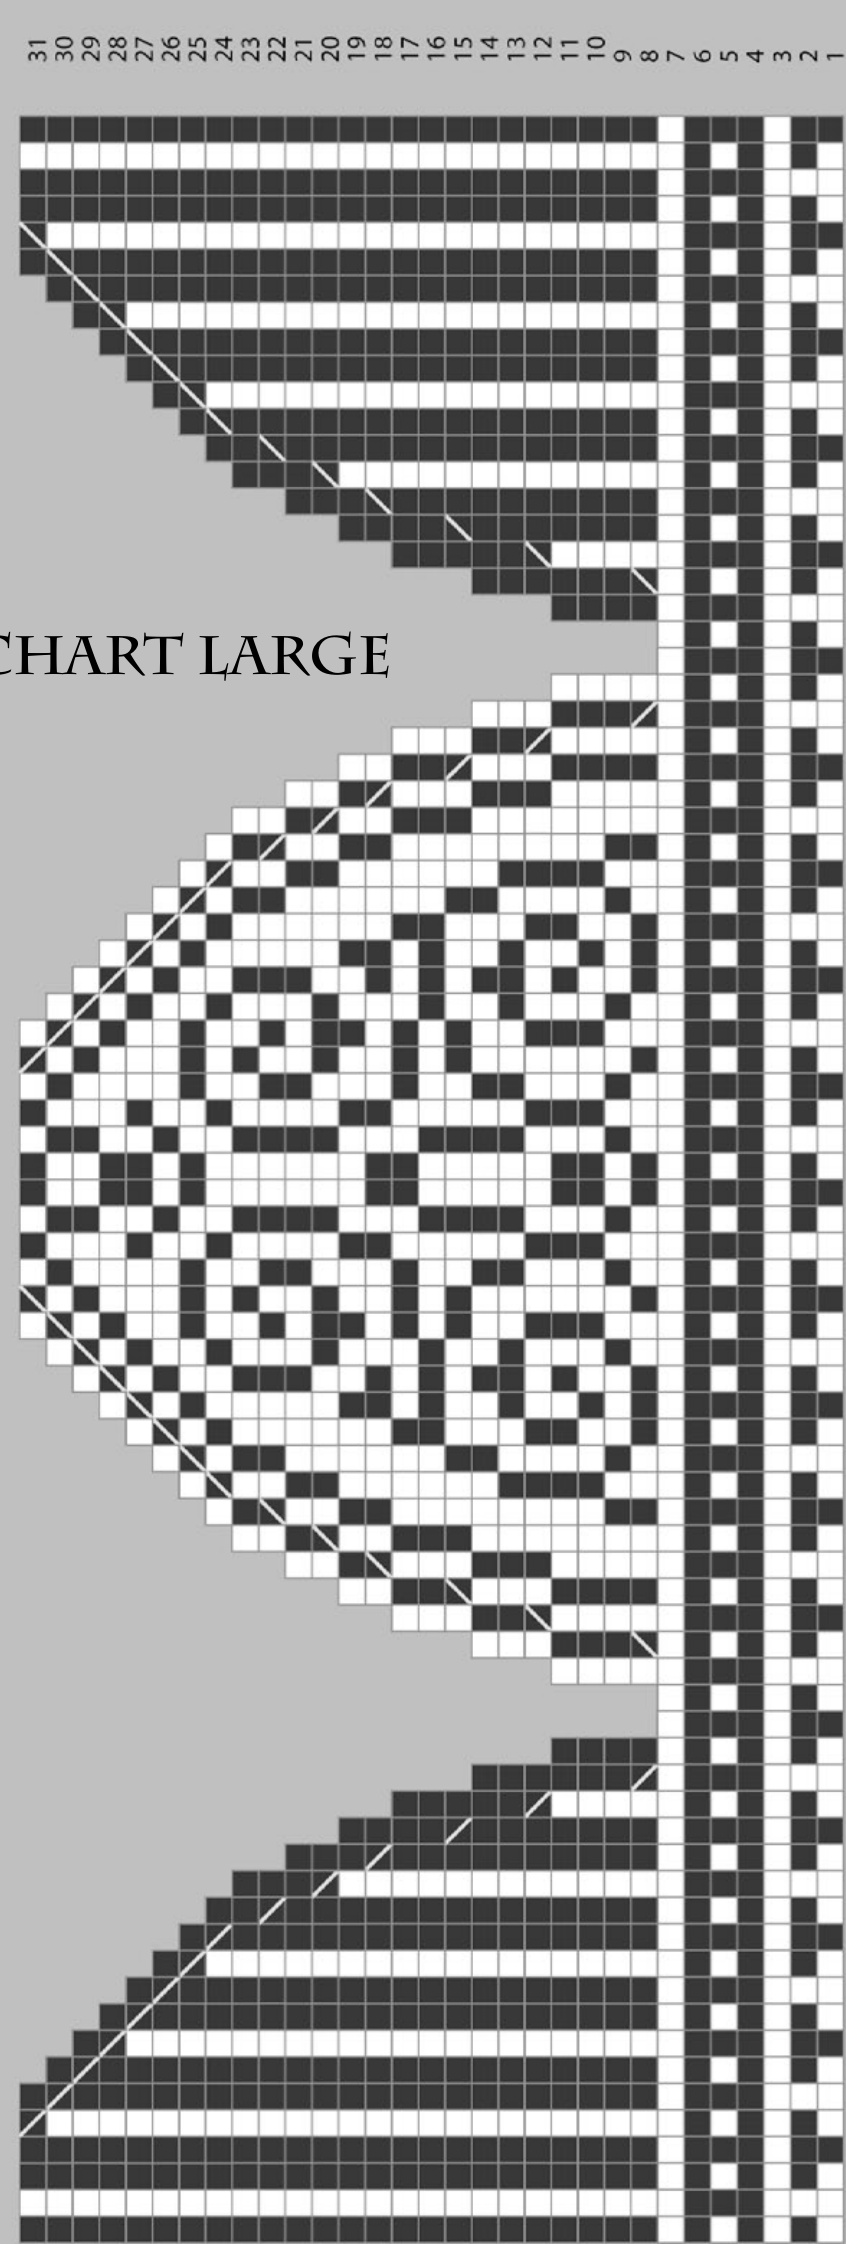
Heel:
Over the 30/40/50 sts on Needle 1, work row 1 of the Foot Chart 1. Please note that the chart shows the small size. For the medium size, work the section outlined in red twice, for the large size work it three times. This will apply to the whole of the Foot Chart 1. On Needle 2, P the purl sts, but instead of a cable work a K2tog. (36 sts on Needle2). Turn. Work the heel flap over the 36 sts on Needle 2 as follows: Row 1: sl1 purlwise, P to end, turn Row 2: sl1 purlwise, [K1, sl1 knitwise] to last st, K1, turn Row 3: sl1 purlwise, P to end, turn Row 4: sl1 purlwise, [sl1 knitwise, K1] to last st, K1, turn This establishes the twisted Eye of Partridge pattern for the heel flap; work for as many rows as you require ( I did 39 rows on my sample), but make sure you end after a Ws row, ready to work On the RS. Turn the heel as follows: Row1: sl1, work in the EoP pattern for 17 sts , K1, SSK, K1, turn Row2: sl1, P3, P2tog, P1, turn Row3: sl1, K to 1 st before the gap, SSK, K1, turn Row4: sl1, P to 1 st before the gap, P2tog, P1, turn Repeat the last 2 rows until you have used up all the sts on your needles, ending with a Row 4 and 20 sts on your needle. K 10 - this is the centre back of your sock and the new beginning of your rounds.
Gusset:
With needle 1, K 10 Pick up and K 1 st in each of the slipped stitches all the way down the heel flap to the instep. You should pick up rounded up half the number of sts that you have knitted rows in your flap, i.e. 20 sts for a 39 row flap. M1 st in the gap between the flap and the instep sts, place a stitch marker, work across the instep according to Row 2 of the Foot Chart 1, place a second marker, M1 in the gap between the instep and the flap. Pick up and K one st in each of the slipped sts up the second side of the heel flap, taking care to pick up the same number as on the other side. K remaining 10 sts to centre back. As the instep is fairly easy to distinguish, you could easily omit the stitch markers here, but use them if this makes it easier for you. Round1: K to 2 sts before marker, SSK, slip marker, work instep as charted, slip second marker, K2 tog, K to end of round. Round2: K to marker, slip marker, work instep as charted, slip second marker, K to end of round. Repeat these two rounds until you have decreased your total stitch count back to 64/72/80 sts. For a very, very short foot you may want to insert a life line at this point. Now only work Round 2 until you have worked Row 39 of the Foot Chart 1
THISCONCLUDESCLUE 3!!!
FOOT CHART 1
Glossary of symbols used:

CLUE 4:
Foot (cont.):
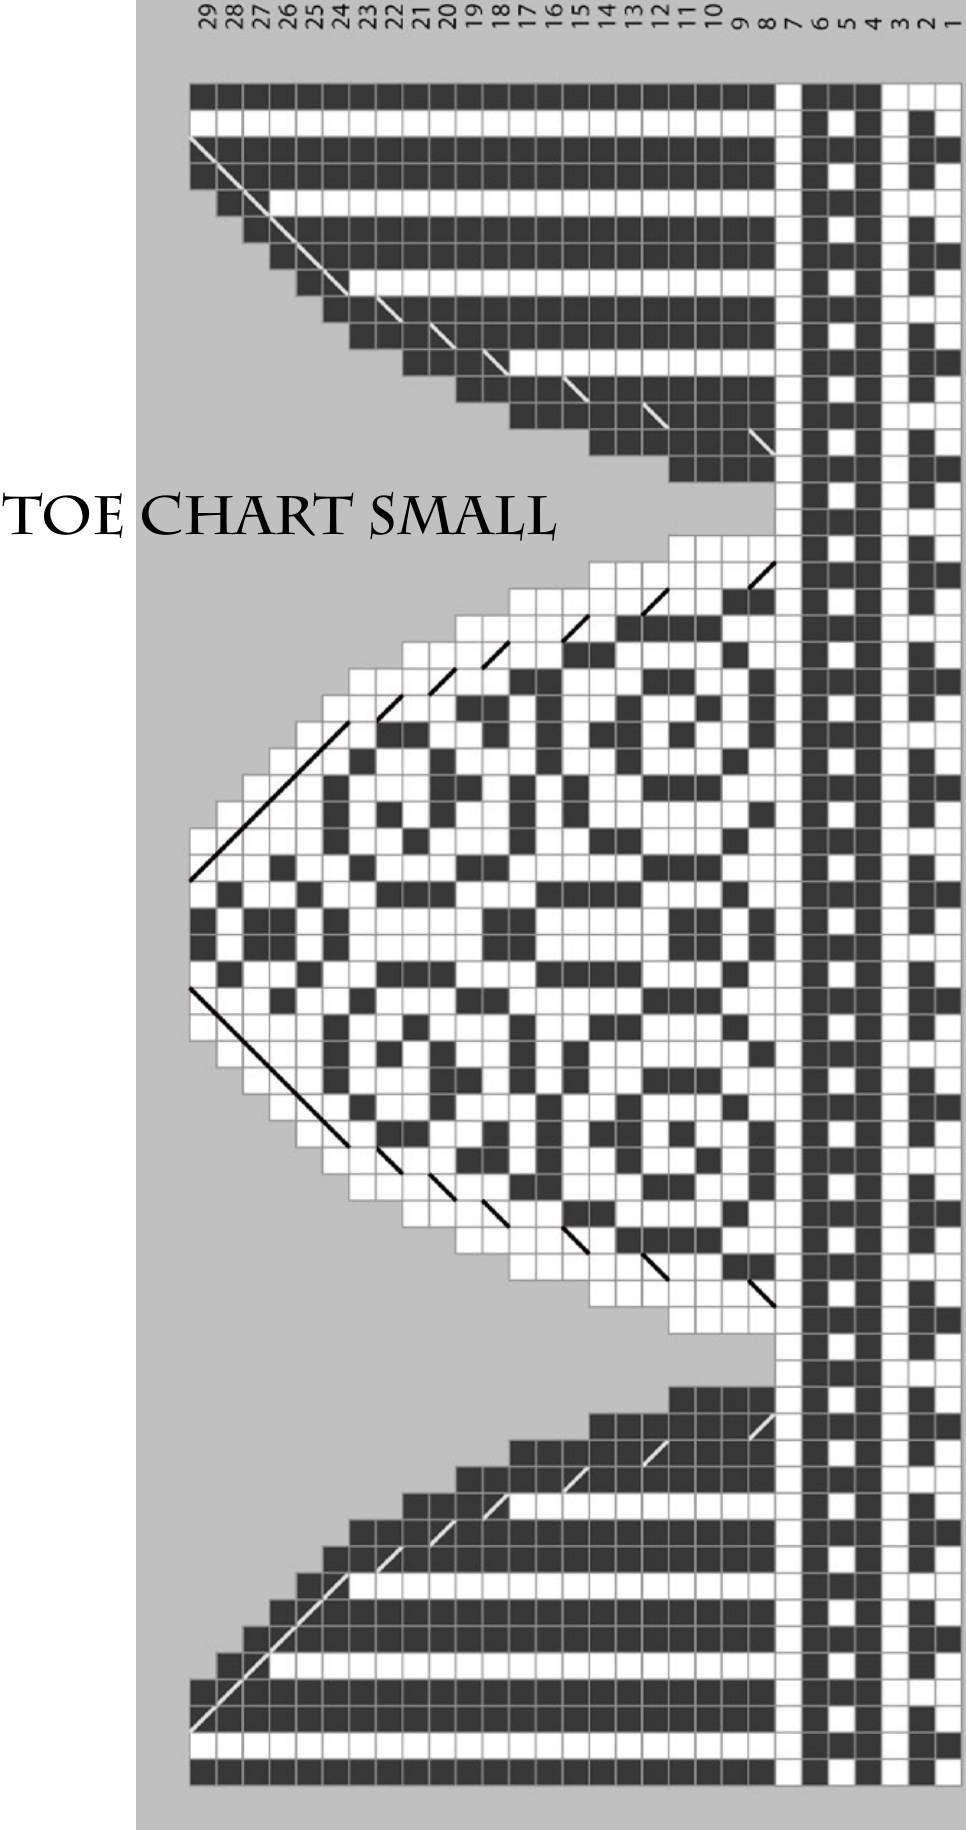
The stranded Toe Chart will take up 29/30/31 rounds, so firstly check the length of your sock s0 far. The stranded section from Clue 1 had 28 rows, so measuring the length of this section should give you a good idea of when you need to start the toe. Typically, this will be somewhere around 3 to 3 14 inches (or 7.5 to 8 cms) less than the total length needed for your size. If you are at this point now, proceed straight to the Toe Chart. Otherwise, work Foot Chart 2 for as many repeats as you need to achieve the required length. It will look best if you end after either row 1 or row 6 of the chart, but you could stop after any row if needed. Please note that once again, you will need to work the red section twice for size M and three times for size L.
Toe:
K one round. Switching to the bigger needles and re-introducing the CC, work the toe chart of your size. You wil end with 16/20/24 sts left, 8/10/12 on each needle. Work 4/5/6 sts in the colour they appear in to bring you to the side of the sock. Re-arrange your sts ready for grafting, using whatever colour you worked the last st in. Cut yarns, leaving about 10 inches / 25 cms and graft the toe closed. Turn sock inside out and darn in all loose threads.
THISCONCLUDESTHEPATTERN!!!
Further suggestions:
As I already said in the intro, you could work both socks the same, or work them as positive/ negative versions by switching MC and CC. Any alternative type of heel could be substituted, but please remember that, should you work these socks as part of the Sockdown challenge, only modifications for fit are allowed. Foot chart 2 could be omitted and a further repeat of the main cable pattern could be worked instead, but this will require a bit of calculation and adaptation. Experienced knitters should have no problems with this.
FOOT CHART 2
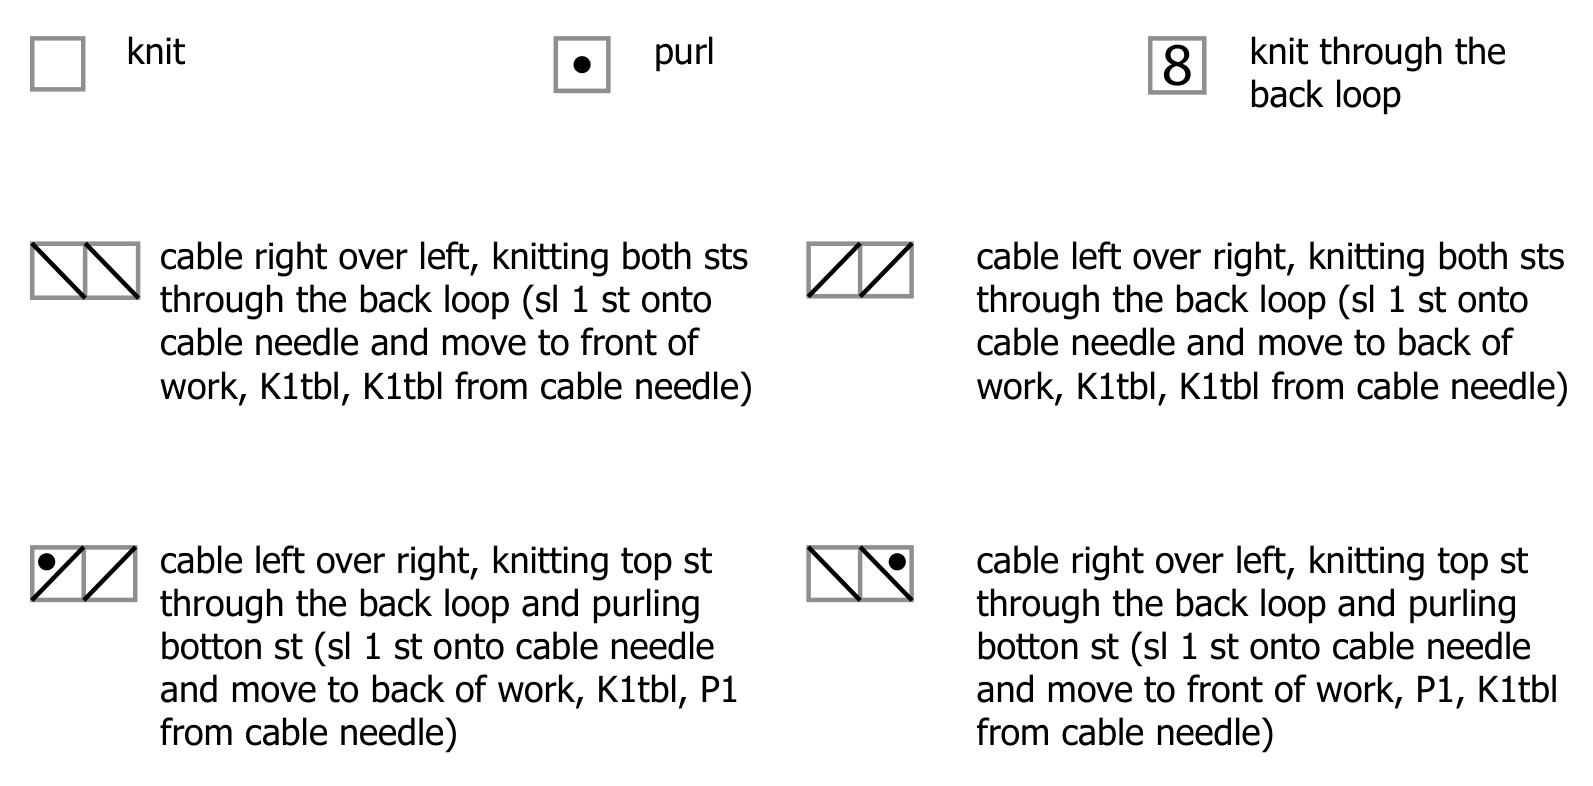
Glossary of symbols used:
knit through the back loop
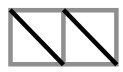
cable right over left, knitting both sts through the back loop (sl 1 st onto cable needle and move to front of work, K1tbl, Kitbl from cable needle) knit 2 together, using the colour indicated
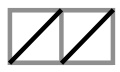
cable left over right, knitting both sts through the back loop (sl 1 st onto cable needle and move to back of work, K1tbl, K1tbl from cable needle) Slip, Slip, Knit using the colour indicated
EISERN