Author/Creator: Lori-Anne Ketola, March 31, 2013.
| License:Creative Commons If you repost this pattern, please include a link back. A lot of work goes into writing these. Feel free to make, copy, and share this pattern. I do not mind if you sell the finished dolls. | |||
| I DO mind if you sell the pattern. I am giving it out for free, pay it forward! Thanks. :) Please read the credits section as well. ** If you find errors in the pattern, or have tweaks for improving it and want to share, send me a message and I will fix them. Thanks :) | |||
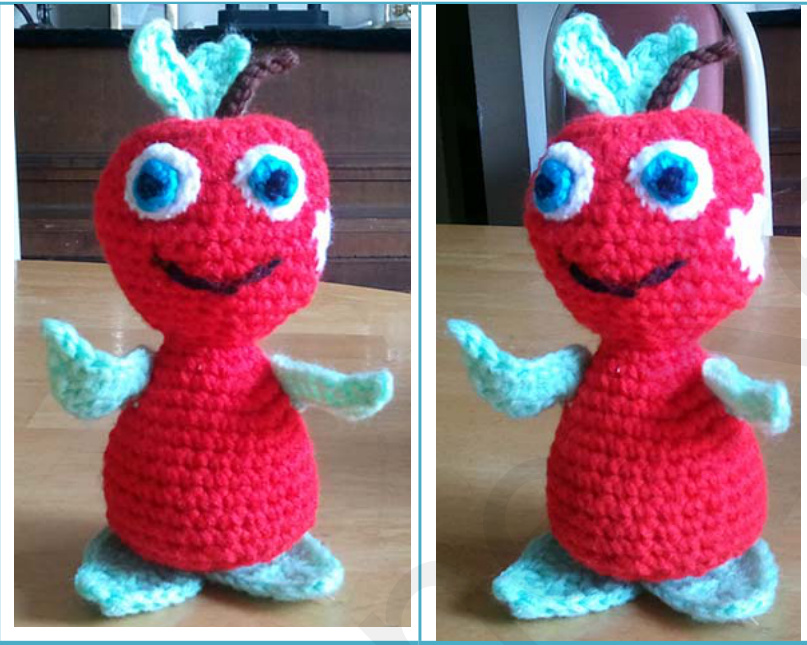
| Description: Skill Level: Beginner/Intermediate | I madethisfor myhusband,who is a Mac addict (the computers, not the apples.) Now he wants it to have a cape and be standing on a Windows logo, lol. This doll is small enough that you can use up some of the scrap yarn lying around | Finished size: Height: 6"/ 16cm * The thicker the yarn, the bigger the doll. **This took me all day, but I was also writingthepatternasIwent.Completion time would normally be much shorter. | |
| from bigger projects. | |||
| Materials Needed: | 2.5 mm hook 3.5 mm hook darning/yarn needle scissors small stitch holder | Yarn: (amounts are roughly estimated) 20g red - light (3) worsted weight white -fine (2) sport, baby 10g green - light (3) worsted weight black - medium (4) worsted weight blue -fine (2) sport, baby brown - light (3) worsted weight | |
| Abbreviations | ch chain stitch | |||
| st | ||||
| sl st | slip stitch | |||
| y/o | yarn over | |||
| inc | increase decrease | |||
| dec | ||||
| f/o | fasten off | |||
| tog | together | |||
| SC | single crochet | |||
| hdc | half double crochet | |||
| dc | double crochet | |||
| htr | half treble crochet | |||
| tr treble crochet | ||||
| dtr | double treble crochet | |||
| Rnd | ||||
| round | ||||
| Special Stitches dtr | yarn over TwicE, insert hook, yarn over, pull loop back through stitch (four loops over and pull through two loops (2 loops left on hook), yarn over and pull | |||
| Credits | The leaves are my variations of patterns created by the Crocheted Leaves -for the Naked Branch- | through remaining two loops (note :: this is equivalent to the US tr stitch) Leaves on the dolls head: | ||
| following crafters: (l have listed the instructions as published by their creators.) **Using a 2.5mm hook, the leaves come outtobe the perfect sizes for this project. | by:Tara from EasyMakesMeHappy Leaves for feet: From theTripleLayerFlowerPattern By: Lucy at Attic 24 Leaves for hands: Veined Leaf Pattern By:Jenn at Wild Rose Fiber Studio | |||
| Instructions | |||
| Head | Row 1 | Using red and a 3.5 mm hook: ch 2. 6 sc in 2nd ch from hook. (6) | |
| Row 2 | inc in each st around (12) | ||
| Row 3 | 1 sc, inc, 2 sc, inc, 1 sc, inc, 2 sc, inc, 1 sc, inc (17) | ||
| Row 4 | 1 sc, inc, 3 sc, inc, 2 sc, inc, 3sc, inc, 2 sc, inc, 1 sc (22) | ||
| Row 5 | 2 sc, inc, 5 sc, inc, 4 sc, inc, 5 sc, inc, 2 sc (26) | ||
| Row 6 | 4 sc, inc, 7 sc, inc, 8 sc, inc, 4 sc (29) | ||
| Row 7 | 7 sc, inc, 9 sc, inc, 9 sc, inc, 1 sc (32) | ||
| Row 8 | 13 sc, inc, 18 sc (33) | ||
| Row 9 | scineachst around (33) | ||
| Row 10 | Attach white: White: 1 sc, Red: 1 sc, White: 1 sc, Red: 1 sc, White: 1 sc, Red: sc in remaining sts around (33) Put red on a stitch holder. We will come back to it soon. |
| Using White | Insert hook into first white stitch (right side facing you), y/o and draw up a loop. ch 1, turn (wrong side facing you) Working wrong side and using white, sc in same st as ch 1, sc across next 7 sts. (8 w). ch 1, turn. sc 2 tog, sc in next 4 sts, sc 2 tog, ch 1, turn | ||
| Row 11 | 1 sc, sc next 4 sts tog, 1 sc, ch 1, turn sc in same st as ch 1 st, sc in next 2 sts, f/o Pick up red sc in first st, pick up 10 sts around the white patch (this will cause the patch to indent), sc in next 10 sts, dec 1, sc in next 13 sts (35) | ||
| Row 12 | *sc in next st, dec 1* 3 times, 1 sc in next 2 sts, dec 1, sc in next 9 sts, dec 1, sc in next 10 sts (29) | ||
| Row 13 | sc in next 4 sts, dec 1, sc in next 8 sts, dec 1, sc in next 7 sts, dec 1, sc in next 4 sts (26) | ||
| Row 14 | sc in the next 2 sts, dec 1, sc in next 5 sts, dec 1, sc in next 4 sts, dec 1, sc in next 5 sts, dec 1, sc in next 2 sts (22) | ||
| Row 15 | sc in next st, dec 1, sc in next 2 sts, dec 1, sc in next 3 sts, dec 1, sc in next2 sts, dec 1, sc in next 3 sts, dec 1, sc in next st (17) | ||
| Row 16 | dec 1, sc in next st, dec 1, sc in next 2 sts, dec 1, sc in next st, dec 1, sc in next 2 sts, dec 1, sc in next st (12) | ||
| Row 17 | stuff 4 dec around (8) | ||
| Continue working body without fastening off. | |||
| Body | Row 18 | sc in each st around (8) | |
| Row 19 | *sc in next st, inc in next st* around (12) | ||
| Row 20 | *sc in next 2 sts, inc in next st* around (16) | ||
| Row 21 | *sc in next 3 sts, inc in next st* around (20) | ||
| Row 22 | *sc in next 4 sts, inc in next st* around (24) | ||
| Row 23 | *sc in next 5 sts, inc in next st* around (28) | ||
| Row 24-30 | sc in each st around (28) | ||
| Row 31 | sc in next st, * dec 1, sc in next 3 sts* around, ending with a dec 1 (22) | ||
| Row 32 Row 33 | sc in next st *dec 1, sc in next st*, around (15) sc in next st, *dec 1, sc in next st* around, ending with a | ||
| Stuff | dec 1 st (10) sc in next 2 sts, dec 1, sc in next 2 sts, dec 1, sc in next 2 sts | ||
| Row 34 (8) | f/o, leaving a tail for closing opening Weave tail through remaining 8 sts. Pull to close, secure. | ||
| Weave in ends. |
| White | Rnd 1 - ch 2, 14 sc in 2nd ch from hook, join with a sl st (14) Rnd 2 - sc in each st around (14) f/o leaving a tail for sewing. Stich center of the eye white so | |||
| Iris | the center of the circle closes and the circle becomes an oval.Weavetherestofthetailtothecenterofthewhite. Using a fine yarn in the eye colour of your choosing (l used blue): ch 2, 6 sc in 2nd ch from hook, join with a sl st | |||
| Pupil | f/o, leaving a tail for sewing. Using black: ch 1, sl st into ch f/o, pulling tight to make a bead. Leave a tail for sewing. | |||
| Putting together: | Pull the tails of pupil through the center of the iris. Pull the tails of the iris and pupil through the center of the white. Using white tail, secure the iris and pupil to eye white. trim | |||
| all tails except the white one. Leave it for sewing the eye to the doll. | For a photo tutorial, | |||
| Feet (make 2) | Step 1 | Using green and a 2.5 mm hook: First make the central stem. Chain 10, then begin in 2nd chain from hook and slip stitch into each stitch along (9 sts). Fasten off. | please see the link above in credits. | |
| Step 2 | This first side of the leaf is effectively worked out of the foundation chain loops. Hold your leaf stem so that the tail ends are hanging off to the right as you will be starting at this end. Begin by inserting your hook into the first stitch | |||
| Step 3 | and pulling though your new colour Work 1dc into the first stitch, then 1 tr into the next stitch | |||
| Step 4 | Work 1 dtr into each of the next 4 stitches. | |||
| Step 5 | Now work 1 tr, 1 htr, 1 dc. You should be at the end of the foundation chain/first side | |||
| Step 6 | There should be a stitch sitting at the end of your central stem...use it to make a picot point, as follows : 1 tr, chain 2, sl st into 2nd chain from hook, 1 tr | |||
| Step 7 | Now work out of BACK LOOPS ONLY down the second side, as follows: 1dc, 1 htr, 1 tr | |||
| Step 8 | Now work 1 dtr into each of the next 4 stitches, then 1 tr. You should have one remaining stitch left, so put 1 dc and 1 slip stitch into that last stitch. | |||
| Step 9 | Chain 1, then slip stitch into beginning stitch to finish. Fasten off and darn ends in on reverse (if you darn the ends up and down the centre, it strengthens the leaf and stops it from being too floppy and curly) | |||
| Hands (make 2) | Side 1: Side 2: | Using green and a 2.5 mm hook: chain 10 leaving 8" beg tail Side 1: working in back loops of beginning chain, 3 dc in fourth st from hook, dc in next 3 sts, hdc in next st, sc in next st, sl st in last st, ch 1, sl st in ch just made (leaf point made) | For the original pattern, as well as a video tutorial, please see the link above. |
| Stem: ch 3 | working down the other side of the beginning chain in the front loops, sl st in next st, sc in next st, hdc in next st, dc in next 3 sts, work 3 dc in next st, join with sl st to top of beg chain 4, sl st in second st from hook and in next two sts. sl st to next dc, finish off weaving in all loose ends | ||
| Leaves on Head | Rnd 1 | Using green and a 2.5 mm hook: Ch 5, sc in 2nd chain from hk, hdc in next, dc in next, work (2hdc | For a photo tutorial, please see the link above in credits. |
| (make 2) | in last, ch 2, sc in second ch from hk, 2hdc) in last ch. Working now on the opposite side of foundation ch. dc in next, hdc in next, sc in last. Fasten off with sl st in the first sc of rnd. Leave a tail long enough to play with (a 6" tail is comfortable) | ||
| Stem | Using brown and a 2.5 mm hook: Ch 10 | ||
| Putting it all | sl st in 2nd ch from hook, and in remaining 8 sts (9) f/o leaving tail for sewing the stem to the doll. | ||
| together: | I like my dolls to be expressive, so for this one I folded the whites of the eyes over before sewing to make it look upset. I then tucked them under (after sewing) so he looks happy, but I can pull up the corners and change his expression whenever I want to. I also added black stitching for the mouth. You can do yours however you like. :) Sew the eyes centered on the head, leaving the bite whereveryou wish. Sew the stem and small leaves to the top of the head. To create the indent on the top of the head: pull a string down through the body from the stem and fasten it so it is invisible. Just make it taut enough to create a pit around the stem. Sew the hands and feet as shown in the picture. Weaveinall looseends. Use your hands to shape him as you wish. Shaping the head | ||
| while indenting the bite mark can be tricky, but it is not impossible. |


