Antalia
Skill level: EASY
You'll need
4 (4, 5, 5, 6) hanks $(140\;\mathbf{g}/\;5\;0z)$ of Bernat Softee Baby light yarn, $100\%$ acrylic, approximately $361\mathsf{m}\ /\ 395$ yds., color $\#30221$ Soft Fern. Straight knitting needles size 4mm (US size 6) or size to obtain gauge, DPN size $3.5\mathsf{m m}$ (US size 4).
Gauge!
$10\ c m\ (4^{\circ})\times10\ c m\ (4^{\circ})\,=\,17.5$ stitches and 24 rows. It is recommended to measure swatch only after you wash it to allow for any shrinkage.
Note
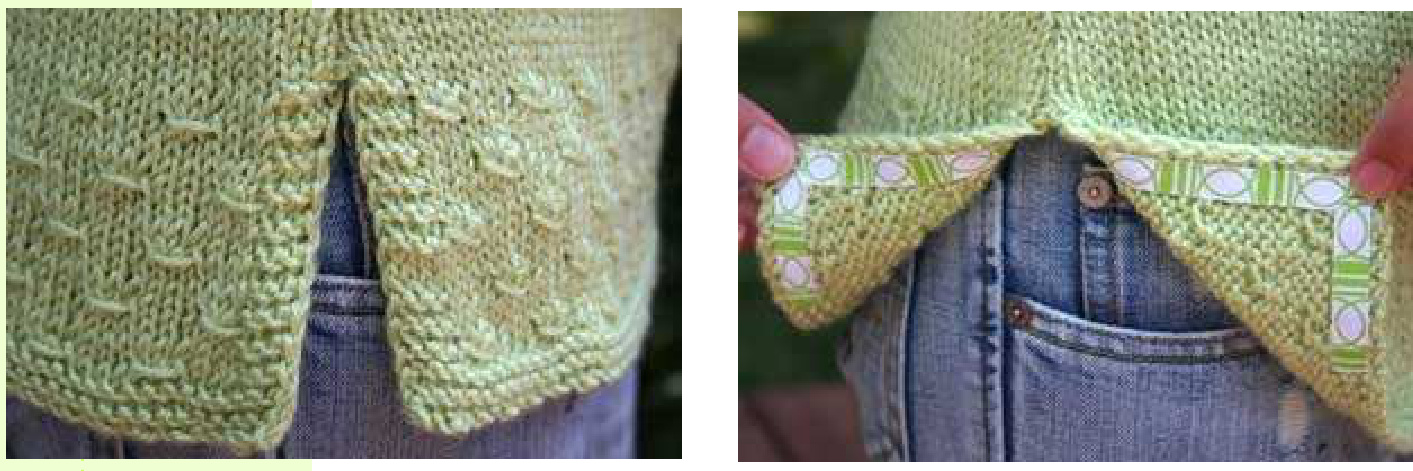
\* The openings in side seams are finished with a narrow ribbon to give a nice accent
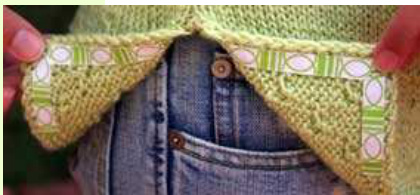
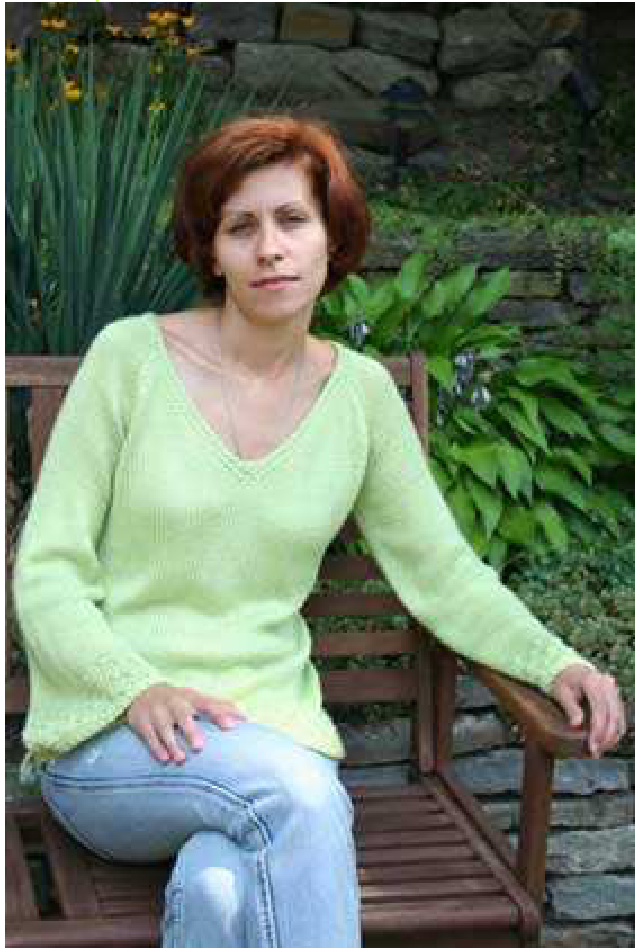
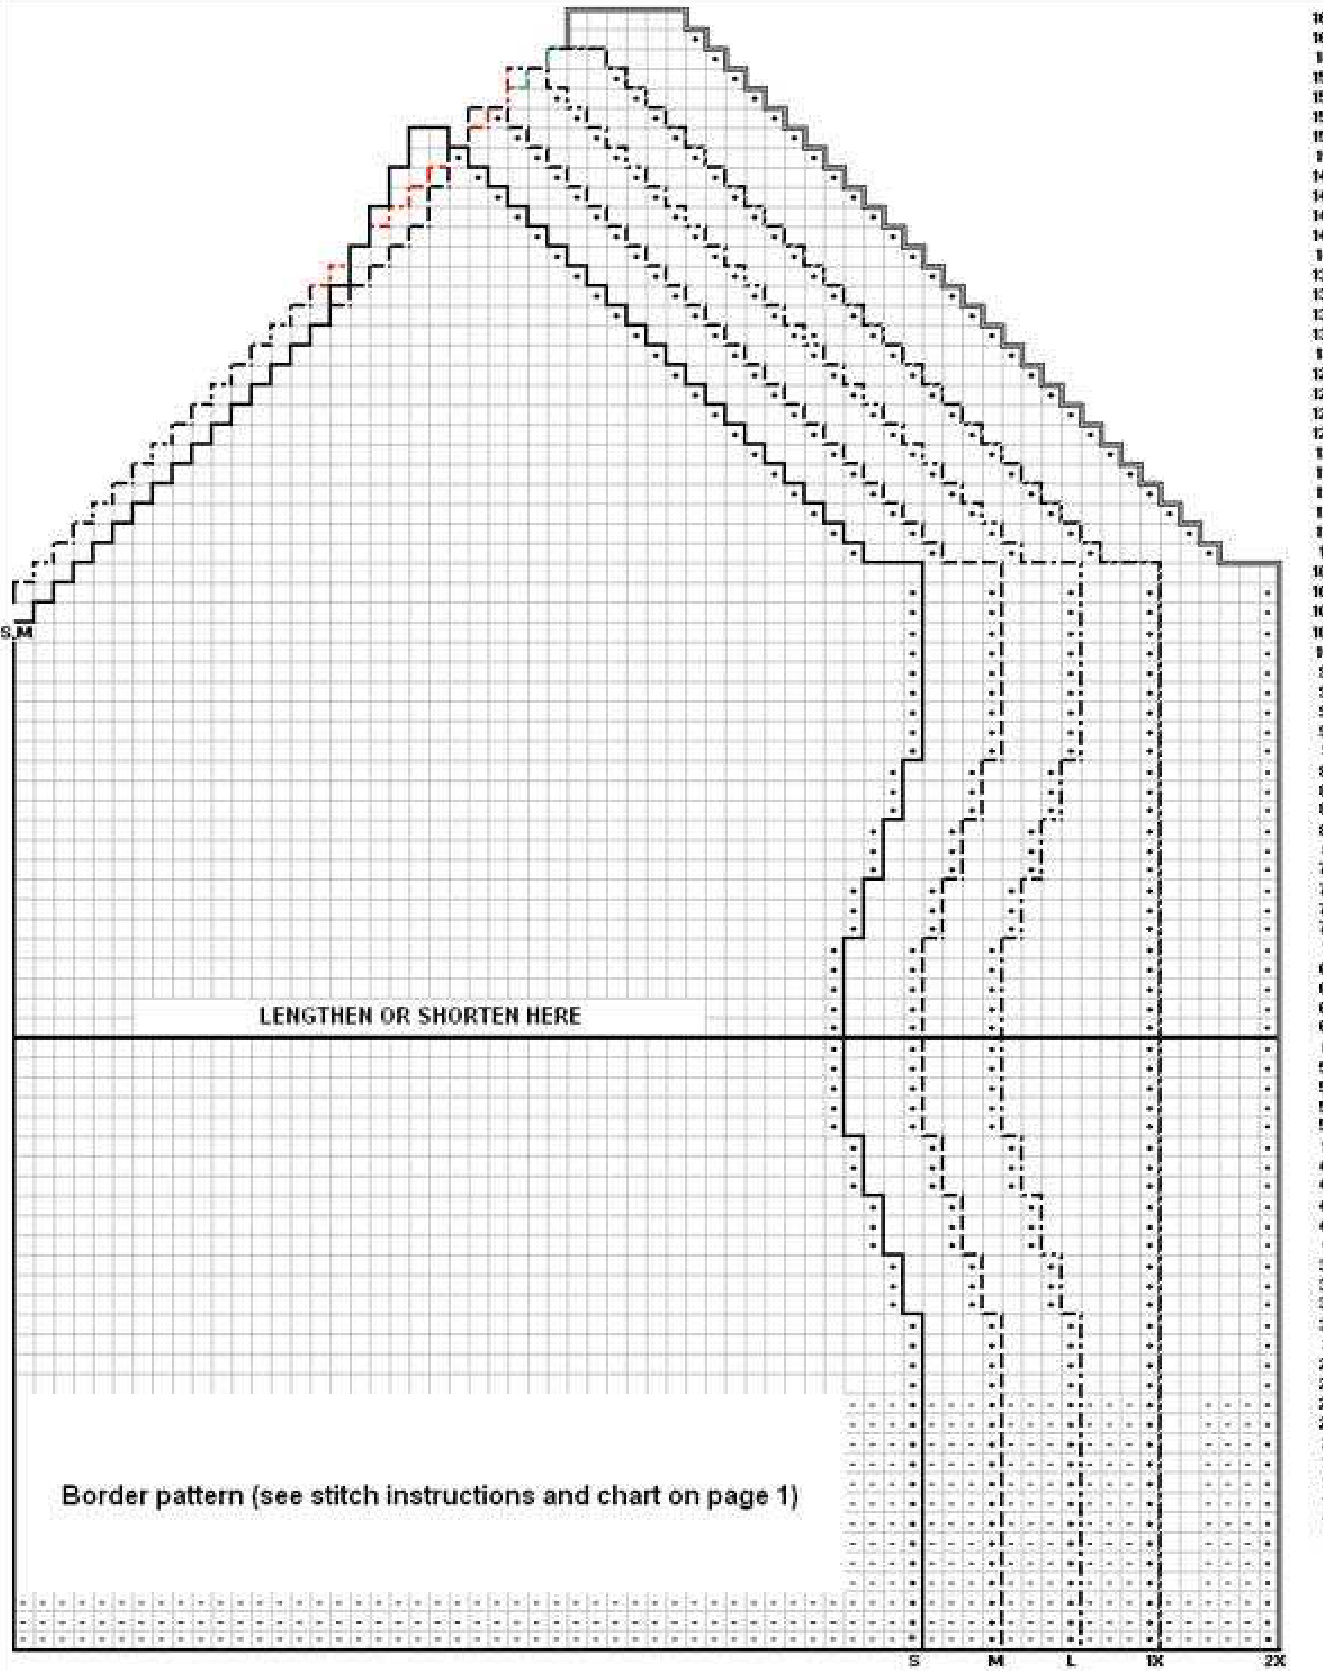
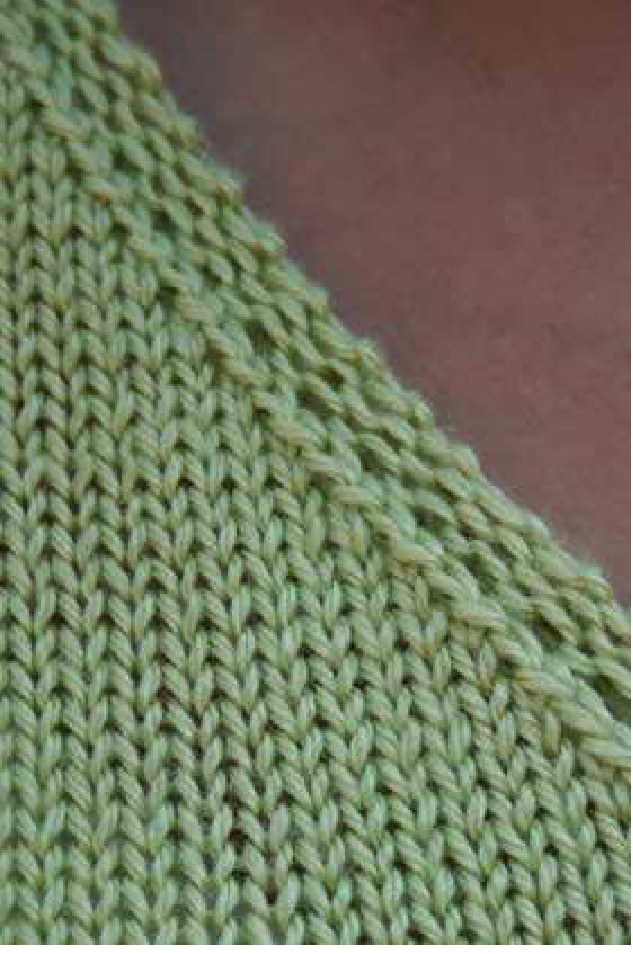
to the garment and to prevent the corners from Curling. \* All measurements in schematics are given in centimeters to avoid overcrowding. To convert cm to inches, multiply cm by 0.3937. This sweater gives a feeling of freedom and style. Hiplength of the sweater and wide sleeves cover your body but openings in side seams and low V-neck give a sexy note which no man can ignore.
Sizes
Instructions are for woman's sizes (height $168\;\mathsf{c m}\;[5^{\prime}6^{\prime\prime}])$ Small (bust circumference 81-86 cm [32-34"]), Medium (bust 91.5-96.5 cm [36-38"]), Large (bust 101.5-106.5 cm [40-42"]), 1X (bust 111.5-117cm [44-46"]), 2X (bust 122-127cm [48-50"]). Changes for sizes Medium, Large, 1X and 2X are in parentheses. To shorten or lengthen the pattern, decrease or increase number of rows at adjustment line by 2 rows per each cm (6 rows per each inch) of increase/decrease. The sweater on the picture is shown in size Small.
Pattern stitch instructions
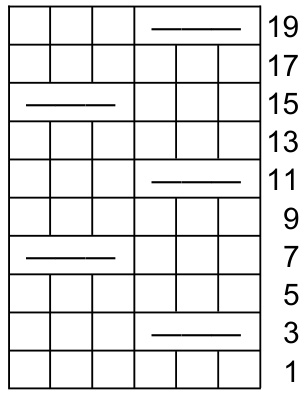
Garter stitch pattern Row 1 and every RS row: Knit every stitch Row 2 and every wS row: Knit every stitch Stockinette stitch pattern Row 1 and every RS row: Knit every stitch Row 2 and every ws row: Purl every stitch Border pattern Row 1 (RS): Knit every stitch. Row 2 and every ws row: Purl every stitch. Row 3 (RS): \*Make 1 knit stitch, knit 3 stitches, pass the stitch you've made over 3 stitches you've just knitted, knit 3 stitches\*, repeat from \* to \*. Row 5 (RS): Knit every stitch. Row 7 (RS): \*Knit 3 stitches, make 1 knit stitch, knit 3 stitches, pass the stitch you've made over 3 stitches you've just knitted\*, repeat from \* to \*. Row 9 (RS): Knit every stitch. Row 11 (RS): Same as row 3. Row 13 (RS): Knit every stitch. Row 15 (RS): Same as row 7. Row 17 (RS): Knit every stitch. Chart for border pattern Knit on RS, purl on WS Make 1 knit stitch, knit 3 stitches, pass the stitch you've made over 3 stitches you've just knitted.
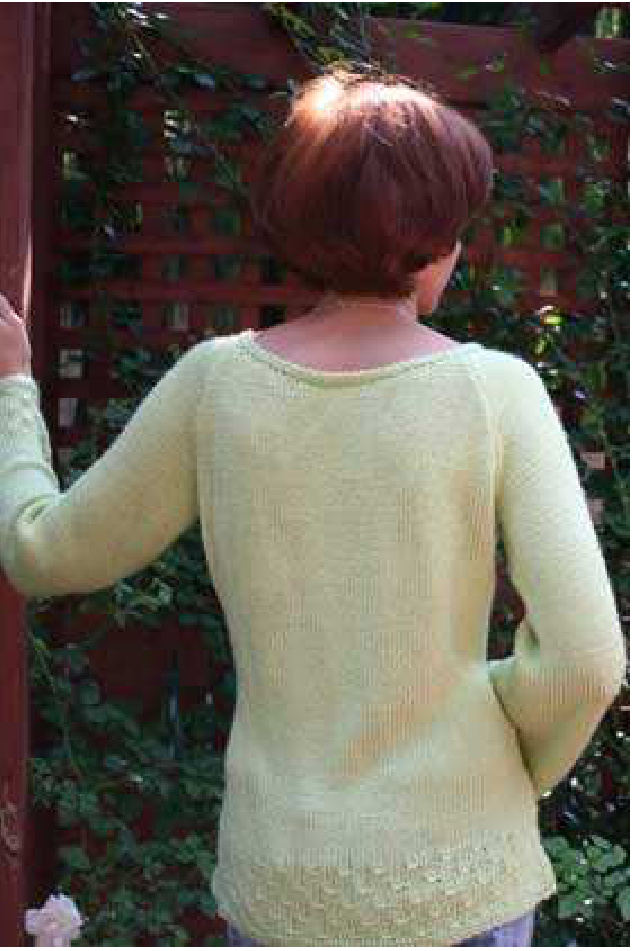
Back hchat sain ndpadistbonffthbakl thhatrwritnistutio
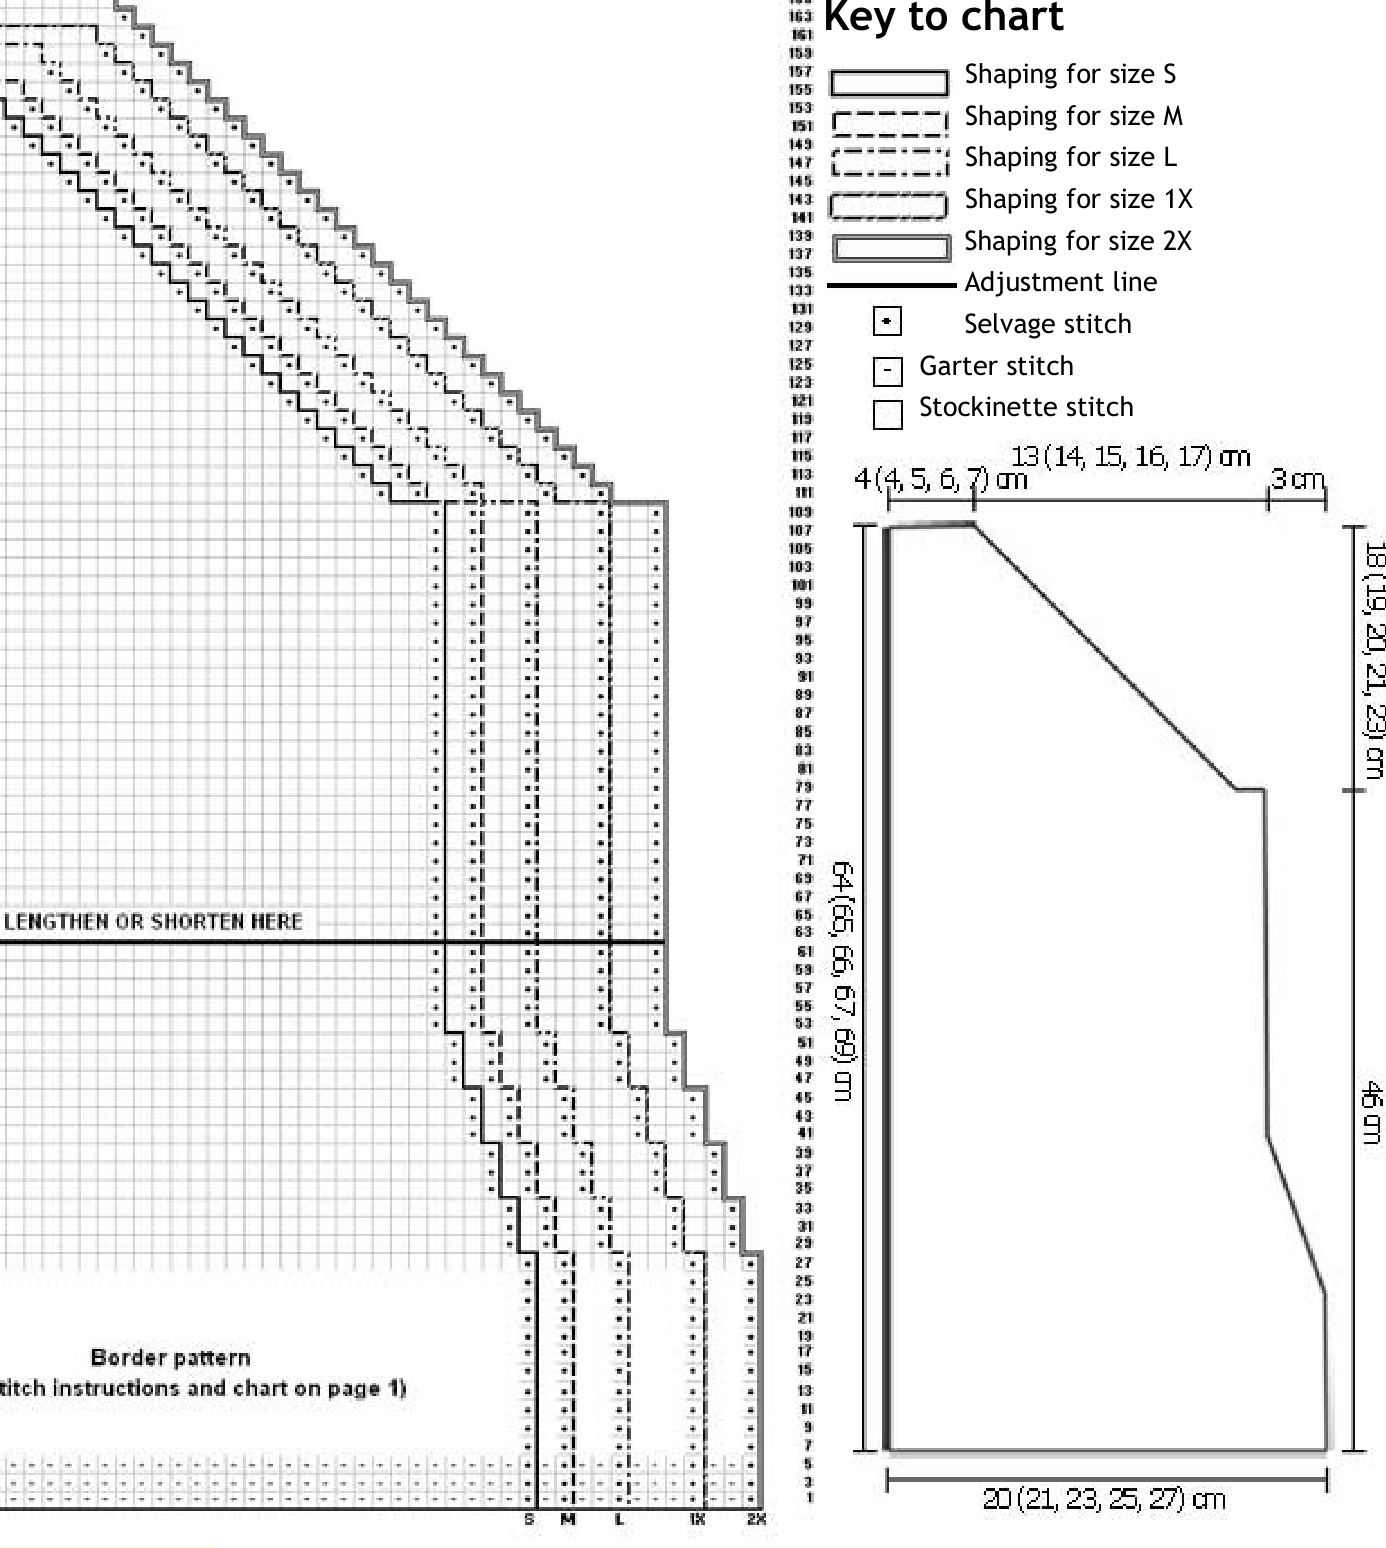
Key to 'chart
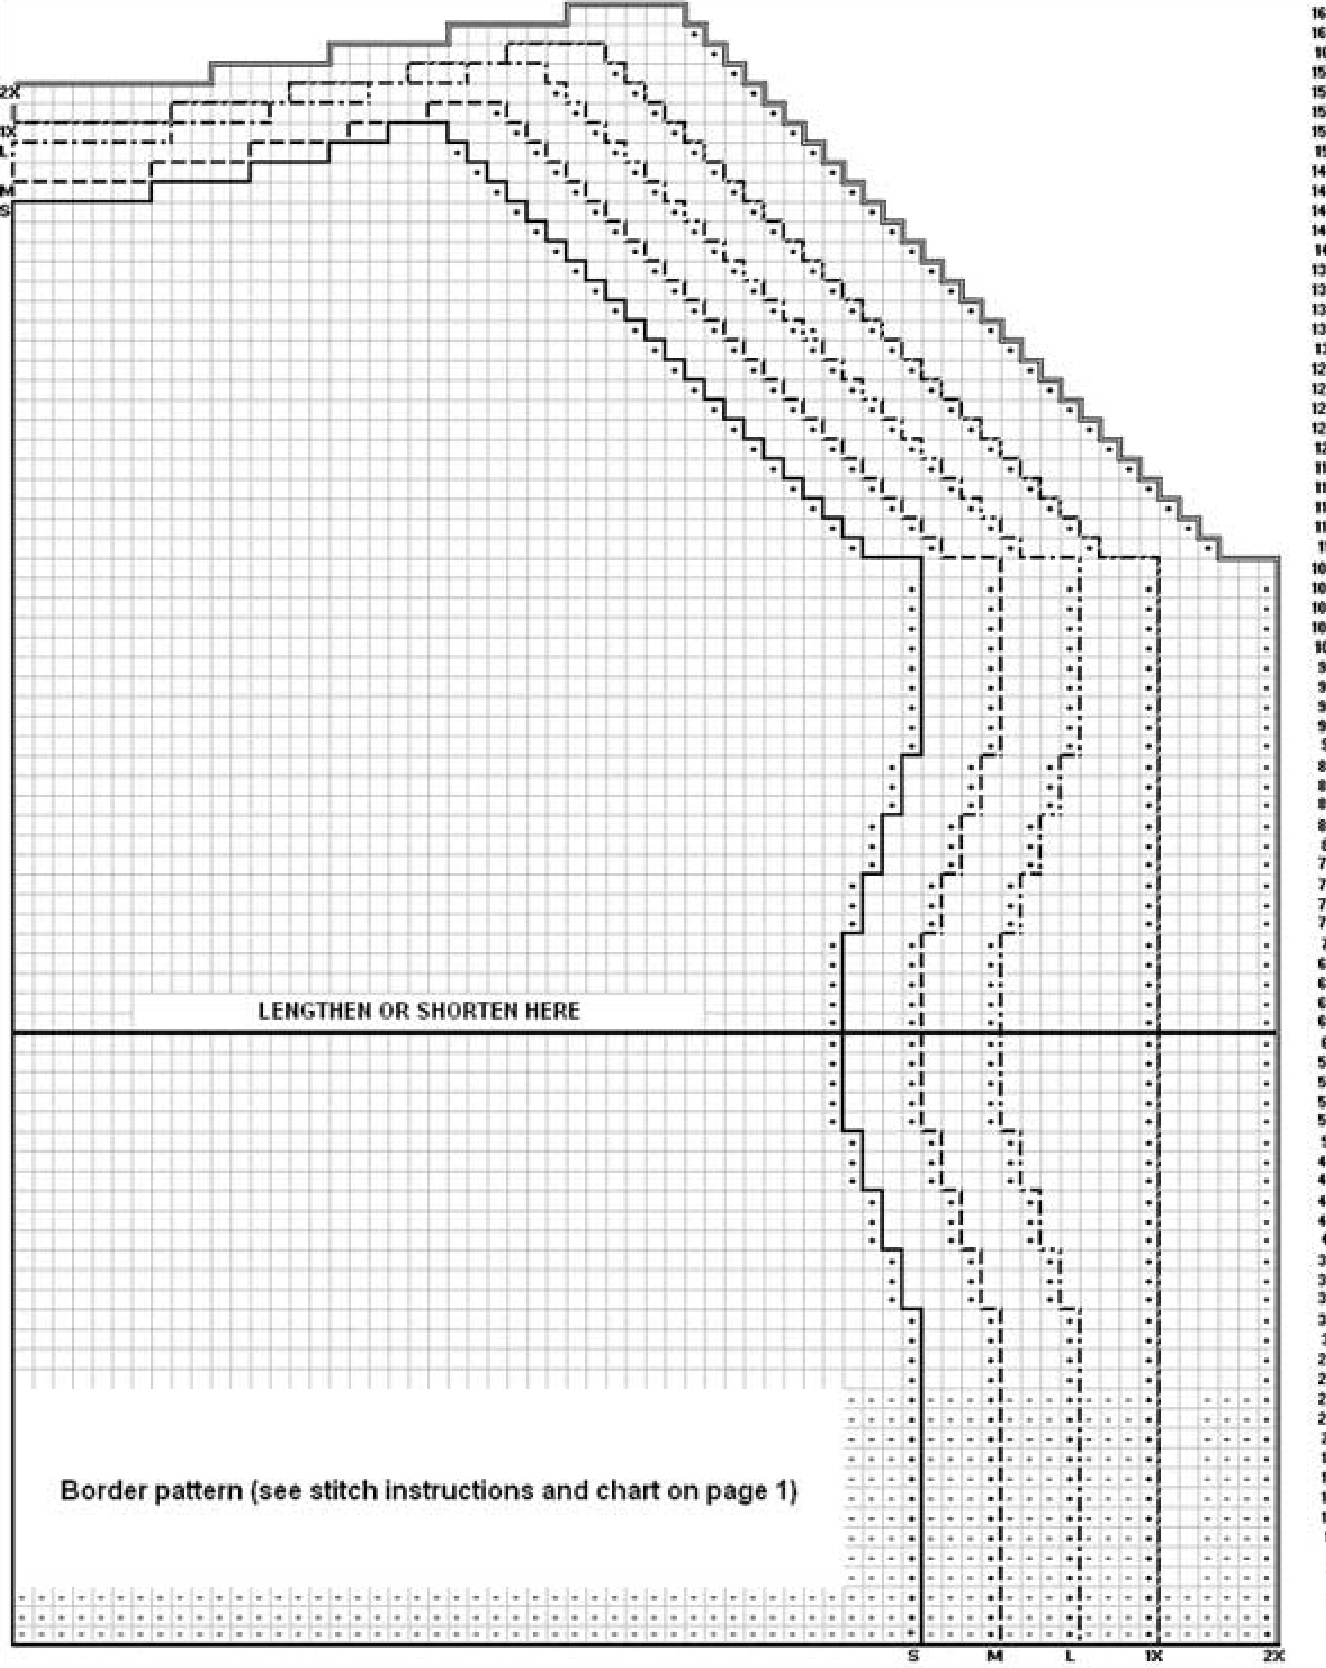
Shaping for size S J Shaping for size 1X Selvage stitch E==E=! Shaping for size M Shaping for size 2X Garter stitch i Shaping for size L Adjustment line Stockinette stitch
Antalia
Back (continued) Schematic and writte instructios.
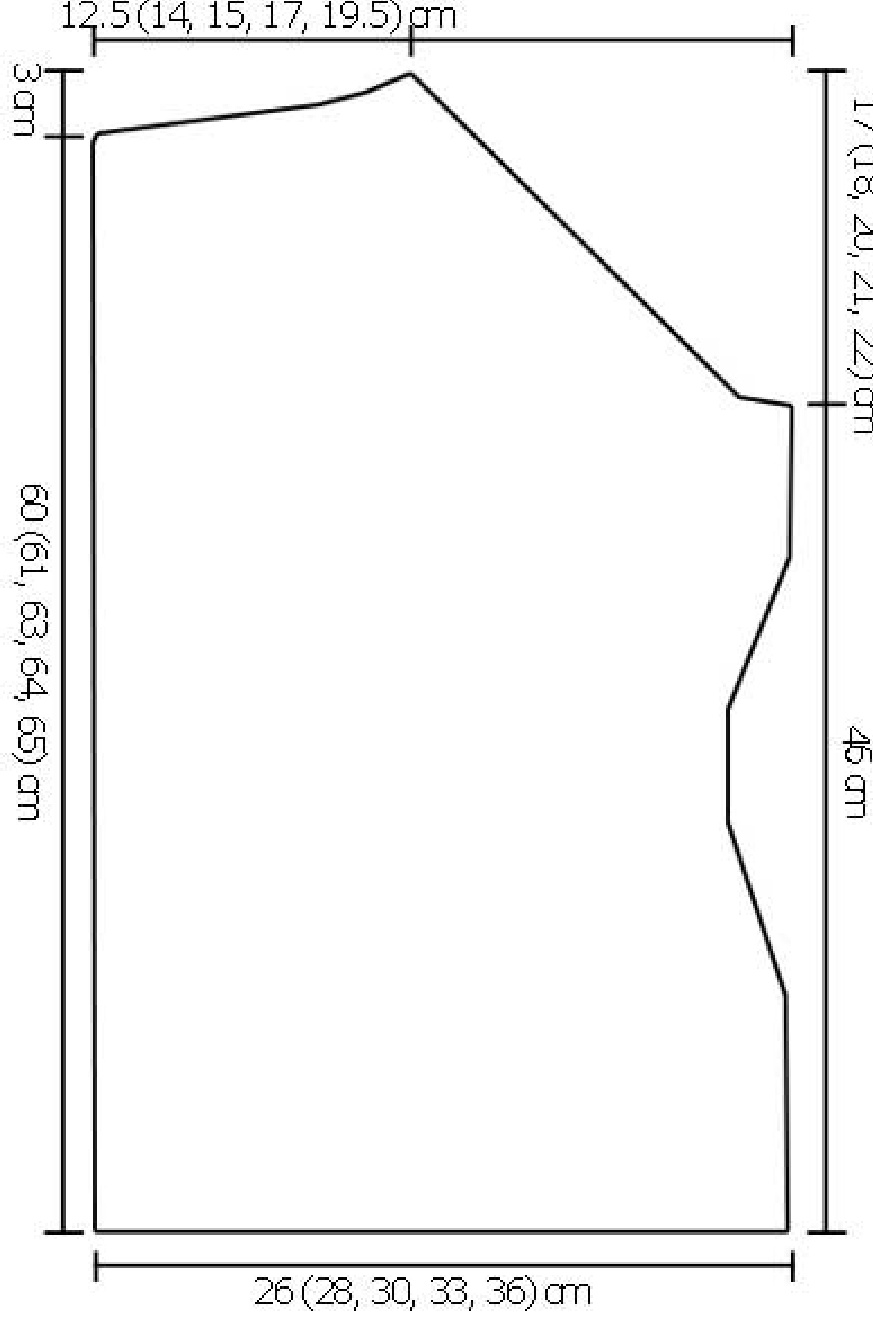
nette stitch pattern, 1 selvage stitch. Rows 1-6: 1 selvage stitch, garter stitch pattern, 1 selvage stitch. Rows 7-25: 1 selvage stitch, 3 stitches of garter stitch pattern, 84 (93, 99, 108, 120) stitches of border pattern, 3 stitches of garter stitch pattern, 1 selvage stitch. Rows 27 and on: 1 selvage stitch, stocki
Cast on 90 (99, 105, 114, 126) $^{+\,2}$ selvage stitches $=92$ (101, 107, 116, 128) stitches.
Pattern:
Shaping:
Shape waist (only for sizes S, M and L): B0 1 stitch on each side of the back in rows 35, 41, 47 and 53, then M1 stitch on each side of the back in rows 73, 79, 85 and 91. Shape armholes: When you complete $46\;\mathsf{c m}$ (18") from the bottom of the back BO 3 stitches on each side of the back, and then B0 1 stitch on each side of the back in RS rows 21 (23, 24, 25, 27) times. Shape neck: When you complete 60 (61, 63, 64, 65 cm) [24 (24.5, 25, 25.5, 26)"] from the bottom B0 center 14 (15, 15, 16, 20) stitches. Working each side separately, at each neck edge B0 5 (5, 5, 6, 6), then B0 4 (5, 5, 6, 6), then B0 3 (4, 5, 5, 6), then B0 3 (4, 4, 5, 6) in every RS row.
Frntha dptinftfrtatis
Key to 'chart
Shaping for size S Shaping for size 1X Selvage stitch C===! Shaping for size M Shaping for size 2X Garter stitch i Shaping for size L Adjustment line Stockinette stitch
Antalia
Front (continued) Schematic, writte instructions and a photo of a fragment of neckline.
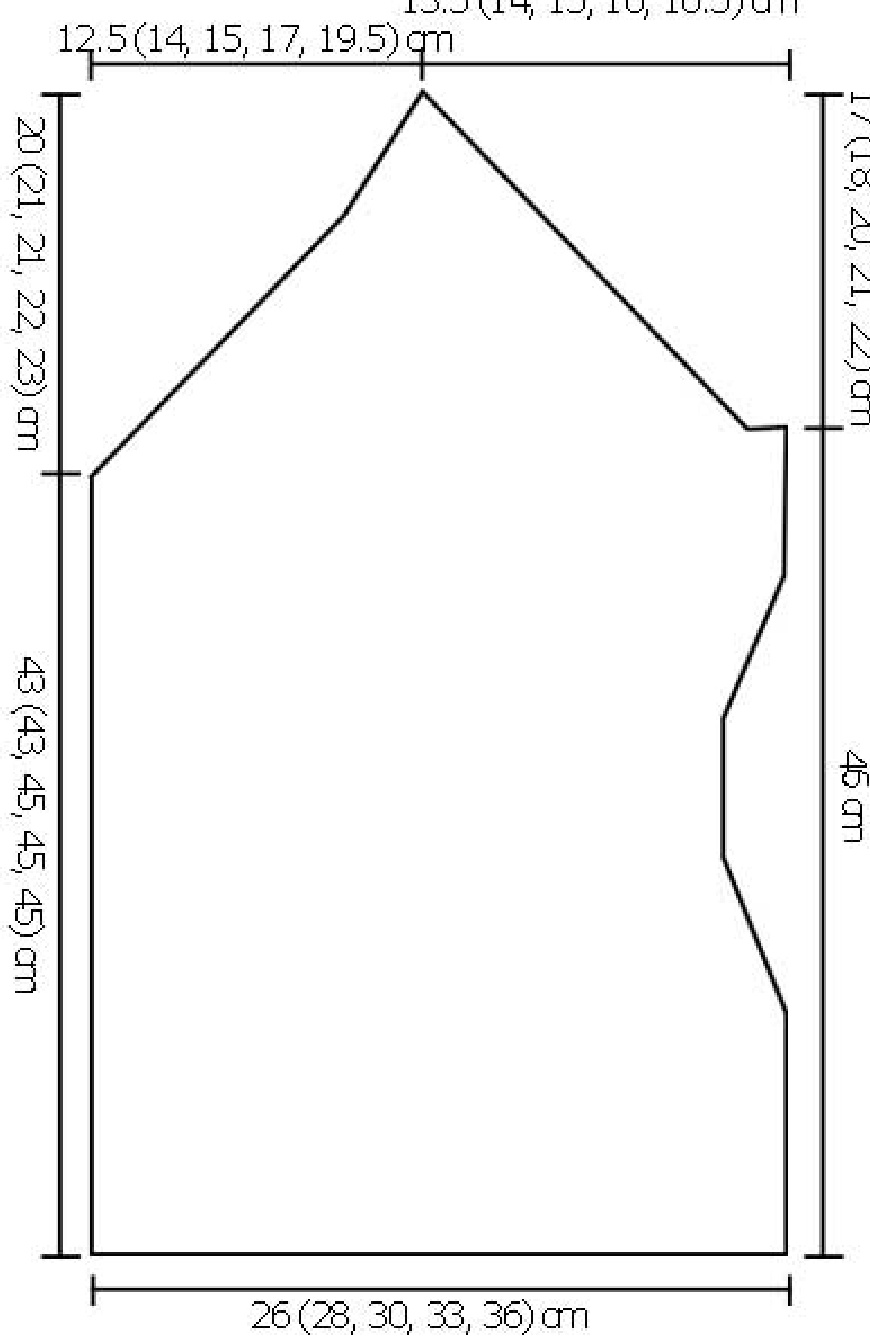
nette stitch pattern, 1 selvage stitch. Rows 1-6: 1 selvage stitch, garter stitch pattern, 1 selvage stitch. Rows 7-25: 1 selvage stitch, 3 stitches of garter stitch pattern, 84 (93, 99, 108, 120) stitches of border pattern, 3 stitches of garter stitch pattern, 1 selvage stitch. Rows 27 and on: 1 selvage stitch, stocki
Cast on 90 (99, 105, 114, 126) + 2 selvage stitches $=92$ (101, 107, 116, 128) stitches.
Pattern:
Shaping:
Shape waist (only for sizes S, M and L): B0 1 stitch on each side of the front in rows 35, 41, 47 and 53, then M1 stitch on each side of the front in rows 73, 79, 85 and 91. Shape armholes: When you complete $46\;\mathsf{c m}$ (18") from the bottom of the front BO 3 stitches on each side of the front, and then B0 1 stitch on each side of the front in RS rows 21 (23, 24, 25, 27) times. Shape neck: When you complete 43 (43, 44.5, 44.5, $44.5\;\mathsf{c m}$ ) (17"(17, 17.5, 17.5, 17.5")) from the bottom of the front B0 center 2 (1, 1, 2, 2) stitches. Working each side separately, at each neck edge B0 in every RS row: forsize $5-15\times1,\,0,\,1,\,0,\,1,\,0,\,1,\,0,\,1,\,0,\,2$ stitches; for size M - 20x1, 0, 1, 0, 1, 0, 2 stitches; for size L - 23x1, 0, 0, 2 stitches, for size 1X - 26x1, 3 stitches; for size 2X - 27x1, 0, 6 stitches. Sha wadtnthw
Cast on 69 (75, 81, 87, 93) stitches $^{+\,2}$ selvage stitches $=71$ (77, 83, 89, 95) stitches total. Pattern: Rows 1-6: 1 selvage stitch, garter stitch pattern, 1 selvage stitch. Rows 7-25: 1 selvage stitch, 69 (75, 81, 87, 93) stitches of border pattern, 1 selvage stitch. Rows 27 and on: 1 selvage stitch, stockinette stitch pattern, 1 selvage stitch.
Shaping:
BO 1 stitch on each side of the sleeve in rows 29, 35, 41, 47 and 53. When you complete 46 cm (18') from the bottom of the sleeve B0 on each side in every RS row: 3 stitches, then 21 (22, 24, 25, 27) times 1 stitch, then B0 last 13 (17, 19, 23, 25) stitches.
Finishing
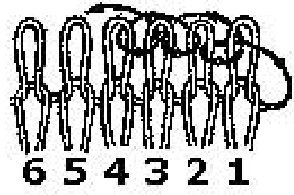
Block pieces to measurements (refer to schematics on pages 3, 5 and 6). Stitch sleeves to armhole edges: Align armhole edges of back (front) and sleeve right sides facing in. To make a nice-looking seam, use sewing thread of matching color and backstitch each seam right below the chain of bound off and selvage stitches. Neckband: With right side facing use 3.5mm (US size 4) double point needles to pick up 25 (26, 27, 28, 30) stitches along right front neck edge, 21 (24, 26, 29, 32) stitches along back neck edge, then 25 (26, 27, 28, 30) stitches along left front neck edge - 71 (76, 80, 85, 92) stitches total. Knit 6 round rows of garter stitch, knitting 2 center stitches together in the center of the front in each row (see the big scheme on the right). Bind off all stitches of the neckband. To make a nicelooking seam use “sewn bind off" technique: when you finish knitting the neckband cut the yarn leaving a “tail" three times longer than the length of the neckband. Thread this yarn "tail" into a tapestry or sewing needle and sew the stitches as shown on the small scheme on the right.

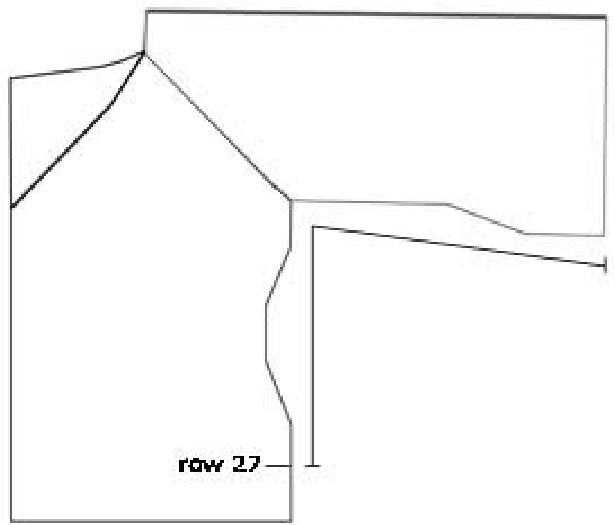
Side seams and sleeve seams. Stitch side seams and sleeve seams as continuous seams. Leave the openings in side seams from row 1 till row 27 of the knitted fabric (see the scheme on the left). To make a nice-looking seam, use sewing thread of matching color and backstitch each seam right below the chain of selvage stitches. Openings in side seams. To prevent corners from curling and to add a nice accent to the sweater finish openings in side seams with a 1 cm (1/2") wide ribbon of matching or contrasting color (see pictures below).
The sweater is ready! Enjoy it and feel great!
Visit my blog at knitca.blogspot.com for more patterns, tutorials and tips. Email your comments or concerns to knitca@gmail.com


