Almond Lace Socks
Published: March 2009
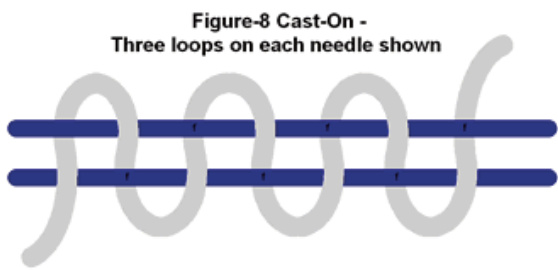
Needle size: 0 $(2.00\mathrm{mm})$ Guage: 8sts per inch I use a Turkish (Tutorial of how at: http://www.youtube.com/watch?v $\equiv$ YnFQVSSx9do) or a figure 8 cast on (Illustration Below). I cast on 16 stitches for each needle For the Adult size. Making the total on both needles of 32 for Adult. I knit two socks on two circulars, toe up.
Increase two stitches per needle every other row till you get the desired amount of stitches that you need. I have (34 sts per needle. 68 total for adult.) I am a continental knitter so when I knit socks I pre- fer to purl. I purl across the Opposite needle. (Like if you look at your needles like a tea cup or a drinking glass. I purl on the opposite side that you would drink from). So these instructions will be purling most of the sock.
Lace for top of foot:
Row 1: P2tog, K2, P2, K2, YO, P1, YO, K2, P2, K2,P3tog, K2, P2, K2, YO, P1, YO, K2, P2, K2, P2tog, P1. Row 2:P1, K2, P2, K2, P3, K2, P2, K2, P1, K2, P2, K2, P3, K2, P2, K2, P2. Row 3: P2tog, K1, P2, K2, P1, YO, P1, YO, P1, K2,P2, K1, P3tog, K1, P2, K2, P1, YO, P1, YO, P1, K2, P2, K1, P2tog, P1.
Row 4: P1, K1, P2, K2, P5, K2, P2, K1, P1, K1, P2,K2, P5, K2, P2, K1, P2. Row 5: P2tog, P2, K2, P2, YO, P1, YO, P2, K2, P2,P3tog, P2, K2, P2, YO, P1, YO, P2, K2, P2, P2tog, P1. Row 6: P3, K2, P7, K2, P5, K2, P7, K2, P4. Row 7: P2tog, P1, K2, P2, K1, YO, P1, YO, K1, P2,K2, P1, P3tog, P1, K2, P2, K1, YO, P1, YO, K1, P2, K2, P1, P2tog, P1. Row 8: P2, K2, P2, K1, P3, K1, P2, K2, P3, K2, P2, K1, P3, K1, P2, K2, P3. Purl across the the other side of sock. (The bottom of the foot) Make a note of what row of the pattern you stop on to do the heel. When the heel is done you start back on the next row of the pattern.
Heel:
You will be working back and forth on one needle to turn the heel. P2 sts onto stitch holder. P across stitches. Do the same for the second sock. Turn. Slip 3 sts on another stitch holder. K across to next stitch holder. Do same for second sock. Now you have 2 Stitch holders on each sock. Turn. 1: sl 1 st onto stitch holder P across to next Stitch Holder. Repeat for Sock #2. Turn. 2: sl 1 st onto stitch holder K across to next Stitch Holder. Repeat for Sock #2. Turn Repeat 1 & 2, till there are 12 sts left on each sockfor adult size. (10 sts on each sock for Child size.) If you have a wider heel you can leave more sts on the needles.
Now we start to do the turning of the heel.
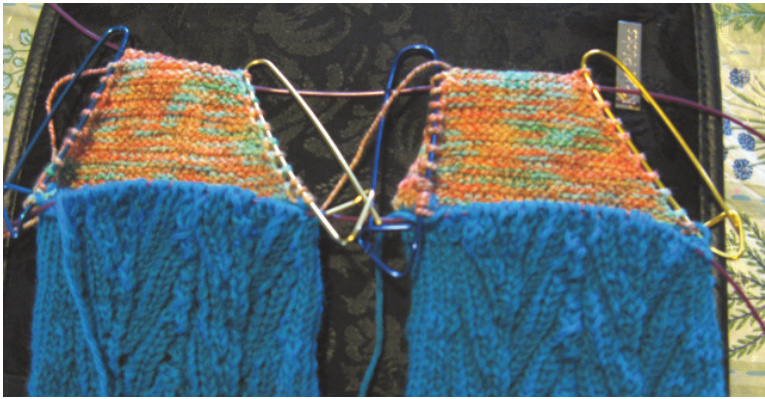
K across to the st before holder. S1 1 st to right needle pick up purl bump from first st on holder K the slipped st and the purl bump to gether in back of st. Sl 1 st from holder onto right needle. Repeat for sock #2 Turn. 1: sl 1 st P across to last st before holder. Sl st to right needle . Pick up Purl bump from next st on holder. P bump and slipped st together. Sl next stitch off of holder to right needle. Repeat for sock #2, Turn. 2: sl 1 st to right needle. K across to last st before holder. Sl 1 st to right needle pick up bump on back of next st on holder. K bump and slipped st together in back of st. Sl next st from holder onto right needle. Repeat for sock#2, Turn. Above is an example of the heels with the stitch holders holding the stitches. Repeat 1&2 till there is one stitch on stitch holders. On the purl row follow row 1 to last st on holder pick up purl bump of last st on holder and P with the slipped st just before it. Then P last st off of holder. Repeat for sock #2. P across pattern side of both socks. You will still have one stitch holder at the beginning of the next nee dle. With left needle pick up purl bump from st on holder then slip last st off holder onto left needle. P1, P bump and next st together. P across sock. Repeat for sock #2. Heel is turned. Continue doing the pattern to the end, doing Stockinette st on the back side. Do one more repeat of the pattern.
On the first row of this pattern M1 at the beginning and the end of each needle. Making 36 sts on each needle. (72 sts around) If you need the leg of the sock bigger at this point you can add a couple of stitches at each side before the pattern. Just remember to purl those stitcheson every row, then follow the pattern. Row 1: P1, P2tog, K2, P2, K2, YO, P1, YO, K2,P2, K2, P3tog, K2, P2, K2, YO, P1, YO, K2, P2, K2, P2tog, P2. Row 2: P2, K2, P2, K2, P3, K2, P2, K2, P1, K2, P2, K2, P3, K2, P2, K2, P3. Row 3: P1, P2tog, K1, P2, K2, P1, YO, P1, YO,P1, K2, P2, K1, P3tog, K1, P2, K2, P1, YO, P1, YO, P1, K2, P2, K1, P2tog, P2. Row 4: P2, K1, P2, K2, P5, K2, P2, K1, P1, K1,P2, K2, P5, K2, P2, K1, P3. Row 5: P1, P2tog, P2, K2, P2, YO, P1, YO, P2,K2, P2, P3tog, P2, K2, P2, YO, P1, YO, P2, K2, P2, P2tog, P2. Row 6: P4, K2, P7, K2, P5, K2, P7, K2, P5. Row 7: P1, P2tog, P1, K2, P2, K1, YO, P1, YO,K1, P2, K2, P1, P3tog, P1, K2, P2, K1, YO, P1, YO, K1, P2, K2, P1, P2tog, P2. Row 8: P3, K2, P2, K1, P3, K1, P2, K2, P3, K2, P2, K1, P3, K1, P2, K2, P4. Follow the pattern for both sides of the sock until you have the sock about as long as you would like it to be. Then Do a K2 P2 rib for 2 inches then bind off. If the top of the sock seems too loose then decrease by 4 to 8 sts around before doing the rib pattern.
Binding Off:
When I bind off a toe up sock I use a knitting needle that is several sizes bigger and bind off loosely. for example, I used a size 9 Knit Picks Options needl tip. Note: As with all of my patterns, If you knit these and find a mistake in the pattern. Please let me know and I will do my best to correct it and update the pattern. Thank You and God Bless You!!


