Lessons in Turkish Cast On and Magic Loop Pieces
Featuring the
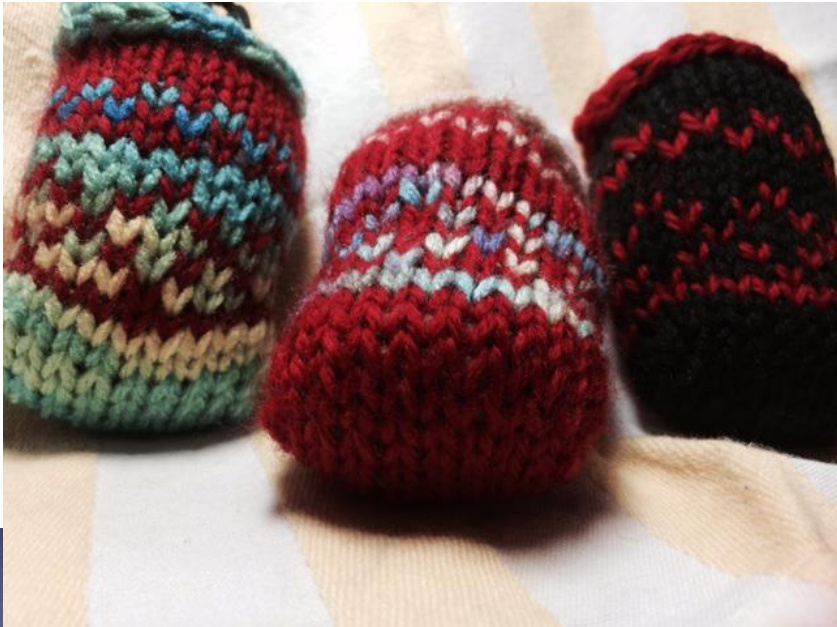
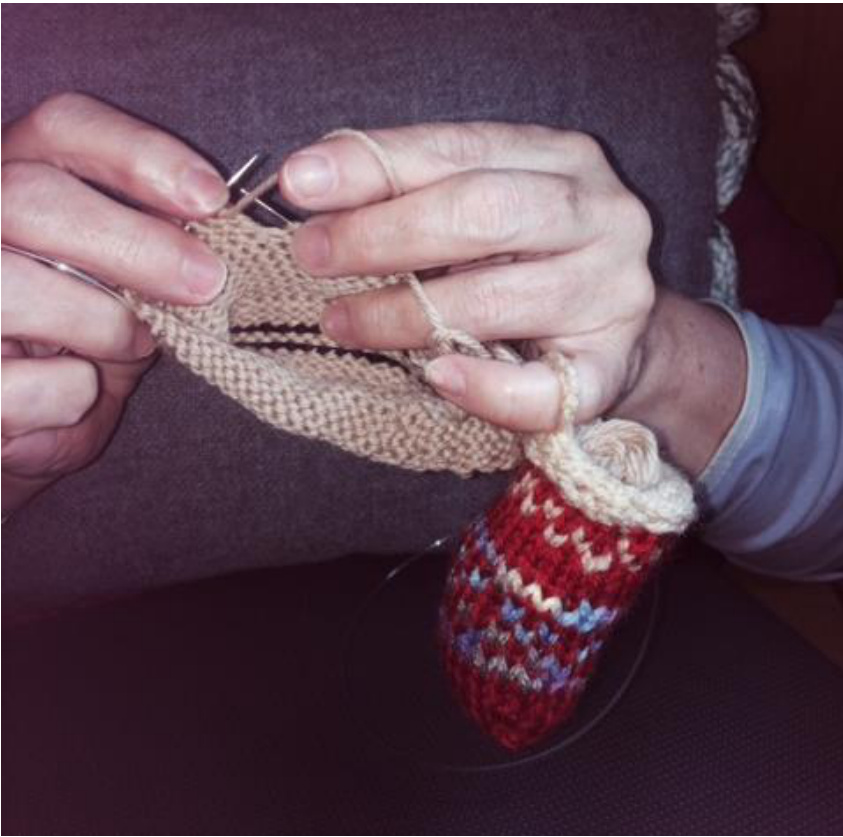
Turkish Cast On Bag - Walking Knitter's Kits (2" x 3")
By Linda Wells January, 2015 Turkish Cast On Bags - Walking Knitter's Kits Last year a design for a Norwegian Fjord Horse and then a Canadian Goose was published, as toy pieces, in
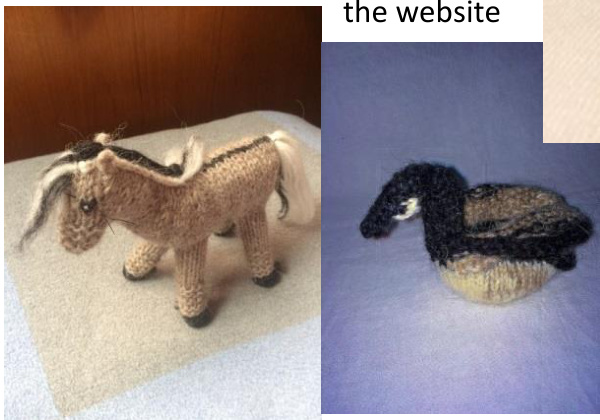
Ravelry.com. With a growth of popularity for the designs, the need to create a booklet to explain Turkish Cast On and Magic Loop became obvious and so here are the freely shared detailed lessons for working with these techniques in creating delightful tiny yarn bags. How about making knitting more mobile? These tiny bags contain yarn ready to be knitted as you walk, ride or fly. 25 yards of yarn can make a small item which you have memorized the instructions. Or, a combination of these with different colors adds even more possibilities. Each bag has a button hole allowing it to be strung onto a necklace or attached to a button on a shirt. Thus yarn easily feeds out to your waiting knitting needles.
Introduction:
The format for this booklet is as follows: A) The indispensable materials list and tools - 1 page B) Lessons Presented - 8 pages 1) Turkish Cast On 2) Magic Loop 3) Shaping 4) Two color knitting 5) Finishing Techniques C) Reference Notes- 1 page Pleasure in knitting increases with a way to keep tools ready at hand that is easy to store at a stopping point. The answer perhaps is a folding wallet clutch bag that has a zipper pouch on the outside and several card pockets on the inside. A snap closure keeps the wallet secure and the contents stay in place.


The Indispensable Materials List and Tools used by the author:
Zipper pouch contents:
| Tool: | Uses: |
| Small Flat ceramic sharpener for scissors | Keepsbeading thread e easytothread |
| SmallFlatcloseablecontainer | Holdssmallitems slikeseedbeads andbeading thread= eyes, eyelashes, etc. |
| Very small tape measure | Appropriate for length standards (optional) |
Card pockets:
| Tool: | Uses: |
| Magnetic sticky tape (2 pieces, sandwiched) Large Blunt Yarn Sewing needle, | Holds various needles for thread or yarn sewing Finishing tool work |
| Large SharpYarn Sewing needle, EmbroiderySizeBluntsewingneedle, Hand Sewing needle, Beading needle | |
| Embroideryscissors | Cutting yarn, thread |
| 40-inch circular knitting needle | Turkish Cast On, Magic Loop knitting |
| Safety pin | Holds coil-less safety pin markers |
| Crochet hook | Tight area yarn tool |
| Double pointed knitting needles, 16-inch circular knitting needle | (optional) May be useful as an Applied I-Cord tool |
| Pencil with eraser, pointed end shortened | Stuffing tight areas |
| Nail clipper or file | Quick personal repair while knitting |
| Comb | Finishingyarn strand separations |
| Needle threader | Less frustrating needle threading |
- Nearby, for refills and reference
Knitting Basket for Yarn storage; Ziploc baggies for yarn scraps, finished pieces Reference and Instruction Notes Camera for files of finished pieces and recipients
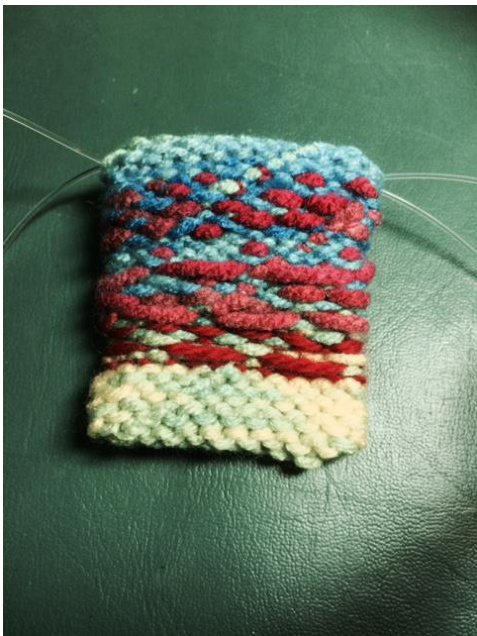
A Turkish Cast On Bag (About 2"x3", knitted in worsted weight yarn)
Tools that are needed to create a Turkish Cast On bag are minimal. Even though the bag is 2-inches in diameter, use a 40-inch circular knitting needle of an appropriate size for the type of yarn you desire. The bag will be shaped with increases and decreases, and then finished with an applied I-Cord edge having a loop button hole. To limit boredom with several rounds of knitting, a simple ski-sweater pattern chart will be incorporated in the central area. The entire bag will be twenty rounds total and could contain a stuffing of worsted weight yarn about 25 yards in length.
Needed:
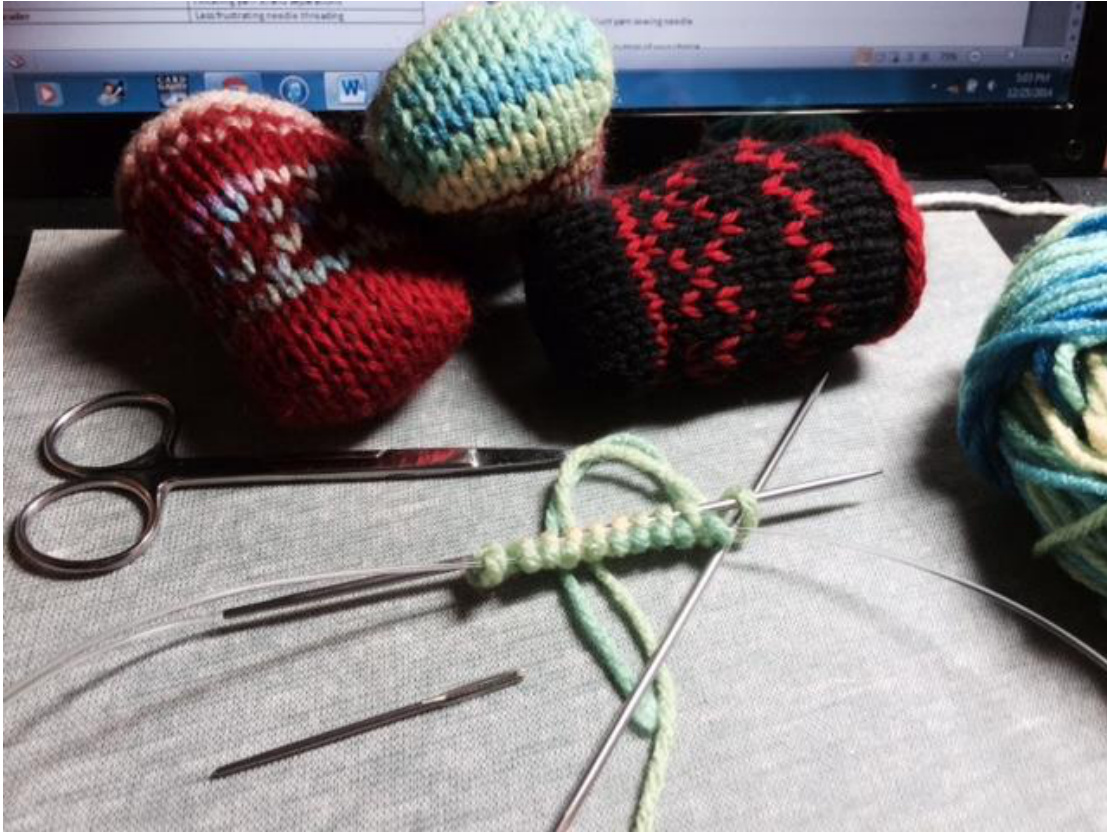
Scissors
Lesson 1: Turkish Cast On
This casting on technique is used in knitted articles such as toe-up socks, and other similar shape projects. It makes a smooth flat base for Magic Loop knitted work. It blends invisibly with stockinet knitting. This lesson will cover tools, application ideas, and a short practice project to help prepare the knitter for a more experienced-level project such as the Norwegian Fjord Horse or the Canadian goose. Time spent with this lesson offers an alternative to edge based cast-on beginnings. It will enhance future enjoyment of the hobby of knit work. Turkish Cast On is formed by a specific number of loops wrapped on the two knitting needle points of the circular knitting needle that are placed parallel and pointing the same direction. These moderately snug loops create a foundational base for Magic Loop knitting, a circular knitting technique for small diameter knit work. Step 1) Place the points of the circular knitting needle parallel and both pointing to the right. One knitting needle will be in front of the other.
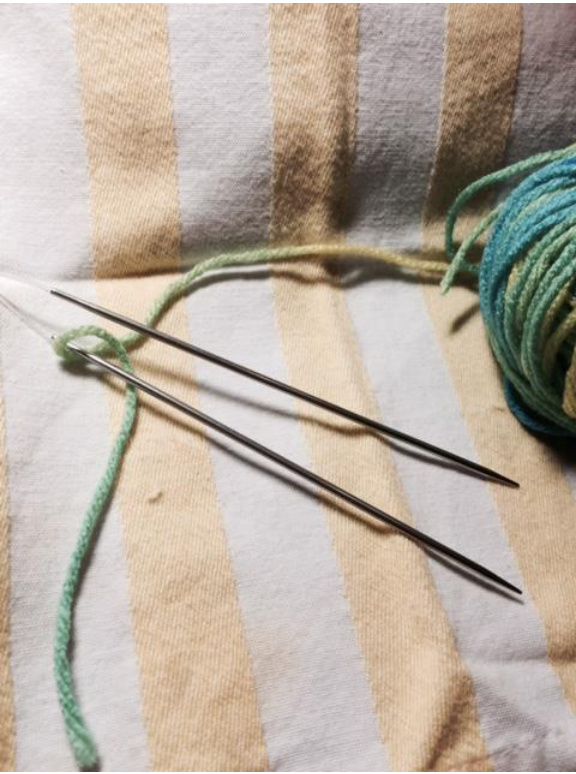
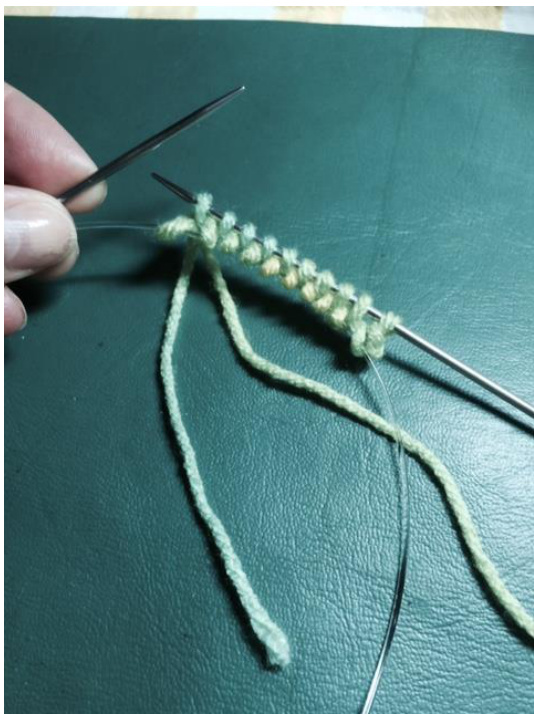
Step 3) Bring the working yarn to the back behind both knitting needles. Wrap around both knitting needles 10 times. On the tenth wrap make a backward loop
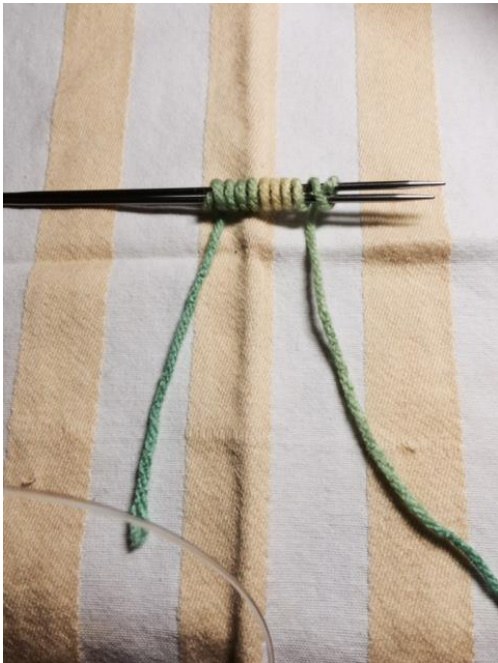
Step 2) Allow a tail of a few inches of yarn. Secure the tail on the front knitting needle only as follows: Lay the tail of the yarn behind the knitting needle. The working yarn wraps in front of the front knitting needle and then crosses behind the tail on the back side of the knitting needle. This keeps the yarn from undoing itself. Slide this secure loop overtotheflexiblecable.
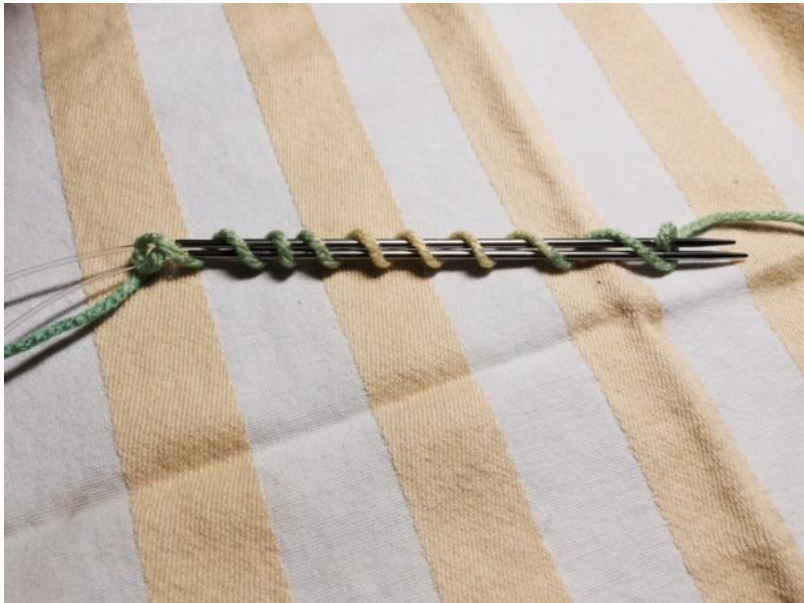
to secure the last wrap on the back knitting needle only. Neatly tighten the wraps. Pull the front knitting needle forward, out of the Turkish Cast On loops.
On the first round of Magic Loop knitting, Turkish Cast On loops are worked first in one direction, and then flat rotated and worked the opposite direction. Thus each cast on loop will carry two stitches each on either side of its edges. Magic Loop knitting, once learned is pleasantly simple and elegant for knitting small diameter rounds
Lesson 2: Magic Loop Knitting
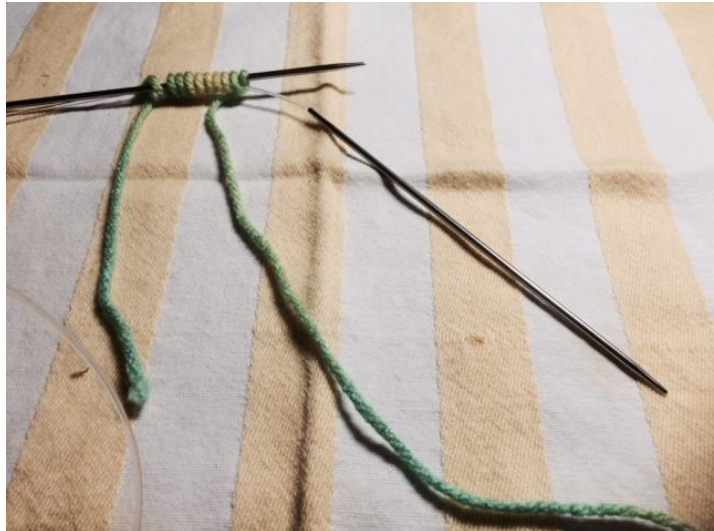
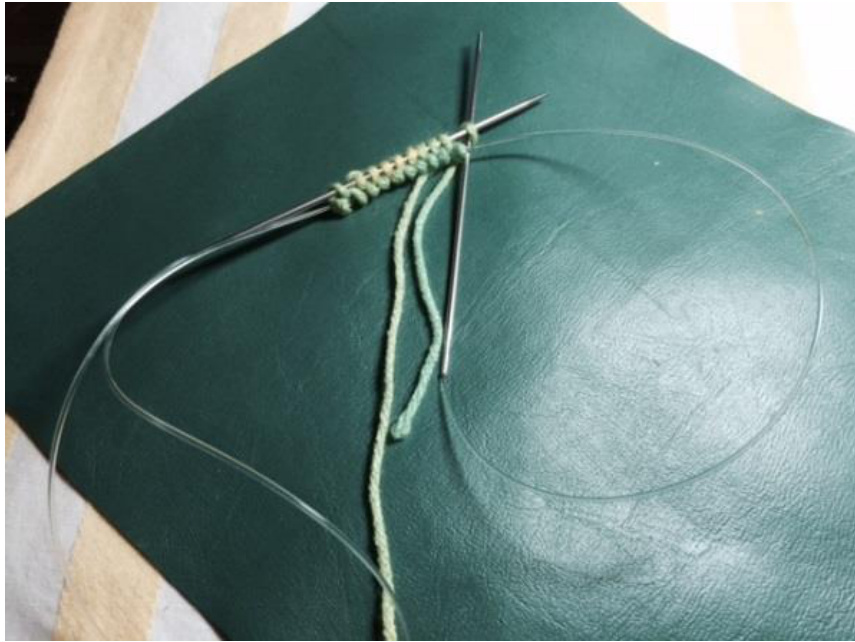
Hold the Turkish Cast On loops securely with your left hand and carefully slide the front knitting needle to the right, out from the loops about 16 inches. Bring the front knitting needle point back to the loops still resting on the back knitting needle. The front knitting needle is now the right knitting needle. The knitting needle with the loops resting in it is the left knitting needle. Carefully knit the loops, keeping the yarn moderately snug on the first loop (the backward 1oth wrapped loop). Knit to the end of the loops on the left knitting needle. Notice the floppy "ear" of flexible cable off the right side of the knitting. Keep this "ear" about saucer size by gently pulling theflexible cable. Release the left knitting needle, opening the Magic Loop and then flat rotate the knitting. This is called a "turn". Retract the left knitting needle so that the Turkish
Release the left knitting needle again and turn to prepare to knit the second round. Cast On loops display themselves on the upper side of the left knitting needle. Carefully pull the right knitting needle on out again and knit the second half of the first round.
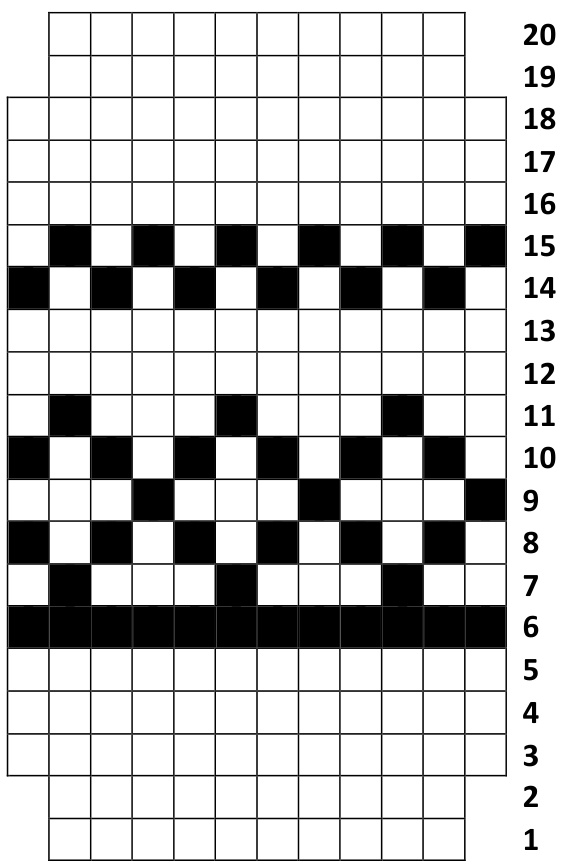
Round 2: This corresponds to the chart at position "2" that appears along the right edge of the Knitting Chart for the bag. The chart is shown on page 7.
Lesson 3: Shaping
Round 3: Increasing at the bag sides (position 3 on the chart)
Position "3" shows an increase added onto both ends of the edges of the Knitting Chart. Knit the first stitch.To increase the number of stitches in this row at the right side, place a backward loop on the knitting needle and continue knitting normally until just one stitch remains o the right knitting needle. Make a backward loop and then knit the final stitch. (12 stitches) Knitting Chart for the Bag: Knit from right to left. On the second half of a round, also repeat from right to left on the same chart position. The chart is worked from the lower edge to the top from position 1 to 20.. Other simple designs may work.
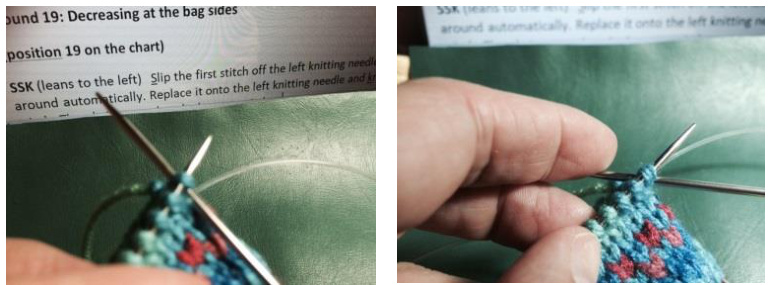
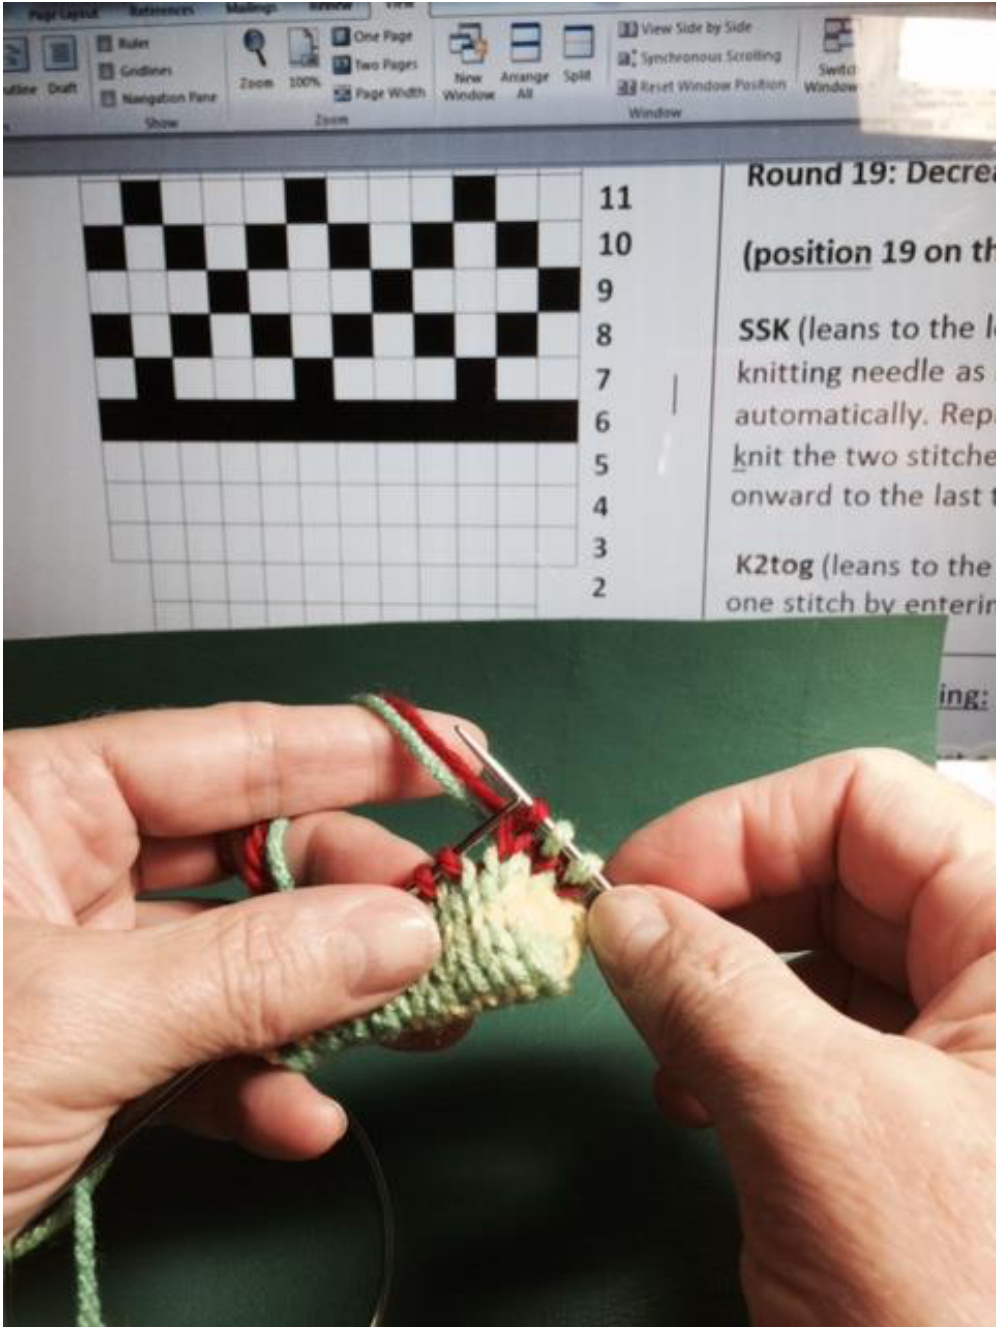
Round 19: Decreasing at the bag sides (position 19 on the chart) SK on the right side; K2tog on the left side.
SSK (leans to the left) Slip the first stitch off the left knitting needle as if to knit. This stitch turns itself around automatically. Replace it onto the left knitting needle and knit the two stitches together as one stitch by entering from
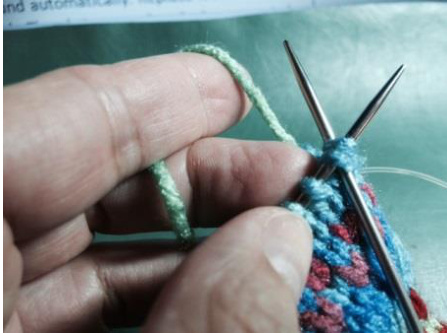
Then knit onward to the last two stitches. K2tog (leans to the right) Knit the last two stitches together as one stitch by entering from the left side. (10 stitches)
Lesson 4: Two color knitting:
On the sixth round (position 6 on the chart), let the main color rest as you join the contrast color yarn, leaving a few inches of tail. Do not cut the main color; just pick it up again on the seventh round.
On Round 7, ( Work the chart from the right to the left) loosely carry the unused color behind the working color yarn (inside the bag). As you switch to the other color, simply pick up the yarn with your right knitting needle. At Round 12 do not cut the contrast color yarn; just allow it to rest loosely until picked up again for use in Round 14. Simply keep the loose yarn vertical and leading up to the row to be knitted. That is a short span and does not require the yarn to be cut. Continue thus following the chart through Round 20. After round 20, cut the main color yarn and the contrast color yarn with three-inch long tails. The bag can now slide back behind the knitting needle points to the flexible cable where it is very easy to turn it inside out and take care of the interior where the tails need to be secured.

Lesson 5: Finishing Techniques
Weaving in the tails:
At this stopping point, slide the knitting work onto the flexible cable and turn the bag inside out. Weave in tails with the large sharp yarn sewing needle. Thread the tail neatly in a diagonal direction just through the very surface of the purl bumps for about an inch. Clip the tail neatly near the surface. Synthetic yarns are more slippery and may need to be secured with a second pull through in the oppositedirection.

Now the Turkish Cast On Bag is ready for the Applied I-Cord and the button hole. Turn the bag right side out and return it to the pointed ends of the knitting needle. To finish this bag, there will be completed an Applied ICord edging which will be knitted using the 2oth round as the base of this sturdy edging. Extend the right knitting needle out about 16-inches and bring in position to knit.
Applied I-Cord:
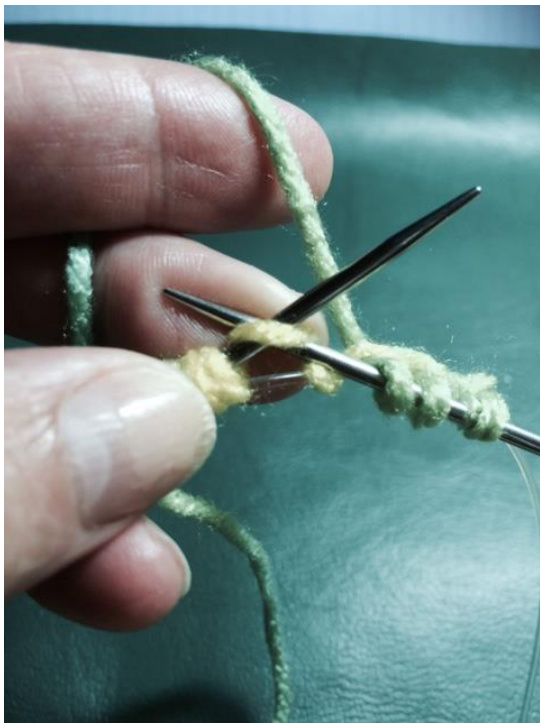
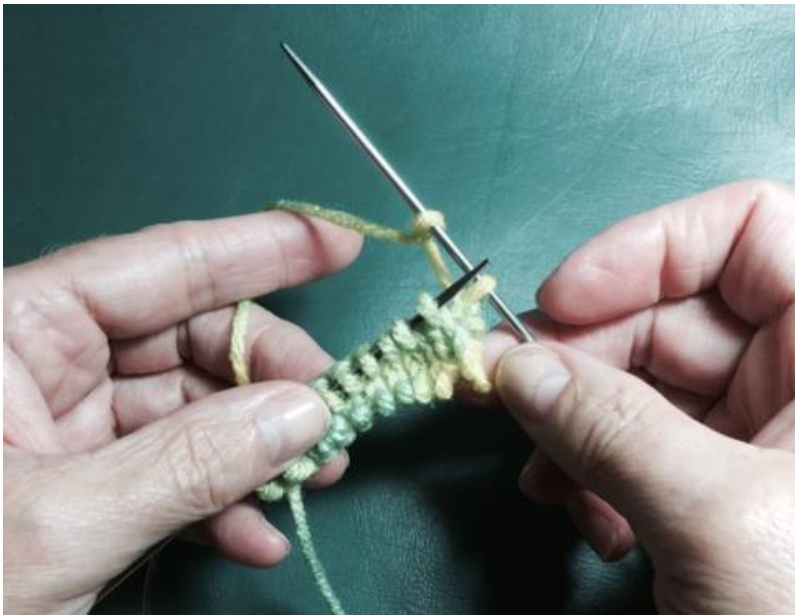
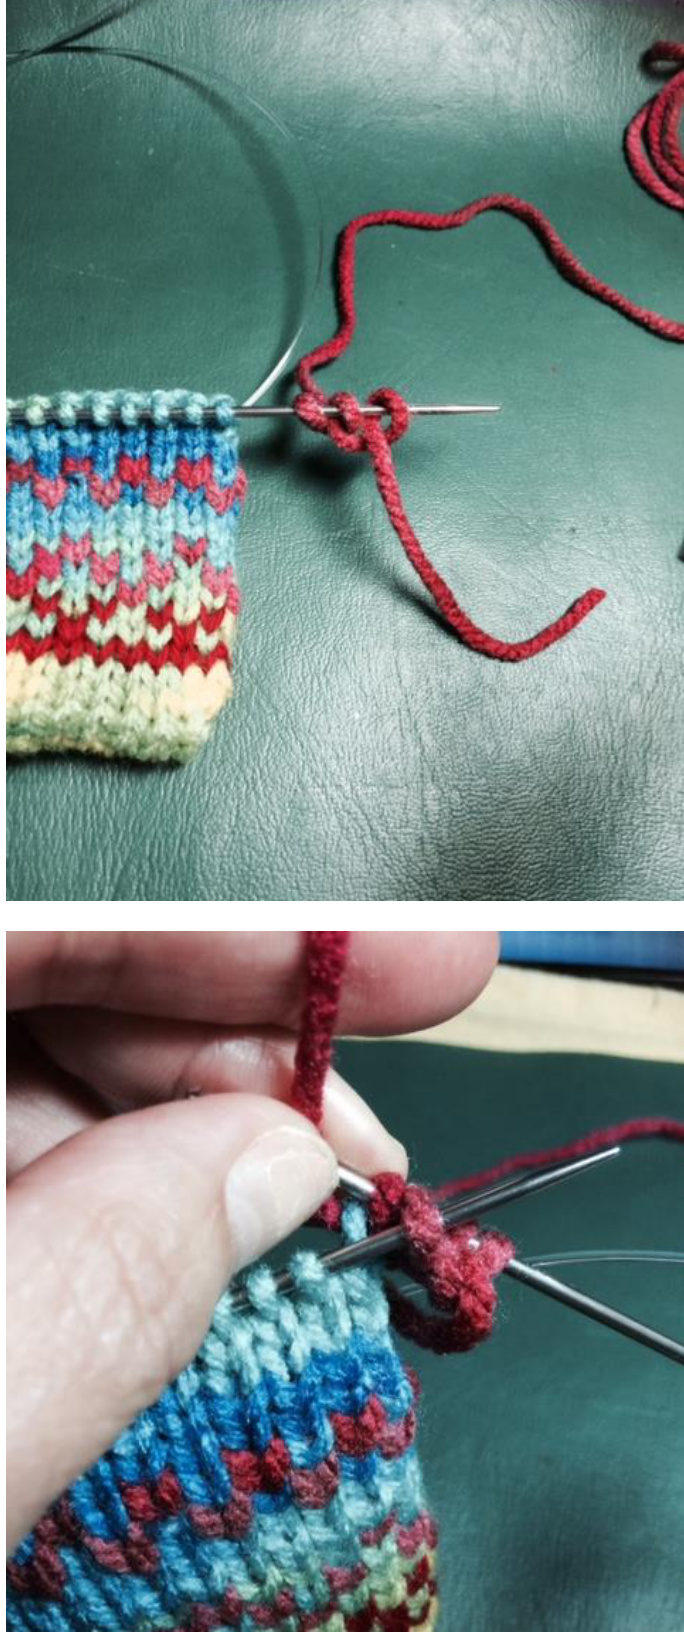
Set up: Make three new backward loops on the left knitting needle using the contrast color yarn. See that the working yarn is next to the first loop to be knitted from Round 20. Follow the close-up picture and pay attention to the working yarn position being near to the stitches on the left knitting needle. The tail will lead off the end of the left knitting needle. \*Hold the working yarn snuggly to knit the first backward loop on the left knitting needle. Knit two stitches. Slip the third backward loop onto the right knitting needle (this will detach the knitting temporarily) and immediately knit the first loop on the left knitting needle. Bring the slipped loop forward to pass over the loop just knitted. (Pass slipped stitch over- PSSO) This will bind off the first stitch after the slipped stitch.
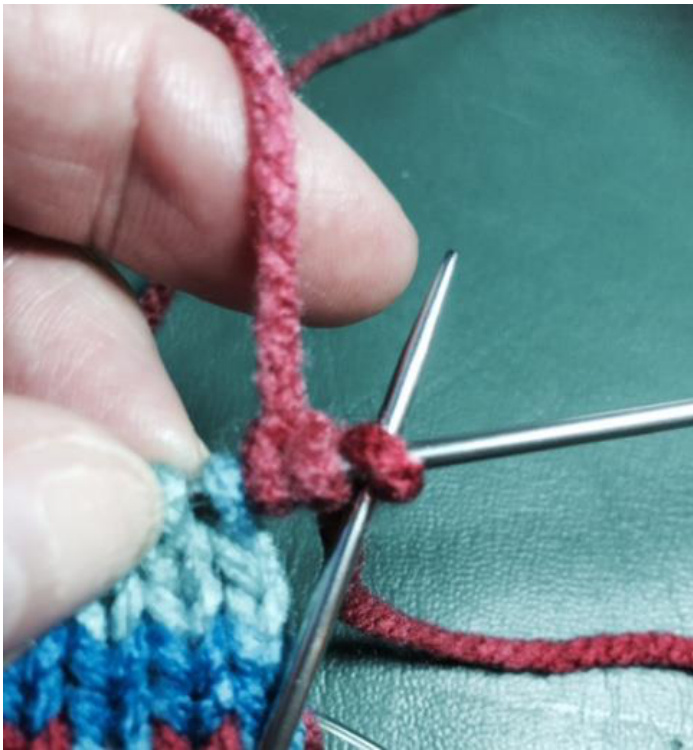
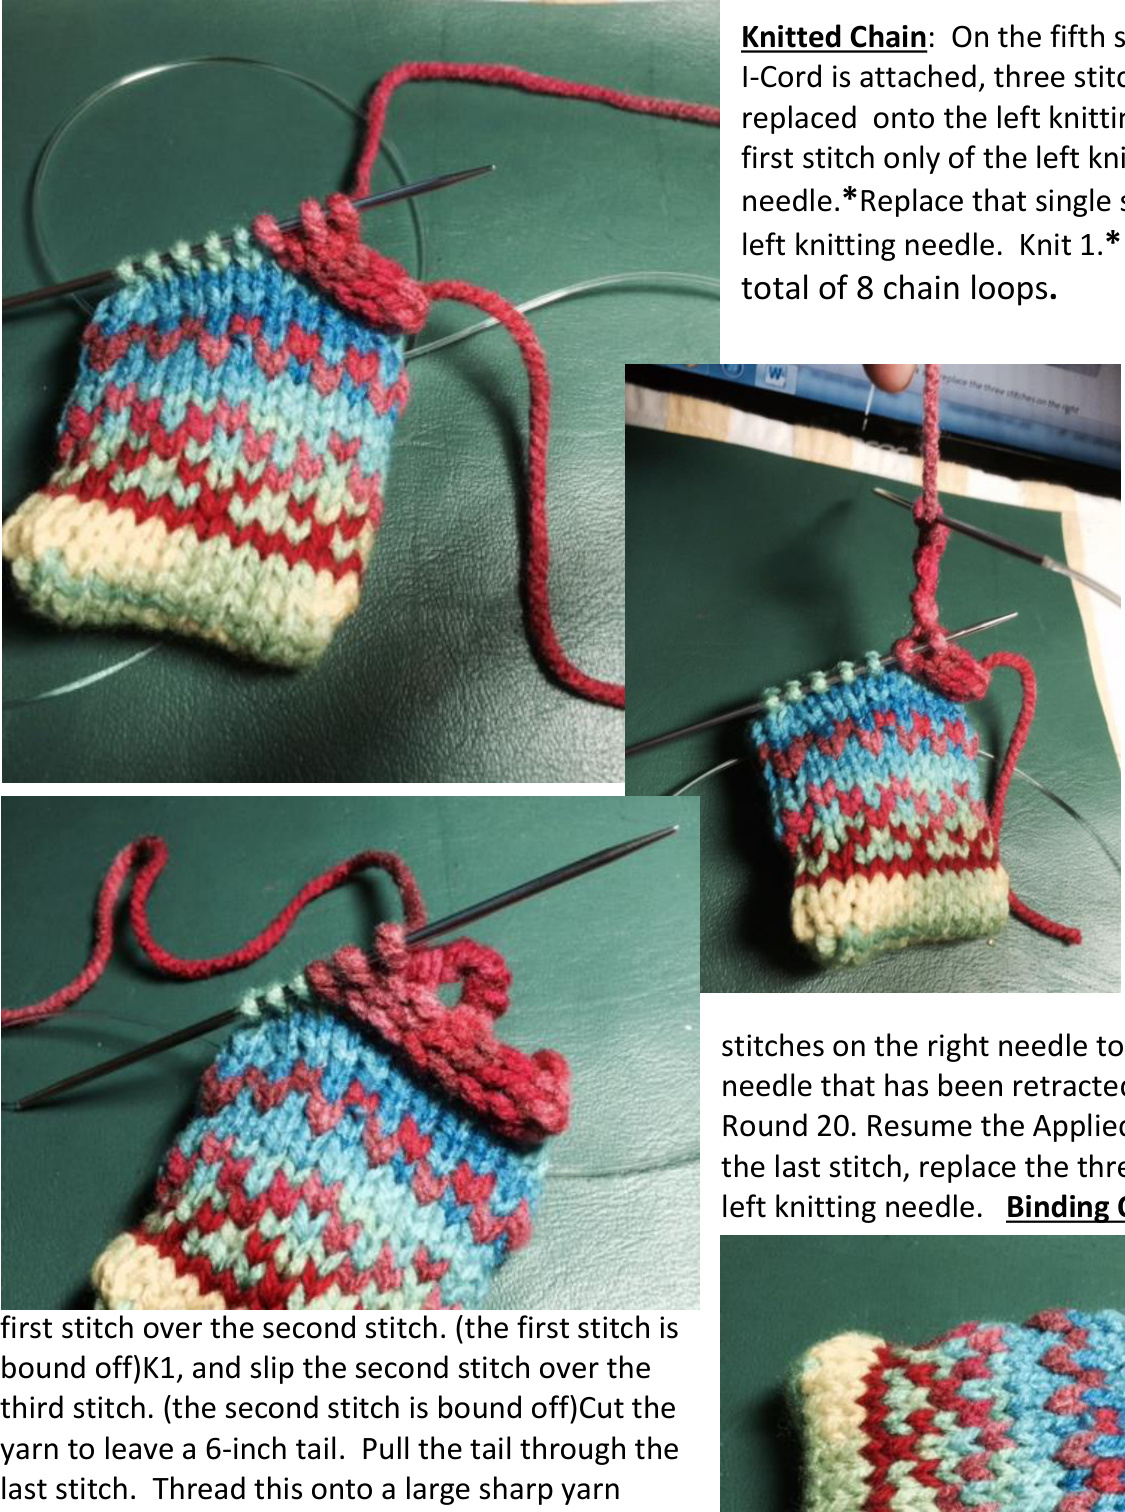
Replace the three stitches back onto the left knitting needle.\* Repeat from \*. Applied I-Cord is a continuous tiny tube of knitting; in this case it is only a round of 3 stitches. This elegant edging is flexible and stretches well in all directions. Knit Applied I-Cord through the 5th stitch. At this point, a knitted chain will be made of 8 chain loops to form a button hole. This button hole is made by attaching both its chain ends to the Applied I-Cord. At the eighth chain loop, re-start the Applied I-Cord by knitting the second replaced stitch on the left knitting needle, slipping the third stitch and finally, knitting the next loop of Round 20, and passing the slipped stitch over. Continue to the tenth stitch of Round 20. Now turn the work. Replace the three
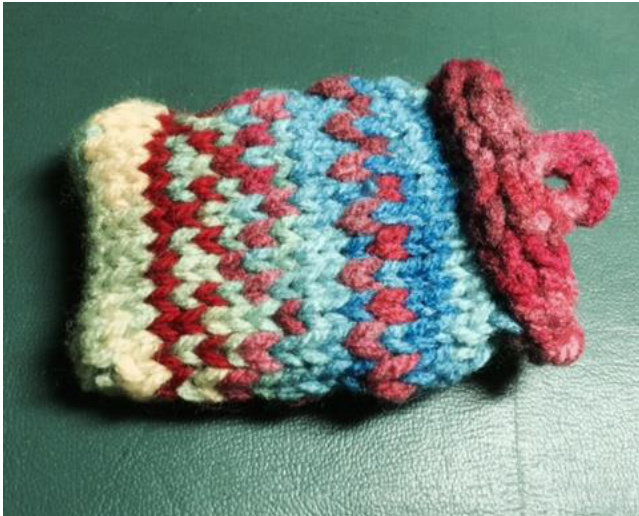
sewing needle. Use the tail to join with the beginning of the Applied I-Cord, and weave in the remaining tail of that yarn. The bag is complete. If desired stuff 25-yards of main color yarn inside. How handy to carry instead of whole skeins.
Useful video Reference
Schoolhouse Press: www.schoolhousepress.com Video -"A Knitting Glossary with Elizabeth Zimmermann & Meg Swansen" over 130 handknitting techniques demonstrated. (2005) This useful video has several more ways to use I-Cord, to make button holes, and is excellent to watch general knitting techniques used by beginning though experienced knitters. If you do not own it, find it or request it at your local library. Notes:
The button hole fits my little finger and feeds the yarn as I need it for this small knitted project. I can see myself strolling along, getting fresh air and exercise, and staying fit at the same time rather than anchored to a sofa.


