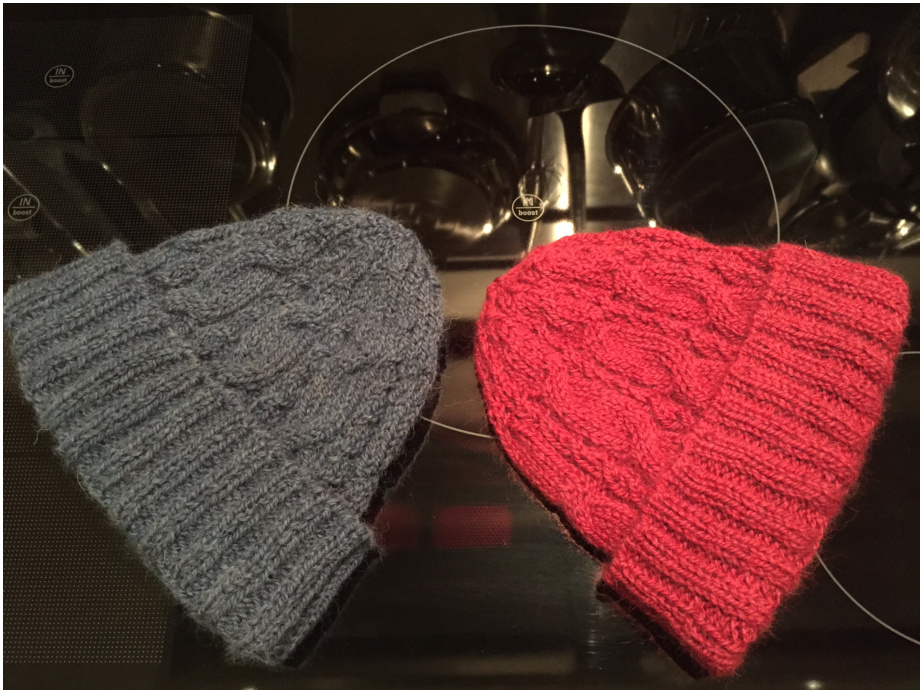
Must Have Cable Hat
By Chavie Fiszer I made this hat for my husband, but liked it so much I made another for me! It fits any adult size head because the pattern is stretchy without loosing shape, and you can just bend up more or less of the rim.
Materials

Louisa Harding Akiko, color 015 (boyfriend) or 014 (berry) -- 2x50g balls 4.5 mm (US 7) and 5 mm (US 8) circular needles (24" = 60 cm circumference) Cableneedle Stitchmarker
Special techniques:
RC= right twist (insert needle to knit 2 together but leave stitches on left needle, knit the first one again and slip off on to the right needle) C6B=slip 3 stitches on a cable needle and hold to the back, knit 3, then knit the 3 stitches on the cable needle Circular tubular 2/2 ribbing cast on. Here is a link to an excellent video tutorial: https://www.youtube.com/watch?v=yE3b4Vq3sJ8 I chose this cast on because it's stretchy and makes an attractive invisible edge to ribbing. This way you have no qualms about turning up the brim. You could just do long tail or any other cast on, but I really urge you to try the tubular cast on!
Cast on 96 using tubular circular cast on.
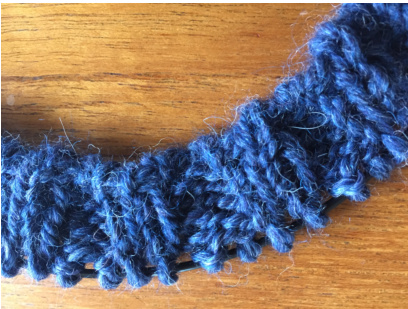
As shown in the video, the first stitch is already a twist and not a slipknot, using the weaving back and forth tubular cast on method. Be careful not to twist when joining in the round and begin double knitting for the next two rows: Foundation Row 1: Knit 1, slip the purl with yarn in front. Repeat to end Foundation Row 2: Slip the knit with yarn in back, purl 1. Repeat to end. Row 3: You will be twisting the stitches to get from the 1/1 rib presenting on the needle to the 2/2 rib you want. Knit 1, take needle over the next purl and instead knit the knit stitch after it, pull it over that purl stitch on to the right needle. (The video shows you to hold the stitches in the air off the needle, but I find it much easier and faster to just knit over the first stitch leaving them on the needle.) Now purl the purl stitch waiting on the left needle, and purl the next purl. Repeat to end. You are now ready for regular 2/2 rib knitting. Place marker.
Knit 2/2 ribbing for 18 rows (not counting the first 2 set up tubular rows).
Begin RC rounds. These 10 rows are still knit with 4.5mm. Round 1: K6, p2,k2,p2. Repeat to end of row Move marker. Round 2: K6, p2,k2,p2. Repeat to end of row Round 3: K6, p2,RC,p2. Repeat to end of row (8 times). Round 4: K6, p2, k2 ,p2. Repeat to end of row Repeat these 4 rows once again: Round 5: K6, p2,k2,p2. Repeat to end of row Round 6: K6, p2,k2,p2. Repeat to end of row Round 7: K6, p2,RC,p2. Repeat to end of row (8 times). Round 8: K6, p2, K2,p2. Repeat to end of row Row 9: K6, p2,k2,p2. Repeat to end of row Row 10: K6, p2,k2,p2. Repeat to end of row Change to 5mm circular needles. Begin cable and RC rounds: Round 1: C6B, p2, RC, p2. Repeat to end of row (8 times). (Cable #1) (RC # 3) Round 2: K6, p2, k2 ,p2. Repeat to end of row Round 3: K6, p2,k2,p2. Repeat to end of row Round 4: K6, p2,k2,p2. Repeat to end of row Round 5: K6, p2,RC,p2. Repeat to end of row Round 6: K6, p2, k2 ,p2. Repeat to end of row Round 7: K6, p2,k2,p2. Repeat to end of row Round 8: K6, p2,k2,p2. Repeat to end of row Round 9: K6, p2,RC,p2. Repeat to end of row Round 10: K6, p2, K2, p2. Repeat to end of row Round 11: K6, p2,k2,p2. Repeat to end of row Round 12: K6, p2,k2,p2. Repeat to end of row Round 13: C6B, p2, RC, p2. Repeat to end of row (8 times). (Cable #2) (RC # 6) Round 14: K6, p2, k2 ,p2. Repeat to end of row Round 15: K6, p2,k2,p2. Repeat to end of row Round 16: K6, p2,k2,p2. Repeat to end of row Round 17: K6, p2,RC,p2. Repeat to end of row Round 18: K6, p2, k2,p2. Repeat to end of row Round 19: K6, p2,k2,p2. Repeat to end of row Round 20: K6, p2,k2,p2. Repeat to end of row Begin crown decrease: Round 21: K6, p2tog ,RC, p2tog. Repeat to end of row. Decrease by 16sts=80. Round 22: K6, p1, k2 ,p1. Repeat to end of row Round 23: K6, p1, K1, p1. Repeat to end Round 24: K6, p1, K1, p1. Repeat to end Round 25: C6B, p1, RC, p1. Repeat to end of row (Cable #3) (RC #9) Round 26: K6, p1, k2, p1. Repeat to end Round 27: K1, SSK, K2tog, K1, p1, k2, p1. Repeat to end. Decrease by 16sts=64. Round 28: K4, p1, k2, p1. Repeat to end. Round 29: K4, p1, RC, p1. Repeat to end. Round 30: K4, p1, k2, p1. Repeat to end. Round 31: K1, K2tog, K1, p1, k2, p1. Repeat to end. Decrease by 8 sts= 56. Round 32: K3, P1, K2, P1. Repeat to end. Round 33: K3, p1, K2tog (instead of RC), p1. Repeat to end. Decrease by 8= 48 sts, Round 34: K3, p1, K1, p1. Round 35: Sl1, K2tog, passo, P1, K1, p1. Decrease by 16 = 32 sts. Round 36: K1, P1 to end. Round 37: Remove marker, Slip 1, replace marker, K2tog 16times. You now have 16sts. Round 38: Knit 16 Round 39: k2tog across row=8sts. Break yarn. With tapestry needle, thread through remaining 8 stitches and pull tight. Weave in ends. You can add a 5cm pompom if you like.