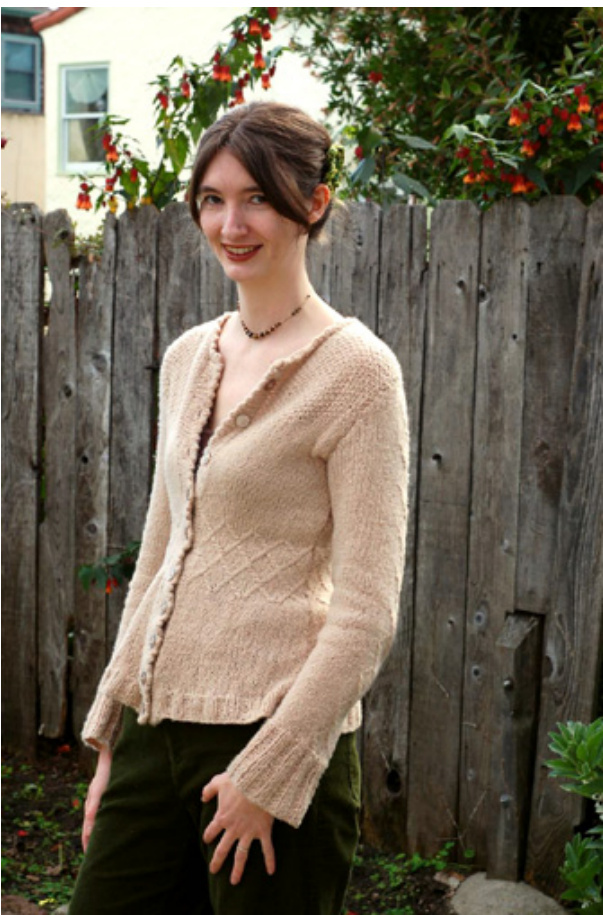
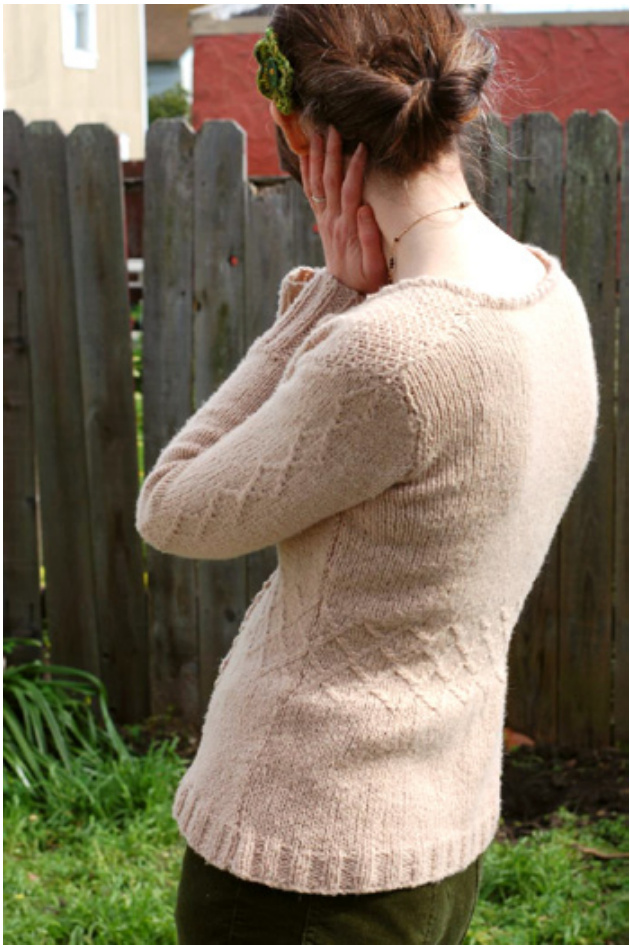
When I learned to knit, my goal was always to be able to create my own sweaters. Maude Louise is the first adult sized sweater that I made, and remains one of my favorites. Knit in pieces and then seamed, Maude Louise is not the simplest of sweaters, but with the fitted waist, pretty detailing, and vintage style, it's always an easy sweater to wear. Since Maude Louise is knit in worsted weight yarn with zero ease at the bust, the pieces work up fast. Choose a sturdy yarn with good drape, such an alpaca or silk blend, for the best look. The fitted waist and flared hips are flattering to most figures.
| SIZE 28" [32", 36", 40", 44", 48", 52"] with 0 ease (shown in size 32") | 1 set US 3/3.25 mm needles 1 set US 6 /4 mm needles |
| Finished Length: 23.5 [24, 24.5, 25, 25.5, 26, 26.5] | 1 set US 8/5 mm needles |
| inches MATERIALS | tapestry needle 9 buttons .75 inches in diameter |
| 880 (960, 1100, 1300, 1375, 1550, 1650) yards w0rsted | GAUGE |
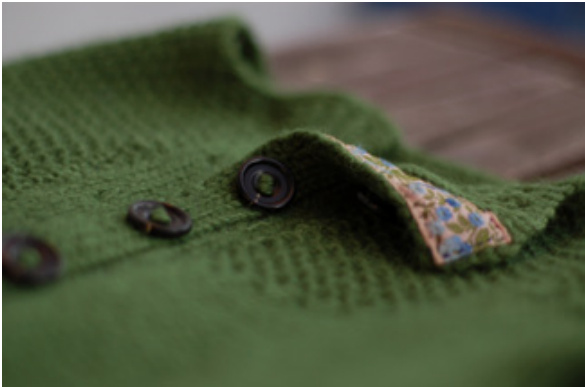
| weight yarn Green sweater knit in Knit Picks Andean Silk, color Leaf | 18 st/26 rows = 4"in stockinette stitch on size 6 needles |
| (color discontinued) TansweaterknitinRYC Soft Lux,color cashmere | 16 st/24 rows = 4"in stockinette stitch on size 8 needles |
| 24 st/30 rows=4" in Lattice Stitch on size 3 needles. |
PATTERN NOTES:
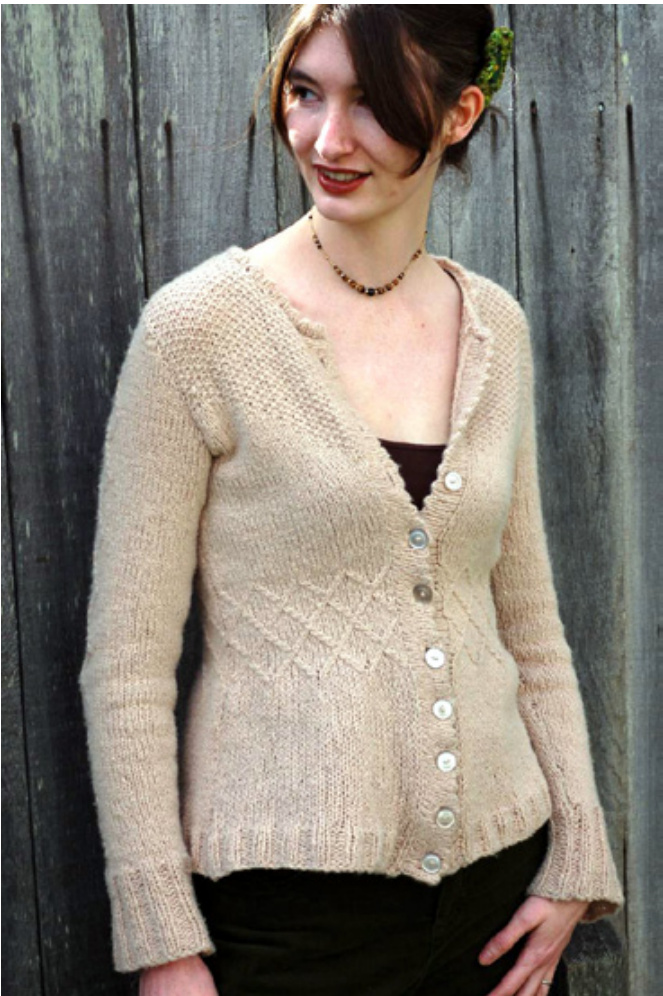
aude Louise is knit in three different needle sizes, drape and sizing. It is most important to get gauge with the size 6 needles, but to ensure a good fit, it's smart to check gauge with all of your different needles sizes. The original Maude Louise was designed with extra long arms. If you want to shorten the arms, the best place to do this is at the cuff, which is knit in straight ribbing. Although you'll want to use a drapey yarn it's best to use a yarn that contains wool, because the sweater may become rather baggy and stretched if you use a yarn without a lot of memory. There are two options listed for button bands and collar: a single rib set of bands knit separately from the sweater and then seamed, or picot bands and collar picked up from the edges. The picot bands can be knit without the picot edge if you prefer. Remember, this is YOUR sweater, so feel free to customize and change to suit your own taste and shape.
PATTERN
Back:
Using size 8 needles, C0 68 (84, 84, 100, 116, 132, 148) sts TIP: Row 1 (RS): \*K2, p2, rep from \* to end. Use a highlighter to highRow 2 (WS): Same as Row 1. light your size throughout Rep rows 1 and 2 three times, or until 2x2 ribbing measures 1.5 inches the pattern. It can get a little from cast on edge. confusingsto etrack of Row 9 (RS): Ssk, k to last 2 st, k2tog. 66 [82, 82, 98, 114, 130, 146] sts Row 10: Purl across. Continue to work in stockinette st without further shaping until piece measures 7 (7, 7.25, 7.25, 7.5, 7.5, 7.75 ) inches from cast on edge, ending in a WS row. Switch to size 3 needles and work in Lattice Stitch from Chart A. Work through chart 1x complete, and then again through Row 14. Switch to size 6 needles and dec evenly across next (Rs) row by 2 (10, 2, 8, 16, 22, 28) sts. 62 [72, 80, 90, 98. 108, 118] sts Next row: Purl. Work in stockinette st without further shaping until piece measures 15.75 (16, 16.25, 16.5, 16.75, 17, 17.25) inches from cast on edge, ending in a WS row.
Shape armholes:
BO 2 (3, 4, 4, 5, 6, 7) sts at beginning of next 2 rows. 58 (66, 72, 82, 88, 96,104) sts Next 2 (3, 3, 4, 5, 6, 7) RS rows, then every other RS row 2 (3, 4, 5, 5, 6, 7)x: K2, ssk, kto last 4 st, k2tog, k2. 50 [54, 58, 64, 68, 72, 76]sts Work in stockinette stitch until piece measures 23 (24, 24.5, 25, 25.5, 26, 26.5) inches from cast on edge, ending in a WS row.
Row 2: Same as Row 1.
Shape shoulders:
BO 5 (5, 6, 6, 7, 7, 8) sts at beginning of next 2 rows. 40 [44, 46, 52, 54,58,60] sts Next r0w (RS): BO 5 (5, 6, 6, 7, 7, 8) sts, k6 (10, 10, 12, 12, 13, 13), BO 12 (14, 14, 16, 16, 18, 18) sts, k to end. Row 2 (WS): BO 5 (5, 6, 6, 7, 7, 8) sts, p across, turn Row 3: B0 4 (4, 4, 5, 5, 6, 6) sts, k across, turn Row 4: B0 remaining 5 (6, 6, 7, 7, 7, 7) sts. Break yarn and rejoin to st on opposite side, starting on a WS row. Row 1 (WS): BO 4 (4, 4, 5, 5, 6, 6) sts, p across, turn. Row 2: B0 remaining 5 (6, 6, 7, 7, 7, 7) sts.
Left Front:
Using size 8 needles, C0 36 (36, 36, 52, 52, 68, 68) sts. Row 1: \*K2, p2, rep from \* to end. Rep Rows 1 and 2 three times or until ribbing measures 1 .5 inches from cast on edge. Change to stockinette stitch and ssk at the beginning of next two RS rows. 34 [34, 34, 50, 50, 66, 66] sts Work in stockinette until piece measures 7 (7, 7.25, 7.25, 7.5, 7.5, 7.75) inches from cast on edge. Switch to size 3 needles and begin Lattice Stitch pattern from Chart A. Work through chart 1x complete, and then again through Row 14. Switch to size 6 needles . Size 28", 40", 44", 48", 52" 0nly: Dec 4 (4, 2,12, 6) sts evenly across row. 30 [46, 48, 54, 60] sts Size 36" only: Inc 6 sts evenly across row. 40 sts
All sizes:
Work in stockinette st until piece measures 14.75 (15, 15.25, 15.5, 15.75, 16, 16.25) inches from cast on edge, ending with a WS row. Row 1 (RS): K across to last 2 st, p1, k1. Row 2: K1, p across. Row 3: K across to last 4 st, (p1, k1) 2x. Row 4: K1, p1, k1, p across. Continue in this way, increasing the seed stitch pattern by 2 seeds on every RS row, until piece measures 15.7t (16, 16.25, 16.5, 16.75, 17, 17.25) inches from cast on edge ending with a WS row.
Shape armhole:
(Continue to increase seed st pattern by 2 seeds on every RS row.) BO 2 (3, 4, 4, 5, 6, 7) sts at beginning of next row. Next 2 (3, 3, 4, 5, 6, 7) RS rows and then every other RS row 2 (3, 4, 5, 5, 6, 7)x: K2, ssk, knit across in pattern. 24 [25, 29, 33, 33, 36, 39] sts Work in seed st pattern until piece measures 20.5 (21, 21.5, 21.75, 22, 22.5, 23) inches from cast on edge, ending with a RS row.
Shape neck:
BO 2 (2, 3, 5, 4, 5, 5) st at beginning of WS row, work across in pattern. Row 1 (Rs): Work across in pattern to last 2 st, p2tog. Row 2: K2tog, work across in pattern. Rep Rows 1 and 2 0ne time. 18 [19, 22, 24, 25, 27, 30] sts Dec 1 st at beginning of next 3 (3, 3, 5, 4, 6, 7) WS rows. 15 [16, 19, 19, 21, 21, 23] sts Knit in seed stitch pattern to 23 (24, 24.5, 25, 25.5, 26, 26.5)
Shape shoulder:
BO 5 (5, 6, 6, 7, 7, 8) sts at beginning of next 2 RS rows. BO remaining 5 (6, 6, 7, 7, 7, 7) sts on next RS row.

Right Front:
Rep Rows 1 and 2 three times, or until ribbing measures 1 .5 inches. Change to stockinette st and k2tog at the end of next 2 RS rows. 34 [34, 34, 50, 50, 66, 66] sts Continue working in stockinette stitch without further shaping until piece measures 7 (7, 7.25, 7.25, 7.5, 7.5, 7.75 ) inches from cast on edge. Switch to size 3 needles and begin Lattice Stitch pattern from Chart A. Knit through chart 1x complete, and then again through Row 14. Inc 6 sts evenly across row. 40 sts Switch to size 6 needles and work in stockinette st until piece measures 14.75 (15, 15.25, 15.5, 15.75, 16, 16.25) inches from cast on edge, ending with a WS row. Row 1 (RS): K1, p1, knit across. Row 2: Purl across to last st, K1. Row 3: K1, p1, k1, p1, knit across. Row 4: Purl across to last 3 st, K1, p1, k1. Continue in this way, increasing the seed st pattern by 2 seeds on every RS row, until piece measures 15.75 (16, 16.25, 16.5, 16.75, 17, 17.25) inches from cast on edge ending with a RS row.
Shape armhole:
(Continue to increase seed stitch pattern by 2 seeds on every RS row.) BO 2 (3, 4, 4, 5, 6, 7) sts at beginning of next row. Next 3 WS rows and then every other WS row 3x: P2, p2tog, knit across in pattern. 24 [25, 29, 33, 33, 36, 39] sts Work in seed st pattern until piece measures 20.75 (21, 21.25, 21.5, 21.75, 22, 22.25) inches from cast on edge, ending with a WS row.
Shape neck:
BO 2 (2, 3, 5, 4, 5, 5) sts at beginning of RS row, work across in pattern. Row 1 (Ws): Work across in pattern to last 22 (2, 2, 2, 2, 2, 2) st, p2tog. Row 2: K2tog, work across in pattern. Rep Rows 1 and 2 one time. 18 [19, 22, 24, 25, 27, 30] sts Dec 1 st at beginning of next 3 (3, 3, 5, 4, 6, 7) RS rows. 15 (16, 19, 19, 21, 21, 23) sts Work in seed st pattern to 23 (24, 24.5, 25, 25.5, 26, 26.5) inches from CO edge, ending with a RS row. Shape shoulder: BO 5 (5, 6, 6, 7, 7, 8) sts at beginning of next 2 WS rows. TIP:
Sleeves (make two alike):
place to change the length of the sleeves. Knit shorter ribbing for shorter sleeves and longer ribbing for longer Row 1 (RS): \*K2, p2, rep from \* to end. sleeves. Row 2 : \*K2, p2, rep from \* to end. Rep Rows 1 and 2 until ribbing measures 4 (4, 4, 4, 4, 4, 4) inches from cast on edge, ending with a WS row. Change to size 6 needles. Row 1 (RS): Kfb, k14 (14, 16, 16, 18, 18, 20) begin Lattice Stitch Pattern B, k14 (14, 16, 16, 18, 18, 20), kfb. Row 2: Purl. Row 3: K across, continuing in Lattice Stitch pattern on middle 10 st, k to end. Row 4: Purl. Rep Rows 3 and 4 five times. Row 15: Kfb, k15 (15, 17,17,19, 19, 21), work center 10 st in Lattice Stitch pattern, k15 (15, 17, 17, 19, 19, 21),kfb. 44 (44, 48, 48, 52, 52, 56) sts Continue to work in pattern, increasing one st at either side of every 18 (12, 10, 8, 8, 6, 6) rows to 50 (54, 60, 64, 68, 72, 78) sts. Work in pattern without further shaping until sleeve measures 21 inches in length from CO edge.
Shape sleeve cap:
BO 2 (3, 4, 4, 5, 6, 7) sts at beginning of next 2 rows. 46 [48, 52, 56, 58, 60, 64] sts Dec 1 st at either end of next 3 (3, 3, 3, 3, 3, 3) rows, then every RS row 2 (2, 2, 3, 3, 3, 3) times, then every row 3 (3, 3, 3, 3, 3, 3) times. Work 2 rows without decreasing. Dec 1 st at either end of following 2 (2, 2, 3, 3, 3, 3) RS rows. Dec 1 st at either end of next 5 (5, 6, 5, 6, 6, 6) rows. BO remaining 16 (18, 20, 22, 22, 24, 28) sts.
Note:
Make a note of what row of the Lattice Stitch pattern you're on as you start the sleeve caps. You will want to knit through Row 13 of the Lattice Stitch chart to end the Lattice pattern running up the sleeves. There are 23 (23, 24, 25, 28, 28, 28) rows in the sleeve cap in which to do this.
Button Bands and Collar:
Block all pieces to schematic and seam together. There are two different button band and collar options listed below. Select which one you want before beginning.
Picot bands:
Left button band:
Starting at top of Left Front Panel, and using size 6 needles, pick up and knit 8o (8o, 82, 82, 84, 84, 86) sts. Work 9 rows in stockinette st, starting and ending with a WS row. Row 10: K1, \*k2tog, yo; rep from \* to last st, k1. Work a further 9 rows in stockinette st, ending with a WS row. Bind Off Row: Pick up 1st st from cast on row and knit together with 1st st on left hand needle. Pick up 2nd st from cast on row and knit together with 2nd st on left hand needle. Pass 1st st (now on right hand needle) ove 2nd st. Continue binding off in this way until all sts are bound off.
Right button hole band:
Starting at bottom of Right Front Panel, and using size 6 needles, pick up and knit 8o (80, 82, 82, 84, 84, 86) Sts. Work 3 rows in stockinette st, starting and ending with a WS row. Button Hole Row 1 (RS): K4 (4, 5, 5, 6, 6, 7), \*BO 2, k6; rep from \* to last 4 st, k4 (4, 5, 5, 6, 6, 7). Button Hole Row 2: P4 (4, 5, 5, 6, 6, 7), \*CO 2, p6; rep from \* to last 4 st, p4 (4, 5, 5, 6, 6, 7). Work 4 rows in stockinette st, ending with a WS row. Row 10: K1, \*k2tog, yo; rep from \* to last st, k1. Work 4 rows in stockinette st, ending with a RS row. Button Hole Row 1 (WS): P4 (4, 5, 5, 6, 6, 7), \*BO 2, p6; rep from \* to last 4 st, p4 (4, 5, 5, 6, 6, 7). Button Hole Row 2: K4 (4, 5, 5, 6, 6, 7), \*CO 2, k6; rep from \* to last 4 st, k4 (4, 5, 5, 6, 6, 7). Work 3 rows in stockinette st, ending with a WS row. Bind off as for Left Button Band.
Collar:
Starting at top right corner of Right Front Panel, using size 6 needles, pick up and knit 20 (20, 22, 30, 26, 33, 36) sts across Right Front Panel, 20 (24, 24, 28, 28, 30, 30) sts across back, 20 (20, 22, 30, 26, 33, 36) sts across Left Front Panel. 60 [64, 68, 88, 80, 96, 102] sts Knit 3 rows in stockinette st, starting and ending with a WS row. Row 4: K1, \*k2tog, yo; rep from \* to last st, k1. Knit 3 more rows in stockinette st, ending with a WS row. Bind off as for Button Bands.
Alternate Button Bands and Collar: Button band (Left):
Using size 3 needles, CO 11 st. Row 1: \*K1, p1; rep from \* to last st, k1. Row 2: \*P1, k1; rep from \* to last st, p1. Rep Rows 1 and 2 until piece measures same length as front panel from bottom edge to neck shaping. Bind off.
Button hole band (Right):
Using size 3 needles, CO 11 st. Row 1: \*K1, p1; rep from \* to last st, k1. Row 2: \*P1, k1; rep from \* to last st, p1. Continue working in K1, P1 rib until piece measures one inch from cast on edge. Make Button Hole: Rib 5, yo, k2tog rib 4. Work in k1, p1 rib, making a button hole every 2 inches until piece measures same length as front panel from bottom edge to neck shaping. Bind off.
Collar:
Seam button bands to front panels. Starting at top right corner of Right Front Panel, using size 6 needles, pick up and knit 20 (20, 22, 30, 26, 33, 36) sts across Right Front Panel, 20 (24, 24, 28, 28, 30, 30) sts across back, 20 (20, 22, 30, 26, 33, 36) sts across Left Front Panel. 60 [64, 68, 88, 80, 96, 102] sts Work 4 rows in stockinette st, ending with a WS row. Fold over and bind off as in Picot Button Bands.
FINISHING
You should already have seamed the body pieces and sleeves by this time, but if you haven't, now's the time to do it! Weave in all ends and attach buttons to button band. I've found with both my Maude Louises (Louisi? Maudes Louise?) that they generally look better with some buttons left undone, whether it's the ones above the waistorbelow.
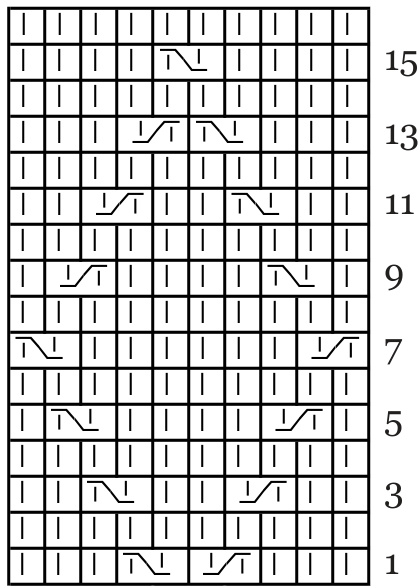
Lattice Chart A
| 15 | ||||||||||||||||||||
| 13 11 | ||||||||||||||||||||
| LT | N | LT | ||||||||||||||||||
| 9 | ||||||||||||||||||||
| L | ||||||||||||||||||||
| | | ||||||||||||||||||||
| 7 | ||||||||||||||||||||
| LT | N | 5 | ||||||||||||||||||
| 3 | ||||||||||||||||||||
| Vi | 1 | |||||||||||||||||||
Chart Key: | = Knit l = Left Twist ↑ = Right Twist
Lattice Chart B
Stitch Guide/Abbreviation Key: BO: Bind off CO: Cast on Dec: Decrease K: Knit K2tog: Knit two together kfb: Knit front and back of stitch Left Twist (LT): With right hand needle behind left hand needle, skip next stitch on left hand needle, knit 2nd stitch through back loop, then knit skipped stitch in front loop, slip both stitches from left hand needle. P: Purl Rep: Repeat Right Twist (RT): Skip next stitch on left hand needle, knit 2nd stitch in front of skipped stitch, knit 1st stitch, slip both stitches from left hand needle. RS: Right side sl: Slip Ssk: Slip one stitch knitwise, slip one purlwise, knit both together through back loops st(s): stitch(es) WS: Wrong side yo: Yarn over
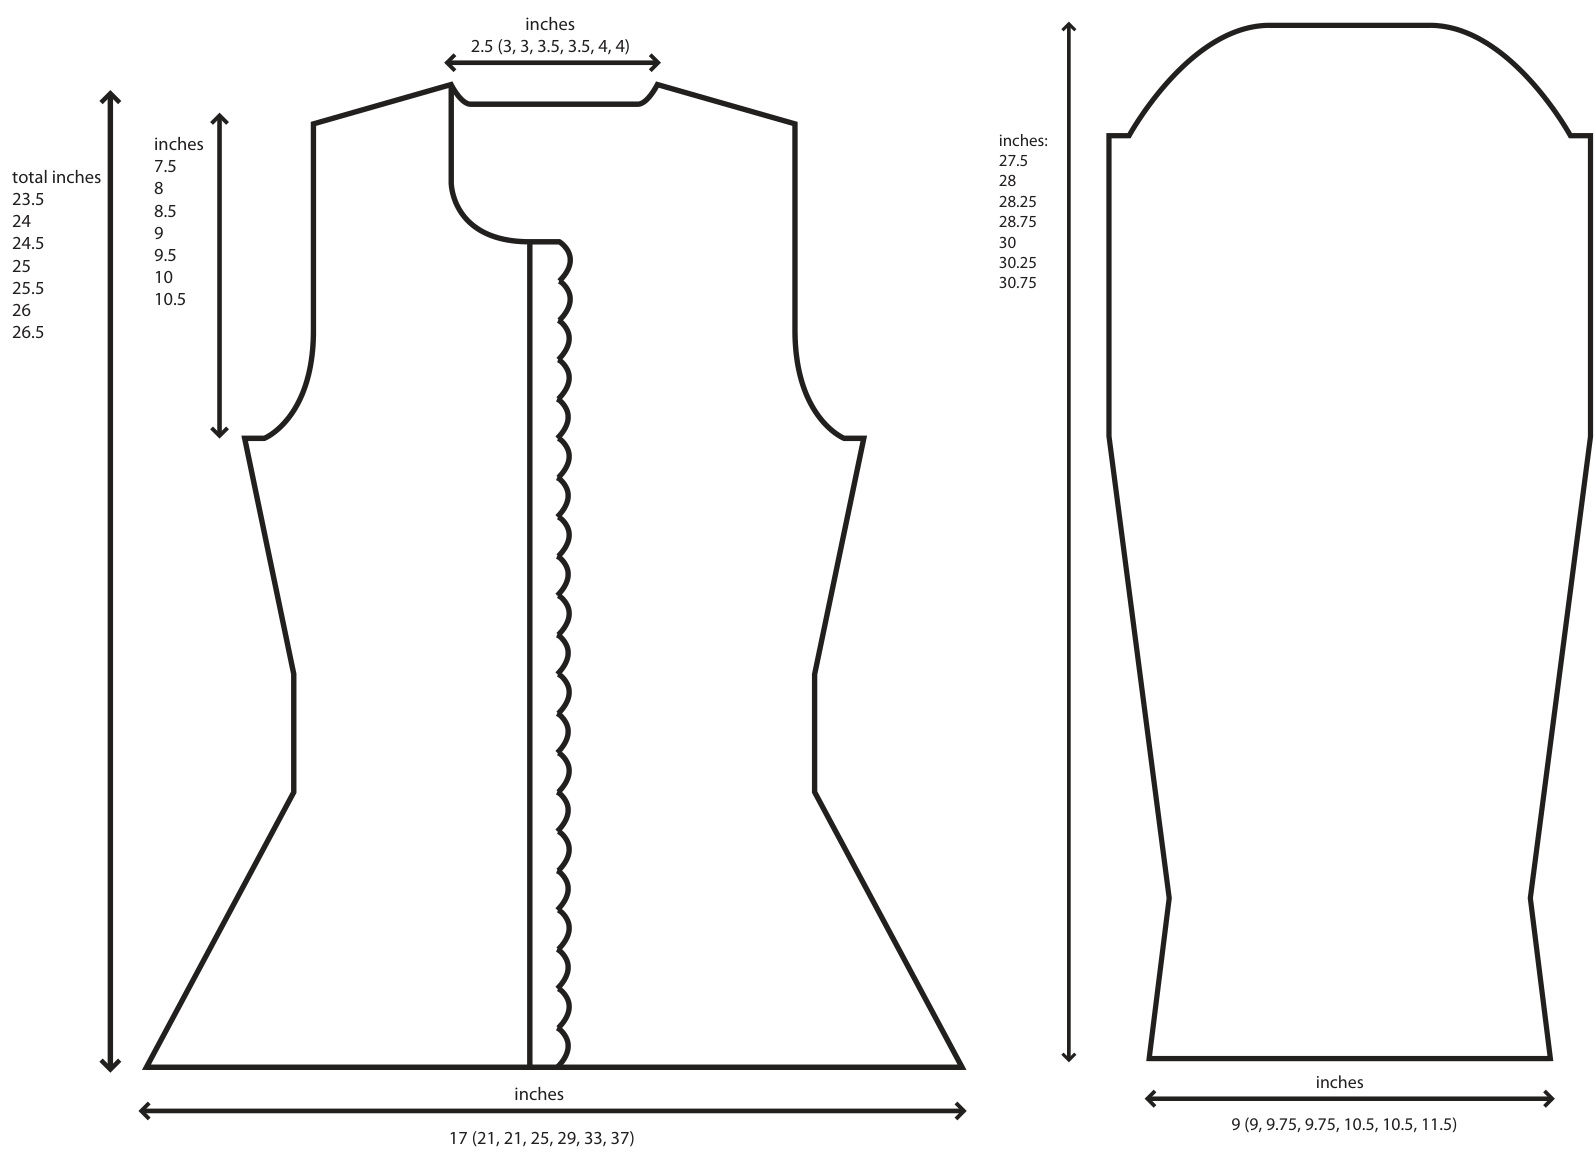
Schematics
Copyright 2009, Kristen Hanley Cardozo For personal or charitable use only. If you have any problems with the Maude Louise pattern, email Kristen at knittingkninja@ gmail.com, or check knittingkninja.com for more tips.


