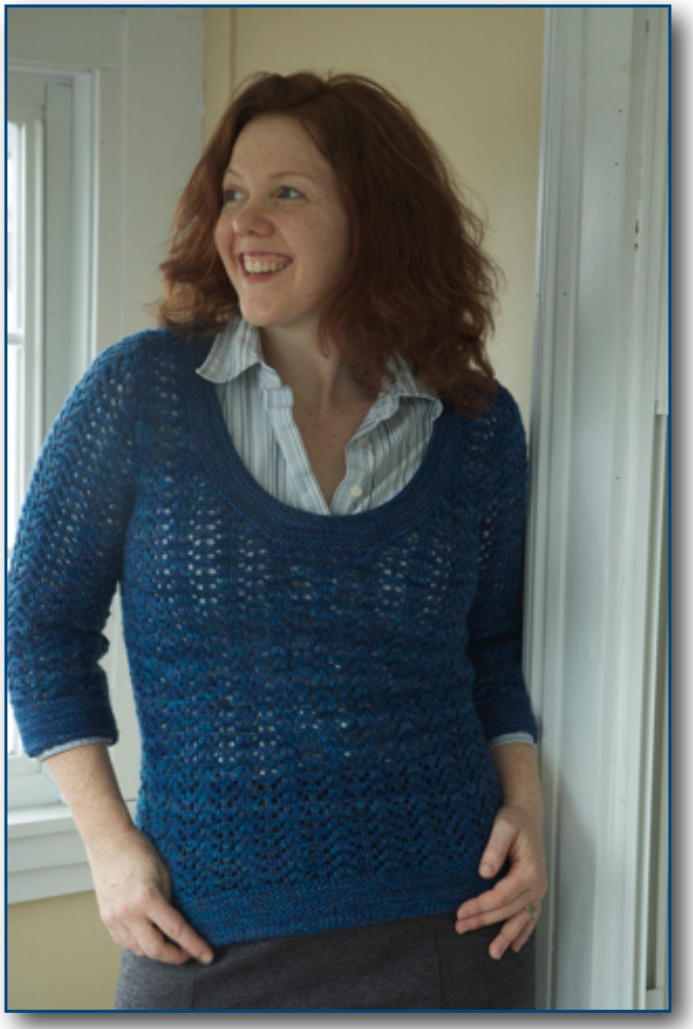
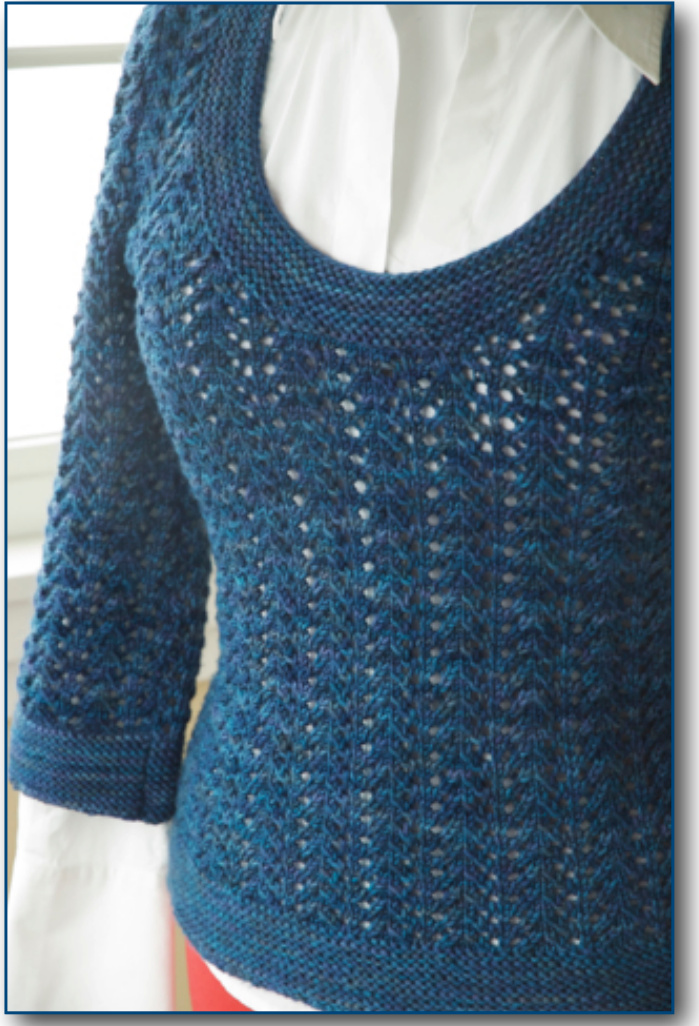
February Fitted Pullover
by Amy Herzog http://www.stashknitrepeat.com/designs
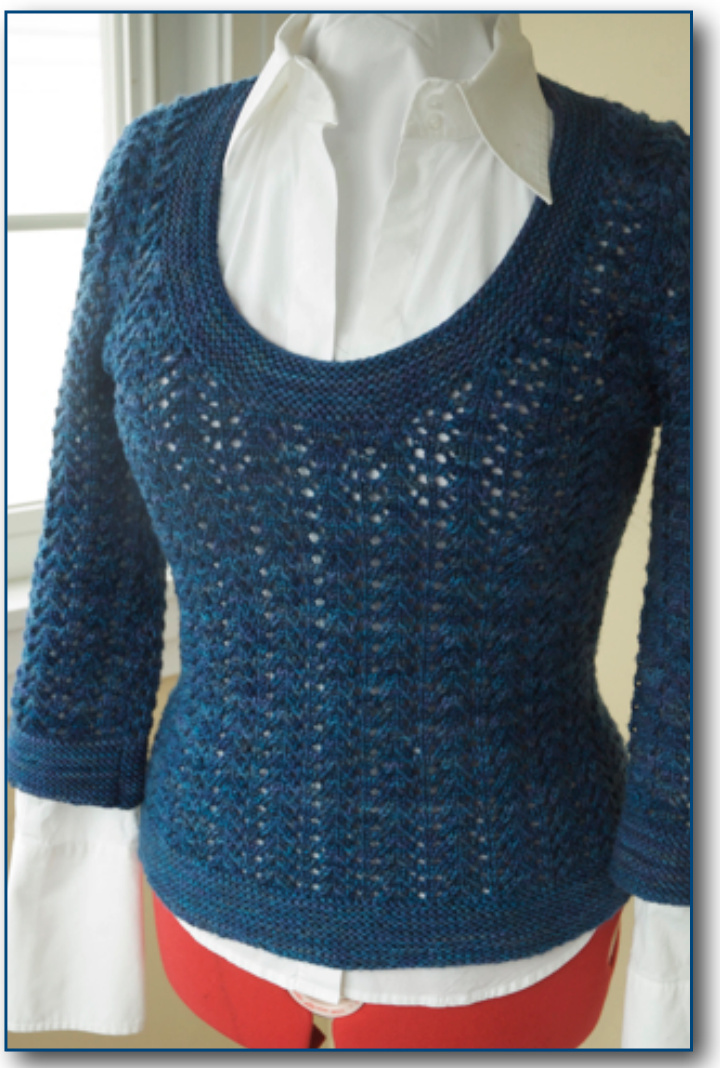
Sizes: S (M, L, XL, 2XL, 3XL) Final Measurements: Bust: 33 (36, 39.5,43, 46, 50)", 84 (91, 100, 109, 117, 127) cm Length: 21.5 (22, 23.5, 24, 24.5, 24.5, 5)", 55 (56, 60, 61, 62, 62) cm Materials: Dream in Color Classy (250 yds/228 m) Shown in Deep Seaflower (VM230), 3 (4, 4, 5, 5, 6) skeins Gauge: 17 sts & 28 rows $=$ 4"/10cm in gull lace pattern, blocked Needle size: 1 set US #7, 4.5mm 24" circular needles or size needed toobtaingauge Notions: Stitch markers, holder, darning needle (A curves-friendly pullover in EZ's popular gull lace pattern.)
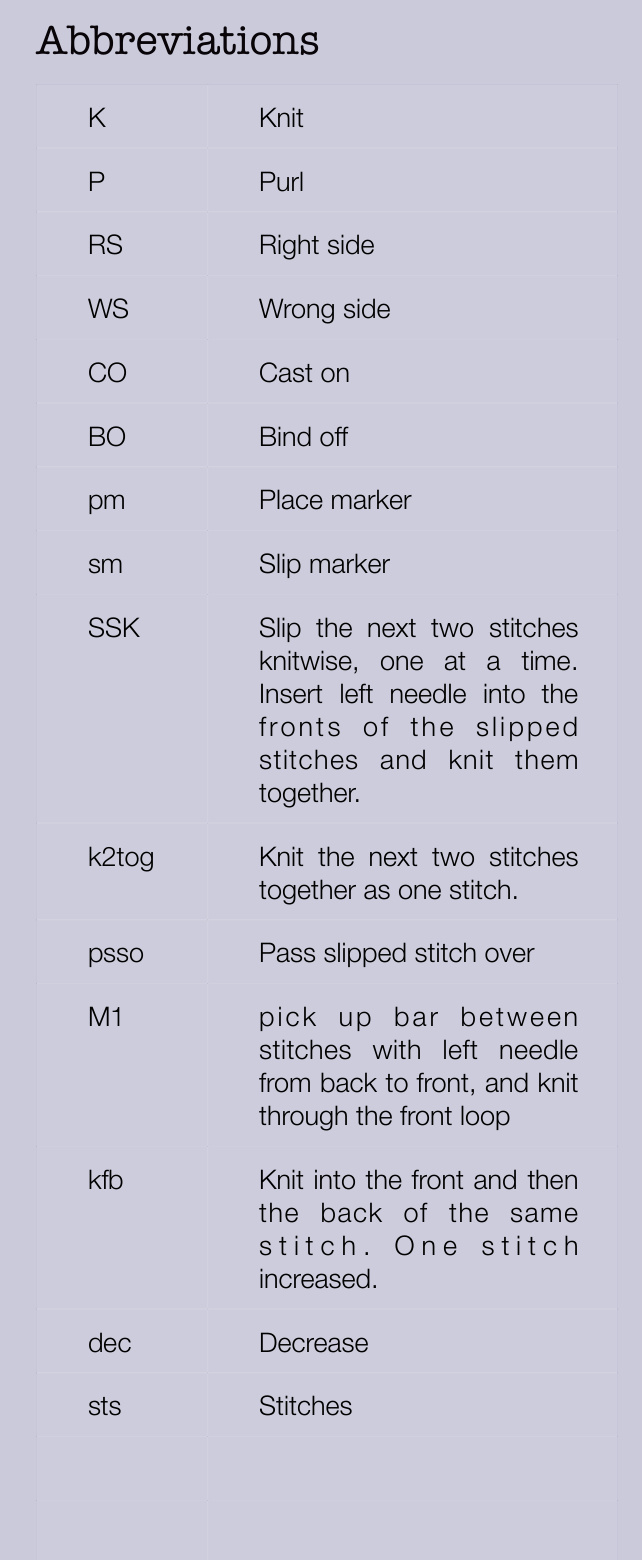
SPECIAL STITCHES AND TERMS
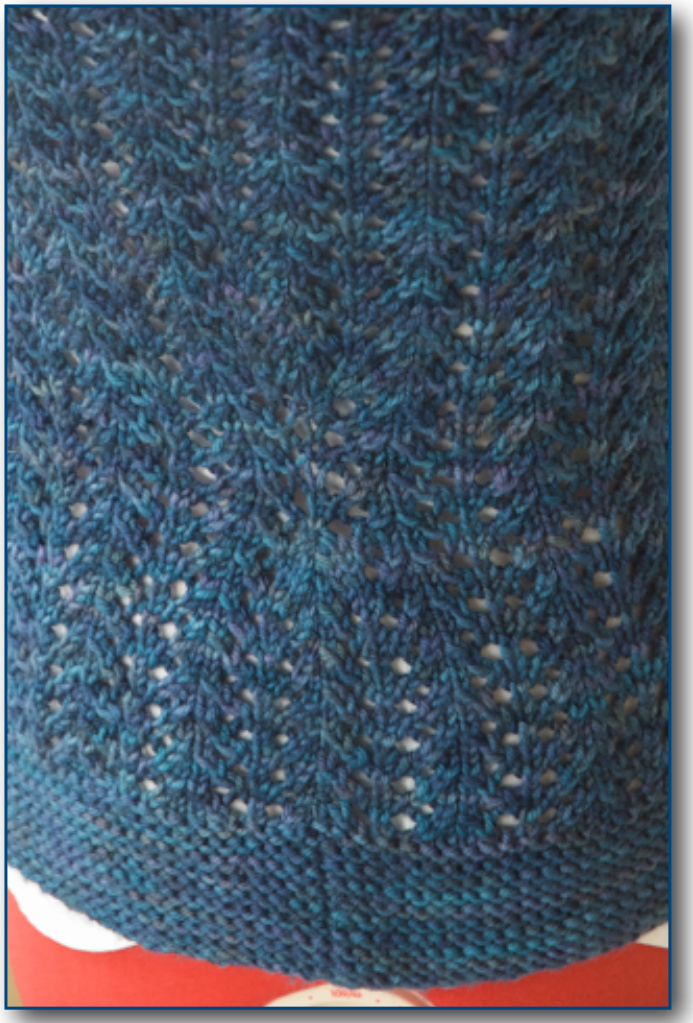
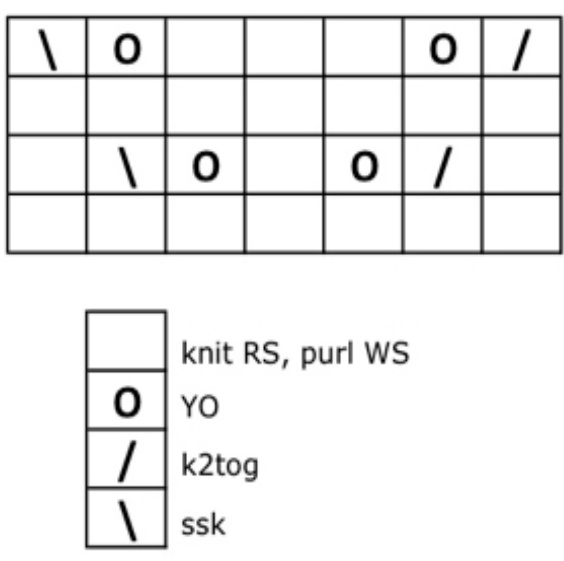
Gull Lace Pattern, adapted from Elizabeth Zimmerman's Knitter's Almanac, worked over a multiple of 7 : stitches and 4 rows. Chart located at end of pattern.
Flat:
Rows 1 and 3 (WS): Purl Row 2 (RS): K1, k2tog, YO, K1, YO, ssk, K1. Repeat across. Row 4 (RS): K2tog, YO, k3, YO, ssk. Repeat across.
In the round:
Rows 1and3:K Row 2: K1, k2tog, YO, K1, YO, ssk, K1. Repeat across. Row 4: K2tog, YO, k3, YO, ssk. Repeat across.
PATTERN NOTES
This garment is worked in the round to the scoop neck shaping, and then worked flat. The set-in sleeves are worked flat as well. Waist shaping occurs on the side, with one full lace repeat decreased for the waist on each side. If you desire more than ${\sim}3.5$ inches of waist shaping, I recommend going down a needle size (or two) during the decrease portion of the body, and then returning to your original needle size during the increase portion of the body. Should you desire less, simply omit the waist shaping entirely and just go down a needle size where you desire the shaping. The original version of this pattern included waist decrease instructions without a chart. They are now offered both charted and written. Charts can be found at the end of the pattern, and the original gull lace chart was created by Jaclyn Pawlowski. Finally, you may find it helpful to place additional markers at the sides, on either side of the two lace panels that decrease to one panel during the waist shaping portion of the body.

Notes on Fit
The February Fitted Pullover is an adaptation of an adaptation. I adored the popular "February Lady Sweater" by Pamela Wynne but knew that it would not flatter my larger bust and curvy waist. The FFP was born of a desire to retain the fabric and feel of Pamela's highly stylish version without losing my curves under the line of a swing jacket. The FFP is a flattering choice for curvy and busty knitters of all shapes. Top-heavy knitters should ensure the hem falls at the widest point of their hips; bottom-heavy knitters should ensure it falls above the widest point. It is easy to knit a version of this sweater with long, slightly swingy sleeves simply by lengthening them. Remember to purchase more yarn, though! As with all sweaters, carefully examine the pattern schematic to note potential modifications before you knit.
BODY
CO 140 (154, 168, 182, 196, 210) sts and join for working in the round, being careful not to twist the join. First round: K 70 (77, 84, 91, 98, 105) sts, pm, K 70 (77, 84, 91, 98, 105) sts, pm (this marker will denote the beginning of a round). Knit garter stitch in the round (K 1 row, P 1 row) for 2 inches, ending with a P row. Begin working the gull lace pattern (in the round) with Row 1. Work for approximately 2.5"/6.5cm, ending with Row 1. You will now work the waist shaping, if desired. (Other options include eliminating the shaping entirely or going downa needle sizefor the next few inches.) Waist shaping is accomplished as follows: Two lace panels oneachside of the sweater will decrease into one panel through the decreases, and back up to two panels during the increases. The side markers will be after stitch 4 of the single lace repeat during the smallest part of the waist, and return to their original placement by the end of the increases. If you wish to mark the four lace repeats involved in the waist shaping (one on either side of each side marker), do so now. Follow the written instructions or the charts for the waist shaping as desired. First decrease row (Row 2 of gull lace pattern): K1, K2tog, K1, YO, SSK, K1, work in lace pattern as established until last 7 sts before marker, K1, K2tog, YO, K1, SSK, K1, sm, K1, K2tog, K1,YO, SSK, K1 work in lace pattern as established until last 7 sts before marker, K1, K2tog, YO, Kl, SSK, K1. Four sts have been decreased by omitting 4 YOs. The original 14 sts on each side of the sweaterarenow12. K one round even. Second decrease row (Row 4 of gull lace pattern): K2tog, K2, YO, SSK, work in lace pattern as established until last 6 sts before marker, K2tog, YO, K2, SSK, sm, K2tog, K2, YO, SSK, work in lace pattern as established until last 6 sts before marker, K2tog, YO, K2, SSK. Four additional sts decreased by omitting YOs. Original 14 sts on each sideof sweater are now10. K one round even. Third decrease row (Row 2 of gull lace pattern): K2tog, YO, SSK, K1, work in lace pattern as established until last 5 sts before the marker, K1, K2tog, YO, SSK, remove marker, K2tog, pass previous stitch over (3 sts total decreased this side), replace marker, YO, SSK, K1, work in lace patternas establisheduntillast5stsbefore marker, K1, K2tog, YO, SSK, remove marker, slip last stitch over 1st stitch of round, replace marker. 6 additional sts decreased. You have now eliminated one full lace repeat, or 7 stitches, from each side of the garment. K one round even. The round and side markers are now located after stitch 4 in the 7-stitch repeat. Continue even inlace as established for approximately 1"/2.5cm, ending with Row 1. You will now work the bust increases, increasing one gull lace repeat on each side of the garment until you have the original two lace repeats between the shaping markers. At the end of the increases, the side markers will be between lace repeats, just as at the beginning of the pattern.
First increase row (Row 2 of gull lace pattern): M1,YO,SSK, K1,work lace pattern as established until last 4 sts before marker, K1, K2tog, YO, M1, K1, sm, M1, YO, SSK, K1, work lace pattern as normal until last 4 sts before marker, K1, K2tog, YO, M1, K1. You have added 2 sts to each side of the garment. K one round even. Second increase row (Row 4 of gull lace pattern): K1, YO, K1, YO, SSK, work in lace as established until 5 sts before marker, K2tog, YO, K2, YO, K1, sm, K1, YO, K1, YO, SSK, work in lace as established until 5 sts before marker, K2tog, YO, K2, YO, K1. You have added 2 sts to each side of the garment by adding YOs without corresponding decreases. Third increase row (Row 1 of gull lace pattern): K2, kfb, K to marker, sm, K2, kfb, K to end. 2 sts increased on a “rest" row of the lace pattern. Fourth increase row (Row 2 of gull lace pattern): K2, YO, K1, YO, SSK, K1, work in lace as established until 6 sts before marker, K1, K2tog, YO, K1, YO, K2, Sm, K2, YO, K1, YO, SSK, K1, work in lace as established until last 6 sts, K1, K2tog, YO, Kl, YO, K2. You are now back to your original number of stitches: 140 (154, 168, 182, 196, 210). Your side markers should also be back in their original position between two lace repeats. Continue working the lace pattern as established in the round until the piece measures 13 (13, 13.5, 13.25, 13.25, 13.5)" / 33 (33, 34, 34, 34, 34) cm from CO edge.
LEFT FRONT
Shape Scoop Neck: Work as established in lace pattern for 28 (31, 35, 38, 42, 45) sts. Turn work, and place rem sts on a holder. You will be shaping the left front scoop neck and armhole shaping flat.
P 1 row even.
Continue in lace pattern as established (now using instructions for knitting flat), decreasing 1 stitch at neck edge every RS row 10 times, then every 4th row 5 (6, 4, 6, 8, 9) times, and at the same time, when piece measures 14 (14, 14.5, 14.25, 14.25, 14.5)" / 36 (36, 37, 36, 36, 37) cm from CO edge, shape armhole: Armhole shaping (RS row): BO 4 (4, 4, 4, 4, 5) sts. At the beginning of next RS row, BO 0 (O, 0, 2, 4, 5) sts (if the number is zero, omit this row). Then dec 1 st at armhole edge every RS row 2 (4, 7, 6, 6, 6) times. 7 (7, 10, 10, 10, 10) sts remain. Continue working straight in lace pattern as established until armhole measures 7.25 (7.75, 8.75, 9.25, 9.5, 9.75)" /18 (20, 22, 23, 24, 25) cm, ending with a WS row. Shape shoulder: B0 4 (4, 5, 5, 5, 5) sts and work to end of row. P one row even. BO remaining 3 (3, 5, 5, 5, 5) sts.
RIGHT FRONT
Re-join yarn to RS of work. BO 14 (15, 14, 15, 14, 15) sts, then work in established lace pattern on the remaining 28 (31, 35, 38, 42, 45) sts before side marker. Leave remaining sts on holder for back. P 1 row even. Continue in lace pattern as established, decreasing 1 st at neck edge every RS row 10 times, then every 4th row 5 (6, 4, 6, 8, 9) times, and at the same time, when piece measures 14 (14,14.5,14.25,14.25,14.5)" / 36 (36, 37, 36, 36, 37) cm from CO edge, shape armhole: Armhole shaping (WS row): BO 4 (4, 4, 4, 4, 5) sts. At the beginning of next WS row, BO 0 (O, 0, 2, 4, 5) sts (if the number is zero, omit this row). Then decrease 1 stitch at armhole edge every RS row 2 (4,7,6,6, 6) times.7 (7, 10, 10,10, 10) sts remain. Continue working straight in lace pattern as established until armhole measures 7.25 (7.75, 8.75, 9.25, 9.5, 9.75)" / 18 (20, 22, 23, 24, 25) cm, ending with a RS row. Shape shoulder: B0 4 (4, 5, 5, 5, 5) sts and work to end of row. Work one row even in lace pattern as established. B0 remaining 3 (3, 5, 5, 5, 5) sts.
BACK
Re-join yarn to RS of held sts and work even in lace pattern as established until piece measures 14 (14, 14.5, 14.25, 14.25, 14.5)" / 36 (36, 37,36, 36, 37) cm from CO edge, ending with a WS row. Shape armholes: B0 4 (4, 4, 4, 4, 5) sts at the beginning of the next two rows. BO 0 (0, 0, 2, 4, 5) sts at the beginning of the following two rows (if the number is zero, omit these rows). Then, decrease 1 stitch at each armhole edge every RS row 2 (4, 7, 6, 6, 6) times: 58 (61, 62, 67, 70, 73) sts remain. Continue even inlace as established until armhole measures 5.25 (5.75, 6.75, 6.75, 7, 7.25)" / 13 (15, 17, 17, 18, 18) cm, ending with a WSrow. Shape back neck: Continue in lace pattern as established for 13 (13, 16, 18, 17, 18) sts, BO center 32 (35,30,31,36,37) sts,continue in lace pattern for remaining 13 (13, 16, 18, 17,18) sts. Place R shoulder/neck sts on holder and turn work. P 1 row even. Working in lace pattern as established, decrease 1 stitch on neck edge every RS row 6 (6, 6, 8, 7, 8) times. Continue even until L shoulder sts match front to shoulder shaping, ending with a RS row. Shape left shoulder: B0 4 (4, 5, 5, 5, 5) and work to end of row. Work one row even in lace pattern as established. B0 remaining 3 (3, 5, 5, 5, 5) sts. Shape right shoulder: Join yarn to WS of remaining shoulder/neck sts and P one row even. Working in lace pattern as established, decrease 1 stitch on neck edge every RS row 6 (6, 6, 8, 7, 8) times. Continue even until L shoulder sts match front to shoulder shaping, ending with a WS row. BO 4 (4, 5, 5, 5, 5) sts and work to end of row. P 1 row even. B0 remaining 3 (3, 5, 5, 5, 5) sts.
SLEEVES (make 2)
CO 42 (49, 56, 63, 63, 70) sts and work in garter stitch for 2" / 5cm. Change to gull lace pattern and work even until sleeve measures 11 (11.5, 12, 12, 12, 12.5)" / 28 (29, 30, 30, 30, 32, 0) cm from CO edge. NOTE: Toaccommodate the odd number of stitches in the gull lace pattern, some of the sleeve caps have a decrease on only one side of the cap. This will be noted with a superscript "R"(right side) or "L"(left side). Thus, if sleeve cap shaping includes the symbol 1R, it means one decrease on the right side only. Shape sleeve cap: BO 4 (4, 4, 4, 4, 5) at beginning of next 2 rows. Decrease one stitch at each side of every 2 rows 2 (5, 4,7, 3, 3) times, then every 4 rows 5 (2, 1, 0, 2, 1) times, every 6 rows 1R (3, 4, 4, 5, 5) times, every 4 rows 0 (0, 0, 1, 0, 2) times, every 2 rows 0(1, 0, 1L, 1l, 0) times. Size 3XL only: Decrease 1 stitch at each end of nextrow. All sizes: Work 7 (0, 5, 0, 2, 0) rows even. BO 3 (3, 4, 4, 5, 5) sts at the beginning of the next 4 rows. BO final 7 (7, 14, 14, 14, 14) sts.
FINISHING
Pin and sew shoulder seams. Pin and sew in sleeves. Sew arm and side seams. Scoop neck: With RS facing and beginning at right shoulder seam, pick up and K 10 (10, 10, 12, 12, 13) sts along right back neck, pm, pick up and K 32 (35, 30, 31, 36, 37) sts along center back, pm, pick up and K 10 (10, 10,12,12, 13) sts along left back neck and then 37 (41, 44, 46, 49, 50) sts along left front neck, placing markers at sts 19 (23, 26, 28, 31, 32) and sts 27 (31, 34, 36, 39, 40), pm after left front neck sts, pick up and K 14 (15, 14, 15, 14, 15) sts along center front neck, pm, pick up and K 37 (41, 44, 46, 49, 50) sts along right front neck, placing markers at sts 10 (all sizes) and 18 (all sizes).
You now have 140 (152, 152, 162, 172, 178) neck stitches and 8 markers placed for decreases. Work in garter stitch for 1.5 inches, decreasing 4 sts every RS row as follows. (The sts must be decreased in multiple places to ensure a smooth scoopneck.) Next round (RS): K to 2 sts before first back neck marker, SSK, sm, K to 2nd back neck marker, sm, K2tog, K to 2 sts before first center-neck marker (the 3rd marker on the front), SSK, sm, K tocenter-neck marker (the 4th marker on the front), sm, K2tog, K to end of the round. K 1 wS round even. Repeat decrease round twice more. After these threedecreaserounds removecenterneck markers. You now have two markers on the back of thesweaterand4markersonthefront. Next round (RS): K to 2 sts before first back marker, SSK, sm, K to 2nd back neck marker, sm, K2tog, K to 2 sts before first front marker, SSK, sm, K to last front marker, sm, K2tog, K to end.
K 1 wS round even.
Next round (RS): K to 2 sts before first back marker, SSK, sm, K to 2nd back neck marker, sm, K2tog, K to 2 sts before second front marker, SSK, sm, K to third front marker, sm, K2tog, K to end. K 1 wS round even. Repeat these 4 rows, decreasing 4 sts per decrease row and alternating the placement of the front decreases, until neckline measures $1.5^{\prime\prime}\,/$ 4cm. BO all sts. Sew seam of garter sts at right shoulder seam. Block sweater to finished measurements.
SCHEMATIC
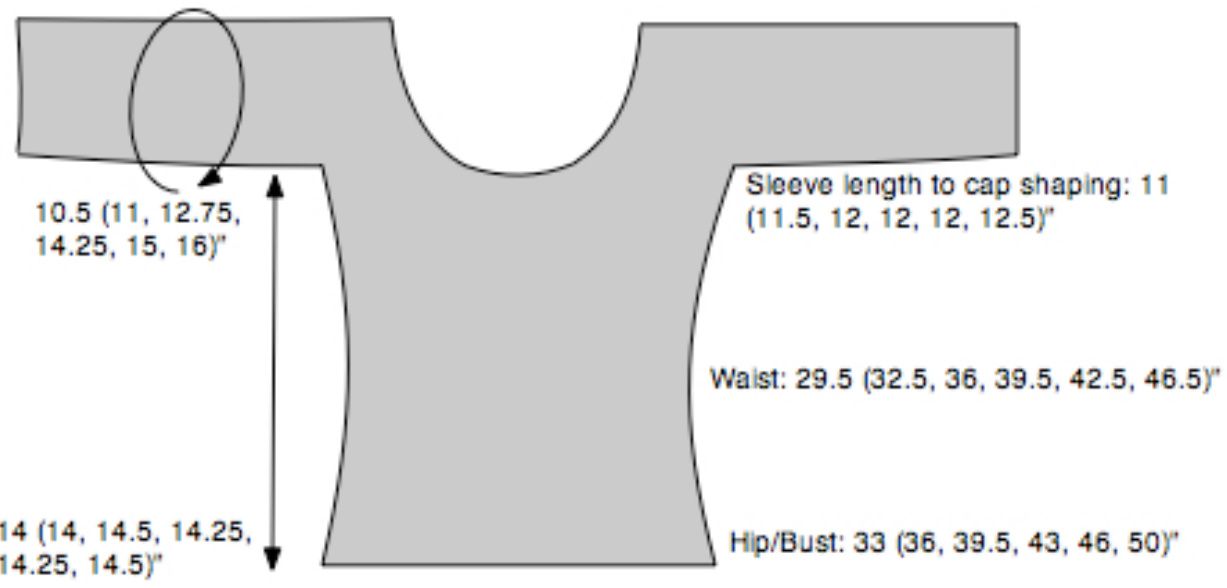
Sleeve cap height measures 5.8 (6.2, 6.4, 7, 7.4, 7.7)"
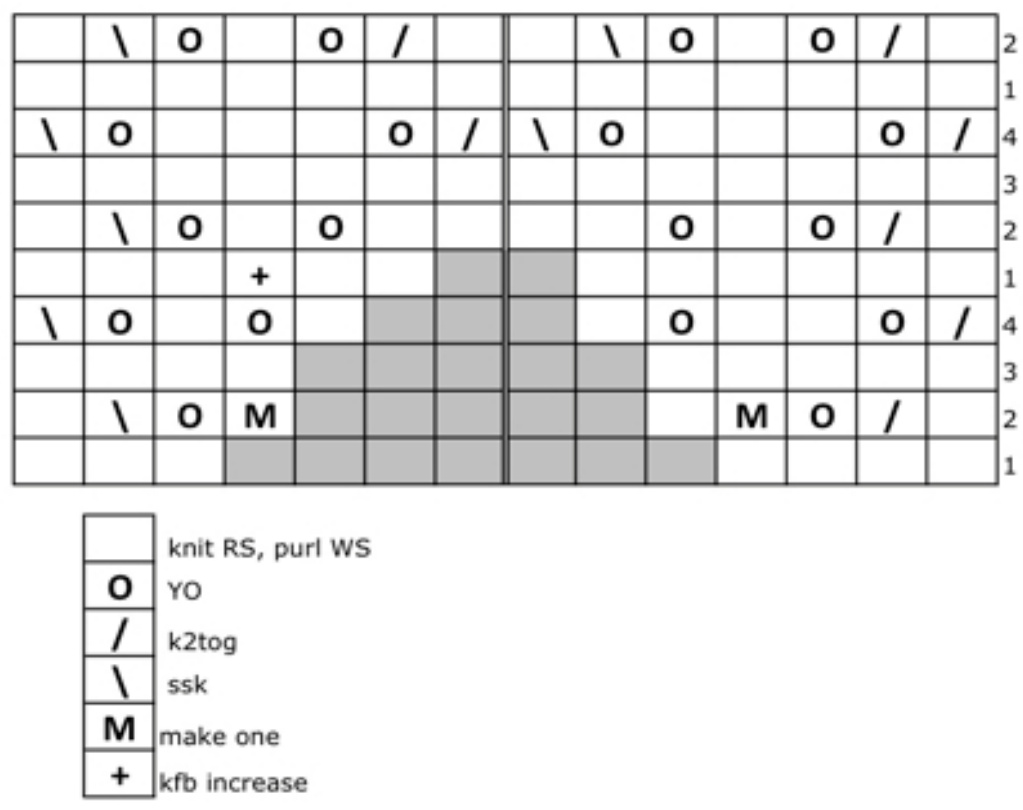
LACE CHARTS
In all charts, grayed out boxes are stitches that have been eliminated. Basic gull lace pattern:
Waist decrease chart:
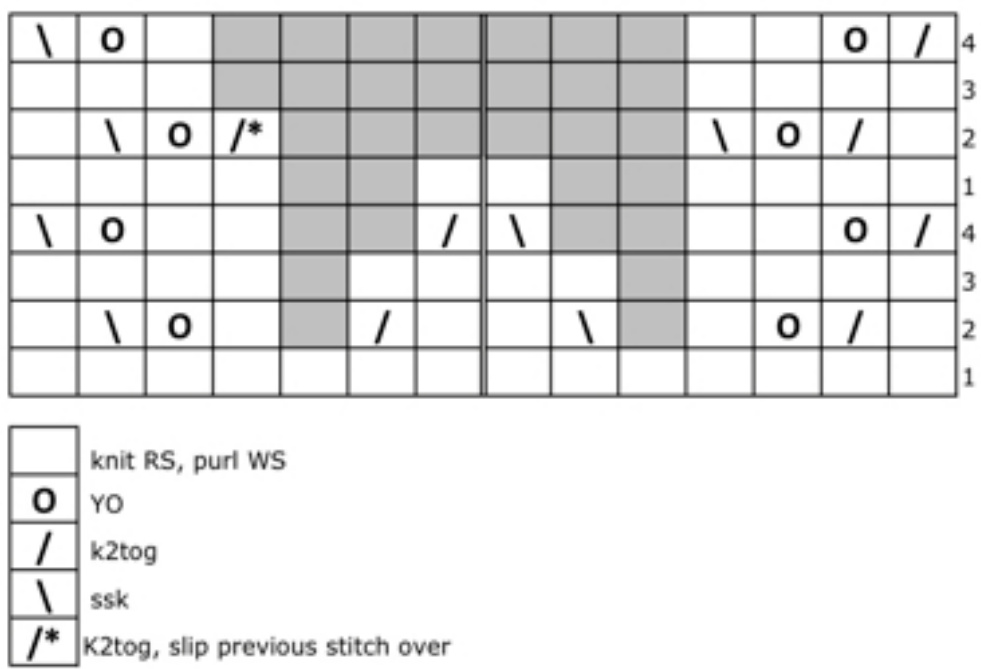
Waist increase chart: