Atalanta
Introduction
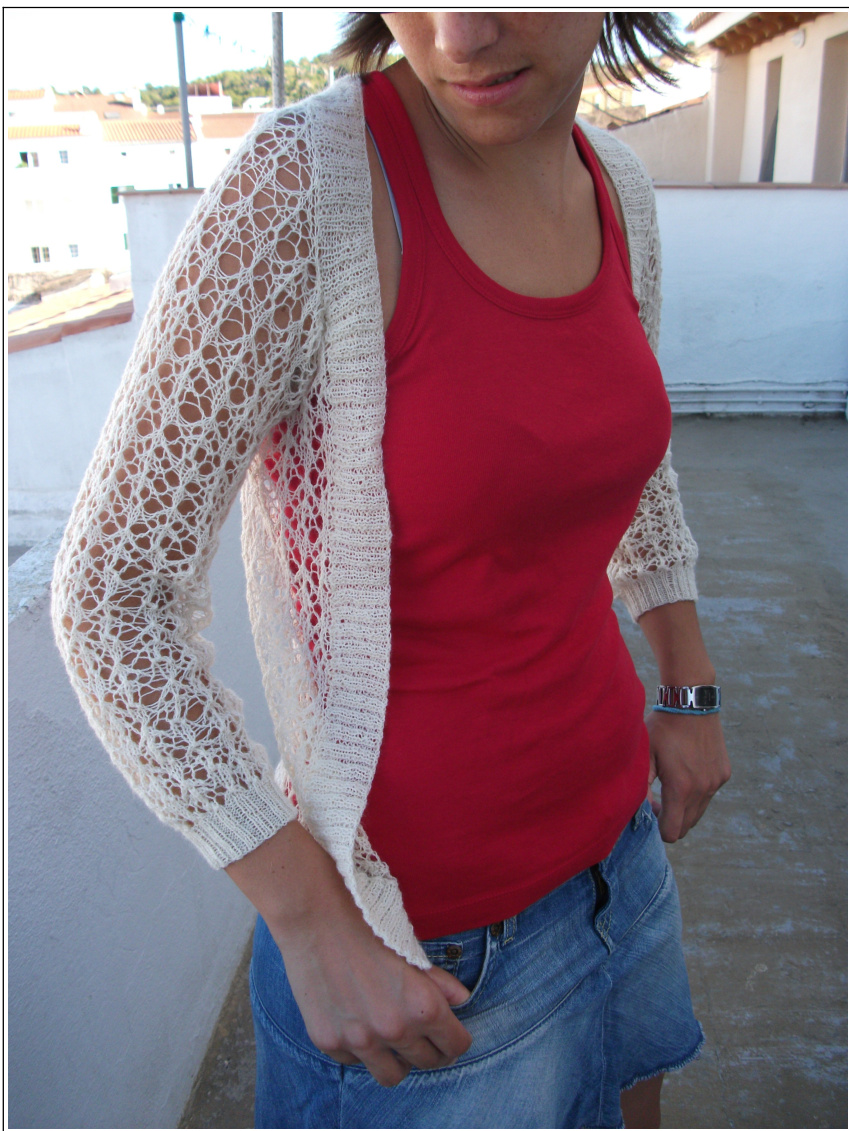
I had a beautiful skein of handspun lace yarn that I treasured. It had been my first success at natural dyeing and I wanted to knit it into something very special so I designed a jacket for that skein. To accommodate to the amount of yarn I had available, I decided to go without front panels, only sleeves, back, and a ribbed collar that would help keep the jacket in its place and not falling off the shoulders. The result was a light, easy to wear, girly, but not too girly garment. This is its evolved version. I named it after mitologic hero Atalanta, great hunter and archer, who later was turned into one of the lions that pull Cybele's chariot.
Materials
Teetee elegant ( $70\%$ wool, $30\%$ sillk, $50\mathrm{g}/\,500\mathrm{m})$ , 2 (2, 2, 2, 2, 2, 3) skeins. Each size uses about 600 (650, 700, 760, 850, 940, 1020) metres 0f yarn. $2.5\;\mathrm{mm}$ circular needle $3.5\;\mathrm{mm}$ circular needle $4.5\;\mathrm{mm}$ needle $2.5\;\mathrm{mm}$ set of 5 double pointed needles $3.5\;\mathrm{mm}$ set of 5 double pointed needles Tapestry needle 2 stitch markers
Gauge
With $3.5\;\mathrm{mm}$ needles and lace pattern: 16 stitches and 28 rows make a square of $10\mathrm{x}10\;\mathrm{cm}$ after blocking. With $2.5\;\mathrm{mm}$ needles and $2\mathbf{x}2$ ribbing stitch: 32 stitches and 50 rows make a square of $10\mathrm{x}10\;\mathrm{cm}$ after blocking. It is highly recommendable to check gauge. Seriously.
Sizes
Directions are given in 7 sizes, the smallest is given before the brackets and the other 6 inside: XS (S, M, L, XL, XXL, XXXL). Each size corresponds to the following body measurements in cm (left) and inches (right):
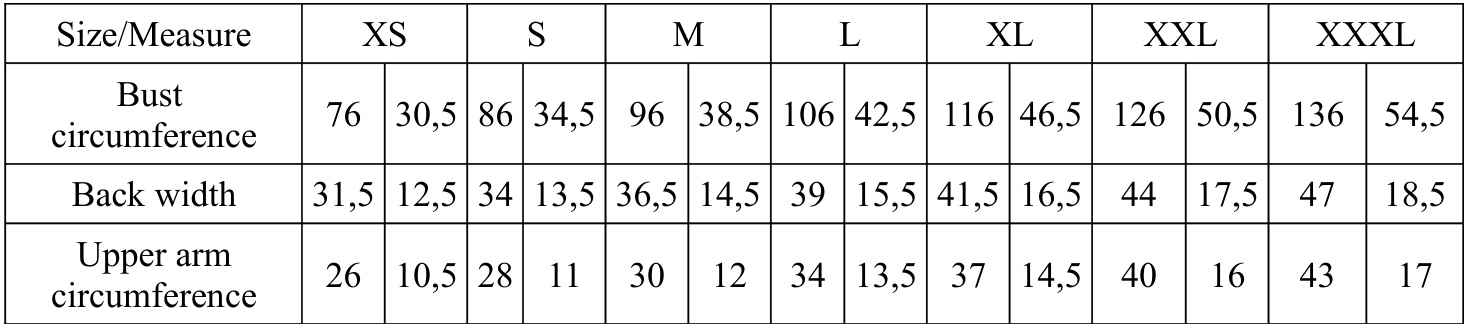
When choosing your size, keep in mind that this cardigan was designed to be worn over a sleeve less tee or sun dress, and has no ease, so if you want to wear it over a long sleeved tee or would like it to have more ease, choose a bigger size than usual. On the other hand, as it is not fastened, if your bust measurement doesn't match your back and top arm measurements, base your size choice on the latter ones.
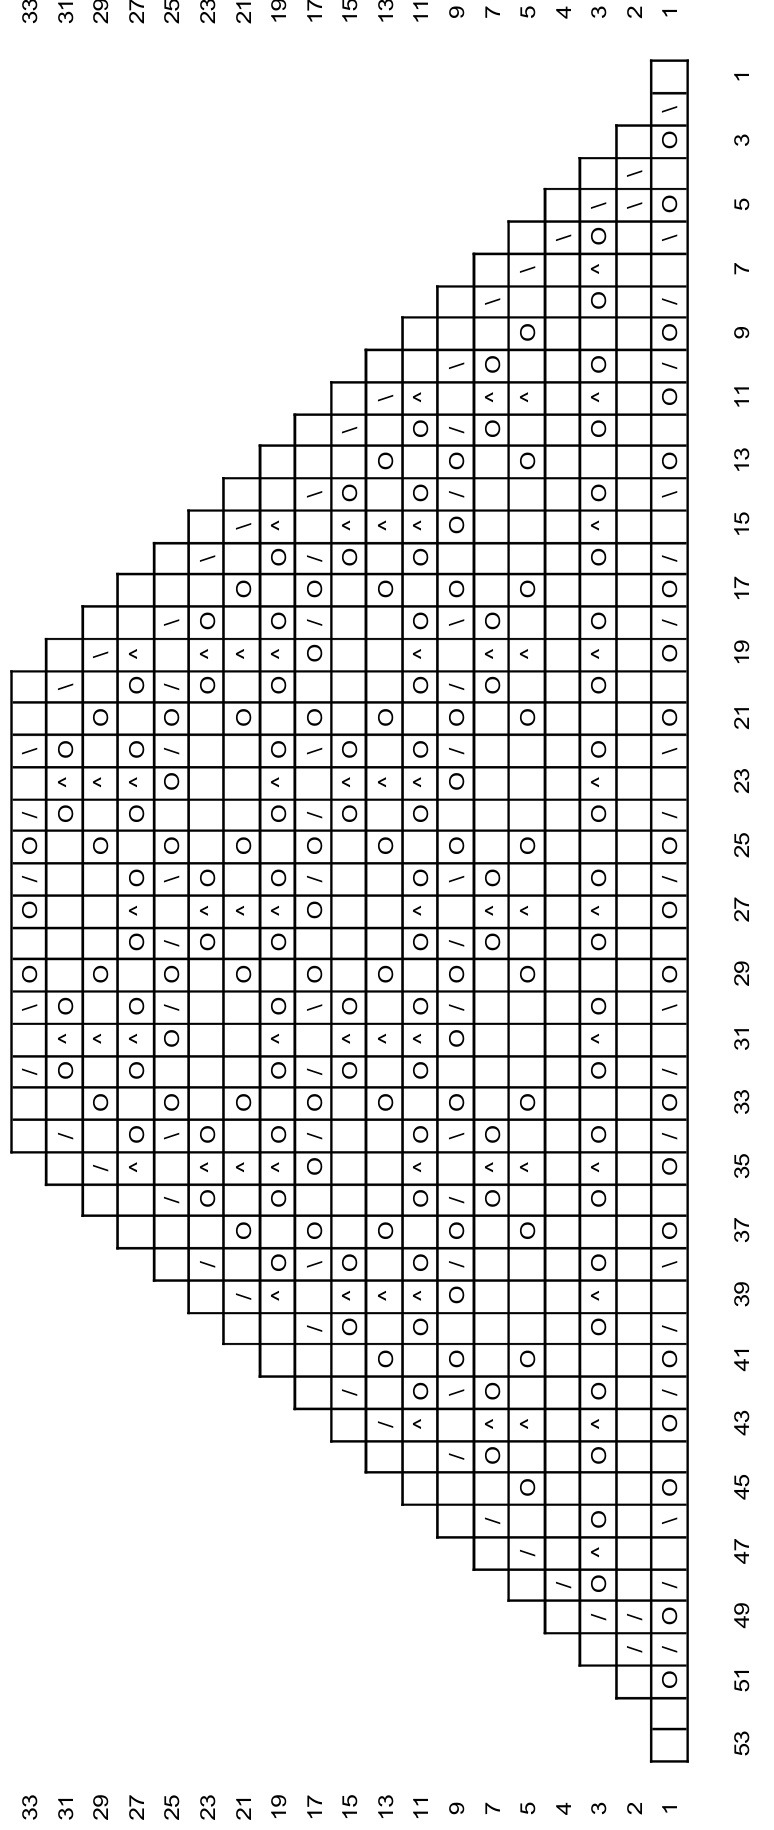
The charts
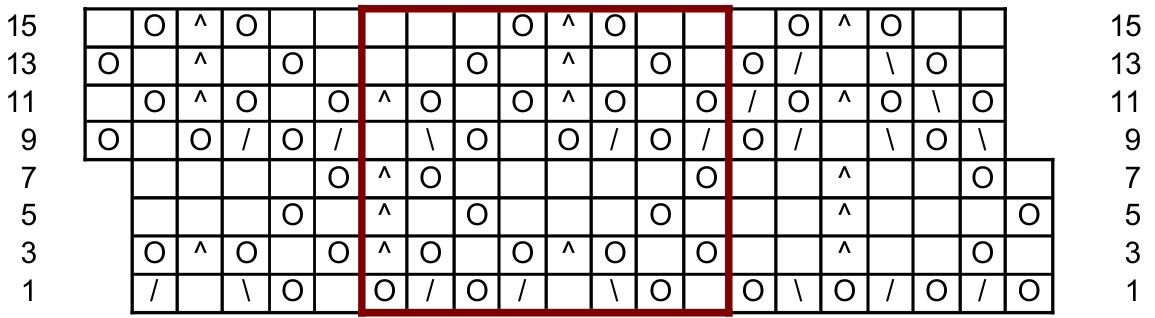
The directions for the lace pattern are given in charted form. For a more easy reading of the pattern and following of the chosen size, they are given at the end of the file, arranged by size. Only odd numbered rows are displayed in the charts. On even numbered rows purl all stitches if working flat and knit all stitches if working in the round. Most of them are made of 3 sections: 2 sets of edge stitches to be worked at the beginning and end of the row and the lace pattern repeat itself, to be worked in between. The pattern repeat is highlighted in red. For each size, the corresponding set of charts occupies two pages, so you don't need to print the full file, you can choose to print only the written directions and the pages that contain the charts you need.
Legend
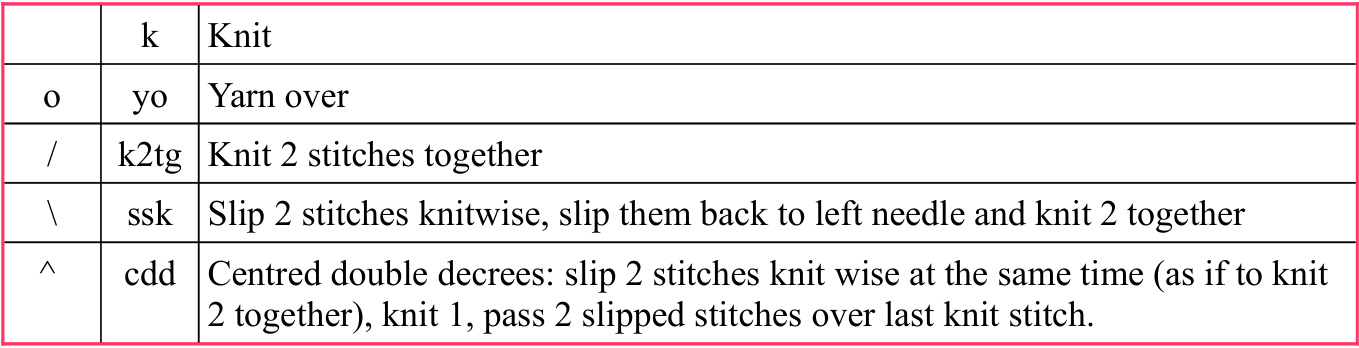
Abbreviations
k: knit p: purl st: stitch sts: stitches slm: slip marker k2tg: knit 2 stitches together p2tg: purl 2 stitches together kfb: make one stitch by knitting through the front and back loop of the stitch.
Directions
Body
The body is worked flat. Cast on 182 (198, 214, 230, 252, 276, 292) stitches on $3.5\;\mathrm{mm}$ needles. Switch to $2.5\;\mathrm{mm}$ needles and work as follows: Row 1: k2 (k2, k2, k2, k3, k3, k3), p2, [k2, p2], repeat what's in brackets until you have 2 (2, 2, 2, 3, 3, 3) sts left, k to end. Row 2: p2 (p2, p2, p2, p3, p3, p3), k2, [p2, k2], repeat what's in brackets until you have 2 (2, 2, 2, 3, 3, 3) sts left, p to end. Repeat last 2 rows until piece measures 4 cm (20 rows total). Switch to $3.5\;\mathrm{mm}$ needles and work next row as follows: k2 (k2, k2, k2, k3, k3, k3), [k2tg], repeat what's in brackets until 2 (2, 2, 2, 3, 3, 3) sts are left, $\mathrm{k}$ to end. You have 93 (101, 109, 117, 129, 141, 149) stitches on your needle. Next row (wrong side row), purl all stitches and begin with row 1 of chart 1.
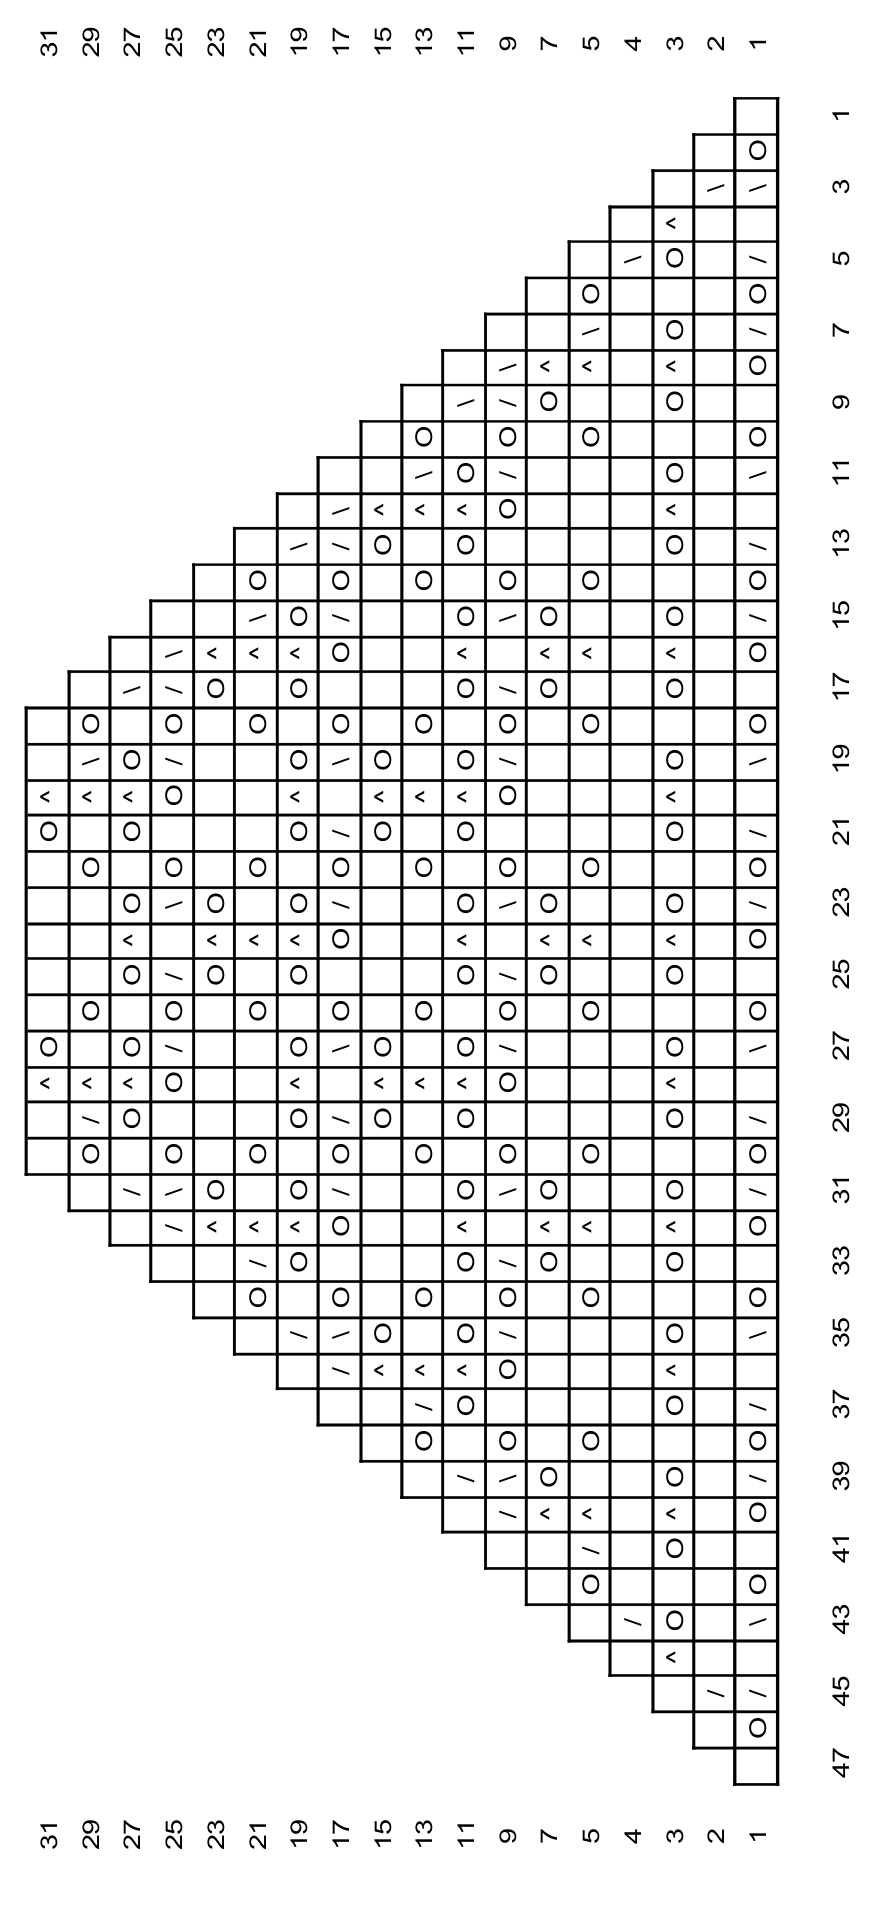
Chart 1
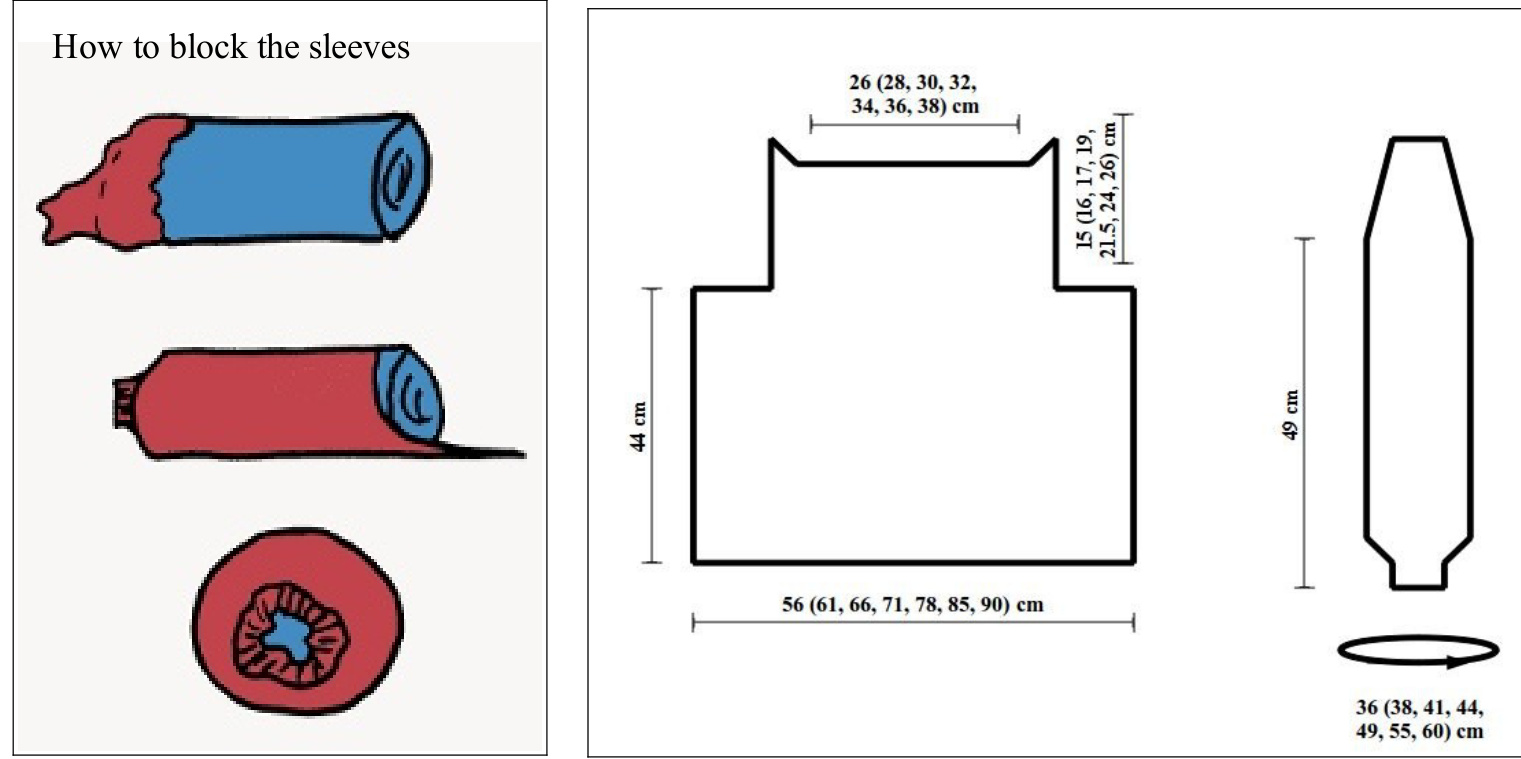
Repeat all rows in chart 1 until piece measures 36 cm unstretched (7 repeats) for an approximated final length of $44\;\mathrm{cm}$ .Finish with row 15. At the beginning of next 2 rows, bind off 19 (21, 23, 25, 29, 33, 35) sts very loosely (use $4.5\;\mathrm{mm}$ needles). Pick up again $3.5\;\mathrm{mm}$ needles. Switch to chart 2.
Chart 2
You already have one stitch on right needle, that will be the first stitch on row 1. Work this chart once. Finish with a wrong side row. Go to directions for chart 3.
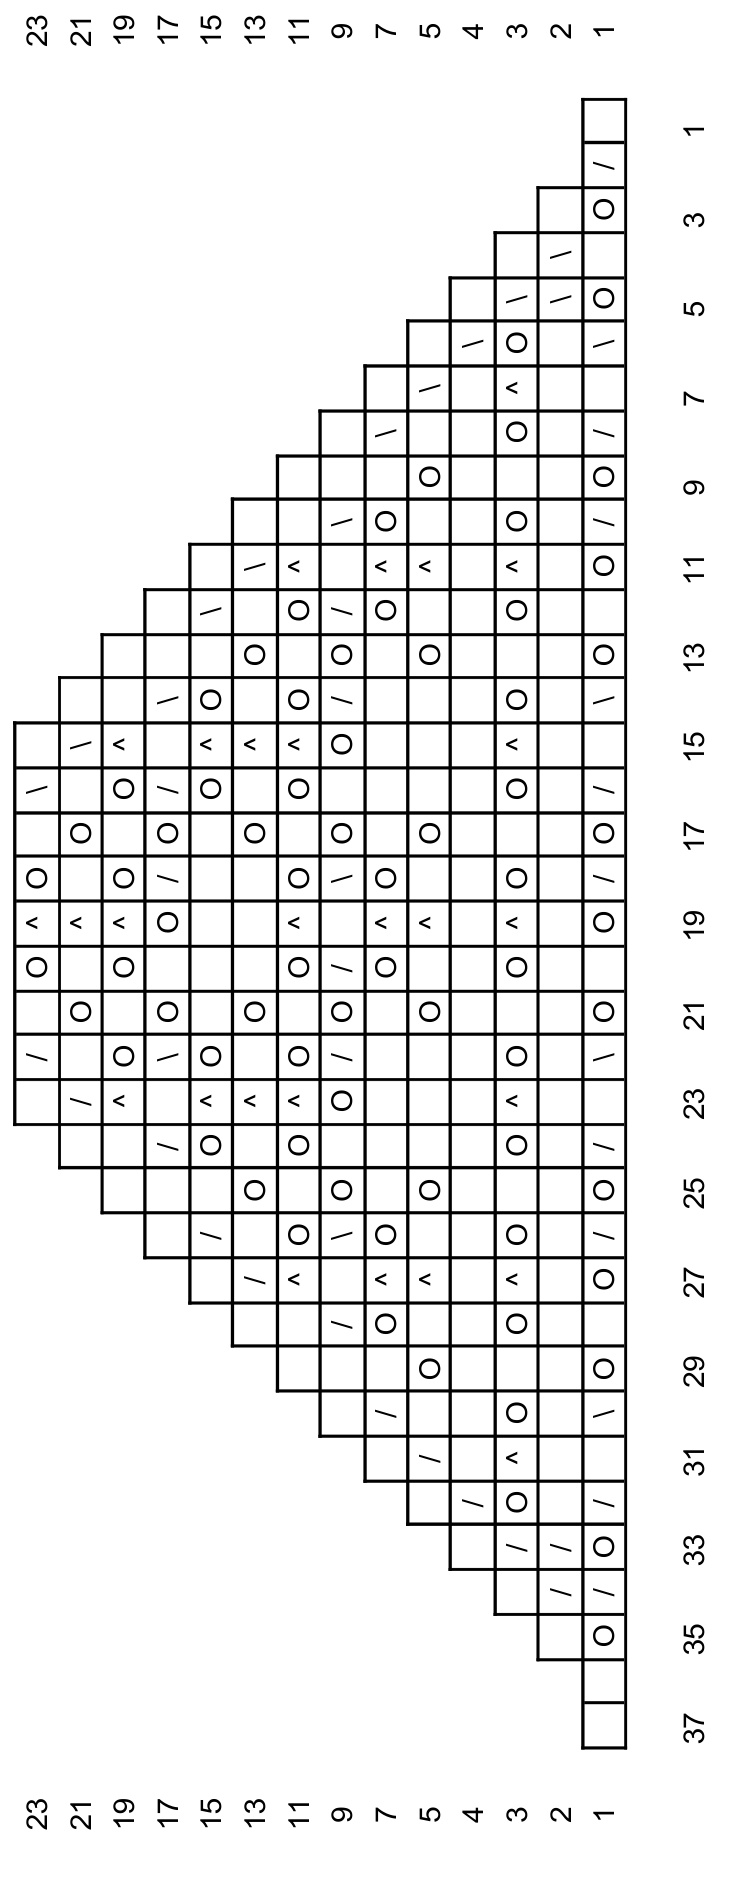
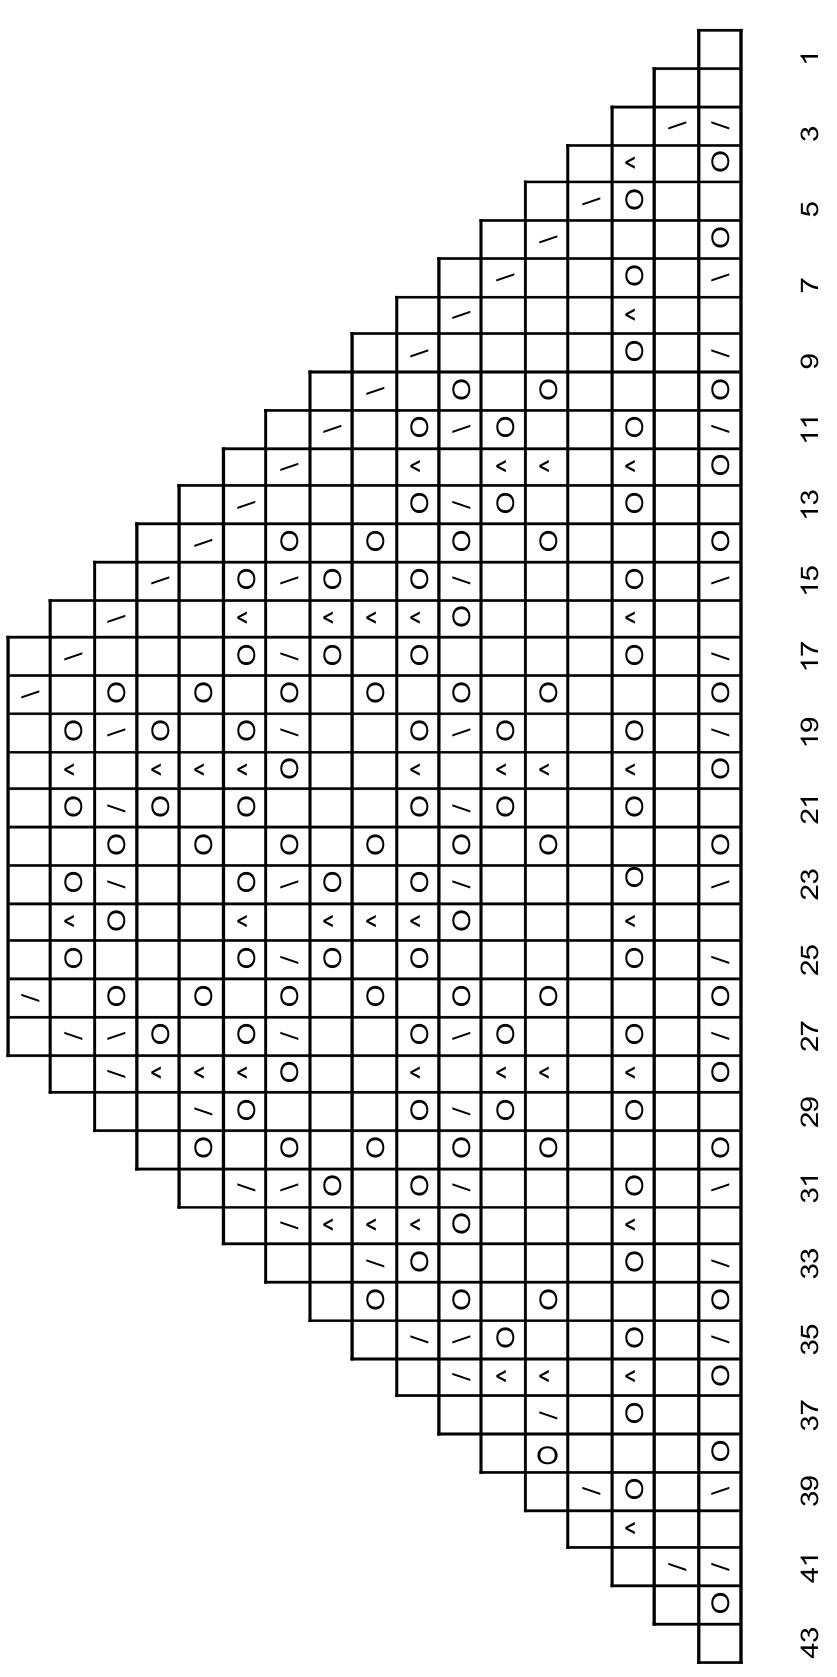
Chart 3
Continue with row number 7 of chart 3, and work according to chart until the end of it. Work from row 1 to row 5 (5, 7, 9, 13, 15, 1 of next repeat). End with a wrong side row. Work 8 (9, 10, 11, 11, 12, 13) first stitches of next row according to chart, then bind off 35 (37, 39, 41, 45, 47, 49) centre stitches, work remaining 7 (8, 9, 10, 10, 11, 12) sts according to chart. Now each side of the back will be finished separately.
Left side:
Row 1: p until 4 (4, 4, 6, 6, 6, 4) sts are left, p2tg 2 (2, 2, 3, 3, 3, 2) times (6 (7, 8, 8, 8, 9, 11) sts). Row 2: k2tg 2 (2, 2, 2, 2, 1, 1) times, k to end (4 (5, 6, 6, 6, 8, 10) sts). Row 3: p until 4 (4, 4, 2, 2, 2, 2) sts are left, $\mathrm{p}2\mathrm{tg}\,2\,(2,2,1,1,1,1)$ times, (2 (3, 4, 5, 5, 7, 9) sts) . $\mathrm{Row}\,4;\,\mathrm{k}2\mathrm{tg}\,1\,(1,2,1,1,1,1)$ times, k to end (1 (2, 2, 4, 4, 6, 8) sts). Size XS only: bind off remaining stitch and go to directions for right side. Row 5: p until 2 sts are left, $\mathrm{p}2\mathrm{tg}\left(0\left(1,1,3,3,5,7\right)\right.$ sts). Sizes S and M only: bind off remaining stitch and go to directions for right side. Row 6: k2tg, k to end, $\left(0\,(0,0,2,2,4,6\right)$ sts). Row 7: p until 2 sts are left, p2tg, $\left(0\left(0,0,1,1,3,5\right)\right.$ sts). Sizes L and XL only: bind off remaining stitch and go to directions for right side. Row 8: k2tg, k to end $\left(0\thinspace(0,0,0,0,2,4)\right.$ sts). Row 9: p until 2 sts are left, p2tg, $(0\,(0,\,0,\,0,\,0,\,1,\,3)$ sts). Size XXL only: bind off remaining stitch and go to directions for right side. Row 10: k2tg, k to end (2sts). Row 11: p2tg, bind off remaining stitch.
Right side:
Join yarn at the left end and begin with a wrong side row. Row 1: p2tg 2 (2, 2, 3, 3, 3, 2) times, p to end, (6 (7, 8, 8, 8, 9, 11) sts). Row 2: k until 4 (4, 4, 4, 4, 2, 2) sts are left, $\mathrm{k}2\mathrm{tg}\,2\,(2,2,2,2,1,1)$ times, (4 (5, 6, 6, 6, 8, 10) sts). Row 3: p2tg 2 (2, 2, 1, 1, 1, 1) times, p to end, $(2\,(3,4,5,5,7,9)\,\mathrm{sts})$ Row 4: k until 2 (2, 4, 2, 2, 2, 2) sts are left, $\mathrm{k}2\mathrm{tg}\,1\,(1,2,1,1,1,1)$ times, (1 (2, 2, 4, 4, 6, 8) sts). Size XS only: bind off remaining stitch. The body is complete. Row 5: p2tg, p to end, (0 (1, 1, 3, 3, 5, 7) sts). Sizes S and M only: bind off remaining stitch. The body is complete. Row 6: k until 2 sts are left, k2tg, (0 (0, 0, 2, 2, 4, 6) sts). Row 7: p2tg, p to end, $\left(0\left(0,0,1,1,3,5\right)\right.$ sts). Sizes L and XL only: bind off remaining stitch. The body is complete. Row 8: k until 2 sts are left, k2tg, $\left(0\thinspace(0,\thinspace0,\thinspace0,\thinspace0,\thinspace2,\thinspace4)\right.$ sts). Row 9: p2tg, p to end, $\left(0\left(0,0,0,0,1,3\right)\right.$ sts). Size XXL only: bind off remaining stitch. The body is complete. Row 10: k until 2 sts are left, k2tg (2 sts). Row 11: p2tg, bind off remaining stitch.
Sleeves
Using $3.5\;\mathrm{mm}$ needles, cast on 52 (56, 60, 60, 64, 72, 80) sts. Pick up $2.5\;\mathrm{mm}$ set of 5 double pointed needles and evenly distribute the stitches on 4 of them. Join to knit in the round. Place marker at the beginning of the row. Work in $2\mathbf{x}2$ ribbing stitch (k2, p2) for $3\;\mathrm{cm}$ (about 15 rows). Switch to double pointed $3.5\;\mathrm{mm}$ needles. For sizes XS, S, and M, knit one row and then follow to chart 4. For size L work next row as follows: [k14, kfb] repeat 4 times. You have increased one stitch at the end of every needle (64 sts). Follow to chart 4. For sizes XL, XXL, XXXL work next row as follows: [kfb, k until one st to end of needle, kfb] repeat 4 times. You have increased one stitch at the beginning and one stitch at the end of every needle (72, 80, 88 sts). Follow to chart 4.
Chart 4
It may look as if the upper part of the chart were drifted from the lower part, but that is to avoid having to transfer stitches between first and last needle which might cause the actual knitted motive to drift. Repeat chart 8 times (or as many as you need to reach desired length, bear in mind that this fabric will grow a little after blocking). Now sleeve measures about $40\;\mathrm{{cm}}$ from cast on. End with an odd numbered row.
Underarm
Knit until 10 (11, 12, 15, 15, 15, 20) sts are left to reach end of row. Bind off 19 (21, 23, 25, 29, 33, 35) stitches, 10 (11, 12, 15, 15, 15, 20) belonging to this row and 9 (10, 11, 10, 14, 18, 15) belonging to the next. Sleeves are worked flat from now on. Follow to chart 5.
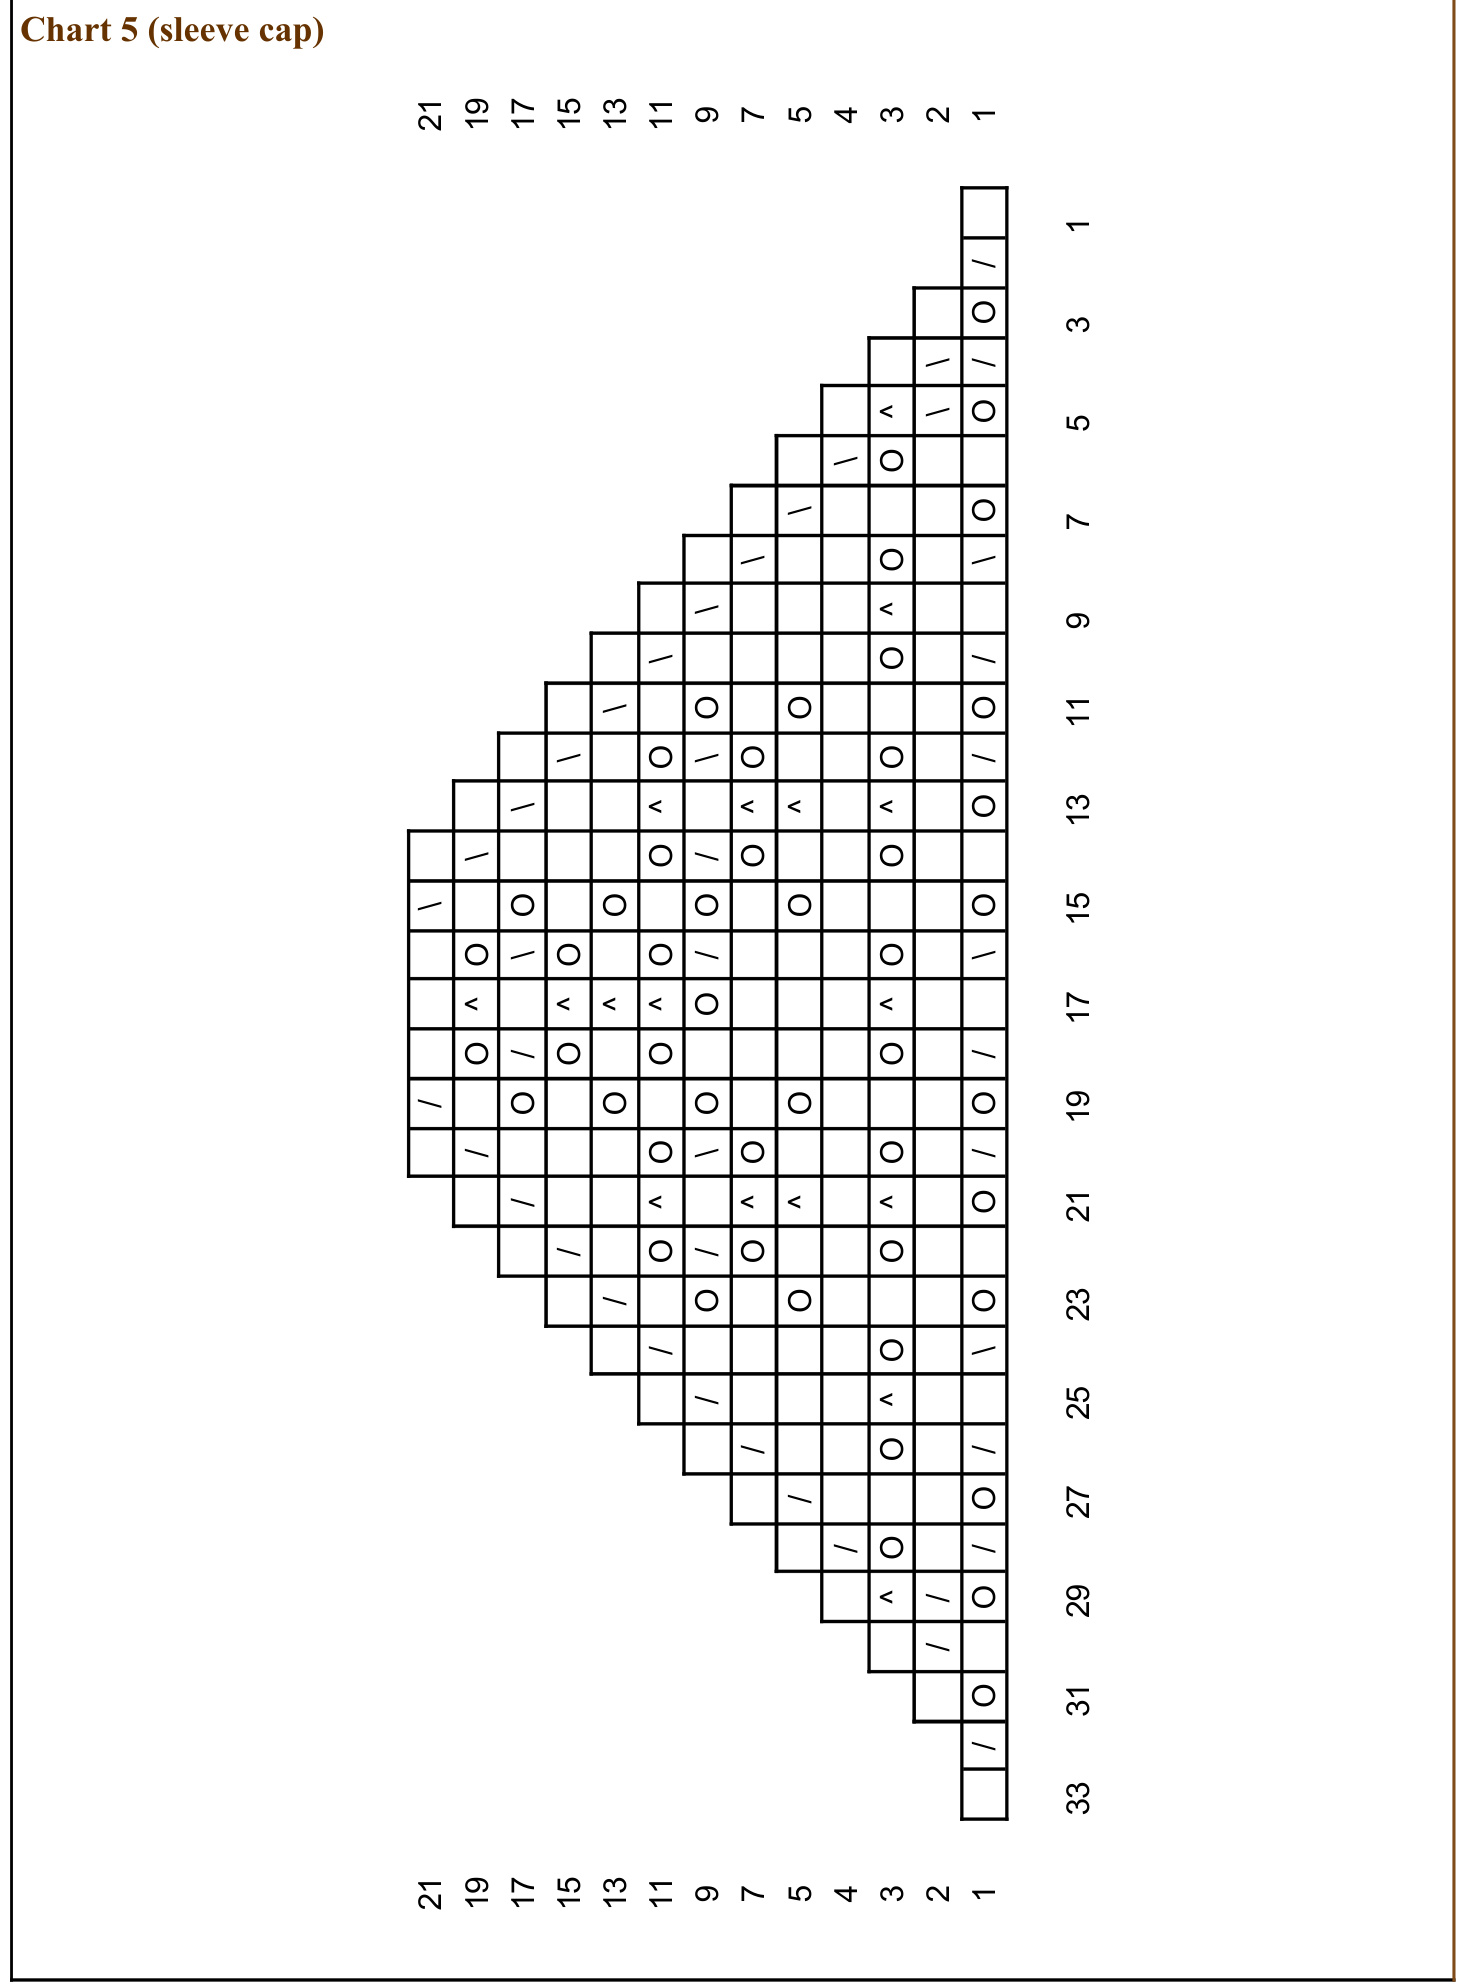
Chart 5
On even numbered rows, purl all stitches. You already have one stitch on your right needle, that will be the first stitch of row 1. Work all rows once. End with a wrong side row and using $4.5\;\mathrm{mm}$ needle, very loosely bind off all remaining stitches.
Finishing
Block body and sleeves. Soak in lukewarm water for 20 minutes. Lay body on a foam mattress or another surface you can sting pins to, stretching to desired measurement. Allow to dry completely before unpinning. To block sleeves, roll a towel so it has a circumference about 8 cm bigger than your upper arm. Put in sleeve, leaving the ribbed cuff out, so It won't stretch. Lay on a foam mattress and pin sleeve cap to desired dimensions. Seam sleeves to body. The section of the body that goes from neck opening to end must be sewn together with sleeve bind off stitches.
Collar
With $2.5\;\mathrm{mm}$ needles, pick up and knit stitches around the edge of the cardigan. The exact number of stitches will depend on your jacket's finished measurements, you may want to make it even and if possible, non divisible by 4. Begin at right lower edge. In order for the fabric not to look either too stretched nor wrinkled, on the ribbing section, pick up one stitch on every row; on the lace section, pick up one stitch on every row 3 times, on $4^{\mathrm{th}}$ row, pick up 2 stitches, repeat this pattern to end. Work in $2\mathbf{x}2$ ribbing pattern (k2, p2) for $3\;\mathrm{cm}$ (about 15 rows). Row 16: work in pattern until you reach the underarm, keep working until you reach next purl stitch, place a marker, p2tg, [k2, p2, k2, p2, k2, p2tg], repeat until you reach next underarm, place marker. Work in pattern to end. Row 17: purl all purl stitches and knit all knit stitches. Row 18: work in pattern until you reach first marker, slm, p1, [k2, p2tg, k2, p2, k2, pl], repeat until you reach next marker, slm. Work in pattern to end. Row 19: purl all purl stitches an knit all knit stitches. Row 20: work in pattern until you reach first marker, slm, p1, [k2, p1, k2, p2tg, k2, p1], repeat until you reach next marker, slm. Work in pattern to end. Row 21: purl all purl stitches, and knit all knit stitches. Using $3.5\;\mathrm{mm}$ needles, loosely bind off all stitches. Block collar slightly by low heat ironing with a wet cloth between the iron and the fabric. Do not stretch the ribbing too much.
Charts for size XS
Chart 1 (body)
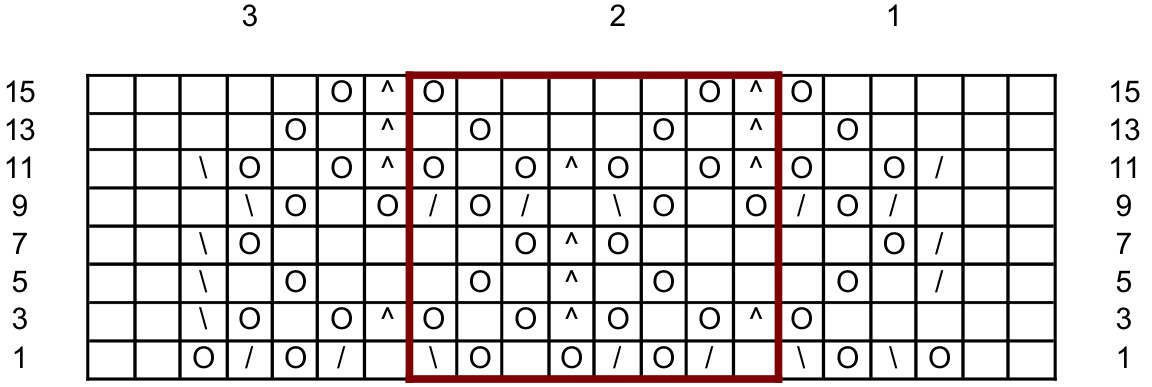
Chart 2 (underarm)

Chart 3 (back)

Chart 4 (sleeves)
Charts for size S
Chart 1 (body)
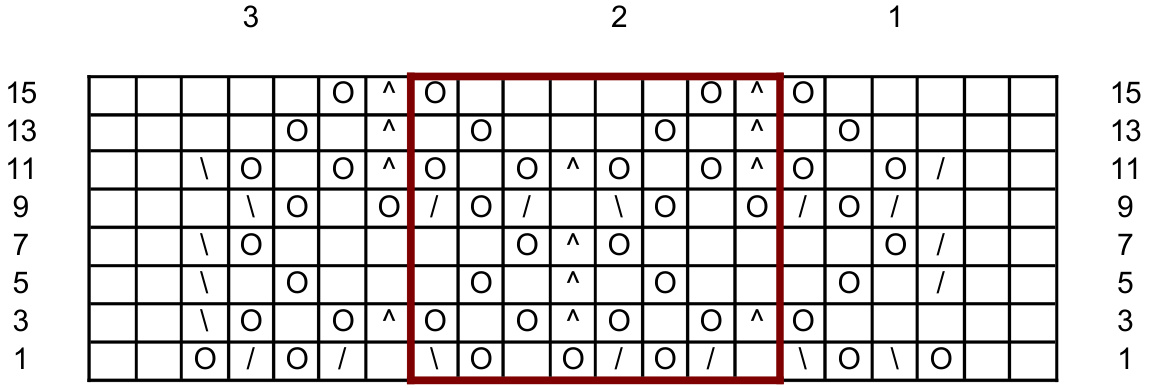
Chart 2 (underarm)

Chart 3 (back)
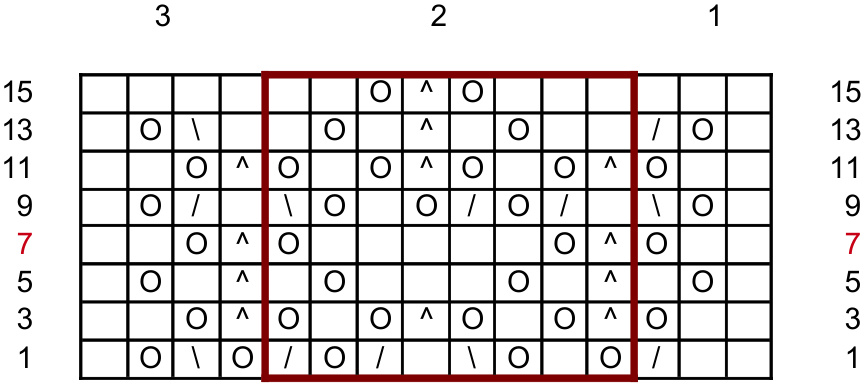
Chart 4 (sleeve)
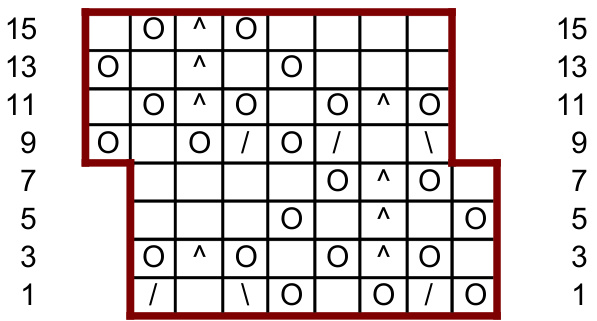
Chart 5 (sleeve cap)

Charts for size M
Chart 1 (body)
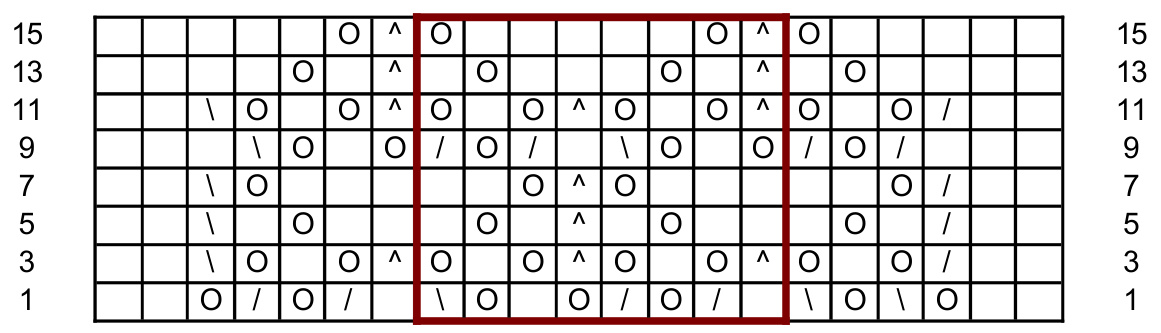
Chart 2 (underarm)

Chart 3 (back)
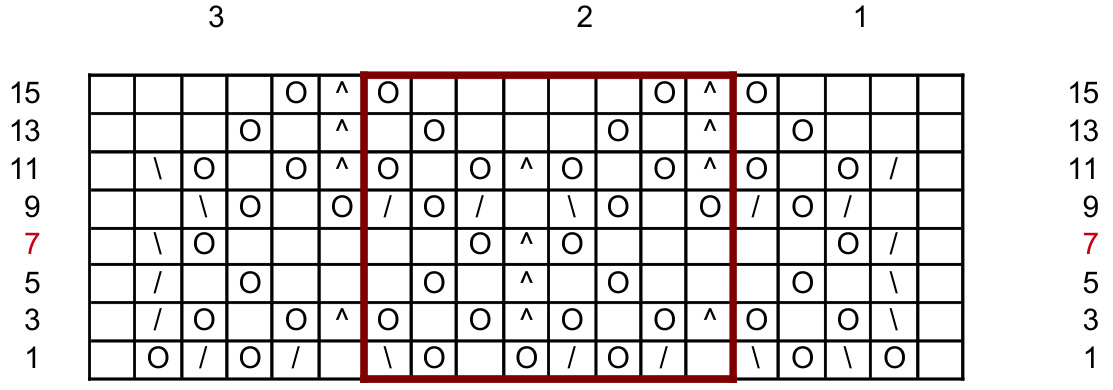
Chart 4 (sleeve)
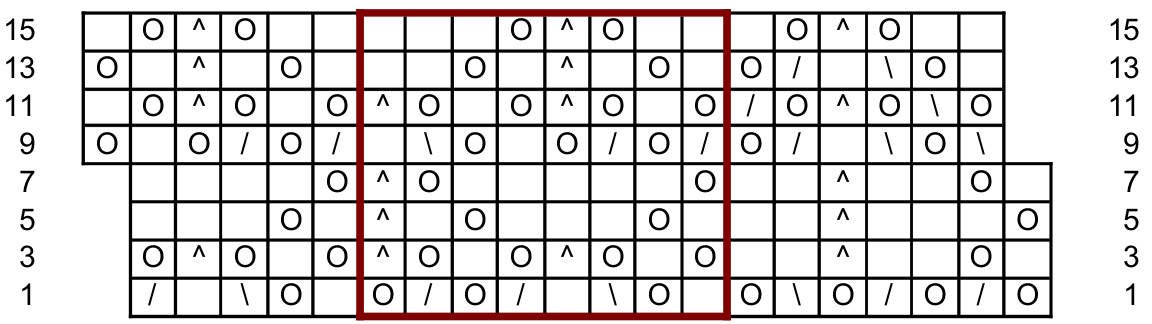
Chart 5 (sleeve cap)
Charts for size L
Chart 1 (body)
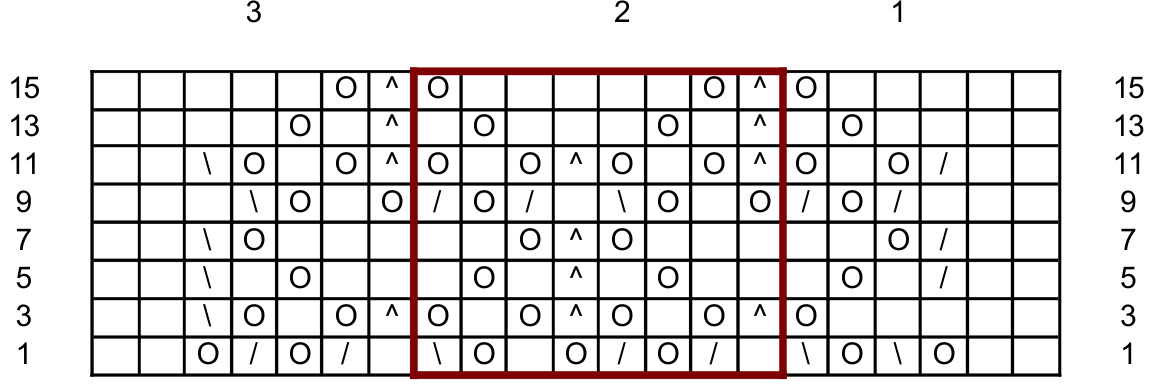
Chart 2 (underarm)

Chart 3 (back)
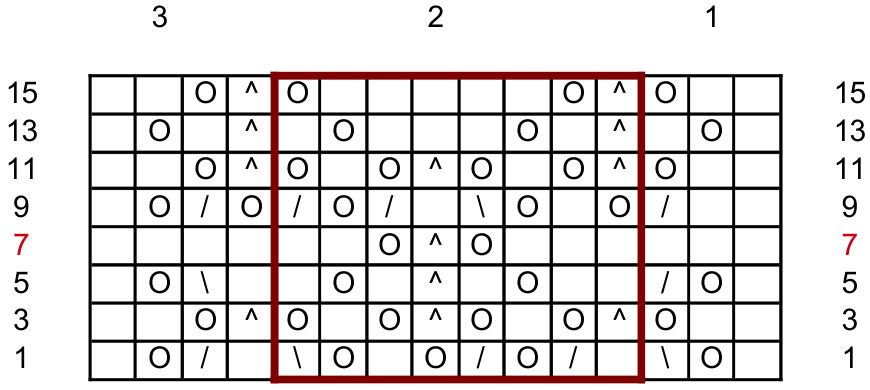
Chart 4 (sleeve)
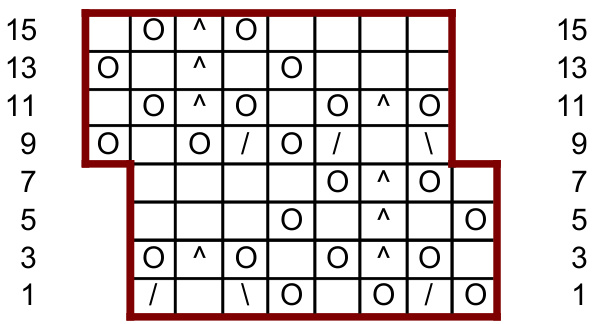
Chart 5 (sleeve cap)
52297531975432

Charts for size XL
Chart 1 (body)
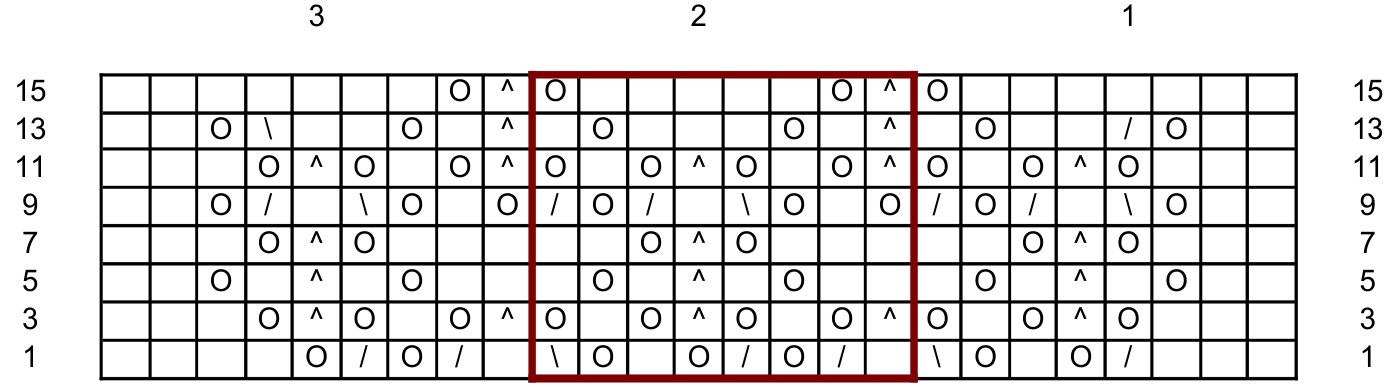
Chart 2 (underarm)

Chart 3 (back)
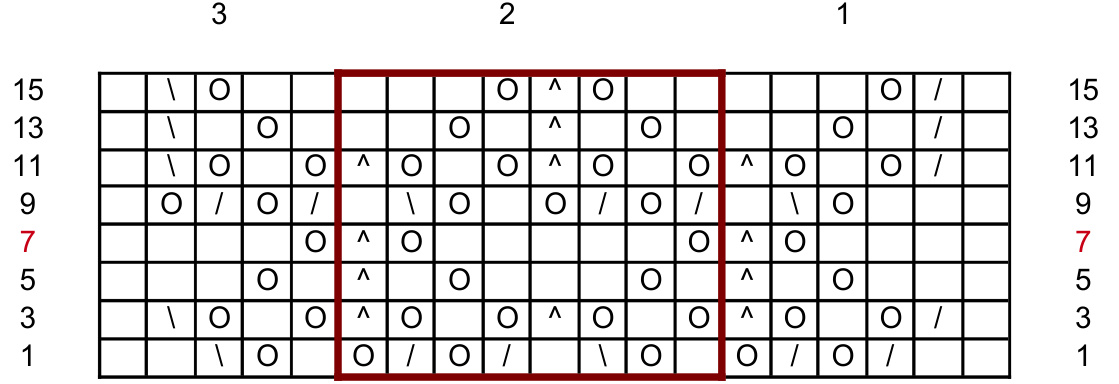
Chart 4 (sleeves)
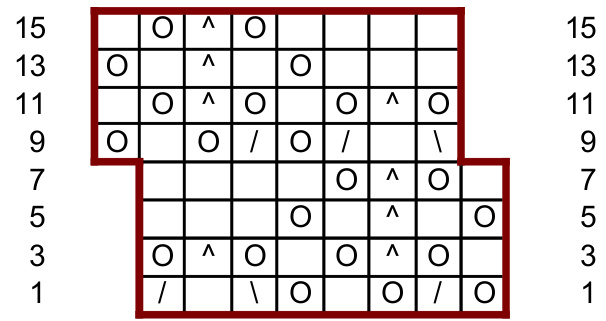
Chart 5 (sleeve cap)
27252097111975432
27220975119754321
Charts for size XXL
Chart 1 (body)

Chart 2 (underarm)

Chart 3 (back)
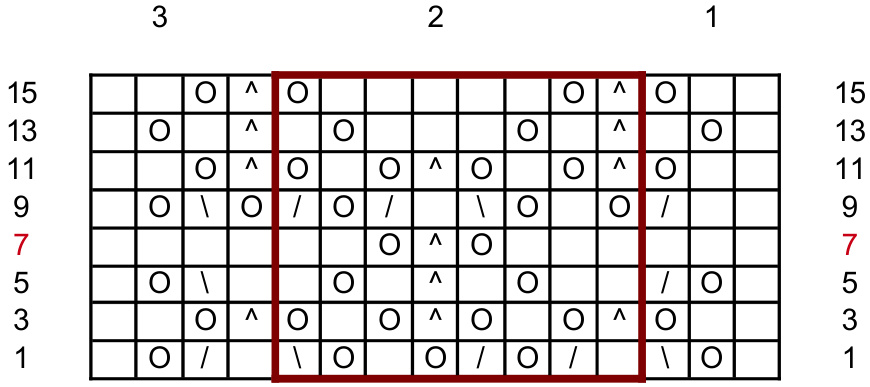
Chart 4 (sleeve)
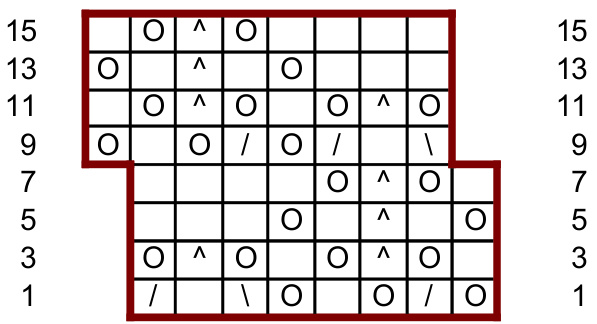
Chart 5 (sleeve cap)
Charts for size XXXL
Chart 1 (body)
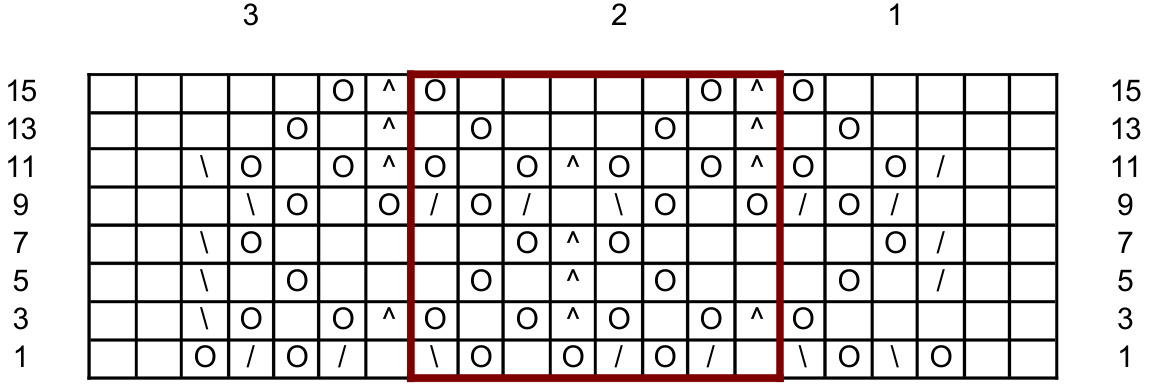
Chart 2 (underarm)

Chart 3 (back)
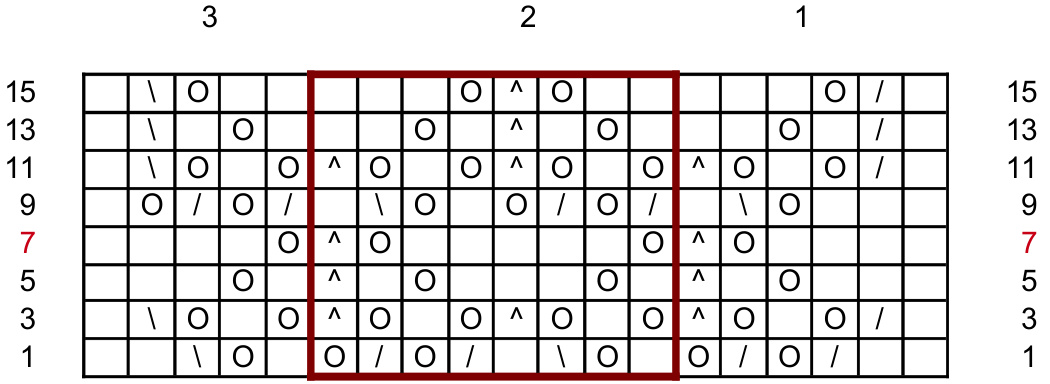
Chart 4 (sleeve)
Chart 5 (sleeve cap)