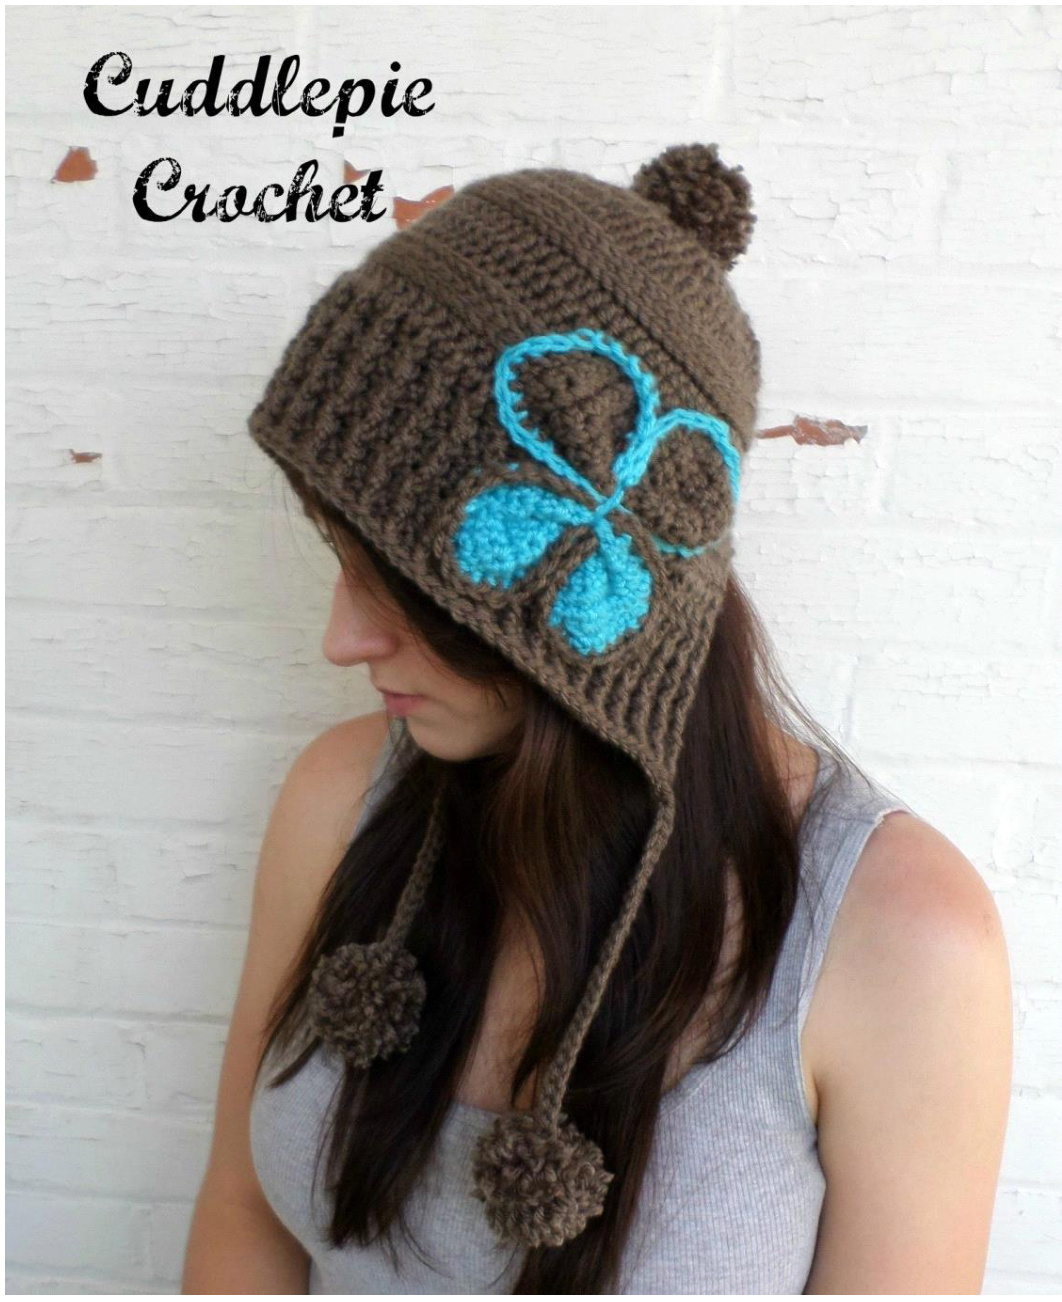
Lola
Pattern design by
Tricia Dodge \~ Cuddlepie Crochet
@ Copyright Notice: You have permission to sell the finished product for this pattern but rewriting, reselling, distributing, or copying the pattern itself is prohibited. Thank you for your understanding and cooperation. Supplies: Any thick worsted (like Vanna's Choice) K (6.5mm)hook 1 (5.5mm)hook Tapestry needle to sew in ends Pom pom maker
Pattern Notes:
All joins will be to 1t st of the round. All 1't sts will be worked into the same st as join. All starting chains do NOT count as a st. All FPdc and BPdc will be worked around each other.
Adult
Starting with K hook.. Begin with magic circle and work 12 hdc in loop, join. OR Ch 4, join w sl st to form loop. Ch 1, 12 hdc in loop, join w sl st. Your piece should measure 1 %". Rnd 1: Ch 1, 2hdc in each st around, join. (24sts) 2 %" Rnd 2: Ch 1, \*2hdc, hdc,\* repeat from \* to \* around, join. (36sts) 3 %" Rnd 3: Ch 1,\* 2hdc, hdc in next 2,\* repeat from \* to \* around, join. (48sts) 4 %" Rnd 4: Ch 1, \*2hdc, hdc in next 3, \* repeat from \* to \* around, join. (60sts) 5 %" Rnd 5: Ch 1, \*2hdc, hdc in next 4,\* repeat from \* to \* around, join. (72sts) 6 %" Your hat willook a little wavy here, but it will flatten out with the next round. Rnd 6: Ch 1, BPsc in each st around, join. Rnd 7-8: Repeat Rnd 6. Rnd 9: Ch 1, hdc in each st around, join. Rnd 10-11: Repeat Rnd 9. Rnd 12: Ch 1, BPsc in each st around, join. Row 13: Ch 1, BPsc in each st around, DO NOT JOIN! You will now be working in rows and will not join anymore. You will ch and turn. Row 14: Ch 1, turn, FPsc in each st around. Make sure you still have 72 sts. You may need to sc in the turning ch to make your count correct. Row 15: Ch 1, turn, hdc in st each around. Row 16: Repeat Rnd 15. SWITCH TO I (5.5mm) Hook Row 17: Ch 2, turn, FPdc around starting ch from row below, \*dc in next, FPdc in next, \* repeat from \* to \* around, dc in last ch. Row 18: Ch 2 and turn, \*BPdc in FPdc from the row before, dc in the dc from the row before,\* repeat from \* to \* dc in last ch. Row 19: Ch 2 and turn, \*FPdc, dc,\* repeat from \* to \* around, dc in last ch. Row 20: Repeat Row 18. Row 21: Repeat Row 19. Row 22: Repeat Row 18. To make without strings for pom poms (so you can attach the pom poms directly to the end corners of the hat), repeat Row 19 once more. To make WiTH strings, continue to Row 23. Row 23: Turn, Ch 25, sl st in 2nd ch from hook and each ch remaining,\* Fpdc, dc,\* repeat from \* to \* around, ch 25, sl st in 2nd ch from hook and each ch remaining, join w sl st to the last dc you worked. Cut yarn and weave in ends. Make 3 pom poms; one for the top and one for each side string. Use a pom pom maker that can be found at any crafting store, or find a free tutorial online.
Child
Starting with K hook.. Begin with magic circle and work 11 hdc in loop, join. OR Ch 4, join w sl st to form loop. Ch 1, 11 hdc in loop, join w sl st. Your piece should measure 1 %". Rnd 1: Ch 1, 2hdc in each st around, join. (22sts) 2 %" Rnd 2: Ch 1, \*2hdc, hdc,\* repeat from \* to \* around, join. (33sts) 3 %" Rnd 3: Ch 1,\* 2hdc, hdc in next 2,\* repeat from \* to \* around, join. (44sts) 4 %" Rnd 4: Ch 1, \*2hdc, hdc in next 3, \* repeat from \* to \* around, join. (55sts) 5 %" Rnd 5: Ch 1, \*2hdc, hdc in next 4,\* repeat from \* to \* around, join. (66sts) Your hat willook a little wavy here, but it will flatten out with the next round. Rnd 6: Ch 1, BPsc in each st around, join. Rnd 7-8: Repeat Rnd 6. Rnd 9: Ch 1, hdc in each st around, join. Rnd 10-11: Repeat Rnd 9. Rnd 12: Ch 1, BPsc in each st around, join. Row 13: Ch 1, BPsc in each st around, DO NOT JOIN! You will now be working in rows and will not join anymore. You will ch and turn. Row 14: Ch 1, turn, FPsc in each st around. Make sure you still have 66 sts. You may need to sc in the turning ch to make your count correct. Row 15: Ch 1, turn, hdc in each st around. Row 16: Repeat Row 15. SWITCH TO I (5.5mm) Hook Row 17: Ch 2, turn, FPdc around starting ch from row below, \*dc in next, FPdc in next, \* repeat from \* to \* around, dc in last ch. Row 18: Ch 2 and turn, \*BPdc in FPdc from the row before, dc in the dc from the row before,\* repeat from \* to \* dc in last ch. Row 19: Ch 2 and turn, \*FPdc, dc,\* repeat from \* to \* around, dc in last ch. Row 20: Repeat Row 18. Row 21: Repeat Row 19. To make without strings for pom poms (so you can attach the pom poms directly to the end corners of the hat), repeat Row 18 once more. To make WITH strings, continue to Row 22. Row 22: Turn, Ch 20, sl st in 2nd ch from hook and each ch remaining,\* BPdc, dc,\* repeat from \* to \* around, ch 20, sl st in 2nd ch from hook and each ch remaining, join w sl st to the last dc you worked. Cut yarn and weave in ends. Make 3 pom poms; one for the top and one for each side string. Use a pom pom maker that can be found at any crafting store, or find a free tutorial online.
Toddler
Starting with K hook... Begin with magic circle and work 10 hdc in loop, join. OR Ch 4, join w sl st to form loop. Ch 1, 10 hdc in loop, join w sl st. Your piece should measure 1 %". Rnd 1: Ch 1, 2hdc in each st around, join. (20sts) 2 %" Rnd 2: Ch 1, \*2hdc, hdc,\* repeat from \* to \* around, join. (30sts) 3 %" Rnd 3: Ch 1,\* 2hdc, hdc in next 2,\* repeat from \* to \* around, join. (40sts) 4 %" Rnd 4: Ch 1, \*2hdc, hdc in next 3, \* repeat from \* to \* around, join. (50sts) 5 %" Rnd 5: Ch 1, \*2hdc, hdc in next 4,\* repeat from \* to \* around, join. (60sts) Your hat will look a little wavy here, but it will flatten out with the next round. Rnd 6: Ch 1, BPsc in each st around, join. Rnd 7: Repeat Rnd 6. Rnd 8: Ch 1, hdc in each st around, join. Rnd 9: Repeat Rnd 8. Rnd 10: Ch 1, BPsc in each st around, join. Row 11: Ch 1, BPsc in each st around, DO NOT JOIN! You will now be working in rows and will not join anymore. You will ch and turn. Row 12: Ch 1, turn, hdc in each st around. Make sure you still have 60 sts. Row 13: Repeat Row 12. SWITCH TO I (5.5mm) Hook Row 14: Ch 2, turn, BPdc around starting ch from row below, \*dc in next, BPdc in next, \* repeat from \* to \* around, dc in last st. Row 15: Ch 2 and turn, \*FPdc in BPdc from the row before, dc in the dc from the row before,\* repeat from \* to \* dc in last st. Row 16: Ch 2 and turn, \*BPdc, dc,\* repeat from \* to \* around, dc in last ch. Row 17: Repeat Row 15. Row 18: Repeat Row 16. Row 19: Repeat Row 15. To make without strings for pom poms (so you can attach the pom poms directly to the end corners of the hat), repeat Row 18 once more. To make WiTH strings, continue to Row 20. Row 20: Turn, Ch 17, sl st in 2nd ch from hook and each ch remaining,\* BPdc, dc,\* repeat from \* to \* around, ch 17, sl st in 2nd ch from hook and each ch remaining, join w sl st to the last dc you worked. Cut yarn and weave in ends. Make 3 pom poms; one for the top and one for each side string. Use a pom pom maker that can be found at any crafting store, or find a free tutorial online.
Flo-Bow Adult
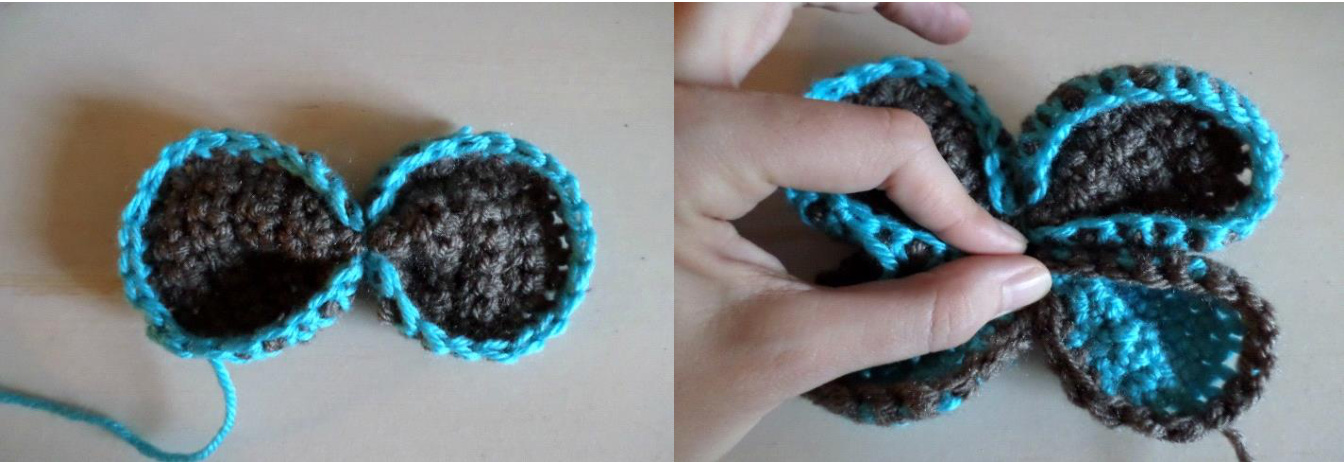
(Yeah, I made up that word. It's a cross between a flower and a bow!) You will make 2 of these. One in the MC and one in your CC. Using K hook, Ch 7, turn and sc in 2nd ch from hook and each across. (6sts) Row 2: Ch 1, turn, 2 sc in 1"t st, sc in next 4, 2sc in last. (8sts) Row 3: Ch 1, turn, 2 sc in 1"t st, sc in next 6, 2sc in last. (10sts) Row 4-11 : Ch1 , turn, sc in each st across. Row 12: Ch 1, turn, sc2tog, sc in next 6, sc2tog. (8sts) Row 13: Ch 1, turn, sc2tog, sc in next 4, sc2tog. (6sts). Row 14: Ch 1, turn, sc in each st across. (6sts) Proceed to finishing instructions.
Flo-Bow Child-Toddler
(Yeah, I made up that word. It's a cross between a flower and a bow!) You will make 2 of these. One in the MC and one in your CC. Using K hook, Ch 5, turn and sc in 2nd ch from hook and each across. (4sts) Row 2: Ch 1, turn, 2 sc in 1st st, sc in next 2, 2sc in last. (6sts) Row 3: Ch 1, turn, 2 sc in 1"t st, sc in next 4, 2sc in last. (8sts) Row 4-9 : Ch1 , turn, sc in each st across. Row 10: Ch 1, turn, sc2tog, sc in next 4, sc2tog. (6sts) Row 11: Ch 1, turn, sc2tog, sc in next 2, sc2tog. (4sts). Row 12: Ch 1, turn, sc in each st across. (4sts)
Finishing Instructions
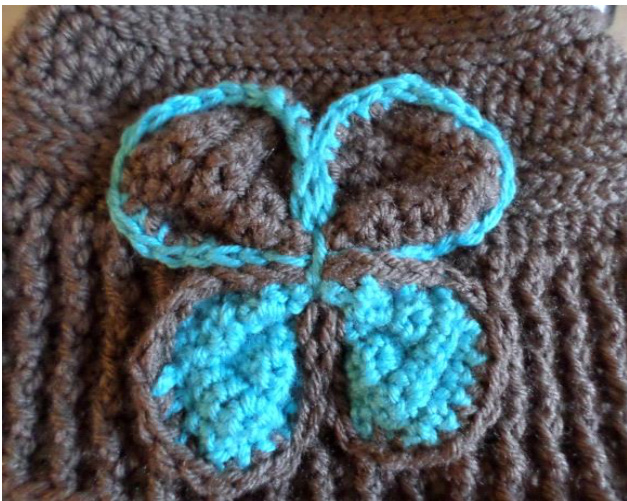
Cut yarn and weave in ends. (Or cheat like me and work your next round over them!) Take your yarn of the opposite color and sc around your flo-bow petal poof. Do this with each. Make sure to leave a long tail to sew it onto your hat. Now you are going to take a piece of yarn and cinch each piece into a bow shape. See the photos at the end of this pattern for help. Tie it tight! Once this is done you will tie OVER the ties you just did, tying the two pieces together into your flo-bow! Sew your flo-bow onto your hat, attach the pom poms and you've got yourself a hat!