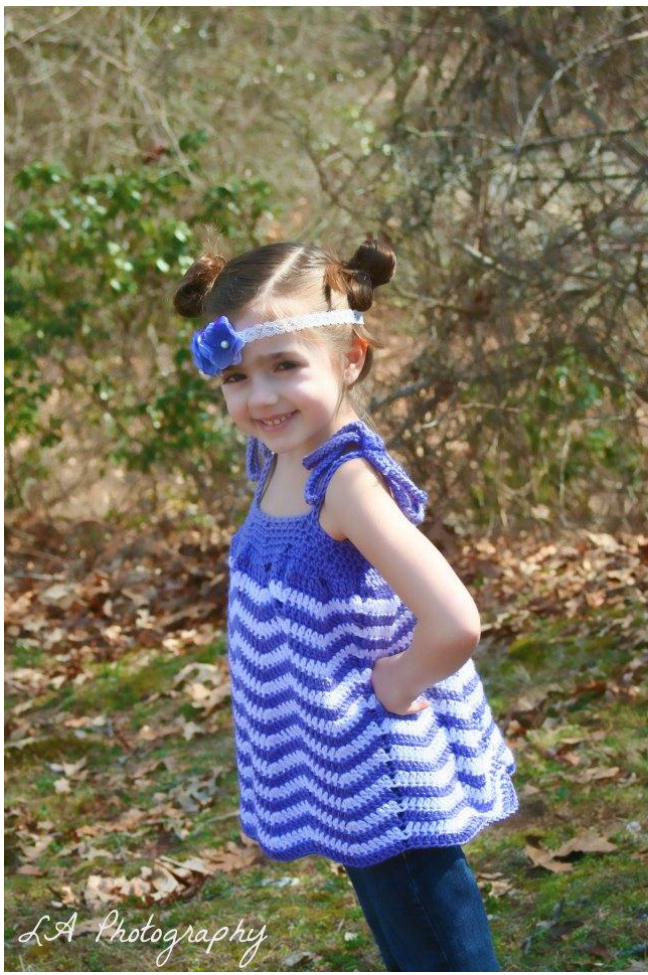
Chevron Tunic Tank
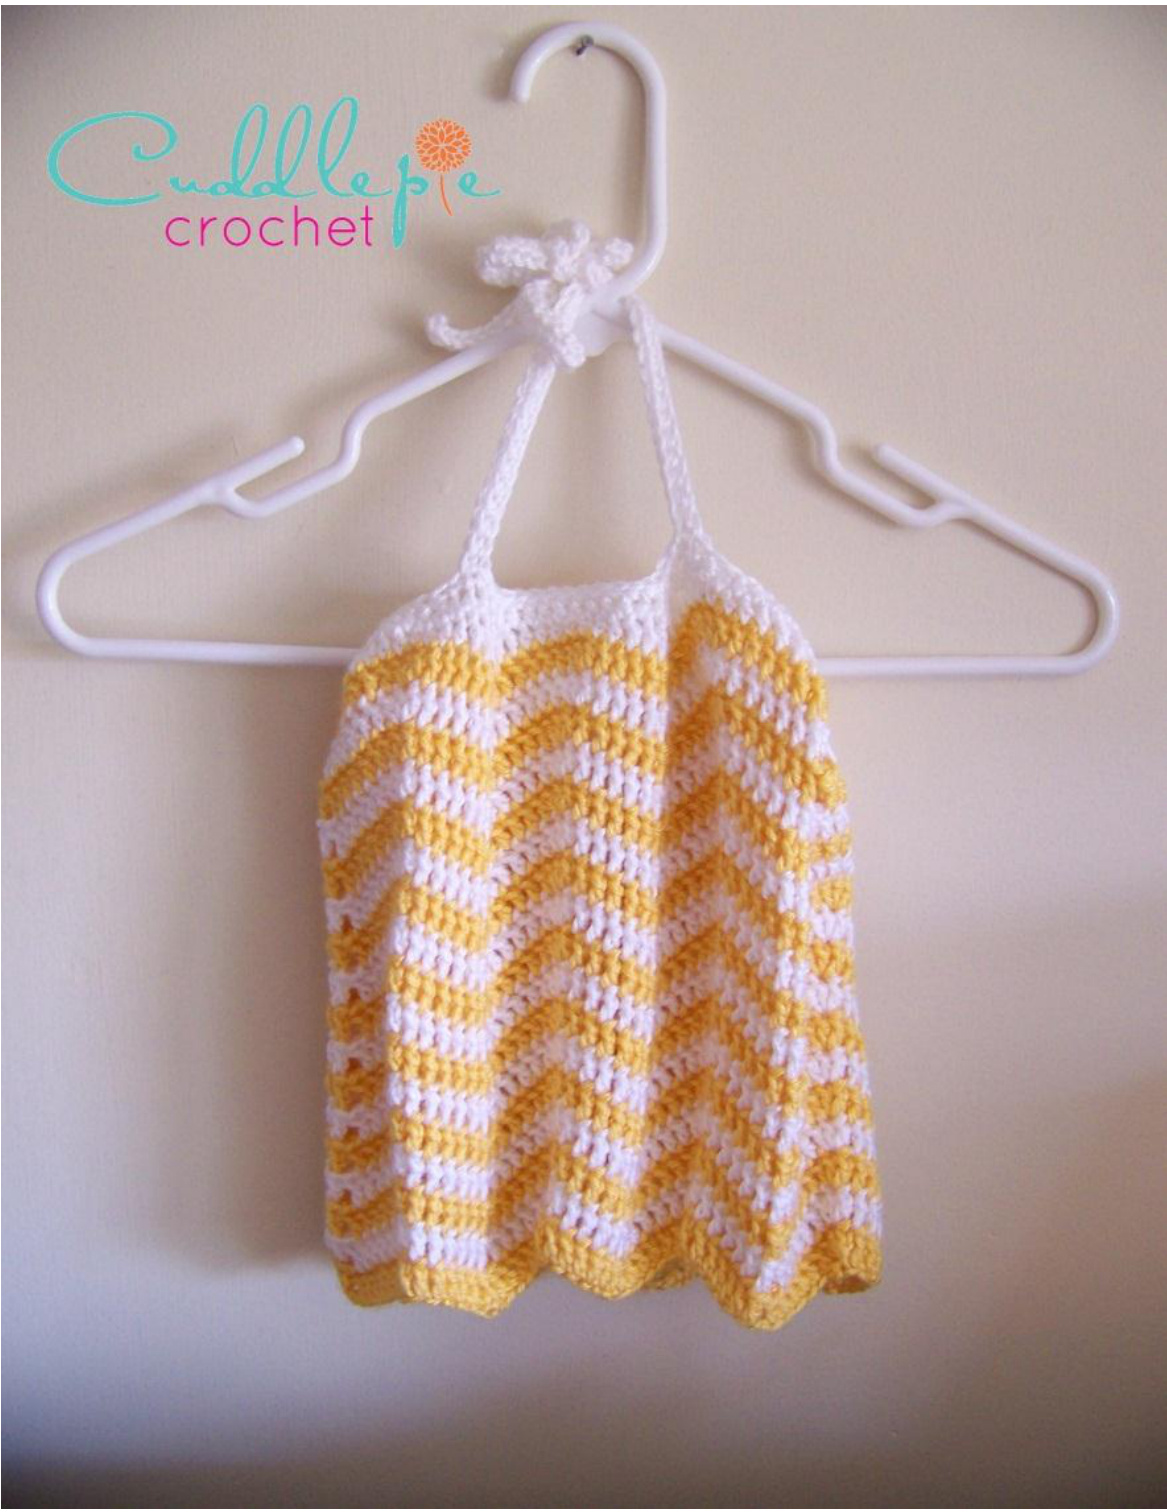
By Tricia Dodge @ Cuddlepie Crochet
Supplies:
H hook (5mm), I hook (5.5) I is only used in 0-3 month Two (or more) colors worsted weight (4) yarn. (l used Caron Simply Soft in Main Color (MC, white) and Contrast Color (CC, yellow). I like the lightness and drape of this yarn.) Tapestry needle to work in ends Stitch markers Optional- Two % inch buttons. (You can use larger if you use the dc option for larger button holes on the straps.)
Gauge Swatch:
15 dc = 4" (This is worked straight, not measured from the pattern stitching.) NOTE: Pattern is worked from bottom to top. When changing colors do NOT finish off. Drop your yarn and drag it up for the next row. This makes a LOT less ends to work in. When sewing on buttons you can sew them to the straps and top to secure permanently, or you may use the stitches as button holes. Do not work sts in your join at any point in this pattern. This video gives you a few tips if you need help not twisting your chain before joining. http://www.youtube.com/watch?v=xQ7PChNkYK0
Strap Options:
0-3 months
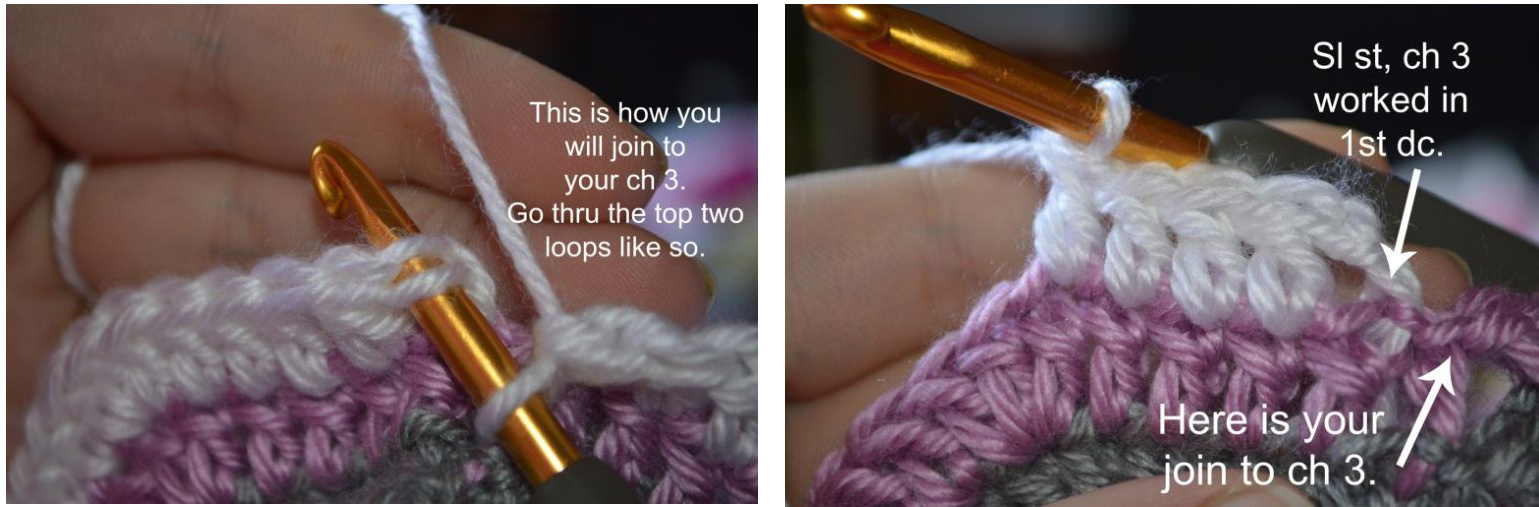
To make NB size, follow as written. It will fit up to a 14 %2" chest To make 0-3 month, follow as written, but use one hook size larger for the border and bodice. This willfit up to 16". With CC,Ch 78. Join w/ sl st taking care not to twist your chain. Rnd 1: Ch 1, sc in each ch around, join w sl st to ch 1. Rnd 2: Ch 3 (counts as dc from here on out), dc in next 4, 3 dc in next, dc in next 5, sk 2 ch, \*dc in next 5, 3dc in next, dc in next 5, sk 2\*, repeat from \* to \* around, join w/ sl st to ch3. Rnd 3: Sl st in next dc, pulling thru new color, ch 3, dc in next 4, 3 dc in next, dc in next 5, sk 2 dc, \*dc in next 5, 3 dc in next, dc in next 5, sk 2 dc\*, repeat from \* to \* around, join w/ sl st to ch 3. Repeat Rnd 3 until you reach 6", alternating between your MC and CC. This was 9 total rnds for me. End with your CC. Add extra rnds to make a tunic or more to make a dress! As written it will hit regular shirt length. Work 7" for a skirt when you want to add a bodice.
Top border
Rnd 1: With MC, sl st in next st, ch 3, dc in next 2, hdc in next 2, sc (this will be the top of your chevron point) in next, hdc in next 2, dc in next 3, sk 2 dc, \*dc in next 3, hdc in next 2, sc in next, hdc in next 2, dc in next 3, sk 2 dc\*, repeat from \* to \* around. Join w Sl st to 1 st ch 3. Rnd 2: Sl st in next st,ch 2, hdc in next 8, sk 2, \*hdc in next 9, sk 2\*, repeat from \* to \* around, joining w/ sl st to ch 2. DO NOT FINISH OFF.
Optional Bodice:
If you don't want a bodice skip to Rnd 5. Rnd 3: Ch 2, (counts as 1"t hdc), \*bphdc around next st\*, repeat from \* to \* around, join W sl st to ch 2. Rnd 4: Ch 2, \*hdc in next st\*, repeat from \* to \* around, join w sl st to ch 2. Repeat Rnd 4 until bodice measures approximately 2 inches.
Rnd 5:
Strap Options
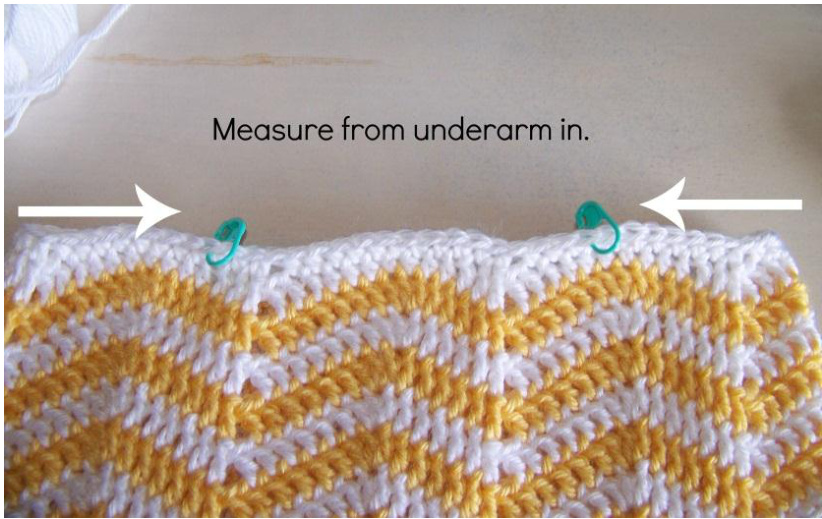
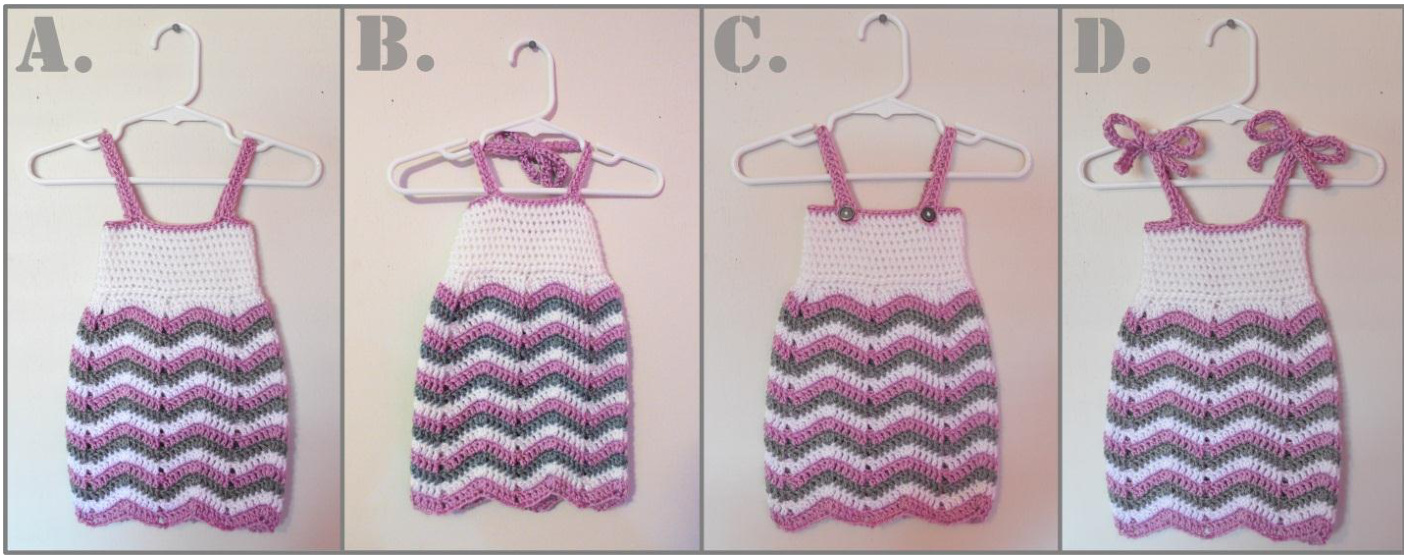
Want to change strap colors? Change your colors now! @ you've made a bodice, replace the sc2tog w sc. If not, work as written Note: \*\*lf you want to make it with larger buttons holes, work your 1st 2 sts of the strap in dc instead of hdc. \*\* A - Joined Straps from the front: (These straps will start from the front and be joined in the back by sewing or with a button. They will not be long enough to crisscross.) Place 2 st markers on the front (left and right of each "underarm") about 1 % “ in. B - Halter Straps: (These straps will join in the front and can be either tied around the neck or crisscross around the back and joined with a button) Place 2 st markers in the front (left and right of each "underarm") about 1 %4 “ in. C - Joined Straps from the back: (These straps will start in the back and be joined in the front with buttons. They will not be long enough to crisscross.) Place 2 st markers in the back (left and right of each "underarm") about 1 3%4 “in. Before you begin this Rnd, finish off and rejoin w/ a sl st to the back left st marked spot. D - Tie above the shoulder Straps: (These straps will join in the front AND the back, and will be tied above the shoulders.) Place 4 st markers (2 in front and 2 in back left and right of each "underarm") about 1 % “ in. Option A: Ch 1, \* sc2tog in next\*, repeat from \* to \* until you reach your first marker. (It is not necessary to complete the repetition. Just go until you can't anymore! @ ) Ch 20, sk 2 chs, hdc in next 18 chs back down the chains}, sc in next sts until you reach the next marker. Repeat from { to } Repeat from \* to \* again, join w/ sl st to ch 1. Fasten off andweave inends. Option B: Ch 1, \* sc2tog in next\*, repeat from \* to \* until you reach your first marker. (It is not necessary to complete the repetition. Just go until you can't anymore! @ ) {Ch 35, sk 2, hdc in last 33 chs back down the chains}, sc in next sts until you reach the next marker. Repeat from { to } Repeat from \* to \* again, join w/ sl st to ch 1. Fasten off and weaveinends. Option C: Ch 1, \* sc2tog in next\*, repeat from \* to \* until you reach your first marker. (It is not necessary to complete the repetition. Just go until you can't anymore! @ ) {Ch 20, sk 2 chs, hdc in next 18 chs back down the chains}, sc in next sts until you reach the next marker. Repeat from { to } Repeat from \* to \* again, join w/ sl st to ch 1. Fasten off andweave inends. Option D: Ch 1,( \* sc2tog in next\*, repeat from \* to \* until you reach your first marker. It is not necessary to complete the repetition. Just go until you can't anymore! {Ch 35, sk 2 chs, hdc in next 33 chs back down the chains}), repeat from ( to ) one more time, sc in sts to next marker. Repeat from { to } one more time, then \* to \* once more, join w sl st to ch 1. Fasten off and weave in ends. is in the back or front if you made straps to button. Make it your own. (
6 months
Fits a chest up to 17" With CC,Ch 78. Join w/ sl st taking care not to twist your chain. Rnd 1: Ch 1, sc in each ch around, join w sl st to ch 1. Rnd 2: Ch 3 (counts as dc from here on out), dc in next 4, 3 dc in next, dc in next 5, sk 2 ch, \*dc in next 5, 3dc in next, dc in next 5, sk 2\*, repeat from \* to \* around, join w/ sl st to ch 3. Rnd 3: Sl st in next dc, pulling thru new color, ch 3, dc in next 4, 3 dc in next, dc in next 5, sk 2 dc, \*dc in next 5, 3 dc in next, dc in next 5, sk 2 dc\*, repeat from \* to \* around, join w/ sl st to ch 3. Repeat Rnd 3 until you reach 7", alternating between your MC and CC. This was 11 total rnds for me. End with your CC. Add extra rnds to make a tunic or more to make a dress! As written it will hit regular shirt length. Work 9" for a skirt when you want to add abodice.
Top border
Rnd 1: With MC, sl st in next st, ch 3, dc in next 2, hdc in next 2, sc (this will be the top of your chevron point) in next, hdc in next 2, dc in next 3, sk 2 dc, \*dc in next 3, hdc in next 2, sc in next, hdc in next 2, dc in next 3, sk 2 dc\*, repeat from \* to \* around. Join w SI st to 1 st ch 3. Rnd 2: Sl st in next st,ch 2, hdc in next 8, sk 2, \*hdc in next 9, sk 2\*, repeat from \* to \* around, joining w/ sl st to ch 2. DO NOT FINISH OFF.
Optional Bodice:
If you don't want a bodice skip to Rnd 5. Rnd 3: Ch 2, (counts as 1st hdc), \*bphdc around next st\*, repeat from \* to \* around, join W sl st to ch 2. Rnd 4: Ch 2, \*hdc in next st\*, repeat from \* to \* around, join w sl st to ch 2. Repeat Rnd 4 until bodice measures approximately 2 12 inches.
Rnd 5:
Strap Options
Want to change strap colors? Change your colors now! @ Note: If you've made a bodice, replace the sc2tog w sc. If not, work as written. Note: \*\*f you want to make it with larger buttons holes, work your 1st 2 sts of the strap in dc instead ofhdc.\*\* A - Joined Straps from the front: (These straps will start from the front and be joined in the back by sewing or with a button. They will not be long enough to crisscross.) Place 2 st markers on the front (left and right of each "underarm") about 1 % "in. B - Halter Straps: (These straps will join in the front and can be either tied around the neck or crisscross around the back and joined with a button) Place 2 st markers in the front (left and right of each "underarm") about 1 %4 " in. C - Joined Straps from the back: (These straps will start in the back and be joined in the front with buttons. They will not be long enough to crisscross.) Place 2 st markers in the back (left and right of each "underarm") about 1 % " in. Before you begin this Rnd, finish off and rejoin w/ a sl st to the back left st marked spot. D - Tie above the shoulder Straps: (These straps willjoin in the front AND the back, and will be tied above the shoulders.) Place 4 st markers (2 in front and 2 in back left and right of each "underarm") about 1 % “ in. Option A: Ch 1, \* sc, sc2tog in next\*, repeat from \* to \* until you reach your first marker. (It is not necessary to complete the repetition. Just go until you can't anymore! @ ) {Ch 25, sk 2 chs, hdc in next 23 chs back down the chains}, sc in next sts until you reach the next marker. Repeat from { to } Repeat from \* to \* again, join w/ sl st to ch 1. Fasten off andweave inends. Option B: Ch 1, \* sc, sc2tog in next\*, repeat from \* to \* until you reach your first marker. (It is not necessary to complete the repetition. Just go until you can't anymore! @ ) {Ch 40, sk 2, hdc in last 38 chs back down the chains}, sc in next sts until you reach the next marker. Repeat from { to } Repeat from \* to \* again, join w/ sl st to ch 1. Fasten off and weaveinends. Option C: Ch 1, \* sc, sc2tog in next\*, repeat from \* to \* until you reach your first marker. (It is not necessary to complete the repetition. Just go until you can't anymore! ? ) {Ch 25, sk 2 chs, hdc in next 23 chs back down the chains}, sc in next sts until you reach the next marker. Repeat from { to } Repeat from \* to \* again, join w/ sl st to ch 1. Fasten off andweaveinends. Option D: Ch 1,(\* sc, sc2tog in next\*, repeat from \* to \* until you reach your first marker. It is not necessary to complete the repetition. Just go until you can't anymore! @ {Ch 40, sk 2 chs, hdc in next 38 chs back down the chains}), repeat from ( to ) one more time, sc in sts to next marker. Repeat from { to } one more time, then \* to \* once more, join w sl st to ch 1. Fasten off and weave in ends. Add buttons in the back or front if you made straps to button. Make it your own. @
12 months
Fits a chest up to 18" With CC Ch 91. Join w/ sl st taking care not to twist your chain. Rnd 1: Ch 1, sc in each ch around, join w sl st to ch 1. Rnd 2: Ch 3 (counts as dc from here on out), dc in next 4, 3 dc in next, dc in next 5, sk 2 ch, \*dc in next 5, 3dc in next, dc in next 5, sk 2\*, repeat from \* to \* around, join w/ sl st to ch3. Rnd 3: Sl st in next dc, pulling thru new color, ch 3, dc in next 4, 3 dc in next, dc in next 5, sk 2 dc, \*dc in next 5, 3 dc in next, dc in next 5, sk 2 dc\*, repeat from \* to \* around, join w/ sl st to ch 3. Repeat Rnd 3 until you reach 8", alternating between your MC and CC. This was 13 total rnds for me. End with your CC. Add extra rnds to make a tunic or more to make a dress! As written it will hit regular shirt length. Work 11" for a skirt when you want to add abodice.
Top border
Rnd 1: With MC, sl st in next st, ch 3, dc in next 2, hdc in next 2, sc (this willbe the top of your chevron point) in next, hdc in next 2, dc in next 3, sk 2 dc, \*dc in next 3, hdc in next 2, sc in next, hdc in next 2, dc in next 3, sk 2 dc\*, repeat from \* to \* around. Join w Sl st to 1 st ch 3. Rnd 2: Sl st in next st,ch 2, hdc in next 8, sk 2, \*hdc in next 9, sk 2\*, repeat from \* to \* around, joining w/ sl st to ch 2. DO NOT FINISH OFF.
Optional Bodice:
If you don't want a bodice skip to Rnd 5. Rnd 3: Ch 2, (counts as 1st hdc), \*bphdc around next st\*, repeat from \* to \* around, join W sl st to ch 2. d 4: Ch 2, \*hdc in next st\*, repeat from \* to \* around, join w sl st to ch 2 Repeat Rnd 4 until bodice measures approximately 3 inches.
Rnd 5:
Strap Options
Want to change strap colors? Change your colors now! @ Note: If you've made a bodice, replace the sc2tog w sc. If not, work as written. Note: \*\*If you want to make it with larger buttons holes, work your 1st 2 sts of the strap in dc instead ofhdc.\*\* A - Joined Straps from the front: (These straps will start from the front and be joined in the back by sewing or with a button. They will not be long enough to crisscross.) Place 2 st markers on the front (left and right of each "underarm") about 2" in. B - Halter Straps: (These straps will join in the front and can be either tied around the neck or crisscross around the back and joined with a button) Place 2 st markers in the front (left and right of each "underarm") about 2" in. C - Joined Straps from the back: (These straps will start in the back and be joined in the front with buttons. They will not be long enough to crisscross.) Place 2 st markers in the back (left and right of each "underarm") about 2" in. Before you begin this Rnd, finish off and rejoin w/ a sl st to the back left st marked spot. D - Tie above the shoulder Straps: (These straps willjoin in the front AND the back, and will be tied above the shoulders.) Place 4 st markers (2 in front and 2 in back left and right of each "underarm") about 2" in. Option A: Ch 1, \* sc, sc2tog in next\*, repeat from \* to \* until you reach your first marker. (It is not necessary to complete the repetition. Just go until you can't anymore! @ ) {Ch 30, sk 2 chs, hdc in next 28 chs back down the chains}, sc in next sts until you reach the next marker. Repeat from { to } Repeat from \* to \* again, join w/ sl st to ch 1. Fasten off andweave inends. Option B: Ch 1, \* sc, sc2tog in next\*, repeat from \* to \* until you reach your first marker. (It is not necessary to complete the repetition. Just go until you can't anymore! ? ) {Ch 45, sk 2, hdc in last 43 chs back down the chains}, sc in next sts until you reach the next marker. Repeat from { to } Repeat from \* to \* again, join w/ sl st to ch 1. Fasten off and weave inends. Option C: Ch 1, \* sc, sc2tog in next\*, repeat from \* to \* until you reach your first marker. (It is not necessary to complete the repetition. Just go until you can't anymore! @ ) {Ch 30, sk 2 chs, hdc in next 28 chs back down the chains}, sc in next sts until you reach the next marker. Repeat from { to } Repeat from \* to \* again, join w/ sl st to ch 1. Fasten off and weave in ends. Option D: Ch 1,(\* sc, sc2tog in next\*, repeat from \* to \* until you reach your first marker. It is not necessary to complete the repetition. Just go until you can't anymore! @ {Ch 45, sk 2 chs, hdc in next 43 chs back down the chains]), repeat from ( to ) one more time, sc in sts to next marker. Repeat from { to } one more time, then \* to \* once more, join w sl st to ch 1. Fasten off and weave in ends. Add buttons in the back or front if you made straps to button. Make it your own. @
18 months
Fits a chest up to 19" With CC,Ch 91. Join w/ sl st taking care not to twist your chain. Rnd 1: Ch 1, sc in each ch around, join w sl st to ch 1. Rnd 2: Ch 3 (counts as dc from here on out), dc in next 4, 3 dc in next, dc in next 5, sk 2 ch, \*dc in next 5, 3dc in next, dc in next 5, sk 2\*, repeat from \* to \* around, join w/ sl st to ch3. Rnd 3: Sl st in next dc, pulling thru new color, ch 3, dc in next 4, 3 dc in next, dc in next 5, sk 2 dc, \*dc in next 5, 3 dc in next, dc in next 5, sk 2 dc\*, repeat from \* to \* around, join w/ sl st to ch 3. Repeat Rnd 3 until you reach 9", alternating between your MC and CC. This was 15 total rnds for me. End with your CC. Add extra rnds to make a tunic or more to make a dress! As written it will hit regular shirt length. Work 13" for a skirt when you want to add abodice.
Top border
Rnd 1: With MC, sl st in next st, ch 3, dc in next 2, hdc in next 2, sc (this will be the top of your chevron point) in next, hdc in next 2, dc in next 3, sk 2 dc, \*dc in next 3, hdc in next 2, sc in next, hdc in next 2, dc in next 3, sk 2 dc\*, repeat from \* to \* around. Join w Sl st to 1 st ch 3. Rnd 2: Sl st in next st,ch 2, hdc in next 8, sk 2, \*hdc in next 9, sk 2\*, repeat from \* to \* around, joining w/ sl st to ch 2. DO NOT FINISH OFF.
Optional Bodice:
If you don't want a bodice skip to Rnd 5. Rnd 3: Ch 2, (counts as 1\$t hdc), \*bphdc around next st\*, repeat from \* to \* around, join W sl st to ch 2. Rnd 4: Ch 2, \*hdc in next st\*, repeat from \* to \* around, join w sl st to ch 2. Repeat Rnd 4 until bodice measures approximately 3 1/2 inches.
Rnd 5:
Strap Options
Want to change strap colors? Change your colors now! @ you've made a bodice, replace the sc2tog w sc. If not, work as written Note: \*\*If you want to make it with larger buttons holes, work your 1st 2 sts of the strap in dc instead of hdc. \*\* A - Joined Straps from the front: (These straps will start from the front and be joined in the back by sewing or with a button. They will not be long enough to crisscross.) Place 2 st markers on the front (left and right of each "underarm") about 2" in. B - Halter Straps: (These straps will join in the front and can be either tied around the neck or crisscross around the back and joined with a button) Place 2 st markers in the front (left and right of each "underarm") about 2" in. C - Joined Straps from the back: (These straps will start in the back and be joined in the front with buttons. They will not be long enough to crisscross.) Place 2 st markers in the back (left and right of each "underarm") about 2" in. Before you begin this Rnd, finish off and rejoin w/ a sl st to the back left st marked spot. D - Tie above the shoulder Straps: (These straps will join in the front AND the back, and will be tied above the shoulders.) Place 4 st markers (2 in front and 2 in back left and right of each "underarm") about 2" in. Option A: Ch 1, \* sc in next 2, sc2tog in next\*, repeat from \* to \* until you reach your first marker. (It is not necessary to complete the repetition. Just go until you can't anymore! @ ) {Ch 35, sk 2 chs, hdc in next 33 chs back down the chains}, sc in next sts until you reach the next marker. Repeat from { to } Repeat from \* to \* again, join w/ sl st to ch 1. Fasten off and weave in ends. Option B: Ch 1, \* sc in next 2, sc2tog in next \*, repeat from \* to \* until you reach your first marker. (lt is not necessary to complete the repetition. Just go until you can't anymore! ? ) {Ch 50, sk 2, hdc in last 48 chs back down the chains}, sc in next sts until you reach the next marker. Repeat from { to } Repeat from \* to \* again, join w/ sl st to ch 1. Fasten off and weave in ends. Option C: Ch 1, \* sc in next 2, sc2tog in next\*, repeat from \* to \* until you reach your first marker. (It is not necessary to complete the repetition. Just go until you can't anymore! ? ) {Ch 35, sk 2 chs, hdc in next 33 chs back down the chains}, sc in next sts until you reach the next marker. Repeat from { to } Repeat from \* to \* again, join w/ sl st to ch 1. Fasten off and weave in ends. Option D: Ch 1,( \* sc in next 2, sc2tog in next \*, repeat from \* to \* until you reach your first marker. It is not necessary to complete the repetition. Just go until you can't anymore! @ {Ch 50, sk 2 chs, hdc in next 48 chs back down the chains]), repeat from ( to ) one more time, sc in sts to next marker. Repeat from { to ↓ one more time, then \* to \* once more, join w sl st to ch 1. Fasten off and weave in ends. @ Add buttons in the back or front if you made straps to button. Make it your own. @
2T/24 months
Fits a chest up to 22" With CC,Ch 105. Join w/ sl st taking care not to twist your chain. Rnd 1: Ch 1, sc in each ch around, join w sl st to ch 1. Rnd 2: Ch 3 (counts as dc from here on out), dc in next 5, 3 dc in next, dc in next 6, sk 2 ch, \*dc in next 6, 3dc in next, dc in next 6, sk 2\*, repeat from \* to \* around, join w/ sl st to ch 3. Rnd 3: Sl st in next dc, pulling thru new color, ch 3, dc in next 5, 3 dc in next, dc in next 6, sk 2 dc, \*dc in next 6, 3 dc in next, dc in next 6, sk 2 dc\*, repeat from \* to \* around, join w/ sl st to ch 3. Repeat Rnd 3 until you reach 10", alternating between your MC and CC. This was 17 total rnds for me. End with your CC. Add extra rnds to make a tunic or more to make a dress! As written it will hit regular shirt length. Work 15" for a skirt when you want to add a bodice.
Top border
Rnd 1: With MC, sl st in next st, ch 3, dc in next 2, hdc in next 3, sc (this will be the top of your chevron point) in next, hdc in next 3, dc in next 2, sk 2 dc, \*dc in next 3, hdc in next 3, sc in next, hdc in next 3, dc in next 3, sk 2 dc\*, repeat from \* to \* around. Join w Sl st to 1 st ch 3. Rnd 2: Sl st in next st,ch 2, hdc in next 10, sk 2, \*hdc in next 11, sk 2\*, repeat from \* to \* around, joining w/ sl st to ch 2. DO NOT FINISH OFF.
Optional Bodice:
If you don't want a bodice skip to Rnd 5. Rnd 3: Ch 2, (counts as 1st hdc), \*bphdc around next st\*, repeat from \* to \* around, join W sl st to ch 2. Rnd 4: Ch 2, \*hdc in next st\*, repeat from \* to \* around, join w sl st to ch 2. Repeat Rnd 4 until bodice measures approximately 4 inches.
Rnd 5:
Strap Options
Want to change strap colors? Change your colors now! @ you've made a bodice, replace the sc2tog w sc. If not, work as written Note: \*\*f you want to make it with larger buttons holes, work your 1st 2 sts of the strap in dc instead ofhdc.\*\* A - Joined Straps from the front: (These straps will start from the front and be joined in the back by sewing or with a button. They will not be long enough to crisscross.) Place 2 st markers on the front (left and right of each "underarm") about 3" in. B - Halter Straps: (These straps will join in the front and can be either tied around the neck or crisscross around the back and joined with a button) Place 2 st markers in the front (left and right of each "underarm") about 3" in. C - Joined Straps from the back: (These straps will start in the back and be joined in the front with buttons. They will not be long enough to crisscross.) Place 2 st markers in the back (left and right of each "underarm") about 3" in. Before you begin this Rnd, finish off and rejoin w/ a sl st to the back left st marked spot. D - Tie above the shoulder Straps: (These straps willjoin in the front AND the back, and will be tied above the shoulders.) Place 4 st markers (2 in front and 2 in back left and right of each "underarm") about 3" in. Option A: Ch 1, \* sc in next, sc2tog in next\*, repeat from \* to \* until you reach your first marker. (It is not necessary to complete the repetition. Just go until you can't anymore! ) {Ch 35, sk 2 chs, hdc in next 33 chs back down the chains}, sc in next sts until you reach the next marker. Repeat from { to } Repeat from \* to \* again, join w/ sl st to ch 1. Fasten off and weave in ends. Option B: Ch 1, \* sc in next, sc2tog in next\*, repeat from \* to \* until you reach your first marker. (It is not necessary to complete the repetition. Just go until you can't anymore! ) {Ch 50, sk 2, hdc in last 48 chs back down the chains}, sc in next sts until you reach the next marker. Repeat from { to } Repeat from \* to \* again, join w/ sl st to ch 1. Fasten off and weave in ends. Option C: Ch 1, \* sc in next, sc2tog in next\*, repeat from \* to \* until you reach your first marker. (It is not necessary to complete the repetition. Just go until you can't anymore! ) {Ch 35, sk 2 chs, hdc in next 33 chs back down the chains}, sc in next sts until you reach the next marker. Repeat from { to } Repeat from \* to \* again, join w/ sl st to ch 1. Fasten off and weave in ends. Option D: Ch 1,( \* sc in next, sc2tog in next\*, repeat from \* to \* until you reach your first marker. It is not necessary to complete the repetition. Just go until you can't anymore! @ {Ch 50, sk 2 chs, hdc in next 48 chs back down the chains}), repeat from ( to ) one more time, sc in sts to next marker. Repeat from { to ↓ one more time, then \* to \* once more, join w sl st to ch 1. Fasten off and weave in ends. is in the back or front if you made straps to button. Make it your own. ( Fits a chest up to 23" With CC, Ch120. Join w/ sl st taking care not to twist your chain. Rnd 1: Ch 1, sc in each ch around, join w sl st to ch 1. Rnd 2: Ch 3 (counts as dc from here on out), dc in next 5, 3 dc in next, dc in next 6, sk 2 ch, \*dc in next 6, 3dc in next, dc in next 6, sk 2\*, repeat from \* to \* around, join w/ sl st to ch 3. Rnd 3: Sl st in next dc, pulling thru new color, ch 3, dc in next 5, 3 dc in next, dc in next 6, sk 2 dc, \*dc in next 6, 3 dc in next, dc in next 6, sk 2 dc\*, repeat from \* to \* around, join w/ sl st to ch 3. Repeat Rnd 3 until you reach 11", alternating between your MC and CC. This was 19 total rnds for me. End with your CC. Add extra rnds to make a tunic or more to make a dress! As written it will hit regular shirt length. Work 17" for a skirt when you want to add abodice.
Top border
Rnd 1: With MC, sl st in next st, ch 3, dc in next 2, hdc in next 3, sc (this will be the top of your chevron point) in next, hdc in next 3, dc in next 2, sk 2 dc, \*dc in next 3, hdc in next 3, sc in next, hdc in next 3, dc in next 3, sk 2 dc\*, repeat from \* to \* around. Join w SI st to 1st ch 3. Rnd 2: Sl st in next st,ch 2, hdc in next 10, sk 2, \*hdc in next 11, sk 2\*, repeat from \* to \* around, joining w/ sl st to ch 2. DO NOT FINISH OFF.
Optional Bodice:
If you don't want a bodice skip to Rnd 5. Rnd 3: Ch 2, (counts as 1"t hdc), \*bphdc around next st\*, repeat from \* to \* around, join W sl st to ch 2. Rnd 4: Ch 2, \*hdc in next st\*, repeat from \* to \* around, join w sl st to ch 2. Repeat Rnd 4 until bodice measures approximately 4 12 inches.
Rnd 5:
Strap Options
Want to change strap colors? Change your colors now! @ Note: \*\*If you want to make it with larger buttons holes, work your 1st 2 sts of the strap in dc instead ofhdc. \*\* A - Joined Straps from the front: (These straps will start from the front and be joined in the back by sewing or with a button. They will not be long enough to crisscross.) Place 2 st markers on the front (left and right of each "underarm") about 3" in. B - Halter Straps: (These straps will join in the front and can be either tied around the neck or crisscross around the back and joined with a button) Place 2 st markers in the front (left and right of each "underarm") about 3" in. C - Joined Straps from the back: (These straps will start in the back and be joined in the front with buttons. They will not be long enough to crisscross.) Place 2 st markers in the back (left and right of each "underarm") about 3" in. Before you begin this Rnd, finish off and rejoin w/ a sl st to the back left st marked spot. D - Tie above the shoulder Straps: (These straps will join in the front AND the back, and will be tied above the shoulders.) Place 4 st markers (2 in front and 2 in back left and right of each "underarm") about 3" in. Option A: Ch 1, \* sc2tog in next\*, repeat from \* to \* until you reach your first marker. (It is not necessary to complete the repetition. Just go until you can't anymore! @ ) {Ch 40, sk 2 chs, hdc in next 38 chs back down the chains), sc in next sts until you reach the next marker. Repeat from { to } Repeat from \* to \* again, join w/ sl st to ch 1. Fasten off andweave inends. Option B: Ch 1, \* sc2tog in next\*, repeat from \* to \* until you reach your first marker. (It is not necessary to complete the repetition. Just go until you can't anymore! @ ) {Ch 55, sk 2, hdc in last 53 chs back down the chains}, sc in next sts until you reach the next marker. Repeat from { to } Repeat from \* to \* again, join w/ sl st to ch 1. Fasten off and weaveinends. Option C: Ch 1, \* sc2tog in next\*, repeat from \* to \* until you reach your first marker. (It is not necessary to complete the repetition. Just go until you can't anymore! @ ) {Ch 40, sk 2 chs, hdc in next 38 chs back down the chains), sc in next sts until you reach the next marker. Repeat from { to } Repeat from \* to \* again, join w/ sl st to ch 1. Fasten off andweave inends. Option D: Ch 1,( \* sc2tog in next\*, repeat from \* to \* until you reach your first marker. It is not necessary to complete the repetition. Just go until you can't anymore! @ {Ch 55, sk 2 chs, hdc in next 53 chs back down the chainsl), repeat from ( to ) one more time, sc in sts to next marker. Repeat from { to } one more time, then \* to \* once more, join w sl st to ch 1. Fasten off and weave in ends.
@ Add buttons in the back or front if you made straps to button. Make it your own. @
6
Fits a chest up to 25"
With CC,Ch 120. Join w/ sl st taking care not to twist your chain. Rnd 1: Ch 1, sc in each ch around, join w sl st to ch 1. Rnd 2: Ch 3 (counts as dc from here on out), dc in next 5, 3 dc in next, dc in next 6, sk 2 ch, \*dc in next 6, 3dc in next, dc in next 6, sk 2\*, repeat from \* to \* around, join w/ sl st to ch3. Rnd 3: Sl st in next dc, pulling thru new color, ch 3, dc in next 5, 3 dc in next, dc in next 6, sk 2 dc, \*dc in next 6, 3 dc in next, dc in next 6, sk 2 dc\*, repeat from \* to \* around, join w/ sl st to ch 3. Repeat Rnd 3 until you reach 12", alternating between your MC and CC. This was 21 total rnds for me. End with your CC. Add extra rnds to make a tunic or more to make a dress! As written it will hit regular shirt length. Work 19" for a skirt when you want to add abodice.
Top border
Rnd 1: With MC, sl st in next st, ch 3, dc in next 2, hdc in next 3, sc (this will be the top of your chevron point) in next, hdc in next 3, dc in next 2, sk 2 dc, \*dc in next 3, hdc in next 3, sc in next, hdc in next 3, dc in next 3, sk 2 dc\*, repeat from \* to \* around. Join w Sl st to 1 st ch 3. Rnd 2: Sl st in next st,ch 2, hdc in next 10, sk 2, \*hdc in next 11, sk 2\*, repeat from \* to \* around, joining w/ sl st to ch 2. DO NOT FINISH OFF.
Optional Bodice:
If you don't want a bodice skip to Rnd 5. Rnd 3: Ch 2, (counts as 1t hdc), \*bphdc around next st\*, repeat from \* to \* around, join W sl st to ch 2. Repeat Rnd 4 until bodice measures approximately 5 inches.
Rnd 5:
Strap Options
Want to change strap colors? Change your colors now! @ Note: If you've made a bodice, replace the sc2tog w sc. If not, work as written. Note: \*\*If you want to make it with larger buttons holes, work your 1st 2 sts of the strap in dc instead ofhdc.\*\* A - Joined Straps from the front: (These straps will start from the front and be joined in the back by sewing or with a button. They will not be long enough to crisscross.) Place 2 st markers on the front (left and right of each "underarm") about 4 "in. B - Halter Straps: (These straps will join in the front and can be either tied around the neck or crisscross around the back and joined with a button) Place 2 st markers in the front (left and right of each "underarm") about 4 " in. C - Joined Straps from the back: (These straps will start in the back and be joined in the front with buttons. They will not be long enough to crisscross.) Place 2 st markers in the back (left and right of each "underarm") about 4 "in. Before you begin this Rnd, finish off and rejoin w/ a sl st to the back left st marked spot. D - Tie above the shoulder Straps: (These straps willjoin in the front AND the back, and will be tied above the shoulders.) Place 4 st markers (2 in front and 2 in back left and right of each "underarm") about 4 " in. Option A: Ch 1, \* sc in next, sc2tog in next\*, repeat from \* to \* until you reach your first marker. (It is not necessary to complete the repetition. Just go until you can't anymore! ) {Ch 40, sk 2 chs, hdc in next 38 chs back down the chains}, sc in next sts until you reach the next marker. Repeat from { to } Repeat from \* to \* again, join w/ sl st to ch 1. Fasten off and weave in ends. Option B: Ch 1, \* sc in next, sc2tog in next\*, repeat from \* to \* until you reach your first marker. (It is not necessary to complete the repetition. Just go until you can't anymore! ) {Ch 65, sk 2, hdc in last 63 chs back down the chains}, sc in next sts until you reach the next marker. Repeat from { to } Repeat from \* to \* again, join w/ sl st to ch 1. Fasten off and weave in ends. Option C: Ch 1, \* sc in next, sc2tog in next\*, repeat from \* to \* until you reach your first marker. (It is not necessary to complete the repetition. Just go until you can't anymore! ) {Ch 40, sk 2 chs, hdc in next 38 chs back down the chains}, sc in next sts until you reach the next marker. Repeat from { to } Repeat from \* to \* again, join w/ sl st to ch 1. Fasten off and weave in ends. Option D: Ch 1,( \* sc in next, sc2tog in next\*, repeat from \* to \* until you reach your first marker. It is not necessary to complete the repetition. Just go until you can't anymore! @ {Ch 65, sk 2 chs, hdc in next 63 chs back down the chains}), repeat from ( to ) one more time, sc in sts to next marker. Repeat from { to ↓ one more time, then \* to \* once more, join w sl st to ch 1. Fasten off and weave in ends. @ Add buttons in the back or front if you made straps to button. Make it your own. @
8
Fits a chest up to 26 %2
With CC,Ch 135. Join w/ sl st taking care not to twist your chain. Rnd 1: Ch 1, sc in each ch around, join w sl st to ch 1. Rnd 2: Ch 3 (counts as dc from here on out), dc in next 5, 3 dc in next, dc in next 6, sk 2 ch, \*dc in next 6, 3dc in next, dc in next 6, sk 2\*, repeat from \* to \* around, join w/ sl st to ch 3. Rnd 3: Sl st in next dc, pulling thru new color, ch 3, dc in next 5, 3 dc in next, dc in next 6, sk 2 dc, \*dc in next 6, 3 dc in next, dc in next 6, sk 2 dc\*, repeat from \* to \* around, join w/ sl st to ch 3. Repeat Rnd 3 until you reach 15", alternating between your MC and CC. This was 27 total rnds for me. End with your CC. Add extra rnds to make a tunic or more to make a dress! As written it will hit regular shirt length. Work 21" for a skirt when you want to add abodice. Rnd 1: With MC, sl st in next st, ch 3, dc in next 2, hdc in next 3, sc (this will be the top of your chevron point) in next, hdc in next 3, dc in next 2, sk 2 dc, \*dc in next 3, hdc in next 3, sc in next, hdc in next 3, dc in next 3, sk 2 dc\*, repeat from \* to \* around. Join w Sl st to 1 st ch 3. Rnd 2: Sl st in next st,ch 2, hdc in next 10, sk 2, \*hdc in next 11, sk 2\*, repeat from \* to \* around, joining w/ sl st to ch 2. DO NOT FINISH OFF.
Optional Bodice:
If you don't want a bodice skip to Rnd 5. Rnd 3: Ch 2, (counts as 1st hdc), \*bphdc around next st\*, repeat from \* to \* around, join W sl st to ch 2. Rnd 4: Ch 2, \*hdc in next st\*, repeat from \* to \* around, join w sl st to ch 2. Repeat Rnd 4 until bodice measures approximately 5 12 inches.
Rnd 5:
Strap Options
Want to change strap colors? Change your colors now! @ you've made a bodice, replace the sc2tog w sc. If not, work as written Note: \*\*If you want to make it with larger buttons holes, work your 1st 2 sts of the strap in dc instead of hdc. \*\* A - Joined Straps from the front: (These straps will start from the front and be joined in the back by sewing or with a button. They will not be long enough to crisscross.) Place 2 st markers on the front (left and right of each "underarm") about 4" in. B - Halter Straps: (These straps will join in the front and can be either tied around the neck or crisscross around the back and joined with a button) Place 2 st markers in the front (left and right of each "underarm") about 4 " in. C - Joined Straps from the back: (These straps will start in the back and be joined in the front with buttons. They will not be long enough to crisscross.) Place 2 st markers in the back (left and right of each "underarm") about 4 " in. Before you begin this Rnd, finish off and rejoin w/ a sl st to the back left st marked spot. D - Tie above the shoulder Straps: (These straps willjoin in the front AND the back, and will be tied above the shoulders.) Place 4 st markers (2 in front and 2 in back left and right of each "underarm") about 4 " in. Option A: Ch 1, \* sc2tog in next\*, repeat from \* to \* until you reach your first marker. (It is not necessary to complete the repetition. Just go until you can't anymore! @ ) {Ch 40, sk 2 chs, hdc in next 38 chs back down the chains}, sc in next sts until you reach the next marker. Repeat from { to } Repeat from \* to \* again, join w/ sl st to ch 1. Fasten off and weave in ends. Option B: Ch 1, \* sc2tog in next\*, repeat from \* to \* until you reach your first marker. (It is not necessary to complete the repetition. Just go until you can't anymore! @ ) {Ch 65, sk 2, hdc in last 63 chs back down the chains}, sc in next sts until you reach the next marker. Repeat from { to } Repeat from \* to \* again, join w/ sl st to ch 1. Fasten off and weaveinends. Option C: Ch 1, \* sc2tog in next\*, repeat from \* to \* until you reach your first marker. (It is not necessary to complete the repetition. Just go until you can't anymore! ? ) {Ch 40, sk 2 chs, hdc in next 38 chs back down the chains}, sc in next sts until you reach the next marker. Repeat from { to } Repeat from \* to \* again, join w/ sl st to ch 1. Fasten off andweave inends. Option D: Ch 1,( \* sc2tog in next\*, repeat from \* to \* until you reach your first marker. It is not necessary to complete the repetition. Just go until you can't anymore! @ {Ch 65, sk 2 chs, hdc in next 63 chs back down the chains]), repeat from ( to ) one more time, sc in sts to next marker. Repeat from { to } one more time, then \* to \* once more, join w sl st to ch 1. Fasten off and weave in ends. @ Add buttons in the back or front if you made straps to button. Make it your own. @
10
Fits a chest up to 28"
With CC,Ch 135. Join w/ sl st taking care not to twist your chain. Rnd 1: Ch 1, sc in each ch around, join w sl st to ch 1. Rnd 2: Ch 3 (counts as dc from here on out), dc in next 5, 3 dc in next, dc in next 6, sk 2 ch, \*dc in next 6, 3dc in next, dc in next 6, sk 2\*, repeat from \* to \* around, join w/ sl st to ch 3. Rnd 3: Sl st in next dc, pulling thru new color, ch 3, dc in next 5, 3 dc in next, dc in next 6, sk 2 dc, \*dc in next 6, 3 dc in next, dc in next 6, sk 2 dc\*, repeat from \* to \* around, join w/ sl st to ch 3. Repeat Rnd 3 until you reach 17", alternating between your MC and CC. This was 29 total rnds for me. End with your CC. Add extra rnds to make a tunic or more to make a dress! As written it will hit regular shirt length. Work 23" for a skirt when you want to add abodice.
Top border
Rnd 1: With MC, sl st in next st, ch 3, dc in next 2, hdc in next 3, sc (this will be the top of your chevron point) in next, hdc in next 3, dc in next 2, sk 2 dc, \*dc in next 3, hdc in next 3, sc in next, hdc in next 3, dc in next 3, sk 2 dc\*, repeat from \* to \* around. Join w Sl st to 1st ch 3. Rnd 2: Sl st in next st,ch 2, hdc in next 10, sk 2, \*hdc in next 11, sk 2\*, repeat from \* to \* around, joining w/ sl st to ch 2. DO NOT FINISH OFF.
Optional Bodice:
If you don't want a bodice skip to Rnd 5. Rnd 3: Ch 2, (counts as 1st hdc), \*bphdc around next st\*, repeat from \* to \* around, join w sl st to ch 2. d 4: Ch 2, \*hdc in next st\*, repeat from \* to \* around, join w sl st to ch 2 Repeat Rnd 4 until bodice measures approximately 6 inches.
Rnd 5:
Strap Options
Want to change strap colors? Change your colors now! @ Note: If you've made a bodice, replace the sc2tog w sc. If not, work as written. Note: \*\*f you want to make it with larger buttons holes, work your 1st 2 sts of the strap in dc instead ofhdc.\*\* A - Joined Straps from the front: (These straps will start from the front and be joined in the back by sewing or with a button. They will not be long enough to crisscross.) Place 2 st markers on the front (left and right of each "underarm") about 4" in. B - Halter Straps: (These straps will join in the front and can be either tied around the neck or crisscross around the back and joined with a button) Place 2 st markers in the front (left and right of each "underarm") about 4 " in. C - Joined Straps from the back: (These straps will start in the back and be joined in the front with buttons. They will not be long enough to crisscross.) Place 2 st markers in the back (left and right of each "underarm") about 4 " in. Before you begin this Rnd, finish off and rejoin w/ a sl st to the back left st marked spot. D - Tie above the shoulder Straps: (These straps will join in the front AND the back, and will be tied above the shoulders.) Place 4 st markers (2 in front and 2 in back left and right of each "underarm") about 4 " in. Option A: Ch 1, \* sc in next 2, sc2tog in next\*, repeat from \* to \* until you reach your first marker. (It is not necessary to complete the repetition. Just go until you can't anymore! ? ) {Ch 45, sk 2 chs, hdc in next 43 chs back down the chains}, sc in next sts until you reach the next marker. Repeat from { to } Repeat from \* to \* again, join w/ sl st to ch 1. Fasten off and weave in ends. Option B: Ch 1, \* sc in next 2, sc2tog in next\*, repeat from \* to \* until you reach your first marker. (Ilt is not necessary to complete the repetition. Just go until you can't anymore! ? ) {Ch 70, sk 2, hdc in last 68 chs back down the chains}, sc in next sts until you reach the next marker. Repeat from { to } Repeat from \* to \* again, join w/ sl st to ch 1. Fasten off and weave in ends. Option C: Ch 1, \* sc in next 2, sc2tog in next\*, repeat from \* to \* until you reach your first marker. (lt is not necessary to complete the repetition. Just go until you can't anymore! ? ) {Ch 45, sk 2 chs, hdc in next 43 chs back down the chains}, sc in next sts until you reach the next marker. Repeat from { to } Repeat from \* to \* again, join w/ sl st to ch 1. Fasten off and weave in ends. Option D: Ch 1,( \*sc in next 2, sc2tog in next\*, repeat from \* to \* until you reach your first marker. It is not necessary to complete the repetition. Just go until you can't anymore! {Ch 70, sk 2 chs, hdc in next 68 chs back down the chains]), repeat from ( to ) one more time, sc in sts to next marker. Repeat from { to } one more time, then \* to \* once more, join w sl st to ch 1. Fasten off and weave in ends. Add buttons in the back or front if you made straps to button. Make it your own. @