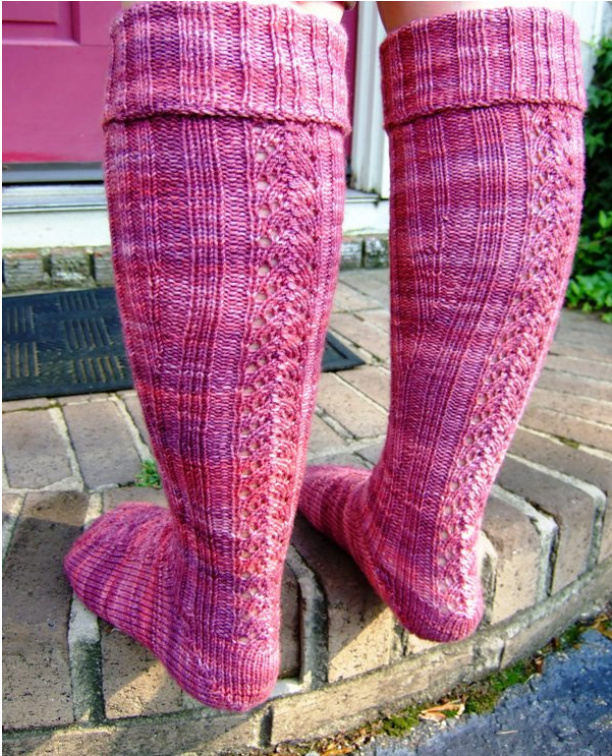
Red Dwarf Socks The Knee-High Version
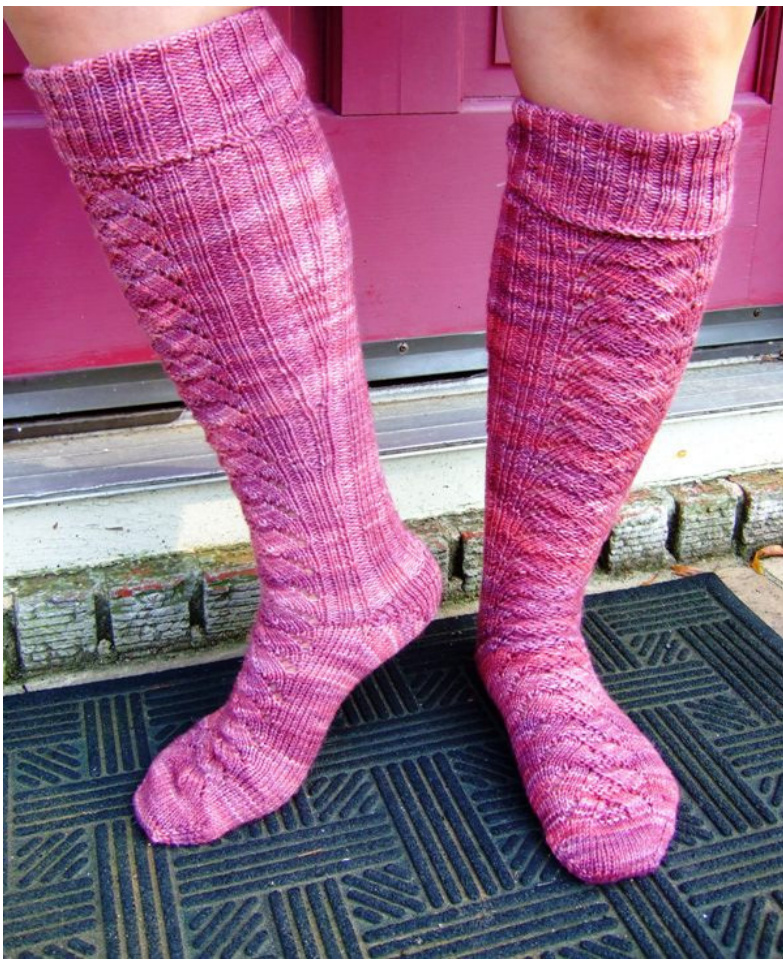
Written for a foot with a circumference of $8\,3/4^{\circ}$ but with plenty of opportunity to adjust for other sizes. It's toe up! Try it on! I'm gonna get you little fishies, I'm gonna get you little fish Be the coolest cat on the ship in your Red Dwarf socks. Gauge - 12 stitches over 2 inches Using the Magic Cast-On from Knitty, Cast On 22 stitches. (11 on each needle) Round 1: Knit all the stitches on needle 1. On needle 2 you will have to knit each stitch through the back legs to keep them seated correctly. This is the only round you will have to do this.
Round 2: K1 M1 Knit to 1 stitch before the end, M1 K1. Round 3: Knit
Repeat these two rounds until there are a total of 50 stitches on the needles or until the toe fits over your first 4 toes and just touches your pinky toe. (If you have more than 5 toes, um, you may want to repeat those increases a few more times. And if you have 6 fingers on your right hand, somebody is looking for you. Goes by the name “Inigo Montoya")

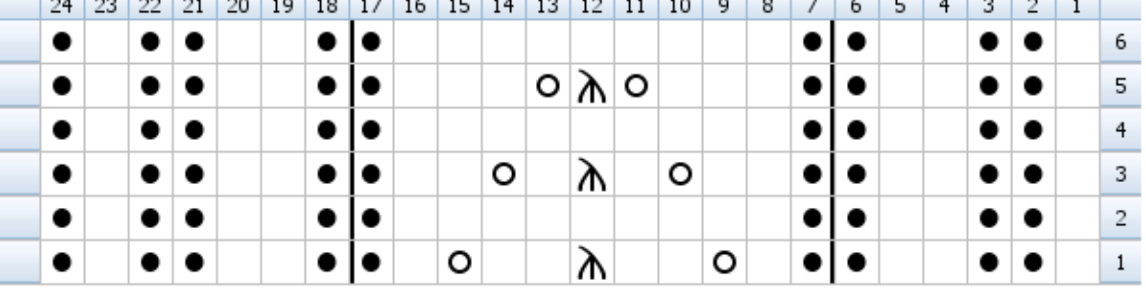
Now we look to the Fish-Scale Lace Chart! (Found at the end of the pattern) Repeat this chart until the sock is long enough to hit the base of your heel or the little knobby bit of your ankle, or about 2 inches from the back of your heel. (For me, this was 8 pattern repeats and my foot is 10 inches long.) On to the smegging heel! A note - We're doing the heel Cat Bordhi style now. When I say “conceal the wrap" you're gonna take your needle and lift the wrap from the PUBLIC side of your knitting, entering it as if to knit, and lift that leg of it over the stitch it was wrapping. Knit the stitch that was wrapped, turn your work. Cat has a kick ass You Tube video showing you what the hell I mean here: http://www.youtube.com/watch?v=kFrVqx-iN7k ) First - to figure out how many stitches YOU need for your heel, here's the way the hamster in my brain runs his wheel. Put the sock on and measure how far you have to knit until you reach the back of your foot. For this example, it's 2 inches. We didn't care about row gauge until just now, so measure that. For me, my row gauge is 9 rows to the inch. So I have to complete my heel in 18 rows. There's wrapped stitches on both sides of the heel so I divide that by 2 and get 9. So I need 9 wrapped stitches on each side. Since we're working this heel over 25 stitches, this leaves me 7 unworked stitches for my heel cup, or just over an inch wide in the center. The pointy part of my heel at the very back is happy with that measurement, so we press on. Wrap & turn (w&t) defined: take the yarn to the public side of the knitting, slip the next stitch purlwise, move the yarn back to the non-public side, turn the work. Row 1: P 24 wrap & turn Row 2: K23 w&t Row 3: P22 w&t Row 4: K21 w&t Row 5: P20 w&t Row 6: K19 w&t Row 7: P18 w&t Row 8: K17 w&t Row 9: P16 w&t Row 10: K15 w&t Row 11: P14 w&t Row 12: K13 w&t Row 13: P12 w&t Row 14: K11 w&t Row 15: P10 w&t Row 16: K9 w&t Row 17: P8 w&t Row 18: K7 w&t Now we get on with the increasing and turn this smegging heel! Row 1: P7 conceal the wrap, turn the work Row 2: K8 conceal the wrap, turn the work Row 3: P9 conceal the wrap, turn the work Row 4: K10 conceal the wrap, turn the work Row 5: P11 conceal the wrap, turn the work Row 6: K12 conceal the wrap, turn the work Row 7: P13 conceal the wrap, turn the work Row 8: K14 conceal the wrap, turn the work Row 9: P15 conceal the wrap, turn the work Row 10: K16 conceal the wrap, turn the work Row 11: P17 conceal the wrap, turn the work Row 12: K18 conceal the wrap, turn the work Row 13: P19 conceal the wrap, turn the work Row 14: K20 conceal the wrap, turn the work Row 15: P21 conceal the wrap, turn the work Row 16: K22 conceal the wrap, turn the work Row 17: P23 conceal the wrap, turn the work Row 18: K24 conceal the wrap and you're done with the hi Continue across the instep (needle 1) with the fish-scale lace pattern wherever it was you left off when you started the heel and begin the Fishtail Lace chart on needle 2. Now, outside of the markers (the bold lines on the chart) you can play around with the ribbing depending on how many stitches you needed for your sock. That's the beauty of the pattern! Don't stress out if you can't match what I did with the ribbing. For MY sock, I chose to set up the random ribbing as follows (keeping in mind that my sock ended up at 50 stitches after my toe increases If yours ended up with a different stitch count, do something different with your ribbing!):
twist the bar and leave no holes. Needle 1 (instep): P1 K2 P1 \*fish scale lace pattern\* P1 K2 P1 Needle 2: K1 P2 K3 P1 \*fish tale lace pattern\* P1 K3 P2 K1 Repeat the two charts on the cuff until there are 12 complete repeats of the Fish-scale Lace panel up the instep of your sock (Or, about 4 more repeats since you turned your heel): Now we begin our calf shaping. How did I figure out when to increase? I used the super-scientific method of trying on the sock and increasing when I felt like it might be a good idea. You can do the same thing. What follows is that same hamster running the wheel in my brain. $\mathbf{M}1\mathbf{K}=\mathbf{M}\mathbf{a}\mathbf{k}\mathbf{e}\mathrm{~}1$ Knit stitch. Lift the bar between two stitches by picking it up from the front of the knitting to the back. Knit this bar through the back legs. This will M1P = Make 1 Purl stitch. Lift the bar between two stitches by picking it up from the front of the knitting to the back. Purl the back leg of the stitch by entering from the left to the right of the back leg. This will twist the bar and leave no holes. At the last row of the $12^{\mathrm{th}}$ pattern repeat: Needle 2: K1 M1K P2 K3 P1 \*fish tale lace pattern\* P1 K3 P2 M1K K1 Knit 12 rows in pattern then: Needle 2: M1P K2 P2 K3 P1 \*fish tale lace pattern\* P1 K3 P2 K2 M1P Knit 15 rows in pattern then: Needle 2: P1 K1 M1P K1 P2 K3 P1 \*fish tale lace pattern\* P1 K3 P2 K1 M1P K1 P1 Knit 2 rows in pattern then: Needle 2: P1 K1 P1 M1P K1 P2 K3 P1 \*fish tale lace pattern\* P1 K3 P2 K1 M1P P1 K1 P1 Copyright Cristi H. Brockway at htp://turtlegirl176.com Please do not photocopy, send your friends to the website to print out their own damn copy. Knit 9 rows in pattern then: Needle 2: P1 K1 P2 M1P K1 P2 K3 P1 \*fish tale lace pattern\* P1 K3 P2 K1 M1P P2 K1 P1 Knit 4 rows in pattern then: Needle 2: P1 K1 P3 K1 M1K P2 K3 P1 \*fish tale lace pattern\* P1 K3 P2 M1K K1 P3 K1 P1 Knit 4 rows in pattern then: Needle 2: P1 K1 P3 K2 M1K P2 K3 P1 \*fish tale lace pattern\* P1 K3 P2 M1K K2 P3 K1 P1 Knit 6 rows in pattern then: Needle 2: P1 K1 P3 K3 P2 M1P K3 P1 \*fish tale lace pattern\* P1 K3 M1P P2 K3 P3 K1 P1 Knit 2 rows in pattern then: Needle 2: P1 K1 P3 K2 M1P K1 P3 K3 P1 \*fish tale lace pattern\* P1 K3 P3 K1 M1P K2 P3 K1 P1 Knit 6 rows in pattern then: Needle 2: P1 K1 P3 K2 P1 M1P K1 P3 K3 P1 \*fish tale lace pattern\* P1 K3 P3 K1 M1P P1 K2 P3 K1 P1 Knit 8 rows in pattern then: Needle 2: P1 K1 P3 K2 P2 K1 M1K P3 K3 P1 \*fish tale lace pattern\* P1 K3 P3 M1K K1 P2 K2 P3 K1 P1 Continue knitting in pattern until there are a total of 25 patterm repeats of the fish-scale lace patterm up the entire instep of your sock. At this point in my sock, this took 27 more rows of knitting in pattern. Then I felt ready for some ribbing. In the random ribbing portion (or, anywhere NOT where the lace patterns were) Knit the Purls and Purl the Knits. We're switching it up so that when you fold the cuff down the ribbing matches up with your sock. This is what I did for the pattern portion of each needle. Across the 17 stitches of the Fish-scale lace pattern: P2 K1 P2 K1 P2 K1 P2 K1 P2 K1 P2 Across the 9 stitches of the Fish-tale lace pattern: P1 K2 P1 K1 P1 K2 P1 Do 52 rows of this ribbing, or about $5\:\%$ , Use Elizabeth Zimmerman's Sewn Bind-off for a super stretchy bind off. (This bind off uses a darning needle, you enter two stitches on the needle as if to purl, go back through the first stitch on the needle as if to knit and drop it off the needle. Rinse, wash, repeat until you're done.) Eat a bowl of gazpacho soup while wearing your cozy socks. Note: I placed markers where the bold lines are just to keep me straight with the repeats as the pattern is easily memorized once you get going. If you aren't a stitch marker person, don't worry. They aren't necessary to the pattern. Please ignore that there's 24 stitches on this chart going across. Just center it over however many stitches you have on the instep needle. Once you turn the heel, do a purl stitch before the marker.
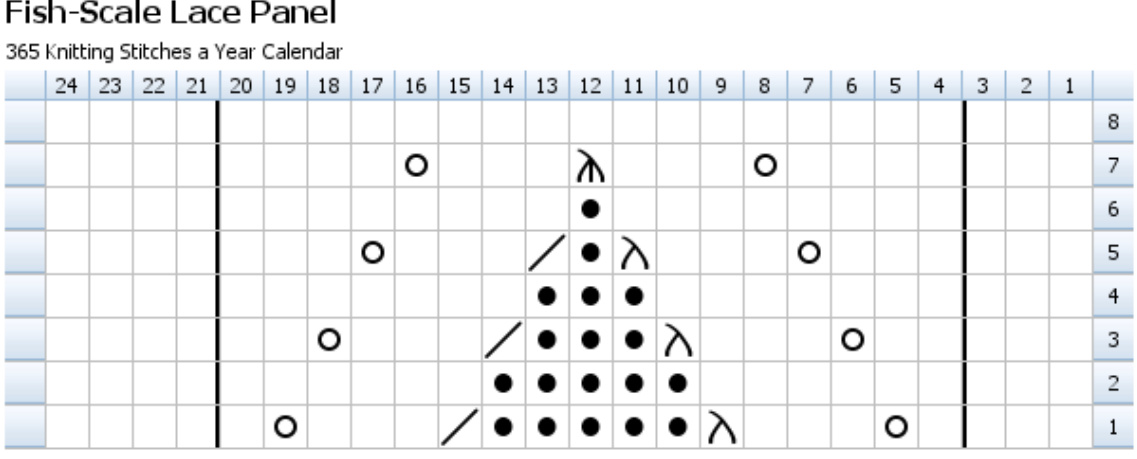
Created in Knit Visualier (www.knitoundry.com) Notes:
See that bit about the smiley faces? Ignore that. I took 'em out and forgot to erase that note. Once you turn the heel, the stitches outside of the dark bars (where your markers are) can be done as follows: Please do not photocopy, send your friends to the website to print out their own damn copy.
K2 P1 sl marker - PATTERN - sl marker P1 K2 P1
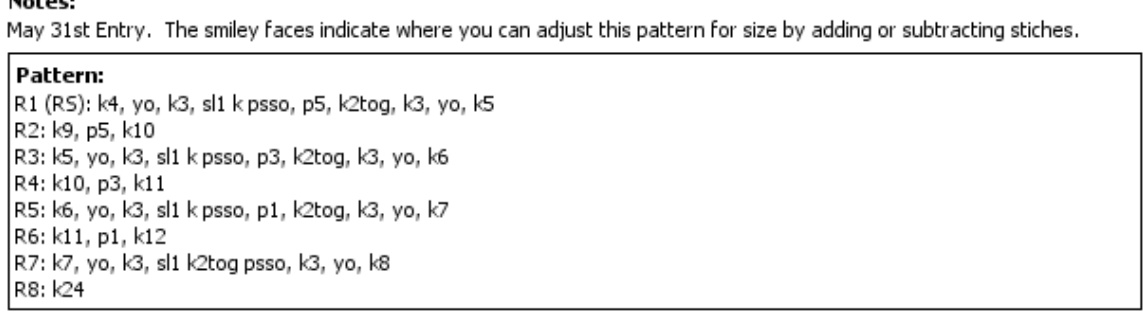
Fishtail Lace Panel
Legend:
knit knit stitch purl purl stitch yo Yarn Over $\leftrightsquigarrow$ ssipstchvrtg Created in Knit Visualizer (www.knitfoundry.com) Notes: May 2nd Entry - The ribbing on either side of the dark bars can be altered to your own preference. |Pattern: R1 (Rs): k1, p2, k2, p2, k1, yo, k2, sl1 k2tog psso, K2, yo, k1, p2, k2, p2, k1, p1 R2: k1, p2, k2, p2, k9, p2, k2, p2, k1, p1 R3:k1, p2, k2, p2, k2, yo, k1, sl1 k2tog pso, k1, yo, k2, p2, k2, p2, k1, p1 R4: k1, p2, k2, p2, k9, p2, k2, p2, k1, p1 R5: k1, p2, k2, p2, k3, yo, sl1 k2tog psso, yo, k3, p2, k2, p2, k1, p1 R6: k1, p2, k2, p2, k9, p2, k2, p2, k1, p1


