SNOW SWELLS ORNAMENT
Crochet In 2 hours
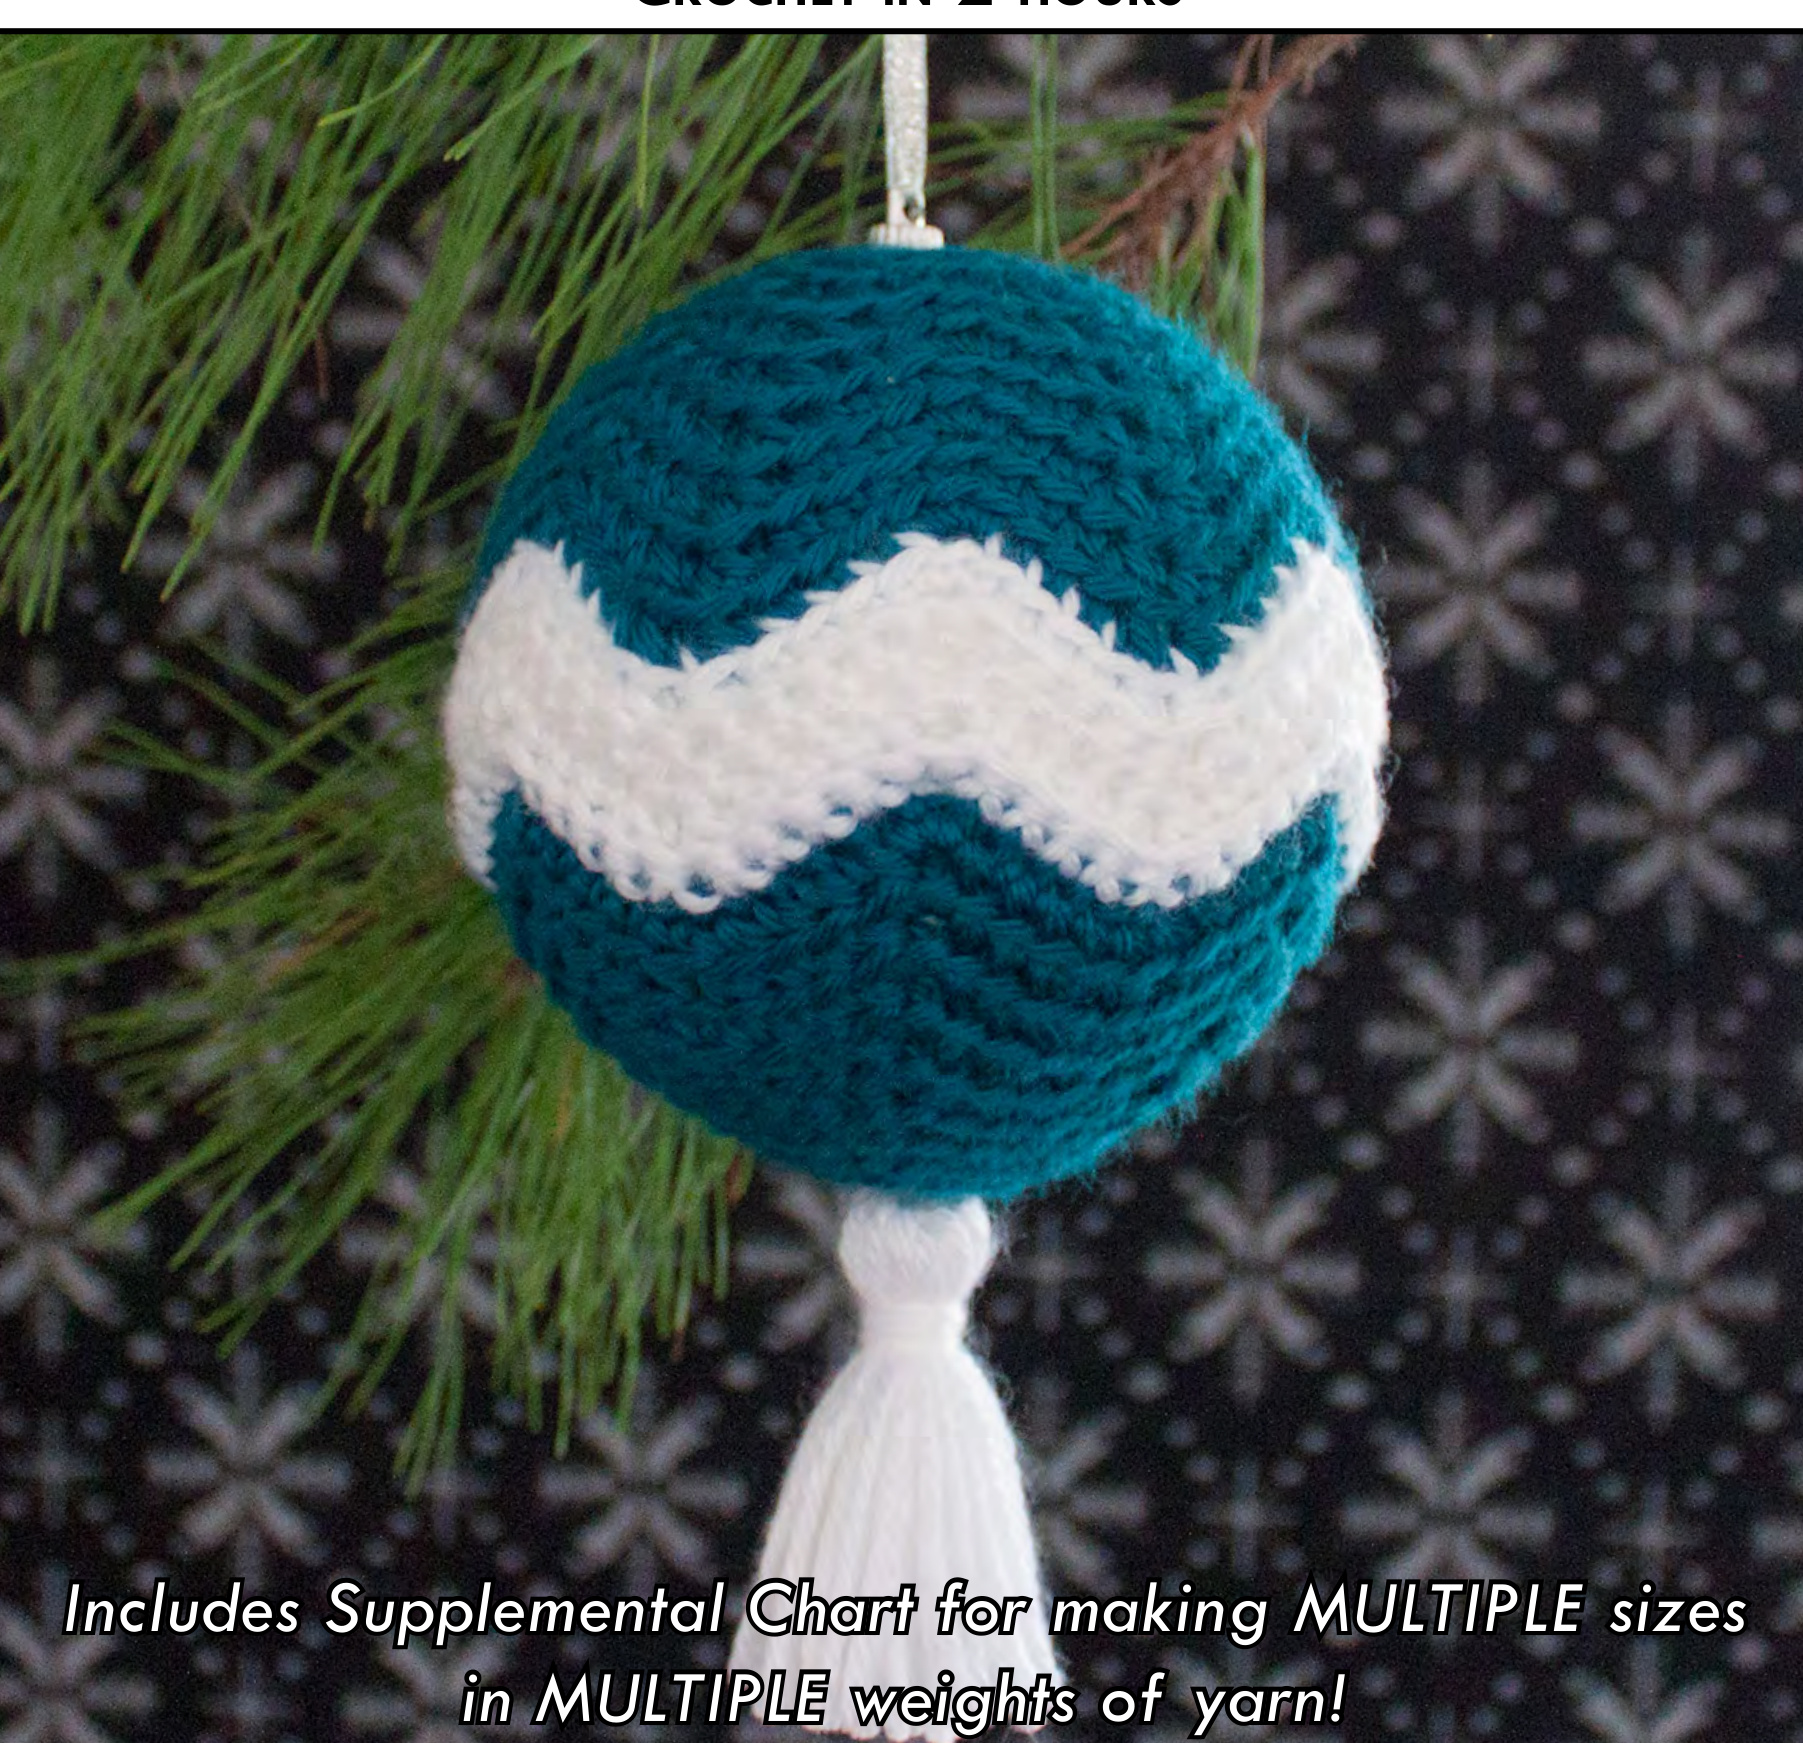
000 intermediate
ABBREVIATIONS
beg = beginning; BL = back loop; ch = chain; Ip(s) = loop(s); rep = repeat; rnd(s) = round(s); RS = right side; sc = single crochet; sk = skip; sl st = slip stitch; st(s) = stitch(es); tog = together; WS = wrong side; YO = yarn over. Note: Abbreviations inside curly brackets should be repeated in sequence the designated number of times. For example, {2 sc in next sc, sc in next sc} 2 times means "2 sc in next sc, sc in next sc, 2 sc in next sc, sc in next sc."
FINISHEDMEASUREMENT
4" [10cm] round, excluding tassel
MATERIALS
MEDIUM Medium Weight (Worsted) Yarn - 40 yards [37 meters] of Color A. WEIGHT - 25 yards [23 meters] of Color B. Caron Simply Soft (100% acrylic), #0014 Pagoda [A] and #9701 White [B] used formodel. Crochet hook, size G-6 [4.25mm] or size needed to produce the Stitch Gauge Stitch marker One 4" [1o0mm] round craft foam ornament Piece of cardboard, 3" [7.5cm] high, for tassel Craftglue STITCH GAUGE 17 sc = 4" [10cm]
SPECIAL STITCH
Single crochet 2 stitches together [Sc2tog]:
Insert hook in next st, YO and pull up a Ip [2 Ips on hook], insert hook in next st, YO and pull up a Ip [3 Ips on hook], then YO and draw through all 3 Ips on hook.
www.1ohoursorless.com
Snow Swells 2
PATTERN NOTES
Cover is worked in rnds. To change color with last sl st, insert hook in st; with new color, YO and draw through both the st and Ip on hook to complete sl st and change color.
INSTRUCTIONS
Cover
With Color A, ch 2. Notes: Rnds 1-9 are worked in unjoined RS rnds. Mark first st on Rnd 1 for beg of rnd and move marker up to first st on each following rnd. Rnd 1 [RS]: Work 6 sc in 2nd ch from hook: 6 sc. Note: For Rnds 2-23, work all sts in BL. Rnd 2: {2 sc in next sc} 6 times: 12 sc. Rnd 3: {2 sc in next sc, sc in next sc} 6 times: 18 sc. Rnd 4: {Sc in next 2 sc, 2 sc in next sc} 6 times: 24 sc. Rnd 5: {Sc in next sc, 2 sc in next sc, sc in next 2 sc} 6 times: 30 sc. Rnd 6: {Sc in next 2 sc, 3 sc in next sc, sc in next 2 sc} 6 times: 42 sc. Rnd 7: {Sc2tog, sc in next sc, 3 sc in next sc, sc in next sc, sc2tog} 6 times. Rnd 8: {Sc in next 3 sc, 3 sc in next sc, sc in next 3 sc} 6 times: 54 sc. Rnd 9: {Sc2tog, sc in next 2 sc, 3 sc in next sc, sc in next 2 sc, sc2tog} 6 times.
Snow Swelle 3
Note: Rnds 10-14 are worked in joined rnds. Rnd 10: {Sc in next 4 sc, 3 sc in next sc, sc in next 4 sc} 6 times; join with sl st in first sc, changing to Color B with last sl st: 66 sc. Ch 1, turn. Rnd 11 [Ws]: {Sk next sc, sc in next 4 sc, 3 sc in next sc, sc in next 4 sc, sk next sc} 6 times; join with sl st in first sc. Ch 1, turn. Rnd 12: {Sc2tog, sc in next 3 sc, 3 sc in next sc, sc in next 3 sc, sc2tog} 6 times; join with sl st in first sc. Ch 1, turn. Rnd 13 [WS]: Rep Rnd 11. Rnd 14: {Sc2tog, sc in next 3 sc, 3 sc in next sc, sc in next 3 sc, sc2tog} 6 times; join with sl st in first sc, changing to Color A with last sl st. Ch 1, but do not turn. Notes: Rnds 15-23 are worked in unjoined RS rnds. Mark first st on Rnd 15 for beg of rnd and move marker up to first st on each following rnd. Rnd 15 [Rs]: {Sc2tog, sc in next 3 sc, 3 sc in next sc, sc in next 3 sc, sc2tog} 6 times. Rnd 16: {Sc2tog, sc in next 7 sc, sc2tog} 6 times: 54 sc. Rnd 17: {Sc2tog, sc in next 2 sc, 3 sc in next sc, sc in next 2 sc, sc2tog} 6 times. Rnd 18: {Sc2tog, sc in next 5 sc, sc2tog} 6 times: 42 sc. Rnd 19: {Sc2tog, sc in next sc, 3 sc in next sc, sc in next sc, sc2tog} 6 times. After working Rnd 19, insert ornament into Cover with hanger at top. Carefully remove hanger from ornament and set aside; then continue with Rnd 20.
Snow Swells 4
Note: Rnds 20-23 are worked with ornament inside Cover. Rnd 20: {Sc2tog, sc in next 3 sc, sc2tog} 6 times: 30 sc. Rnd 21: {Sc2tog, 3 sc in next sc, sc2tog} 6 times. Rnd 22: {Sc2tog, sc in next sc, sc2tog} 6 times: 18 sc. 2tog, sc in next sc} 6 times; join with sl st in first sc: 12 sc After working Rnd 23, fasten off.
FINISHING
Tassel
Cut one 6" [15cm] length of Color B and place across top edge of cardboard. Wrap Color B from skein over cardboard and length at top 30 times. Tie ends of 6" [15cm] length tog tightly at top, then cut yarn at bottom of cardboard. Cut one 14" [36cm] length of Color B and wrap 5 times around tassel 12" [1.3cm] from top. Tie ends of 14" [36cm] length tog to secure. Sew top of Tassel to bottom of Cover. Glue hanger back onto top of ornament.
Snow Swells Supplement
INGMULTIPLESIZESINMULTIPLEWEIGHTSOFYAR
| Yarn Weight | Stitch Gauge | Finished Measurement 2" [5cm] round |
| LACE 0 WEIGHT | Lace Weight | 32-36 sC = 4" [10cm] |
| SUPER FINE WEIGHT | Super Fine Weight (Fingering) 26-28 sc = 4" [10cm] | 21/2" [6.5cm] round |
| FINE Fine Weight (Sport) WEIGHT | 22-24 sc = 4" [10cm] | 3" [7.5cm] round |
| LIGHT Light Weight (DK) WEIGHT or MEDIUM WEIGHT | Medium Weight (Worsted) | 17-18 sC = 4"[10cm] 4" [10cm] round |
| MEDIUM WEIGHT | Medium Weight (Worsted) | 13-14 sC = 4"[10cm] 5"[12.5cm] round |
| BULKY Bulky Weight (Chunky) WEIGHT | 11-12 sC = 4" [10cm] | 6" [15cm] round |
THaNk You FOr ChOoSing

@ 2014 House of Shaheen, Inc., 1 30 Sapphire Dr, Interlachen, FL 32148. Allrights reserved. Reproduction or distribution of this publication in part or in whole is prohibited without written permission from the publisher. This includes, but is not limited to, any form or reproduction or distribution on or through the internet, including posting, scanning or email transmission. We have made every effort to ensure that these instructions are both accurate and complete. However, we cannot be responsible for human error, typographical mistakes or variations in individual work.


