Pink Rilbon ochs
By Laura Spradlin www.sugarbunnyblvd.com Yarn: 100g fingering weight in your favorite gauge Suggested Yarn: Sugar Bunny Boulevard "Katherine" Techniques used in the pattern: K2P2 ribbing K2tog SSK Cable 3x3 (C6L) Basic sock construction (wedge toe, heel flap, picking up stitches along heel flap, gusset decreases) Following a lace and cable chart Needles and Gauge:
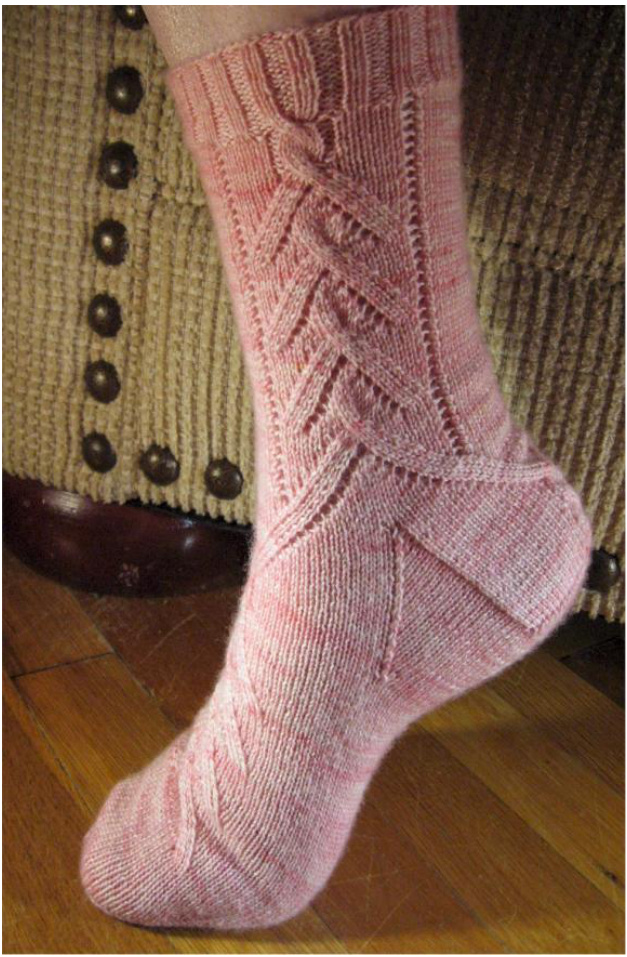
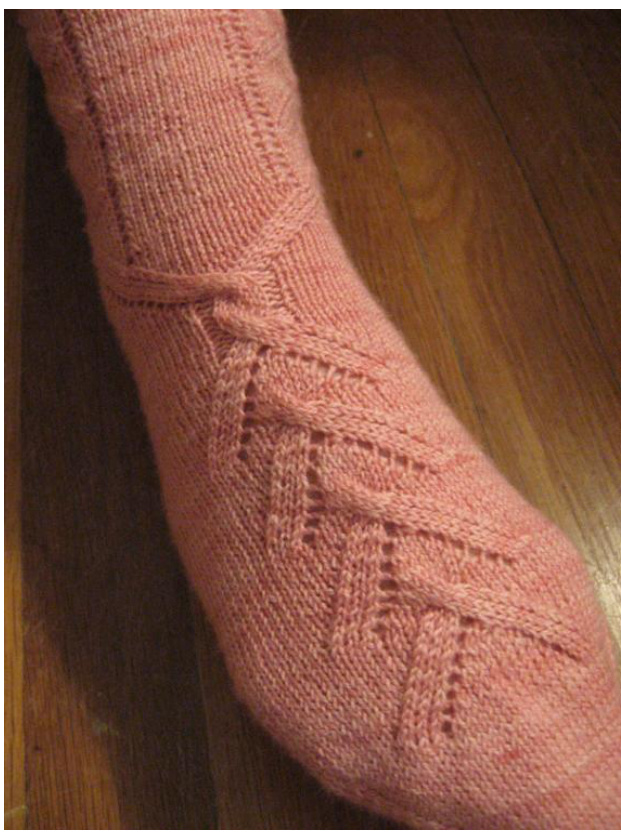
the Magic Loop method. Pattern can be converted to two circulars with no modifications. Suggested caston numbers are 56, 64, 72, and 80 with a gauge of 9 stitches per inch in stockinette using US0 40" circular needles with a light fingering weight yarn. Use whatever needle size necessary to achieve a gauge you like with the yarn you're using and one of the caston numbers willfit into that range. The Pink Ribbon Lace pattern begins at the top and goes down each side of the leg, separating at the gusset, carrying the ribbons to meet in the front and the back. The Pink Ribon Lace pattern continues down the front of the foot and at the heel concludes with a cable twist. The foot and leg can be adjusted in length by adding or subtracting repeats from the pattern, or adding stockinette at the end of the foot. Complete instructions are given in the pattern for heel flap construction, turning the heel, gusset decreases and completing the toe. Alternate toe construction can be substituted for what is given in the pattern.
STITCH LEGEND
K Knit P Purl SSK Slip Slip Knit (slip the nest two stitches one at a time, as if to knit, to the right needles; transfer back to the left needle. Knit the two stitches together through the back loops at the same time.) SSP Slip Slip Purl (slip the next two stitches one at a time, as if to knit, to the right needle; transfer back to the left needle. Purl the two stitches together through the back loops at the same time.) K2tog Knit two stitches together P2tog Purl two stitches together YO Yarn Over M Make one stitch using backward loop caston C6L Cable Six Left (put three stitches on a cable needle, hold to the front of your work, knit the next three stitches, knit three stitches from cable needle) S1P Slip one stitch purlwise S1K Slip one stitch knitwise
INSTRUCTIONS
Cuff Using the long tail method, cast on 56 (64, 72, 80) stitches, dividing the number of stitches evenly between the two needles. If you cast on 56 or 72 stitches, begin ribbing with K1, P2 (K2 P2) until one stitch remains on the needle. Knit the last stitch. If you cast on 64 or 80 stitches, begin ribbing with P1, K2 (P2 K2) until one stitch remains on the needle. Purl the last stitch. Continue ribbing for 1-2 inches, whatever you preference may be for a sock cuff.
Leg
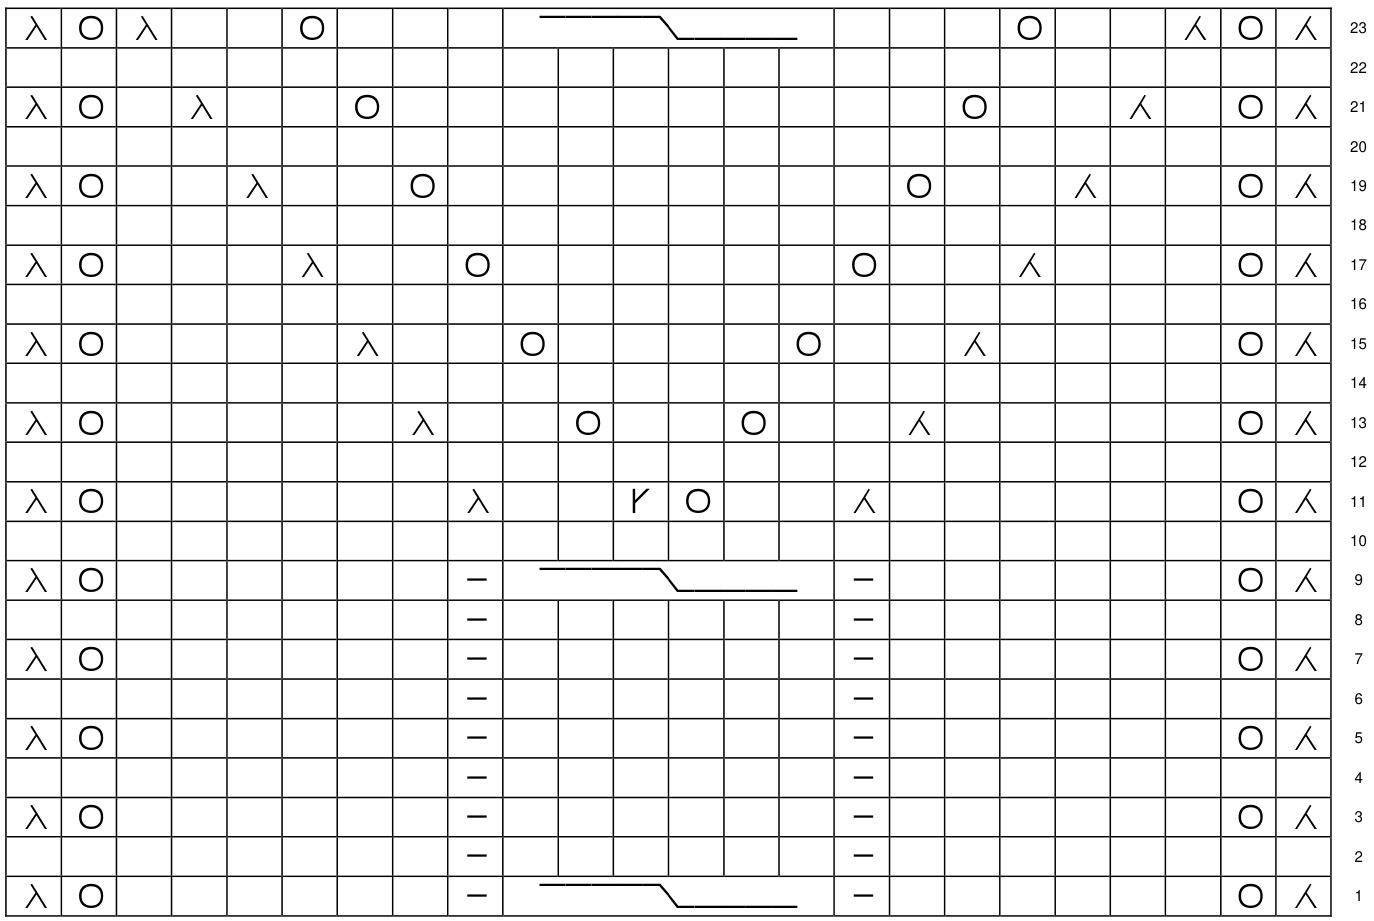
The Pink Ribbon Lace pattern can be knit following a lace chart or written instructions. The Pink Ribbon Lace chart is on page 7 of this pattern. Written instructions are as follows: Note 1: All odd and even rows begin and end each needle with K2 (4, 6, 8). Note 2: All even numbered rows beginning with Row 10 are Knit all the way around. Note 3: Repeat rows 10-23 two times then repeat row 10-22 one time. Instructions to continue the lace pattern follow below with Row 23a. Row 1 K2tog, YO, K6, P1, C6L, P1, K6, YO, SSK Row 2, 4, 6 and 8 K8, P1, K6, P1, K8 Row 3, 5, and 7 K2tog, YO, K6, P1, K6, P1, K6, YO, SSK Row 9 K2tog, YO, K6, P1, C6L, P1, K6, YO, SSK Row 10 and all further even numbered rows: Knit around Row 11 K2tog, YO, K6, K2tog, K2, YO, M, K2, SSK, K6, YO, SSK Row 13 K2tog, YO, K5, K2tog, K2, YO, K2, YO, K2, SSK, K5, YO, SSK Row 15 K2tog, YO, K4, K2tog, K2, YO, K4, YO, K2, SSK, K4, YO, SSK Row 17 K2tog, YO, K3, K2tog, K2, YO, K6, YO, K2, SSK, K3, YO, SSK Row 19 K2tog, YO, K2, K2tog, K2, YO, K8, YO, K2, SSK, K2, YO, SSK Row 21 K2tog, YO, K1, K2tog, K2, YO, K10, YO, K2, SSK, K1, YO, SSK Row 23 K2tog, YO, K2tog, K2, YO, K3, C6L, K3, YO, K2, SSK, YO, SSK After repeats, complete lace pattern as follows: Row 23a K2tog, YO, K2tog, K12, YO, SSK, K1, YO, SSK Knit 1 round Heel Set-Up Your working yarn should be at the beginning of the round, lined up with the cast-on yarn tail, which will be at the center back of the sock leg once we rearrange the heel stitches thus: K3 (5, 7, 9), K2tog, K2, YO, K7 At this point there are 14 (16, 18, 20) stitches on the left needle and 14 (16, 18, 20) stitches on the right. Pull your left needle through (out to the right) so that the left loop disappears. The stitches that were on the left now become part of the top of the sock and your needles will have the front and back half on each needle rather than left and right sides as it was while knitting the leg. The stitches that were just knit "in pattern" are now half of your heel stitches. Magic Loop knitters should arrange their cable loops so that each needle holds 28 (32, 36, 40) stitches, splitting half way across the Pink Ribbon Lace pattern so that each “ribon tail" will continue travelling to the front or back of the sock.
Heel Flap
Row 1 (ws) S1P, P16 (20, 24, 28), SSP, P2, YO, P7 Row 2 (rs) S1K, K7, YO, K2, SSK, K4 (8, 12, 16), K2tog, K2, YO, K8 Odd Rows 3 - 17\* S1P, Purl across. 28 (32, 36, 40) total stitches on heel flap Row 4 S1K, K8, YO, K2, SSK, K2 (6, 10, 14), K2tog, K2, YO, K9 Row 6 S1K, K9, YO, K2, SSK, K0 (4, 8, 12), K2tog, K2, YO, K10 \* If you cast on 56 total stitches, after completing row 7, skip to Row 20. Row 8S1K, K10, YO, K2, SSK, $\mathsf{K}^{\star}$ (2, 6, 10), K2tog, K2, YO, K11Row 10 S1K, K11, YO, K2, SSK, $\mathsf{K}^{\star}$ (0, 4, 8), K2tog, K2, YO, K12 \* If you cast on 64 total stitches, after completing row 11, skip to Row 20 Row 12 S1K, K12, YO, K2, SSK, $\mathsf{K}^{\star}$ (\*, 2, 6), K2tog, K2, YO, K13 Row 14S1K, K13, YO, K2, SSK, $\mathsf{K}^{\star}$ (\*, 0, 4), K2tog, K2, YO, K14\* If you cast on72 total stitches, after completing row 15, skip to Row 20 Row 16S1K, K14, YO, K2, SSK, $\mathsf{K}^{\star}\left({}^{\star},{}^{\star},2\right)$ , K2tog, K2, YO, K15Row 18S1K, K15, YO, K2, SSK, $\mathsf{K}^{\star}\left({}^{\star},{}^{\star},0\right)$ , K2tog, K2, YO, K16Row 20 S1K, K9 (11, 13, 15), P1, C6L, P1, K10 (12, 14, 16) Row 21 S1P, P9 (11, 13, 15), K1, P6, K1, P10 (12, 14, 16) Row 22 S1K, K9 (11, 13, 15), P1, K6, P1, K10 (12, 14, 16) Row 23 S1P, P9 (11, 13, 15), K1, P6, K1, P10 (12, 14, 16) Row 24 S1K, K9 (11, 13, 15), P1, K6, P1, K10 (12, 14, 16) Row 25 S1P, P9 (11, 13, 15), K1, P6, K1, P10 (12, 14, 16) Row 26 S1K, K9 (11, 13, 15), P1, K6, P1, K10 (12, 14, 16) Row 27 S1P, P9 (11, 13, 15), K1, P6, K1, P10 (12, 14, 16) After knitting through Row 27, repeat rows 20-27 once, then 20-22 once.
Heel Turn
Row 1 (ws) S1P, P15 (17, 19, 21), P2tog, P1 - turn Row 2 (rs) S1K, K5, SSK, K1 - turn Row 3 (ws) S1P, Purl to within 1 stitch of the “gap", P2tog, P1 - turn Row 4 (rs) S1K, Knit to within 1 stitch of the “gap", K2tog, K1 - turn Continue repeating rows 3 and 4 until there are 16 (18, 20, 22) stitches on the needle (end with a right side row).
Gusset Set-Up
Working along the right side of the heel flap, pick up 14 (16, 18, 20) stitches plus one stitch at the division between front and back (top/bottom) by lifting the bar between the stitches then knitting into the back of this loop, therefore twisting the stitch and tightening that gap to prevent a hole at the top of the gusset. Pull needle through so that all heel stitches are on one needle and stitches for top of foot are on one needle. Top of foot: K7, YO, K2, SSK, K6 (10, 14, 18), K2tog, K2, YO, K7. Keep these stitches on one needle. Continuing with needle containing heel stitches, pick up one stitch at the division between front/back (top/bottom) of sock by lifting the bar between the stitches then knitting into the back of this loop. Pick up 14 (16, 18, 20) stitches along the left side of heel flap. Knit 8 (9, 10, 11) stiches. Your working yarn should now be at the beginning of the round, positioned at the center bottom of the foot/heel stitches. Knit one round.
Gusset Decreases
As you follow the lace pattern on the top of the foot, gusset decreasing will occur on the same rows as your "pattern" rows as follows, beginning round at the center of the needles containing stitches for the bottom of foot/heel: Round 1 Knit to within 3 stitches of the end of needle, K2tog, K1 Knit in pattern across top of foot by following Row 1-27 of the heel flap instructions (knit around for even numbers), repeat rows 20-27 once, then follow the Pink Ribbon Lace pattern begining with Row 11 excluding the eyelet edging stitches on either edge of the chart (K2tog, YO; YO, SSK in the written instructions) On next needle (other half of bottom of foot stitches): K1, SSK, Knit to end of round
Round 2
Knit around - follow chart for top of foot (purl stitches on each side of cable). Repeat these two rounds until the stitches for bottom of foot have decreased to 28 (32, 36, 40) stitches. Continue working top of foot in Pink Ribbon Lace pattern and bottom in stockinette until desired length has been reached, making an allowance of approximately $z^{\ast}$ for toe shaping. Toe You may use your favorite toe shaping here or follow these instructions for a wedge toe. Round 1 (beginning at center bottom of foot): Knit until 3 stitches remain on needle, K2tog, K1. Top of foot stitches: K1, SSK, Knit across to within 3 stitches of end, K2tog, K1 Bottom: K1, SSK, Knit to center bottom (beginning of round) Round 2 Knit around. Repeat these two rounds until 14 stitches remain on each needle (28 stitches total). Then decrease every round until 8 stitches remain on each needle. Graft these 16 stitches using Kitchener Stitch. Weave ends neatly. Socks made with Sugar Bunny Boulevard “Katherine” superwash merino yarn can be hand or machine washed in cold water and lay flat to dry. Lace shawls and other garments should be hand washed and lay flat to dry. Pink Ribbon Lace Chart Chart is worked from the bottom upward for a top-down sock. All rows are read from right to left. Blank spaces are knit on the right side and purled on the wrong side. See page 3 for additional pattern notes on following the lace chart. 一 Purl on the right side, Knit on the wrong side 入 SSK (slip slip knit) 人 K2tog (Knit two together) YO (Yarn Over) M (Make one stitch using backward loop caston) Cable Six Left (put three stitches on a cable needle, hold to the front of your work, knit the next three stitches, knit three stitches from cable needle)
Thank you for donating to the Susan G. Komen foundation. Any questions or corrections regarding this pattern should be addressed to the pattern designer Laura Spradlin via email at laura $@$ sugarbunnyblvd.com.


