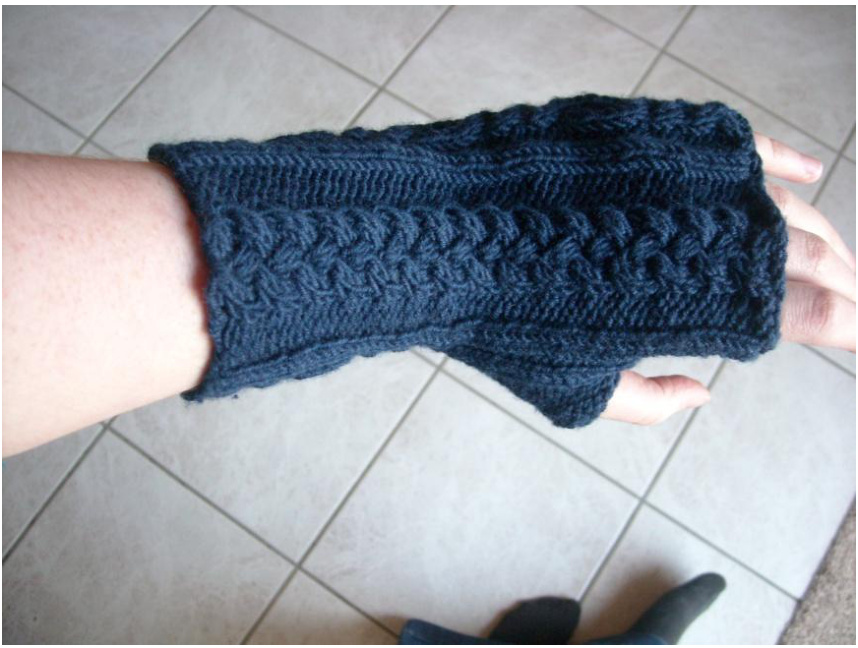
Pattern cabled fingerless gloves - Eireen
For this pattern you will basically just repeat 4 rounds again and again. Sometimes there will be modifications. They will be indicated in the text. N1, N2 and N3 refer to the needles, r1 r2 r3 r4 refer to the rounds in the pattern repeat. I used a Merino-Polyacrylic blend which shows off the cables in a great way but any yarn with a similar gauge will do. gauge: 20st. 28r. $=$ 10cm / 4 inch You can easily add or leave out stitches if you have a different gauge.
Directions
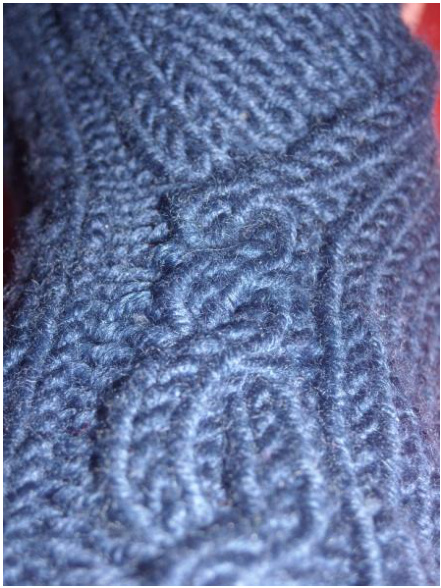
First cast on 48 stitches, distribute onto three DPN as follows: N1 17 stitches N2 14 stitches and N3 17 stitches. Join to knit in the round, as always, be careful not to twist and knit this set-up round: R1: k6 p2 k4 p3 k2 / p3 k8 p3 / k2 p3 k4 p2 k6 As you see this is very symmetrical. The 12 knitted stitches at the start and the end will make up the inside of the hand, the four knitted will make the cables at the sides and the eight stitches in the middle will make the braided cable on the back of the hand. The easiest way to add stitches is to add them to the inside part of the hand. You can also add single stitches to the purl parts but you should always keep it symmetrical. If you do this you might want to put the 2 knit stitches of N1 and N3 onto N2 to have it more even. Here are the four rows you will now repeat:
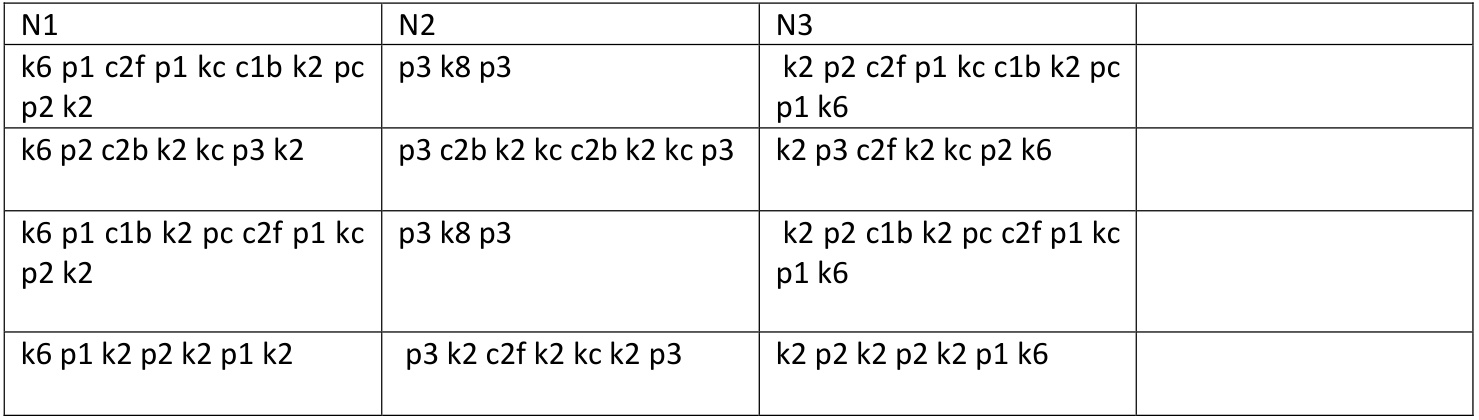
Abbreviations: k- knit p-purl c1/2f - put 1/2 stitches on a cable needle and hold in front of the work c1 / 2b - put 1 / 2 stitches on a cable needle and hold behind the work kc -knit stitches on cable needle pc -purl stitches on cable needle
Charts
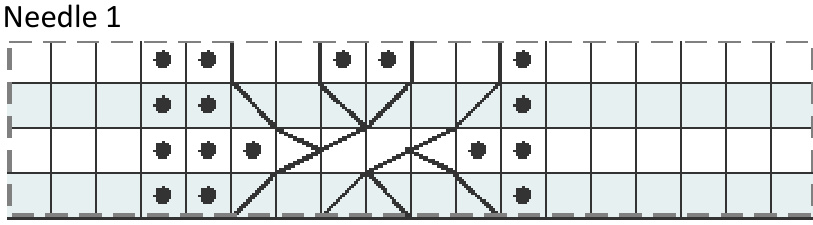
Needle 2
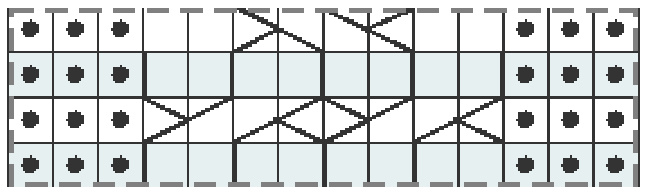
Needle 3
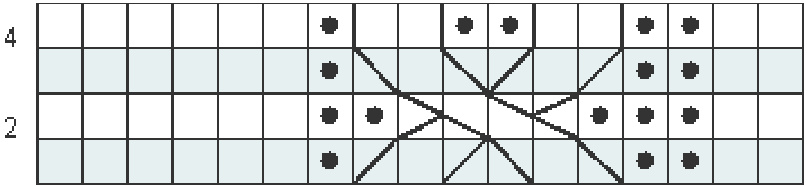
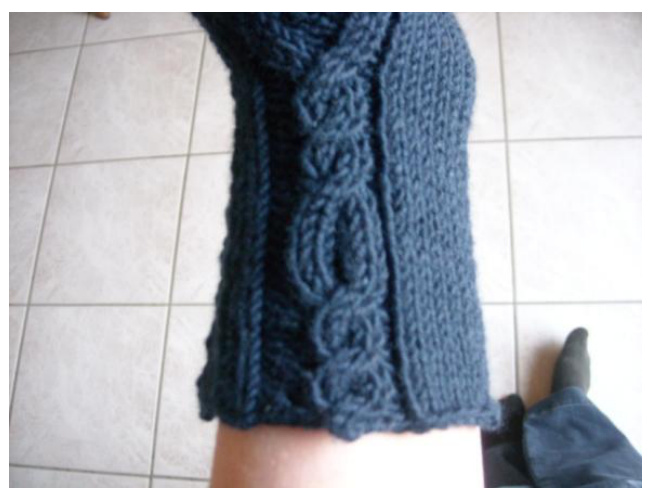
put two st. on a cable needle, hold in front, purl one, knit st. on cable needle Iput one st. on a cable needle, hold behind, knit two, purl st. on cable needle For the first repeat you skip the first round and start with the second. Then you knit the whole pattern two more times. (If you want a short cuff, omit the following instructions and instead begin with the thumb gusset.) In the next repeat continue the chart for N2 but repeat round 4 of the charts for N1 and N3, this means nothing will happen to the side cables while the one in the middle is continued Then repeat the whole pattern another three times. You should now have a nice cuff. If you want it longer, again repeat the 4th rounds for N1 and N3 but the pattern for N2 for one repeat and then knit the whole pattern three times. Now you can start your thumb gusset. For this we will add purl stitches between the cable strands.For the left hand do this with N1; for the right with N3.
Simply do this: k6 p1 k2 (m1 purlwise, purl stitches in between, m1 purlwise) k2 p1 k2 every third round until you have 15 purl stitchedbetweentheknitcable strands On N2 and N3 repeat the pattern you established before. Remember to do one repeat without the cable on the side first! This process should take you two repeats. The cable on the notthumb side should have cabled three times now. If you reach 15 purl stitches before the end of the second repeat, just finish without any further increases. If you have less than 15 purl stitches by the end of the second repeat something went wrong. If it's just one or two stitches missing, it won't be much of a problem, you maybe need to pick up more stitches later when you work the thumb. If you're missing even more stitches I would redo that part. I'm mentioning this here because on my right glove I had only 14 purl stitches so I messed something up somewhere but I'm not sure at what point and I thought this might help to reduce confusion ;) Now you have to synchronize the two cables again. On the next round (the first of the repeat) when you reach the thumb stitches, put them all on waste yarn or stitch holder. Cast on 5 stitches between the cable strands and continue. On r2 purl those stitches, on r3 put the two knit stitches before on a cable needle, hold in front of the work, p1 kc, p3 c1b k2 pc On round4 either do the first or the second cable from the round before so that you have the same number of purl stitches on either side of the cable. Now both cables should be the same again and you can continue to your desired length. I knitted five repeats after the thumb increases. At one point, r2 is best for this, you should decrease the purl stitches next to the cable at the thumb side: k2 p2tog p2 (cable section) p2 p2tog k6 Then I knitted one round across and decreased a few stitches because the edge was rather wide when I first bound off. I think I purled two together between the two small cables and ktog the first and ssk the last two knit stitches of the knit-palm section. Bind off with your favourite technique. I added a little twist, binding off the knit stitched purl-wise and the purl stitches knit wise which adds a little band-thingy. Transfer the thumb stitches to a needle, pick up five additional stitches and distribute stitches evenly to three needles. Purl a few rounds, depending on how long you want the thumb to be, knit one round, bin off. Weave in all loose ends. Finished $\equiv$


