by Raya Budrevich
By special request here is presented the adult version of the popular children's Cascade cardigan.
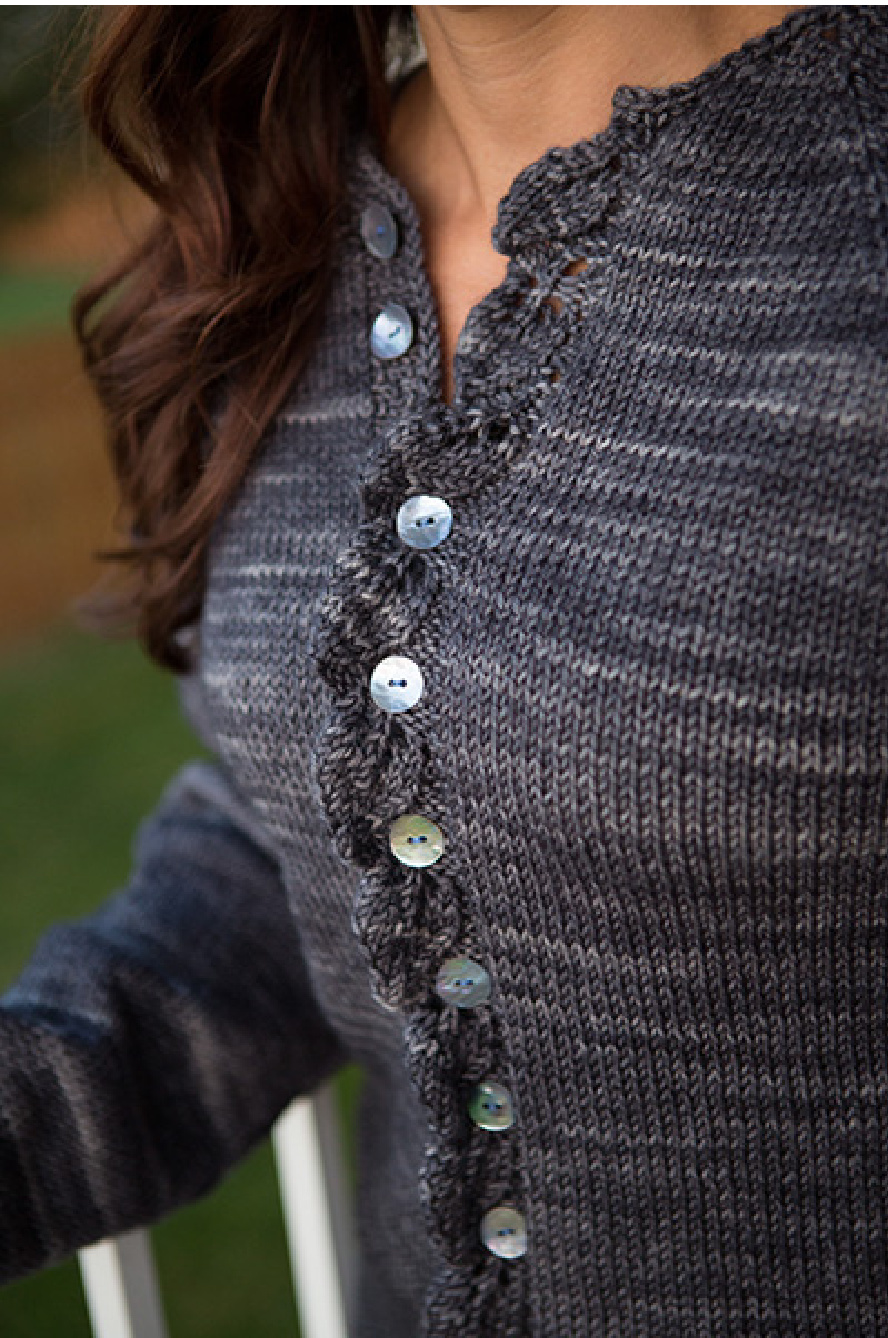
The lace inspiration was brought up by our time in the outdoors. The leaf motif along the button band incorporates form and function. It reminds me of flowing creeks while cleverlyconcealingbuttonholes. The cardigan is presented at a single average length, but can be easily adjusted to accommodate desired length.
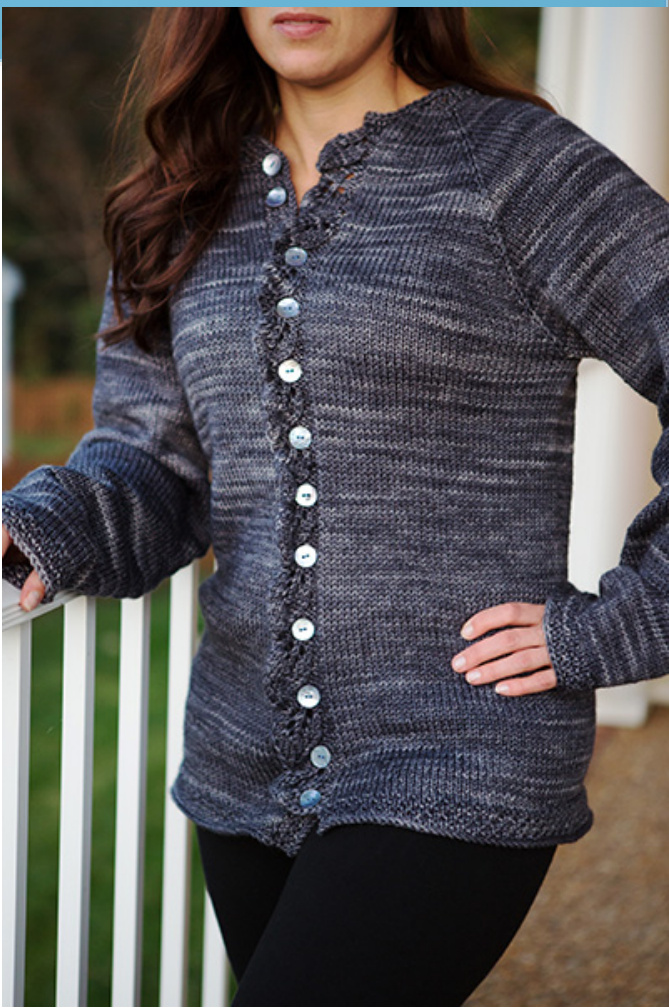
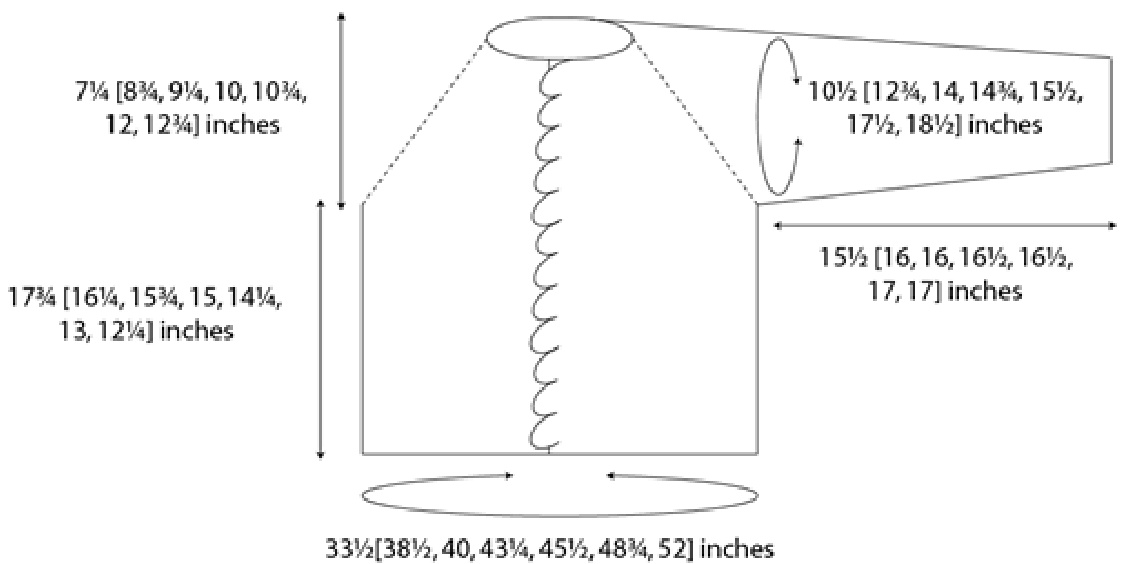
> photos: Brandy Fortune Sizes Womens XS[S, M, L, 1X, 2X, 3X] Shown in size M, on a size S model. Finished Measurements Chest: 331/2[381/2, 40, 4314, 451/2, 483/4, 52] inches Length: Approximately 25 inches from shoulder to hem Materials Sweet Georgia Superwash Worsted [100% superwash merino wool; 200 yards/182 meters per 4 ounce/115] gram hank]; Slate - 5[5, 6, 7, 8, 9, 10] hanks Recommended needle sizes US #7/4.5 mm 32 inch or longer circular needles US #7/4.5 mm dpns (set of 4 or 5) Notions 12 buttons Tapestry needle Gauge 20 sts and 24 rows = 4 inches square in St st. Pattern Notes The cardigan is raglan styled and is knit in a top down fashion. The leaf placket is worked in line with the rest of the cardigan and incorporates buttonholes. The leaf placket is designed as such that the next leaf begins at the same time as the previous leaf ends, which means that the first and last rows of the pattern are done in sequence within the same row of the cardigan. When the cardigan reaches the appropriate length the bottom band is knit in a broken rib stitch. In order to maintain the design, the cardigan's length changes in whole-leaf increments only. The right placket is knit next, also in the broken rib stitch; the neckband is added last. The sleeves are knit in the round using double pointed needles and are finished in the same manner as the rest of the cardigan. M1p (make 1 purl) - with left needle and working from back to front, pick up strand between sts and purl it. Skpo - Slip next st kwise, k1, pass slipped st over Sk2po - Slip next st kwise, k2tog, pass slipped st over CDD (Central Double Decrease) - SI2 tog knit-wise, k1, pass slipped stitches over Leaf Placket Pattern Row 1 (ws): K2, p5, k1. Row 2: P1, k2, yo, k1, yo, k2, m1p, p1, k1. Row 3: K3, p7, k1. Row 4: P1, k3, yo, k1, yo, k3, m1p, p2, k1. Row 5: K4, p9, k1. Row 6: P1, skpo, k5, k2tog, m1p, p3, k1. Row 7: K5, p7, k1. Row 8: P1, skpo, k3, k2tog, m1p, p1, k1, yo, p2tog, k1 - Buttonhole Row. Row 9: K3, p1, k2, p5, k1. Row 10: P1, skpo, k1, k2tog, m1p, [p2, k1] twice. Row 11: k3, p1, k3, p3, k1. Row 12: P1, CDD, pass first st on right needle over second st, bind off next 2 sts pwise (5 sts remain befori pattern marker), [k1, yo] twice, k1, p1, k1. Repeat Rows 1-12 for pattern. Skills Required Knitting on dpns, keeping track of stitch counts and following pattern repeats across multiple rows, kfb, and m1p.
Instructions
Body
With circular needle, cast on as follows: cast on 10[10,12, 12, 12,14, 14], PM, cast 0n 10[10, 12, 12, 12,14, 14], PM, cast 0n 38[42,42,46,48,48,52],PM, cast 0n 10[10, 12, 12, 12, 14, 14], PM, cast 0n 10[10, 12, 12, 12, 14, 14]: 78[82, 90, 94, 96, 104, 108] sts total.
Body Increases
Row 1 (Rs): Kfb, \* knit to one st before marker, kfb, sm, kfb; repeat from \* 3 times more, knit to last st, kfb: 88[92, 100, 104, 106, 114, 118] sts. Row 2: Purl to last st, PM (use a contrasting marker; this is the leaf pattern marker), k1. Row 3: Kfb, \* knit to one st before marker, kfb, sm, kfb; repeat from \* 3 times more, knit to last st, kfb: 98[102, 110, 114, 116, 124, 128] sts. Row 4: Purl to leaf pattern marker, k1, p1. Row 5: Kfb, k1, \* knit to one st before marker, kfb, sm, kfb; repeat from \* 3 times more, knit to last st, kfb: 108[112, 120, 124, 126, 134, 138] sts. Row 6: Purl to leaf pattern marker, k2, p1, cast on 3 sts: 111[115, 123, 127, 129, 137, 141] sts. Row 7: (P2, k1) twice, \* knit to one before sleeve marker, kfb, sm, kfb; repeat \* 3 times more, knit to end of row: 119[123, 131, 135, 137, 145, 149] sts. Row 8: Purl to leaf pattern marker, k3, p1, k2. Row 9: P1, (k1, yo) 3 times, p1, k1, \* knit to one st before marker, kfb, sm, kfb; repeat from \* 3 times more, knit to end of row. (The third yo in this Rnd creates a buttonhole, and is done in this specific Rnd only): 130[134, 142, 146, 148, 156, 160] sts. l0: Purl to leaf pattern marker, k1, k2tog, p5, k1: 129[133, 141, 145, 147, 155, 159] sts Continue working leaf pattern on left front edge starting with Row 2 while also working an additional 17[21, 23, 25, 27, 31, 33] raglan increases, ending on a WS row: 82[94, 98, 106, 112, 120, 128] sts between back st markers, 54[62, 68, 72, 76, 86, 90] sts between sleeve markers.
Divide for Sleeves
Work next row of leaf pattern, knit to first sleeve marker, remove marker, slip 54[62, 68, 72, 76, 86, 90] sleeve sts to scrap yarn, remove marker, cast on 1 st, pm, cast on 1 st, knit to next marker, remove marker, cast on 1 st, pm, cast on 1 st, slip 54[62, 68, 72, 76, 86, 90] sleeve sts to scrap yarn, knit to end of row. Work even in St st while maintaining leaf pattern until 6 leaves have been completed.
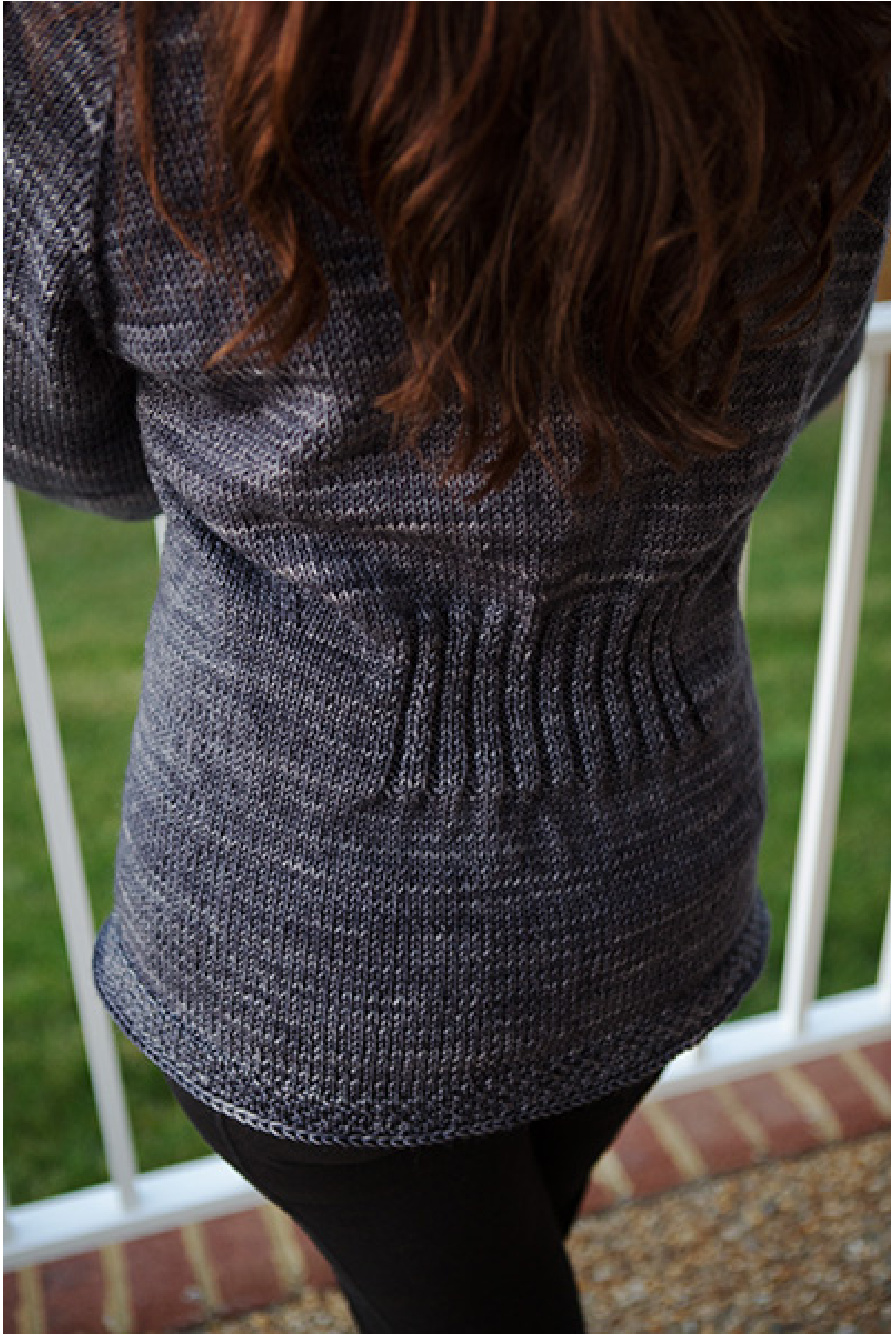
Back Shaping
Back shaping instructions can be delayed or moved up based on individual preference. Next Row (Rs): Work leaf pattern as set, knit to first underarm marker, k 23[29, 31, 35, 38, 42, 46] sts, work [p2, k2] 9 times, p2, k 23[29, 31, 35, 38, 42, 46] sts: you should be at the next underarm marker, knit to end of row. Next Row (ws): Work leaf edging and back ribbing patterns as set. Continue working cardigan with back ribbing for an additional 22 rows. Then continue working cardigan with a plain back until a total of 12 leaves are finished, working the last row of the last leaf (Row 12) in the following manner: Last Leaf Row (Rs): P1, sk2po, pass first st on the right hand needle over the second st, bind off next 5 sts pwise (2 sts remain before marker), k2, remove marker, knit to end of row.
Lower Band
Row 1 (ws): [K1, p1] across. Row 2 (Rs): Knit across. Repeat Rows 1 and 2, 2[2, 2, 3, 3, 3, 4, 4] times, then repeat Row 1 once more. Loosely bind off all sts knitwise. Weaveinlooseends.
Sleeve
Slip sts to dpns or 12 inch circular needles. Pick up 2 stitches at underarm, placing marker between picked up sts: 56[64, 70, 74, 78, 88, 92] sts. Knit two rounds. Decrease Rnd: K1, ssk, knit to last 3 sts, k2tog, k1: 54[62, 68, 72, 76, 86, 90] sts. Continue in St st, working Decrease Rnd every 8 rnds until sleeve measures 16 [1612, 1612, 17, 17, 17/2, 171/2] inchesfromunderarm. (Sleeve tapering can be adjusted to accommodate: approximately 32[38, 44, 48, 52, 62, 66] sts.
Sleeve Cuff
Rnd 1: [K1, p1] around. Rnd 2: Knit around. Repeat Rnds 1 and 2, 2[2, 2, 3, 3,3, 4, 4] times. Bind off all sts knitwise. Repeat for second sleeve.
FINISHING
Right FrontBand With Rs facing, pick up 3 sts for every 4 rows, across right front, making sure to pick up an even number of sts. Row 1: [K1, p1] across. Row2:Knit across. Repeat Rows 1 and 2, 3 more times. Bind off all sts knitwise.
Neckband
With RS facing, pick up sts along the neck in the following manner: Pick up 4 sts from Right Front Band edge, pick up one st in each originally cast on edge of right front, PM, pick up one st in each st of right shoulder, PM, pick up one st in each st across back, PM, pick up one st in each st of left shoulder, PM, pick up one st in each st left front, pick up 3 sts across left front panel (the first 6 rows of cardigan where kfb increases were made), pick up one st in each of 3 sts cast on sts across leaf placket: 88[92, 100, 104, 106, 114, 118] sts. Row 1: [K1, p1] across. Row 2: \* Knit to 2 sts before marker, ssk, sm, k2tog; repeat from \* 3 times more, knit to end of row. Row 3: [K1, p1] across. Bind off all sts knitwise. Weave in all loose ends and block. Using a steam iron and working from the Ws, steam the leaves to shape.
BACK TO TOP ^

Raya is grateful to live with her family in the midst of the amazing Pacific Northwest. In the years since the original Cascade pattern came out she has grown a successful independent dyeing business offering her signature dyeing style or a variety of luxurious yarn bases. When she is not busy dyeing or knitting she enjoys spending every free moment in the great outdoors. www.blissfulknits.com photuris@gmail.com Pattern @ 2013 Raya Budrevichi. Contact Raya.


