HAYhurst HAT
pattern by Rilana Riley-Munson

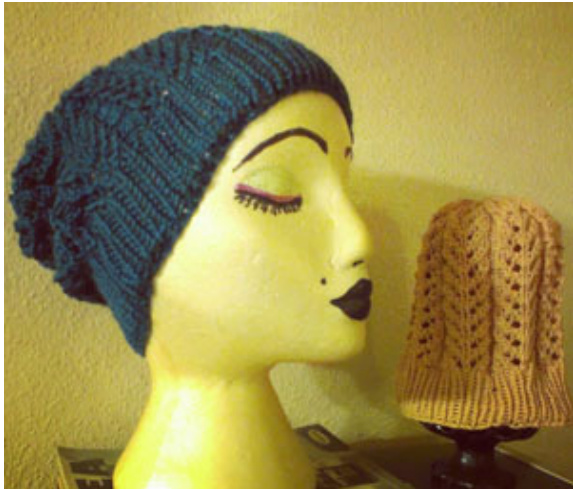
I love to design knit accessories. Hats especially. They are pretty easy and quick to make and are fun to wear. I enjoy mixing my "hat wearing" up. I have beanies, slouchies, cloche hats, etc. I wear the hats according to my mood or outfit that day. I designed this hat to do double duty. You can just knit the beanie if you prefer that style of hat. You could also knit the slouchy version. Both hats are comfortable and easy to wear. You can use wool or acrylic, totally up to you. The pattern stitch is a fairly simple, easily memorized, 4 round repeat.
Finished Size:
Both hats will fit women adult head sizes 19"to 22" The beanie version is meant to be close fitting to the head. The slouchy version is the same, but with extra inches in length to create the slouch.
Level:
Intermediate
Yarn:
Any worsted weight yarn will work for this hat. You will need approximately 125 yards for the beanie and approximately 200 yards for the slouchy hat. Yarns I used: for the beanie (yellow) I used one skein of Knit One Crochet Too Wick; 120 yards in #464 Golden. For the slouchy version (teal blue) I used a little over half a skein, 315 yards of Caron Simply Soft in #9759Ocean.
Gauge:
18 sts/24 rows = 4" in stockinette stitch, on US # 8 (5 mm) needles.
Needles:
US #8 (5 mm) 16 inch circular needle and/or the same size in double pointed needles.
Notions:
Yarn needle 1 removable marker for marking the beginning of rounds.
Helpful Notes:
Feel free to use whatever worsted weight yarn you want or have on hand. I created this hat to use up random one skeins in the stash that you have no idea what to do with. I have a lot of oneskeiners from leftover projects. You can make the slouchy version longer in the crown by knitting the pattern stitch a few more times before starting the crown decreases. Remember to have more yardage of yarn, though. The pattern is the same for the beanie version and the slouchy version. I will indicate in the pattern when you should lengthen the body of the hat to create the slouchy version.
Abbreviations Used:
K = Knit, P = Purl, PM = Place marker, SM = Slip marker, K2tog = Knit two stitches together, K2tog tbl = Knit two stitches together through the back loop, YO = Yarn over, K3tog = Knit 3 stitches together, PSSO = Pass Slipped Stitch Over, Sl 1 = Slip one stitch.
Pattern Stitch:
Round 1: (RS) \*P1, K1, K2tog, YO, K1, YO, K2tog tbl, K1, P1; repeat from \* to endof round Round 2: \*P1, K7, P1; repeat from \* to end of round. Round 3: \*P1, K2tog, YO, K3, YO, K2tog tbl, P1; repeat from \* to end of round. Round 4: repeat round 2. - repeat rounds 1-4 for pattern stitch.
Directions For Hat:
Using circular needle (or dpn's if you prefer): CO 80 stitches; Join, being careful not to twist and place marker to indicate the beginning of the round. Begin working in ribbing.: \*K1, P1; repeat from \* to end of round. Repeat this round until the ribbing from cast on measures approximately 2 inches. Next round - Knit entire round, increasing 1 stitch anywhere you'd like. - 81 sts on needle. Begin working in Pattern Stitch, working rounds 1-4 over and over again until desired length. Beanie - work for 6.5 to 7 inches, measured from cast on edge. (includes ribbing) Slouchy - work for 9 - 9.5 inches, measured in the same manner as beanie. Begin Decreases for the crown: Round 1: \*P1, K2tog, K5, P1; repeat from \* to end of round. Round 2: \*P1, K6, P1; repeat from \* until end of round. Round 3: \*P1, K2tog, K4, P1; repeat from \* to end of round. Round 4: \*P1, K5, P1; repeat from \* to end of round. Round 5: \*P1, K1, Sl1-K2tog-Psso, K1, P1; repeat from \* to end of round. Round 6: \*P1, K3tog, P1; repeat from \* to end of round. Round 7: K1, \*K2tog; repeat from \* to end of round. - 14 stitches on needle.
Finishing:
Cut yarn, leaving a good few inches of a tail. Thread yarn needle with the tail and slip needle through remaining 14 stitches. Pull tight and turn the hat inside out and secure the tail by sewing back and forth into a few stitches. You can even knot the end a bit, if you like, since it is on the inside of the hat, Who will see? Sew in all remaining ends.