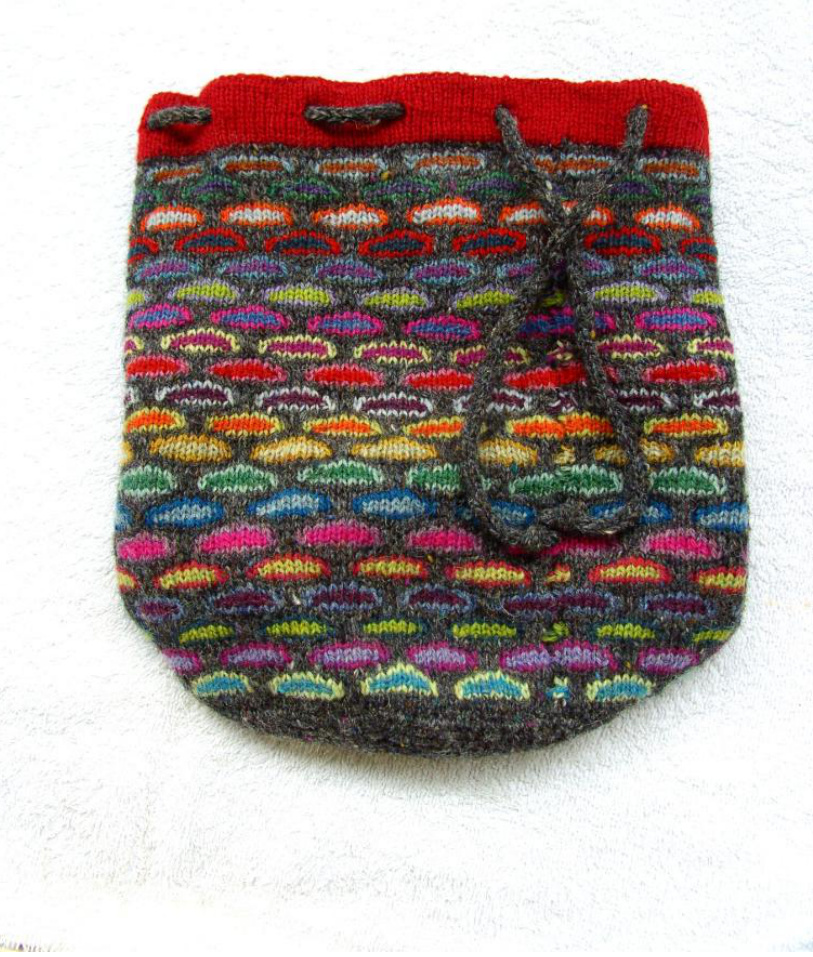
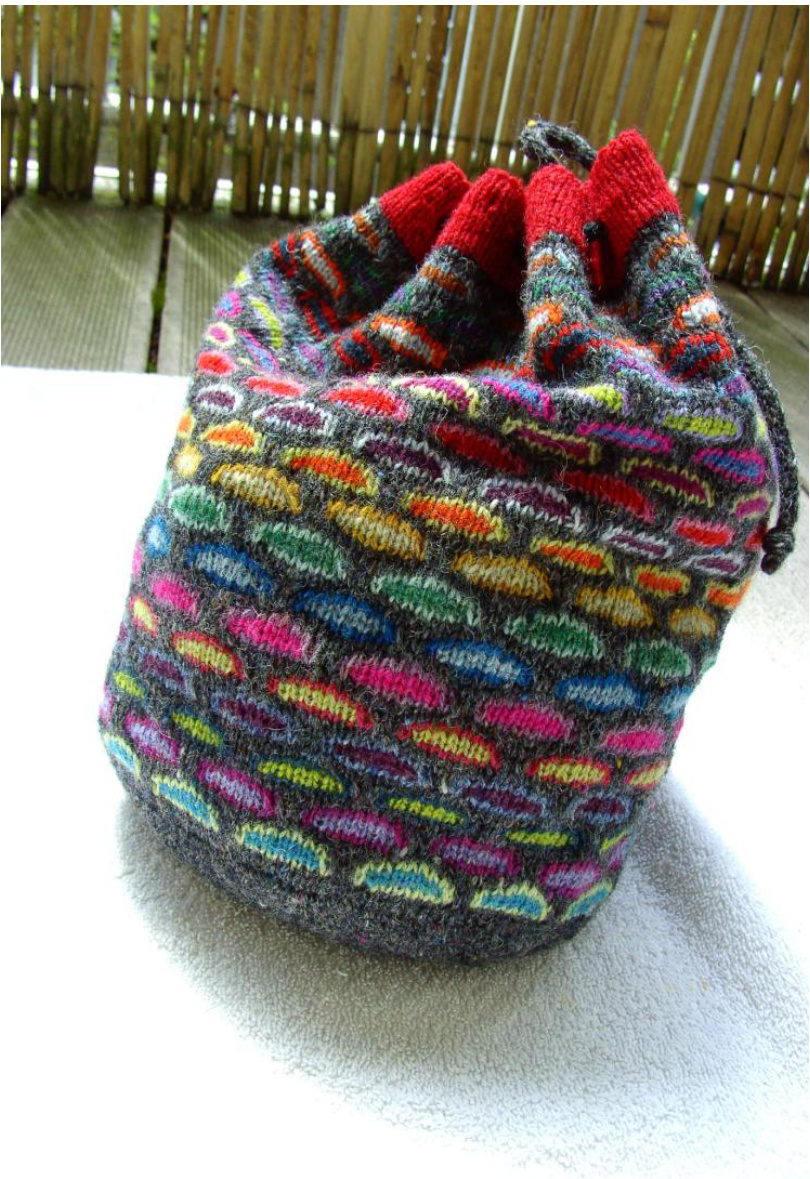
slip stitch Knitting Bag
Love to knit with many colors? Try this project bag and you will knit with only 1 (!) color per row. Because of the slip stitch pattern it will look like intarsia and you can use as many colors as you like. Perfect for stashbusting. One (you can make a bigger or smaller bag, depending on which yarn or needles you use).
Finished measurements
Width: 28 cm Height: 25 cm
Abbreviations
co = Cast on M1 = Make 1 stitch (increase) K= Knit Sl wyib = Slip purlwise with yarn in back K2tog = Knit 2 sts together YO = Yarn over
Materials
Jamieson & Smith 2 Ply Jumper yarn (100% wool, 125 yd/114 m per 25g skein), total of 75g 40 cm (16 in) 2,5 mm circular needle 5 dpn's 2,5 mm Tapestry needle and stitch marker
Gauge
Approx. 28 sts = 10 cm in slip stich pattern Exact gauge is not important for this project.
Pattern notes
The base of this bag is worked in the round and is started in the middle of the base. When the circumference of the bag is the desired width you start working the body in the round with the slip stitch pattern. At the top of the bag you work eyelet buttonholes for the Icord fastening. Make a facing, again with eyelet buttonholes, bind off and stitch the facing to the inside of the bag. Finally thread the Icord through the buttonholes.
slip stitch pattern
You will work with 3 colors, referred to as:
C1 = background color C2 = outline color C3 = inner color Round 1: In C1 knit Round 2: In C1 knit
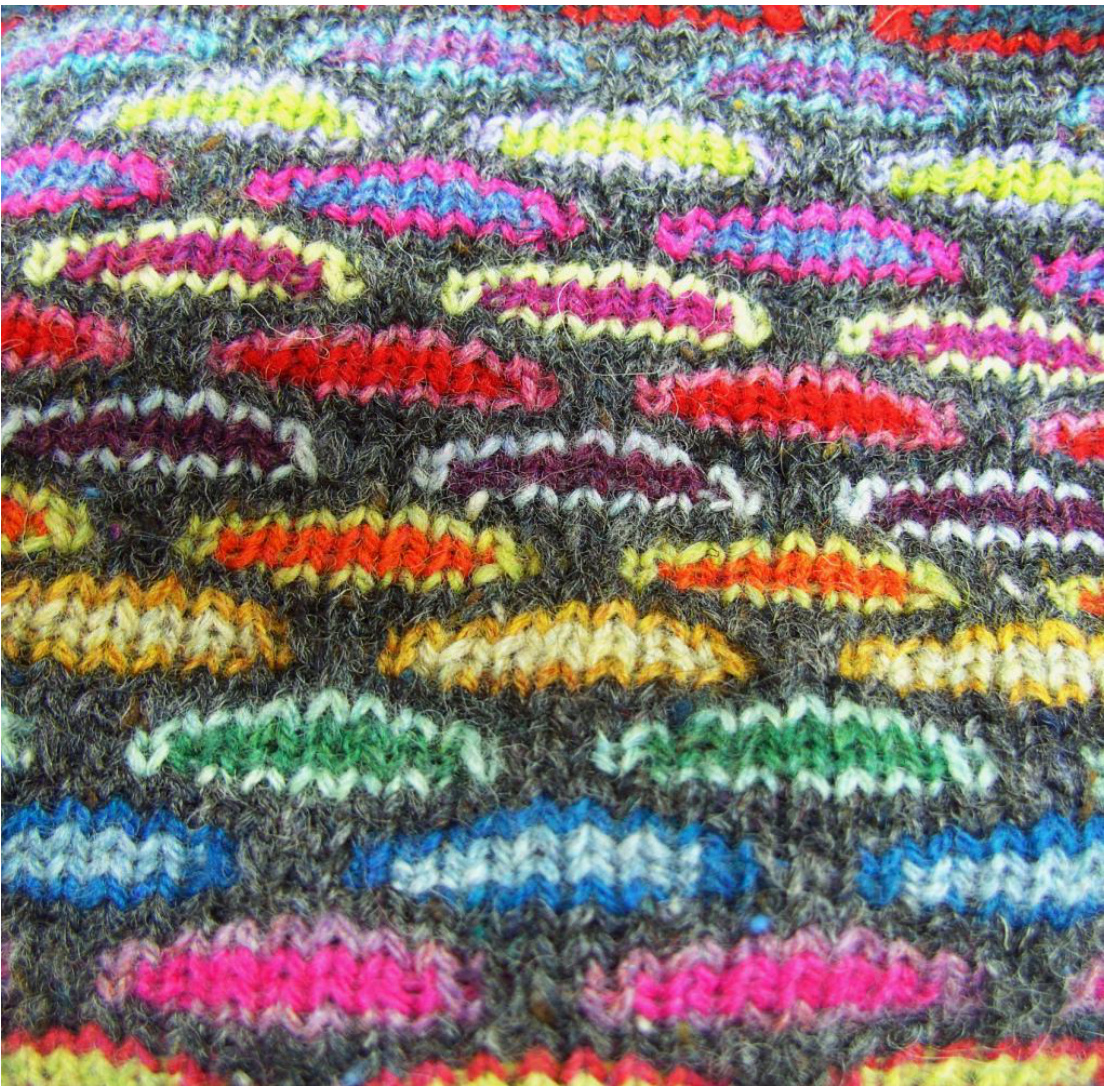
Round 3: In C2 K1 \*S1 2 wyib, K8\* repeat from \*, end Sl 2 wyib, K1 Round 4: In C3 K1, S1 3 wyib \*K6, S1 4 wyib\* repeat from \*, end K6, Sl 3 wyib, K1 Round5: In C3 K1, S1 3 wyib \*K6, S1 4 wyib\* repeat from \*, end K6, S1 3 wyib, K1 Round6: In C2 K1 \*Sl 2 wyib, K8\* repeat from \*, end Sl 2 wyib, K1 Round 7: In C1 knit Round 8: In C1 knit Round9: In C2 K6 \*S1 2 wyib, K8\* repeat from \*, end S1 2 wyib, K6 Round10: In C3 K5 \*S14 wyib, K6\* repeat from \*, end S1 4 wyib, K5 Round11: In C3 K5 \*S1 4 wyib, K6\* repeat from \*, end S1 4 wyib, K5 Round12: In C2 K6 \*S1 2 wyib, K8\* repeat from \*, end S1 2 wyib, K6 Repeat these 12 rounds throughout.
Directions
Base of bag
CO 9 sts by Emily Ocker's method (see link). www.spellingtuesday.com/circular_co.html Place the stitches on 4 dpn's and K1 round. Put a marker at the beginning of round. Next round: \*M1, K1\* rep from \* around K 3 rounds Next round: \*M1, K1\* rep from \* around K 6 rounds Next round: \*M1, K1\* rep from \* around K12 rounds Next round: \*M1, K1\* rep from \* around K24 rounds. Increase 14 sts evenly spaced in the last round (total = 158 sts) Switch to circular needles when you have enough stitches to fit around the 40 cm needle.
Body of bag
the slip stitch pattern and work in pattern until desired height of the ba
Upper body
Knit 6 rounds in st st with a contrasting color of your choice. Increase in the first round 1 st at the beginning and 1 st at the end of the round (total = 160 sts). After 6 rounds work eyelet buttonhole round: \*Knit 9 sts, yo, K2tog\* repeat from \* around. Knit 6 rounds in st st. Purl 1 round (this is your foldline for the facing) Knit 6 rounds in st st. Knit the eyelet buttonhole around once more as described above. Knit 5 rounds in st st. Bind off.
Icord fastening
Knit a 3 stitch Icord for your desired length: CO 3 sts on a dpn. Knit these 3 sts. \*Slide the sts to the right hand of the needle (do not turn) and knit the sts again\* Repeat from \*.
Finishing
Fold the facing to inside of bag along fold line and sew in place. Thread Icord through eyelet buttonholes. You can wetblock the bag using a vase or bucket where it will fit well over slightly stretched.


