RAINY DAY KNITS
BABY BRIOCHE
by Jen Hurley
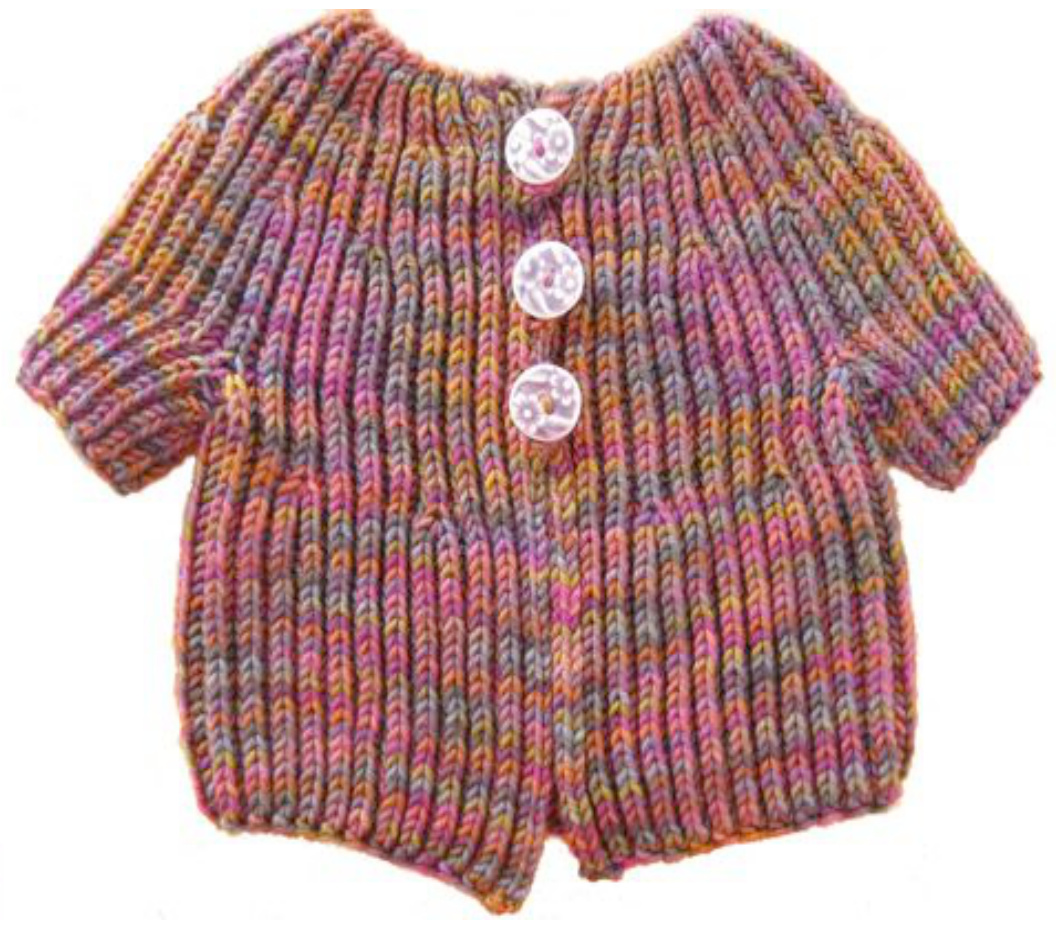
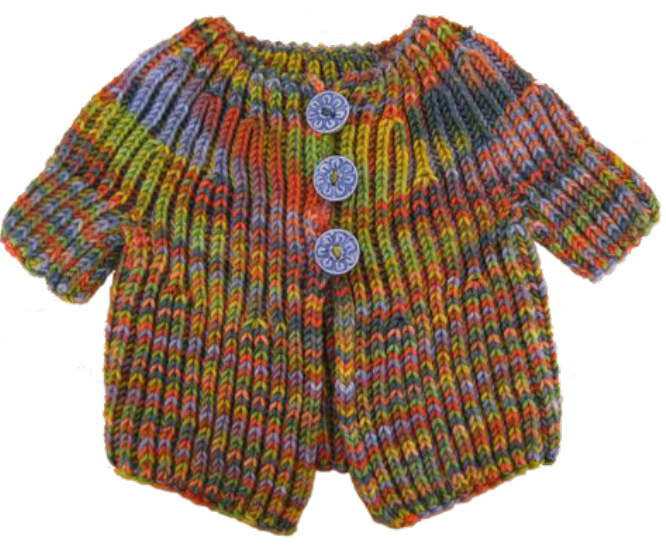
Baby Brioche is a seamless baby cardigan knit in brioche stitch. The brioche stitch creates a lofty fabric that is squeezably soft and incredibly stretchy, good qualities for a garment made for a growing babe. The body is worked top-down and flat while the sleeves are worked circularly. Pattern features include a Channel Island cast on1 which rolls over into the brioche stitch ribs beautifully; a front opening with finished edges worked along with the body; and a combination of crocheted and I-cord2 button loops worked after the garment is finished, allowing button placement where wanted. Body increases are strategically placed and mirror-imaged, giving a sense of balance to the whole.
SIZE
Infant to 12 months3
MATERIALS
Blue Moon Fiber Arts Socks that Rock, heavyweight $[100\%$ superwash Merino wool, 35oyd/320m per 6.98oz/198g skein, 11 wpi], one skein OFor the body, one 24-inch U $\mathrm{S}\neq\!6/4.25\mathrm{mm}$ circular needle For the sleeves, one set of four or five US $\mathrm{~\vec{s}~}\#6/4.25\mathrm{mm}$ double-point needles (or use the circular needle and work using magic loop) crochet hook size G-6/4.0mm waste yarn tapestry needle three buttons GAUGE 22 sts/27 rows $=4$ inches in brioche stitch
FINISHEDMEASUREMENTS
Chest: 9 inches $\bigcirc$ Length: 9 inches ONeck to armhole opening: 6.5 inches (all measurements are unstretched; fabric will have the ability to stretch considerably)
EXPERIENCE NEEDED (or prepare to learn)
Channel Island cast on1, brioche stitch4, Jeny's Surprisingly Stretchy Bind Off5, I-cord2, basic crochet. Having the Internet accessible in order to look up particular skills and pattern features may prove handy. See the Notes & References section at the end of the pattern for suggested links and tips.
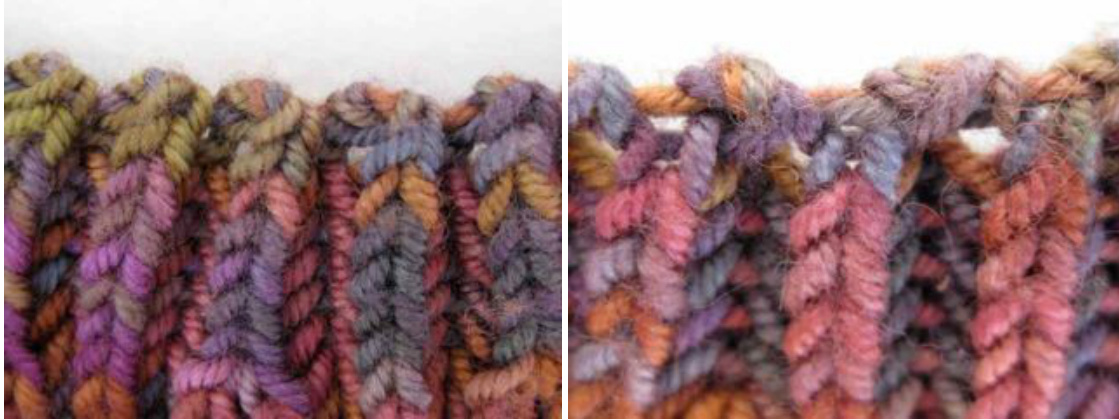
Neck edge, RS. Channel Island CO peaks roll into k sts. Neck edge, WS.
PATTERN NOTES
Basic pattern structure: The body of this seamless garment is worked first, top-down and flat, then the sleeves are worked circularly. After casting on, two set up rows are worked to ready the sts for working brioche st. Once those set up rows are complete the pattern rows begin and continue until it is time to work an increase row. There are three increase rows throughout the body. At a point after the second increase row, sts are placed on holders for sleeves and the body is continued. Throughout the body, the first 3 and last 3 sts of every row are edge sts and will always be worked at the beginning and end of every row as edge sts, not in brioche stitch. After the body is complete sleeve and underarm sts are picked up and worked circularly. Buttonhole loops are then simultaneously worked and applied to the garment. The stitch: The plain brioche stitch used here is basically a ribbing $(^{*}\mathbf{k}\mathbf{1},\mathbf{p}\mathbf{1}^{*})$ with a yarn over thrown in every other stitch. The yarn overs alternate being with either all k or all p sts, depending upon the row/round. Think of the yarn overs as piggy-backing onto the k and p sts. Given that this garment's body is worked flat and the sleeves circularly, it is important to note that brioche stitch worked circularly differs from brioche stitch worked flat. In the flat brioche stitch used here on the body the yarn overs will always be worked together with the knit sts. In the circular brioche stitch used here on the sleeves the yarn overs will be worked with either knit or purl sts on alternate rounds (e.g. with knit sts on one round and with purl sts on the next round). In this pattern all slipped sts are worked purlwise. Measuring gauge: Gauge is given here as a general guide only--as this sweater has stretch, it willfit babies of all shapes and sizes so don't fuss too much with geting gauge spot on. That being said, to measure brioche stitch gauge: for sts per inch, count the knits and purls, ignoring the yos-just like counting gauge in a kip1 ribing. Ofor row gauge, count the knit sts stacked upon one another. (In reality, one knit st in height takes two rows of work to make--it's knit on one row and slipped on the next—-but ignore that when measuring row gauge in brioche st. Another way to think of this is, one resulting row in brioche stitch is worked twice; e.g. 27 rows in height over 4 inches requires 54 actual rows worked.) Counting stitches: When counting stitches in brioche stitch count only the k and p sts, not the yarn overs piggybacking onto other sts. A yo piggy-backing onto a k or p st does not count as its own st as it will be worked with its accompanying k or p st on the next row, e.g. yfsliyo $\l=1$ st, sl1yof $\l=\mathbf{1}$ st. A yo that will become its own st on the next row does count as its own st; e.g. brkyobrk $=3$ sts.
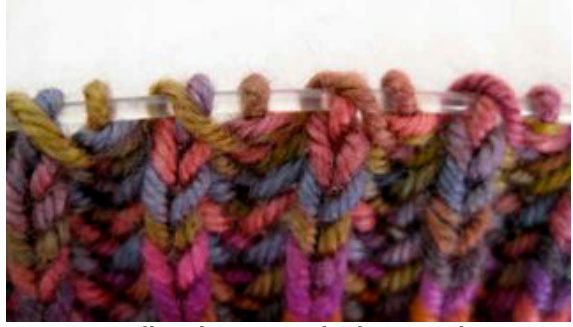
8 sts sit on ndl, with yos piggy-backing over k sts. These sts are ready for \* yfsl1yo, brk1\*
Abbreviations3
brk $=$ brioche knit, aka bark: knit the stitch that was slipped in the previous row together with its yarn over brkyobrk $=$ bark 1, yarn over, bark 1: brk1, yarn over (yarn forward under needle then over needle toward back), then brk1 into the same stitch; 2 stitches increased brp $=$ brioche purl, aka burp: purl the stitch that was slipped in the previous row together with its yarn over circ $=$ circular needle $\mathrm{CO}=$ cast on dpns $=$ double-point needles ${\bf k}=\mathrm{knit}$ $\mathtt{L}=$ left ndl $=$ needle $\ensuremath{\mathbf{p}}=\ensuremath{\mathbf{p}}\ensuremath{\mathbf{u}}\ensuremath{\mathbf{r}}]$ pu $=$ pick up and knit a stitch through the fabric $\mathbf{R}=$ right rem $=$ remain $\mathbf{RS}=\mathbf{\Psi}$ right side; outside of the piece when worn $=$ slip stitch as if to purl without working it sl1yof $=$ with working yarn in front slip 1, yarn over, yarn to front st, sts $=$ stitch, stitches $\mathrm{W}\mathbf{S}=$ wrong side; inside of the piece when worn $=$ $\Chi=$ repeat that number of times (e.g. $9\Chi=$ repeat 9 times) yfsl1yo $=$ yarn forward, slip 1, yarn over: Bring working yarn under the needle to the front, slip the next stitch purlwise, then bring the yarn toward the back over the top of the needle $\mathbf{y0=}$ yarn over: lay yarn over top of needle from front to back $\ast\ast=$ repeat directions between \* \* as many times as indicated
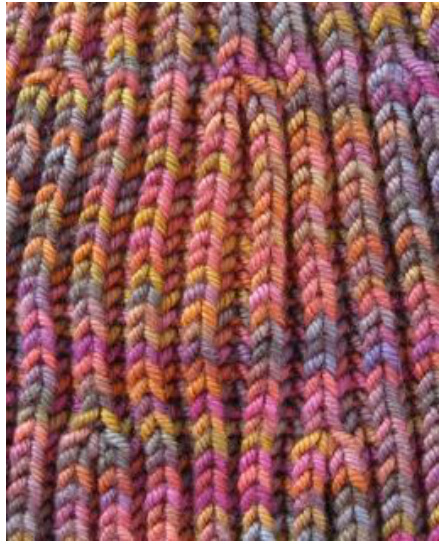
Brkyobrk increases create two ribs that flow out of one. Photo top is toward sweater neck, RS facing.
PATTERN
Body Channel Island CO4 69 sts. The first & last sts should be “peak" sts, not yarn overs. Turn the work so that the WS is facing. (Note: Throughout the body,maintain edge sts on all RS & WS rows: Edge, RS & Ws: k1, slpwise wyif, k1, pattern until last 3 sts, slpwise wyif, k1, slpwise wyif Since the last st of every row is worked slpwise wyif, after you turn the work to begin the next row, the working yarn will be coming from the back of the second st in on the left ndl.) Setup Rows: Row 1 (WS): k1, slpwise wyif, k1, $\ast_{\mathrm{k1}}$ $\mathbf{p1^{*}}$ until 4 sts rem, k1, slpwise wyif, k1, slpwise wyif Row 2 (RS): k1, slpwise wyif, k1, \*yfsliyo, $\mathbf{k}\mathbf{1}^{*}$ until 4 sts rem, yfsl1yo, slpwise wyif, k1, slpwise wyif Pattern Rows: Row 3 (WS): k1, slpwise wyif, k1, brk1, \*yfsliyo, brk1\* until 3 sts rem, slpwise wyif, k1, slpwise wyif Row 4 (RS): k1, slpwise wyif, k1, yfsliyo, \*brk1, yfsl1yo\* until 3 sts rem, slpwise wyif, k1, slpwise wyif Repeat pattern rows $3\,\&\,4$ for $\mathbf{1}^{\ast}$ , ending after a row 3/WS row. (Remember: When counting sts across a row, a yo that will become its own st on the next row counts as one st (e.g. brkyobrk $=3$ sts). $A$ yo piggy-backing onto a k or p st does not count as its own st as it will be worked with its accompanying $k$ or p st on the next row (e.g. yfsliyo $=1\,s t$ ,sl1yof $\mathbf{\chi}=\pmb{\chi}\,s t)$ .) Work two rows for first set of increases: (RS): k1, slpwise wyif, k1, yfsl1yo, \*brk1, yfsl1yo\* 2X, \*brkyobrk, yfsl1yo, brk1, yfsl1yo\* 14X, brk1, yfsl1yo, slpwise wyif, k1, slpwise wyif (97 sts) (WS): k1, slpwise wyif, k1, brk1, \*yfsl1yo, brk1\* 2X, \*yfsl1yo, k1, yfsl1yo, brk1, yfsl1yo, brk1\* 14X, yfsl1yo, brk1, slpwise wyif, k1, slpwise wyif (97 sts) Repeat pattern rows 4 & 3 (beginning with row 4) for total $\mathbf{2}\mathbf{1}/\mathbf{2}$ inches from CO, ending after a row 3/WS row. (Fair warning: Until you place sts on holders for the sleeves, the garment neck will look HUGE. Pay no heed-all will pull into shape once the sleeves are divided for.) Work two rows for second set of increases: (RS): k1, slpwise wyif, k1, yfsl1yo, \*brk1, yfsl1yo\* 4X, \*brkyobrk, yfsl1yo, brk1, yfsl1yo, brk1, yfsl1yo \* 13X, \*brk1, yfsl1yo\* 2X, slpwise wyif, k1, slpwise wyif (123 sts) (WS): k1, slpwise wyif, k1, \*brk1, yfsl1yo\* 4X, brk1, \*yfsl1yo, k1, yfsl1yo, brk1, yfsl1yo, brk1, yfsl1yo, brk1\* 13X, \*yfsl1yo, brk1\* 2X, slpwise wyif, k1, slpwise wyif (123 sts) Repeat pattern rows $4\,\&\,3$ (beginning with row 4) for total $4^{1/2}$ inches from CO, ending after a row 3/WS row. Now place sts on holders for sleeves: (RS): k1, slpwise wyif, k1, \*yfsl1yo, brk1\* 9X across L front 18 sts, place next 23 sts on waste yarn, backward loop CO 5 onto R ndl, \*brk1, yfsl1yo\*, brk1 across back 35 sts, place next 23 sts on waste yarn, backward loop CO 5 onto R ndl, \*brk1, yfsl1yo\* 9X across R front 18 sts, slpwise wyif, k1, slpwise wyif (87 sts) (WS): k1, slpwise wyif, k1, \*brk1, yfsl1yo\* 9X across R front 18 sts, k1, yfsl1yo, k1, yfsl1yo, k1, \*yfsl1yo, brk1\*, yfsl1yo across back 35 sts, k1, yfsl1yo, k1, yfsl1yo, k1, \*yfsl1yo, brk1\* 9X across R front 18 sts, slpwise wyif, k1, slpwise wyif (87 sts)
Repeat pattern rows 4 & 3 (beginning with row 4) for total 5 inches from CO, ending after a row 3/WS row. Work two rows for third set of increases: (RS): k1, slpwise wyif, k1, yfsl1yo, \*brk1, yfsl1yo\* 2X, brkyobrk, yfsl1yo, \*brk1, yfsl1yo\* 3X, brkyobrk, yfsl1yo, \*brk1, yfsl1yo\* 6X, brkyobrk, yfsl1yo, \*brk1, yfsl1yo\* 3X, brkyobrk, yfslyo, \*brk1, yfsl1yo\* 4X, brkyobrk, yfslyo, \*brk1, yfsliyo\* 3X, brkyobrk, yfsl1yo, \*brk1, yfsl1yo\* 6X, brkyobrk, yfsl1yo, \*brk1, yfsl1yo\* 3X, brkyobrk, yfsl1yo, \*brk1, yfsl1yo\* 2X, slpwise wyif, k1, slpwise wyif (103 sts) (WS): k1, slpwise wyif, k1, brk1, \*yfsl1yo, brk1\* 2X, yfsl1yo, k1, yfsl1yo, brk1, \*yfsl1yo, brk1\* 3X, yfsl1yo, k1, yfsl1yo, brk1, \*yfsl1yo, brk1\* 6X, yfsl1yo, k1, yfsl1yo, brk1, \*yfsl1yo, brk1\* 3X, yfsliyo, k1, yfsl1yo, brk1, \*yfsliyo, brk1\* 4X, yfsl1yo, k1, yfsl1yo, brk1, \*yfsl1yo, brk1\* 3X, yfsl1yo, k1, yfsl1yo, brk1, \*yfsl1yo, brk1\* 6X, yfsl1yo, k1, yfsl1yo, brk1, \*yfsl1yo, brk1\* 3X, yfsl1yo, k1, yfsl1yo, brk1, \*yfsl1yo, brk1\* 2X, slpwise wyif, k1, slpwise wyif (103 sts) Repeat pattern rows $4\,\&\,3$ (beginning with row 4) for total 9 inches from CO, ending after a row 3/WS row. Bind off using Jeny's Surprisingly Stretchy Bind Offs. When one st remains, break the yarn leaving a 6 inch tail and pull it through the final st.
Sleeve
Transfer 23 sts on holder to circ or dpns. With RS facing, these sts begin and end with a p st. (Note: Consider leaving the waste yarn through these 23 sts as you work the sleeve. The waste yarn can act as a life line should you need it and can easily be pulled out when the sleeve is finished.) With RS facing, at right side of sleeve sts join yarn and \*yfsliyo, brk1\* 11X, yfsliyo, pu one st at corner, pu 5 sts across underarm, pu one st at next corner (30 sts total) Next round: \*brp1, sliyof $\bf\tilde{\tau}_{11X}$ , brp1, \* sl1yof, $\mathrm{p}^{*}\,3\mathrm{X}_{:}$ sl1yof Repeat sleeve rounds until sleeve measured from underarm $=2$ inches.

Bind off using Jeny's Surprisingly Stretchy Bind Off. When one st remains, break the yarn leaving a 6 inch tail and pull it through the final st. Work second sleeve as first. FINISHING Button Loops Securely sew buttons to the left front, RS facing. With Rs facing turn the garment so that the right front is closest to you with the garment bottom on your right and the garment top on your left. Button loops are worked from bottom to top. Approximately five sts below the bottom of where the lowest button loop will be, insert crochet hook into the side of the garment edge (from RS to WS, under both sides of the st) and) and draw up a loop onto the hook. Draw up a second loop to the left of the first. There are now two loops on the hook. With hook pull second loop through first. \*Draw up another loop to the left of the last loop, then with hook pull second loop through first.\* Repeat one more time, ending with one loop on the hook. Work button loop: Draw up two additional loops onto the hook, each to the left of the previous loop. There should now be three loops on the hook. The leftmost loop should sit just below the center of the button across from it. Transfer the three loops to a dpn. Work I-cord: The working yarn should be coming from the leftmost st on the dpn. \*Without turning the work, slide the three sts to the right end of the dpn. With a second dpn, knit across.\* Repeat 6X or until the button loop reaches around its adjacent button neither too tightly nor too loosely. Prepare to reattach button loop to sweater: K2. Cast off one st. Place the remaining two sts/loops onto the crochet hook. With hook pull second loop through first. One loop remains on the hook. Reattach button loop to sweater: Eyeball the two sides of the sweater together to see where to rejoin the button loop back to the sweater Gjust above the top of the adjacent button). Insert crochet hook into the side of the garment edge (from RS to WS, under both sides of the st) and draw up a loop onto the hook. There are now two loops on the hook. With hook pull second loop through first. \*Draw up another loop to the left of the last loop, then with hook pull second loop through first.\* Continue until you reach the bottom of the next button. Work next button loop.
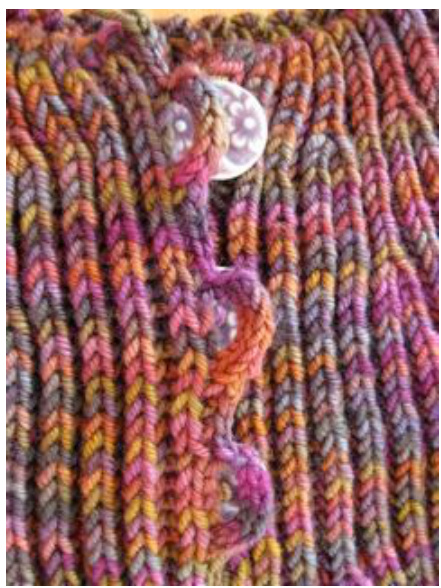
Repeat button loops for middle and top buttons. After making top loop, reattach button loop to sweater and \*draw up another loop to the left of the last loop, then with hook pull second loop through first\* until the neck edge is reached. With one loop left on hook break the yarn leaving a 6 inch tail and pull it through the final loop. Weave in and secure all ends.
NOTES & REFERENCES
1 For how to work the Channel Island cast on, try Oftroy's tutorial on www.youtube.com or see Lucy Neatby's book Cool Socks, Warm Feet: Six Exceptional Sock Patterns for Printed Yarns (2003) Tradewind Knitwear Designs, Inc., Canada. 2 Zimmermann, Elizabeth. Knitter's Almanac (1974) Dover Publications, Inc., New York, NY. p. 146. 3 Craft Yarn Councilof America's Baby Size Chart, http://www.craftyarncouncil.com/babysize.html,. according to chest measurement. 4 Brioche stitch abbreviations are taken from Nancy Marchant's book Knitting Brioche (2009) North Light Books, Cincinnati, Ohio. Crowned as the queen of brioche stitch, Nancy Marchant also maintains a website, WWw.briochestitch.com, that contains a wealth of information regarding the stitch. I highly recommend Nancy's book and/or website as references for how to work brioche stitch. 5 For Jeny's Surprisingly Stretchy Bind Off ingeniously devised by Jeny Staiman, see http: / /www.knitty.com/ISSUEfall09/FEATjssbo.php. According to Jeny's method, prep and work the k and p sts as they present themselves in the ribbing. Work each k or p st with its accompanying yo as one st. \* Buttons shown photographed are by Shelby of Heartstone Ceramics, www.heartstone.etsy.com
CREDITS
Huge thanks to my testers from the Free Pattern Testers group on RavelryTM. You gals rock! Congrats and good luck to all my friends having babies this year-this pattern evolved because of you!
ABOUT THE DESIGNER
Rain or shine, Jen knits, reads and walks her dog in beautiful Portland, Oregon. While her knitting exploits can be seen at www.rainydayknits.com you can find her on Ravelry as sunnydayknitter. For pattern support, contact jen@rainydayknits.com. This pattern is for private use only. The pattern, images or products made from the pattern may not be sold without the express written consent of the designer. Thank you. BabyBrioche V1.2 7/14/10
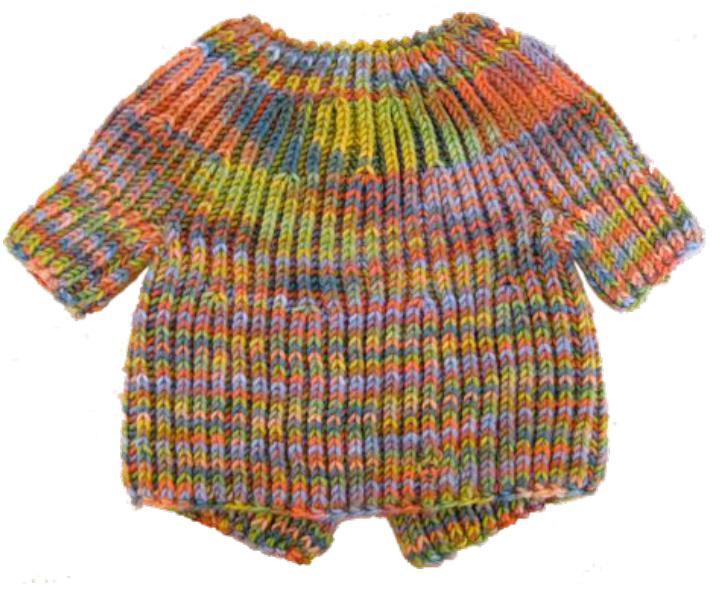
Sweater back, RS facing.


