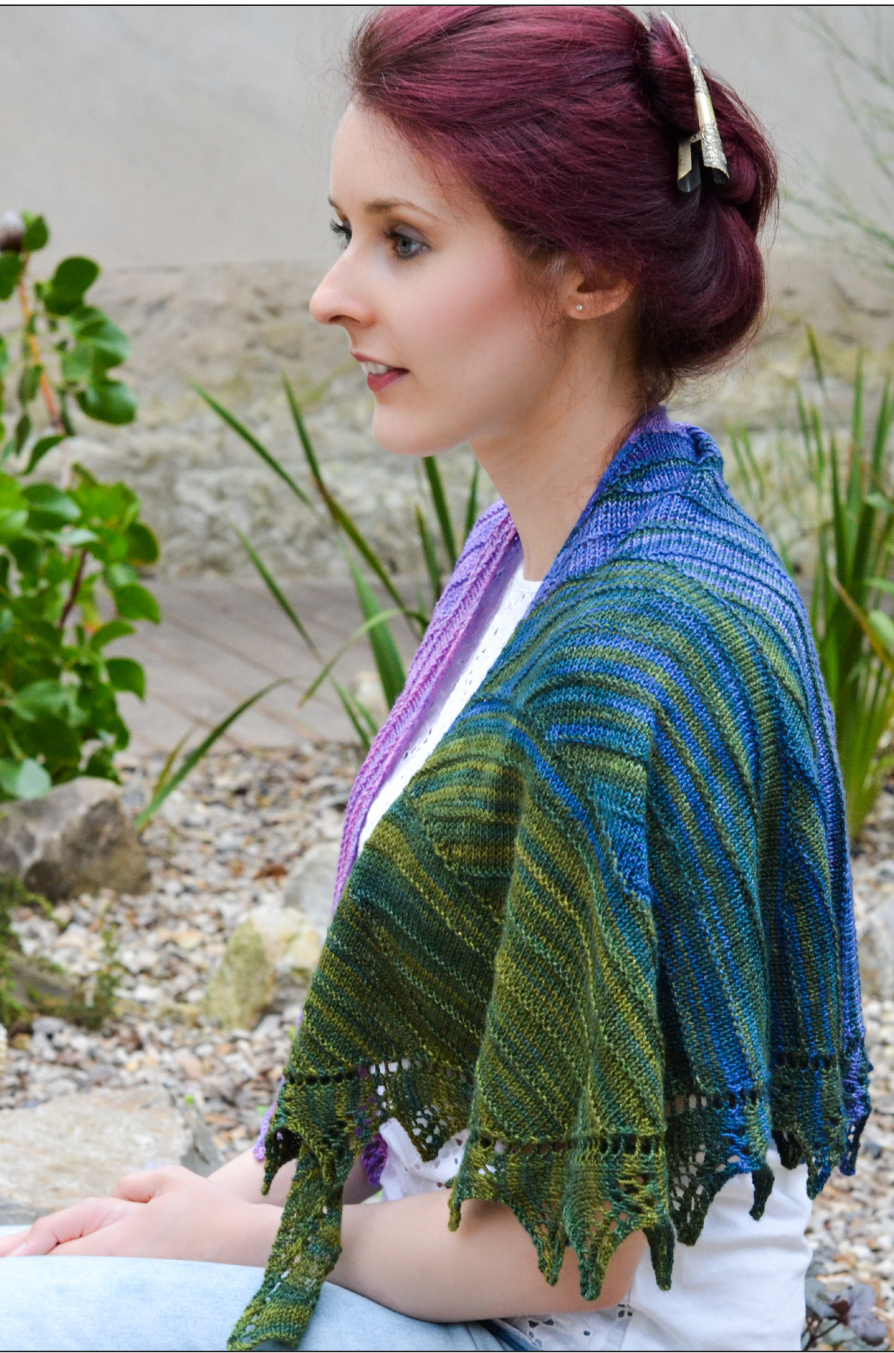
about
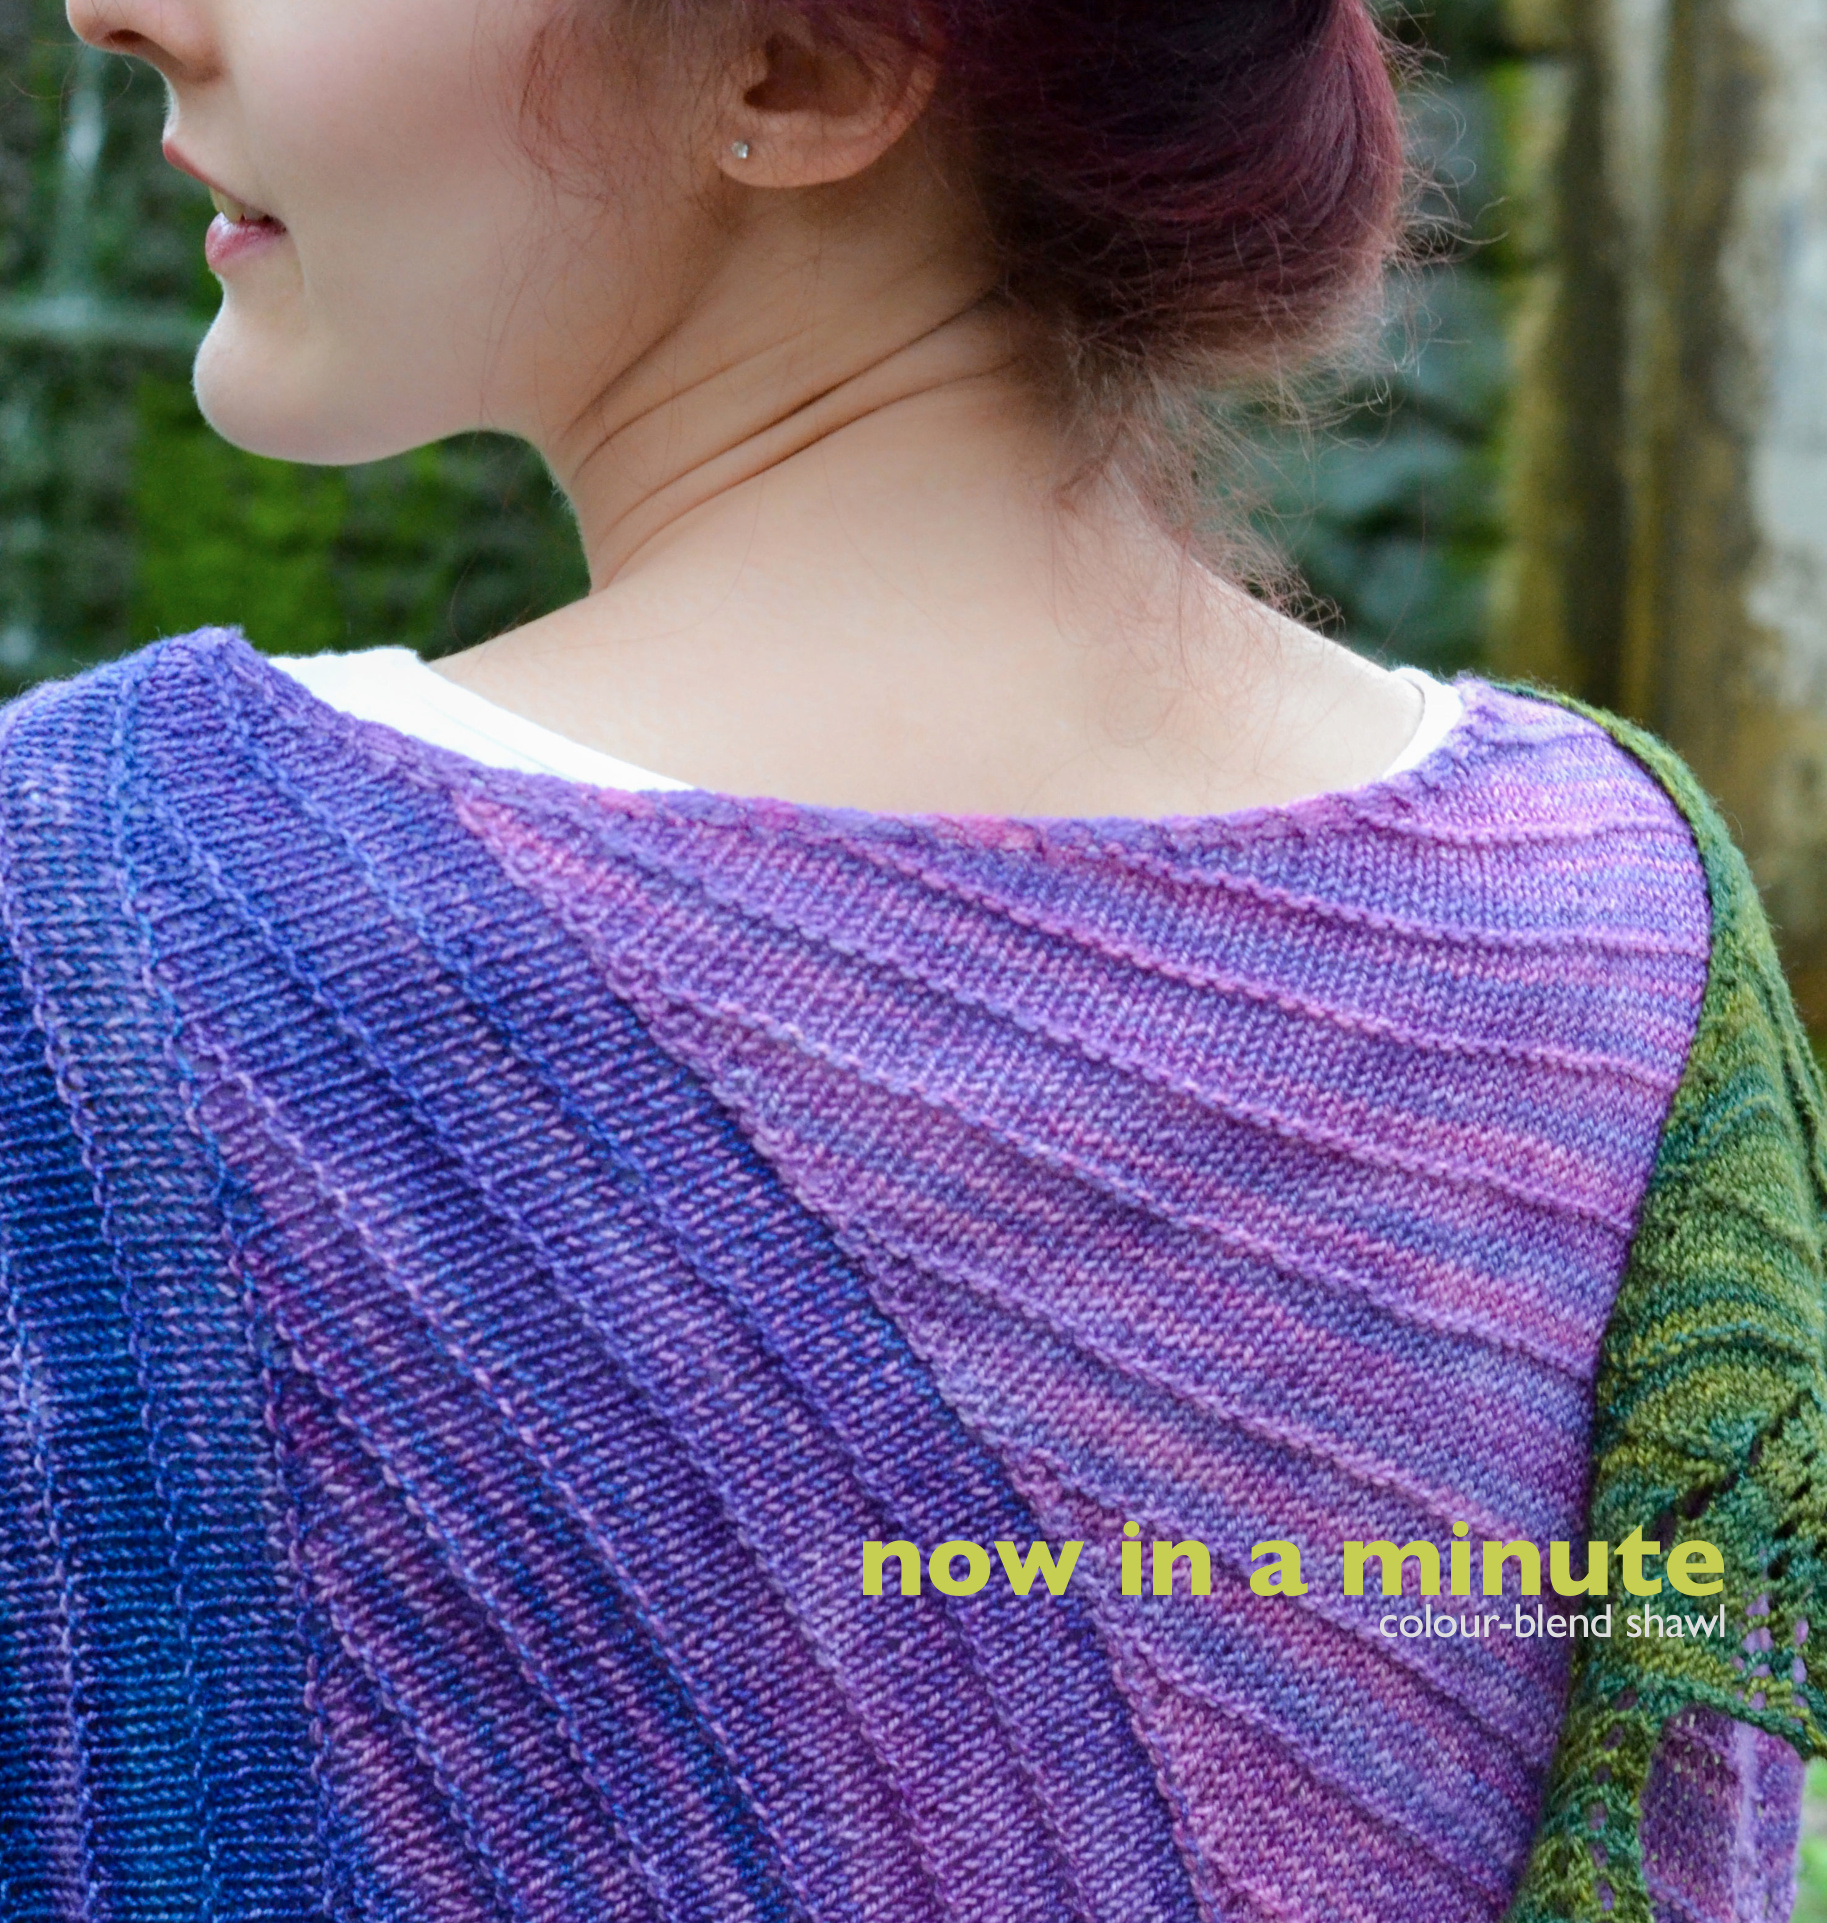
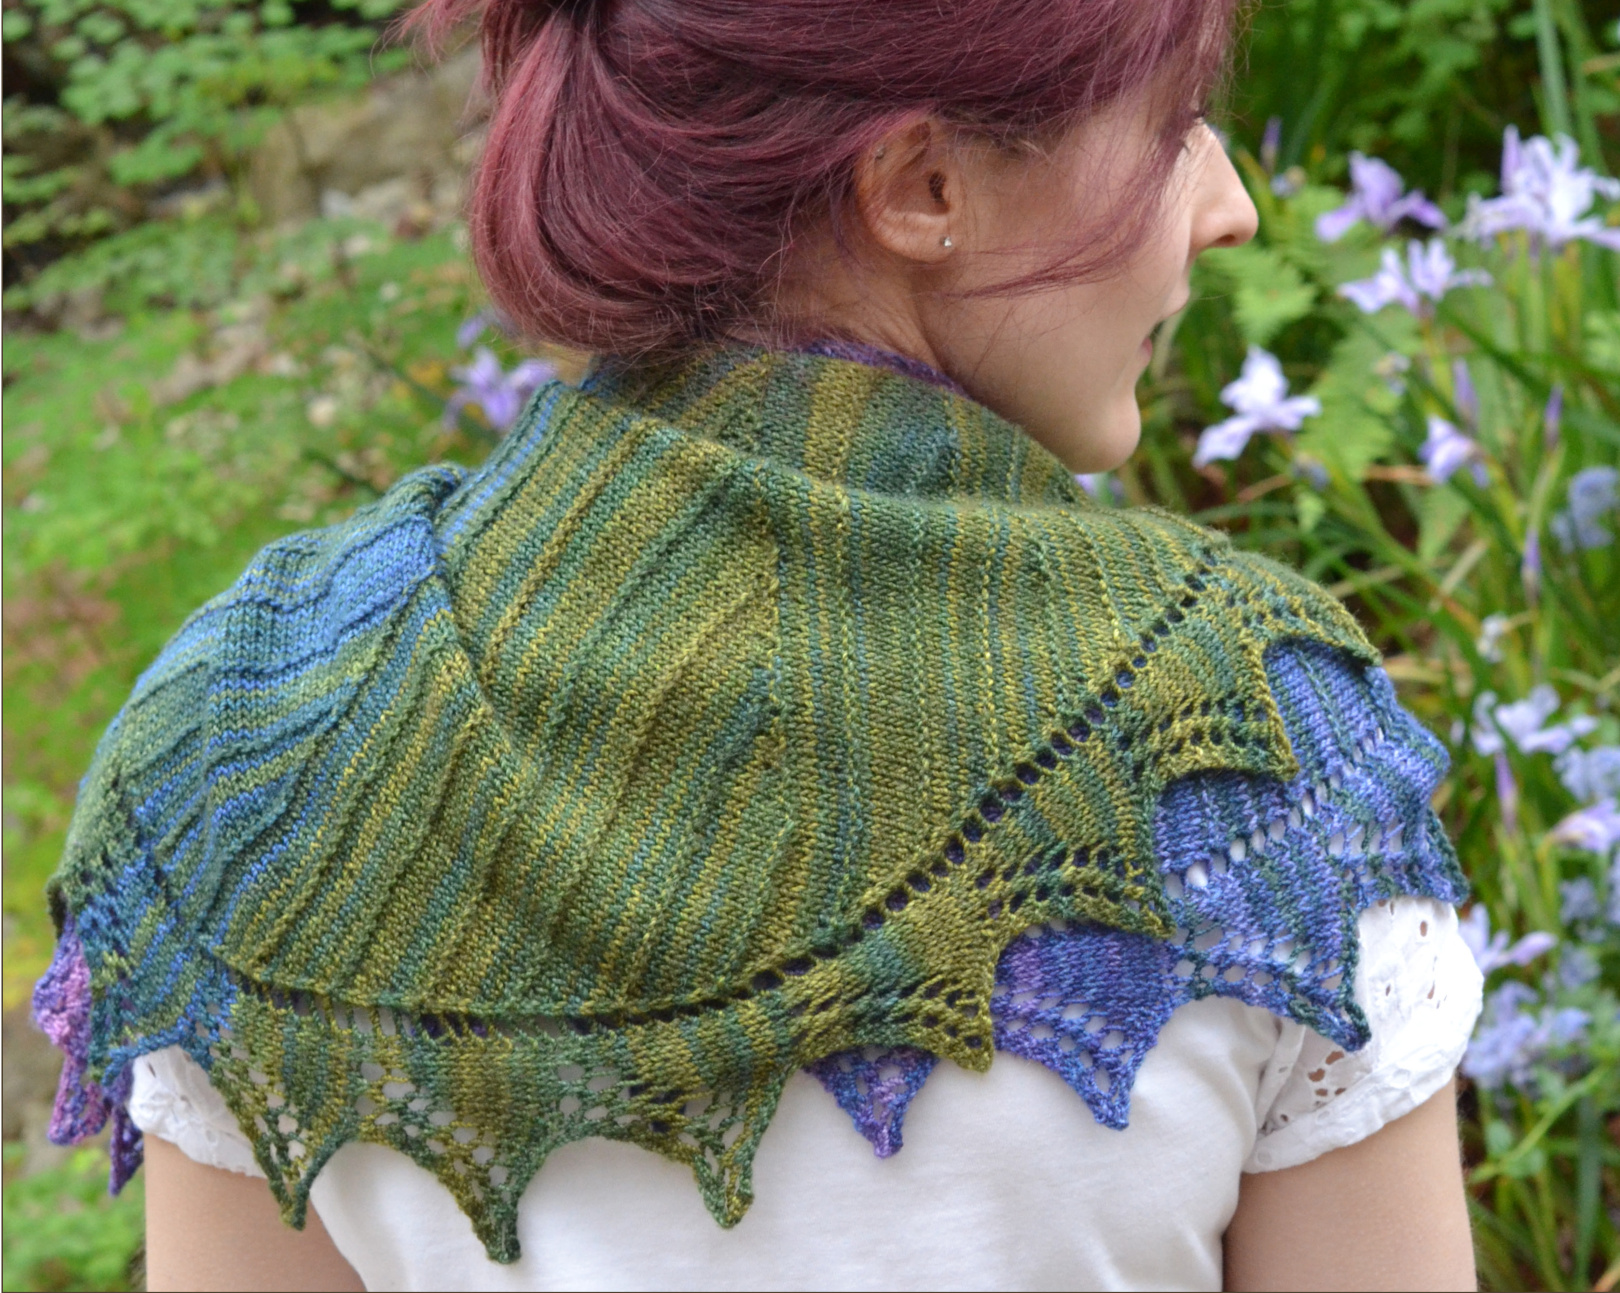
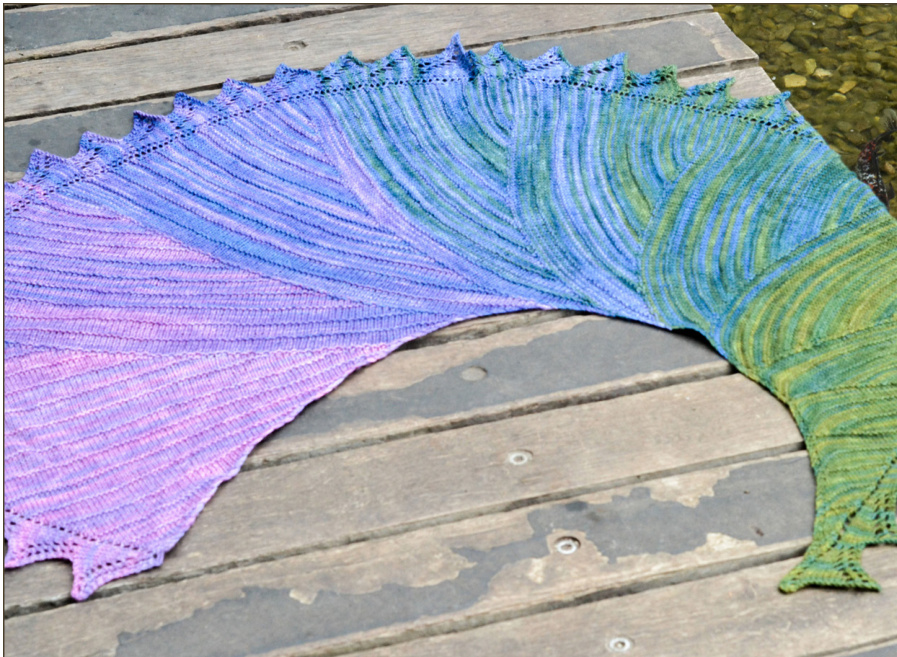
Of all the Welsh idioms, proverbs, and phrases I've learned, none is more dear to me than "Now in a minute." It means, simply,"I acknowledge and agree to your request, but I'll do it in my own time.' I like to think of it as the Welsh equivalent to “Just one more row." Worked mostly in stockinette with a simple lace edging, the Now in a Minute shawl is remarkably easy to knit. For all that, the changing shape of the shawl, and the colour play between skeins mean there's always something new happening on your needles. The long gentle curve of the shawl means it stays on your shoulders, making it as easy to wear as it is to knit.
finished measurements
38 inches long at neck edge; 19 inches deep narrowing to 3 inches,including edging
gauge
30sts/40 rows =4 inches instockinette stitch,blocked
materials
Unique Sheep Luxe [50% Superwash Merino/50% Tussah Silk; I00 yards/25 grams]; Color:"Enfys" from the Gradience Collection; 6 skeins US 4/3.75 mm circular needles, 24 and 32 inches One stitch marker Darning needle
notes
Gauge is less important than achieving a pleasing a fabric with plenty of drape, using your choice of needles and yarn. WVhen substituting yarn, choose a light fingering or fingering weight and use needles a size or two larger than the ball band recommendation. Your stitches should be open enough to see daylight between them, but not so large and loose that they elongate. Unique Sheep Gradiance Yarns are a set of six individually dyed and numbered skeins that allow for gradual color transitions within a project. To use these yarns, begin knitting with the skein at the beginning or end of the set, i.e.either Skein I or Skein 6. Knit to within a few yards of the end of the end of the skein, and work a 2442 Transition (below) to the next numbered skein in the series. If beginning with Skein I, the next in the series would be Skein 2; if beginning with Skein 6, the next in the series would be Skein 5.
2442 Transition
Work 2 Rows of the new colour. Work 4 Rows of the old colour. Work 4 Rows of the new colour. Work 2 Rows of the old colour.
stitches
edging
directions
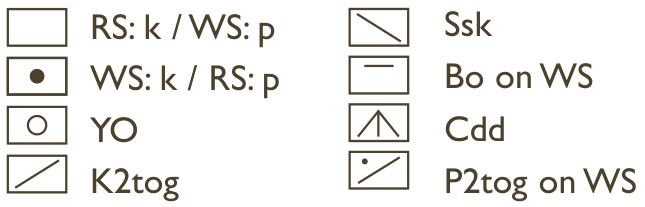
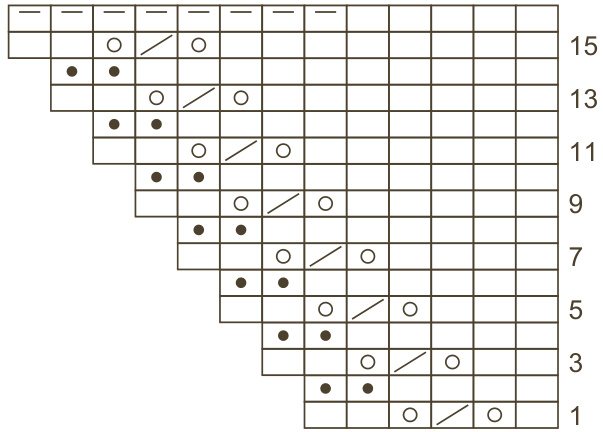
CO 3 sts. Row I (RS): [Kl,yo] twice, kl [5 sts] Rows 2 & 4 (Ws): K all sts Row 3 (Rs): K2, yo, kl, yo, k2 [7 sts] Row 5 (RS): K2 [yo, kl] three times, yo, k2 [1I sts] Row 6 (WS): K5, pm, k6 Your basic shawl stitches are set. Shaping increases are worked at the start of RS and end of WS rows, as well as within each chart. Charts I - 8 will be worked consecutively on the three stitches immediately before the marker on RS rows. Charts are followed by the edging pattern at the end of the RS rows/preceded by the edging on WS rows. Further shaping decreases are worked within the chart patterns. Front Edge Increase Triangle: Row I and all following odd numbered rows (RS): K2, yo, k to 2 sts before marker, work Chart I to marker, work Edging pattern to end. Rows 2, 4, 6 (Ws): Work Edging pattern to marker, work Chart I over next 3 sts,p to 2 sts before end, yo, k2. Row 8 (Ws): Work Edging pattern to marker, work Chart I over next 3 sts, k to 2 sts before end, yo, k2. Continue in pattern as established until you have worked 3 full repeats of the Edging pattern, i.e. 6 repeats of the above 8 rows. [83 sts] From here, continue working the edge patterns as established at the start and end of each row.The shawl gets its curved shape from a combination of short rows, the central decreases as specified in Charts 2 - 8 (the three-stitch center section of shawl),and the increases at the beginning of RS rows in the Increase Section as givenbelow.
Wedge I
Row I (Rs): K2, yo, k to 3 sts before marker, work Chart 2 to marker, slip marker, work Edging pattern to end.
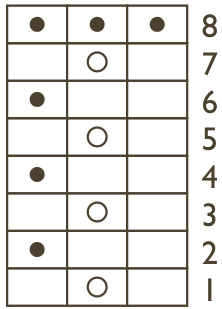
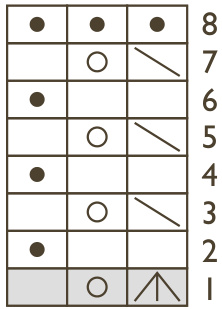
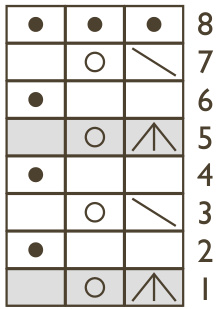
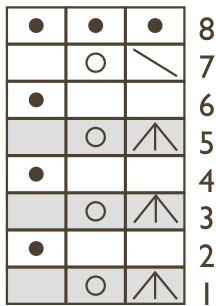
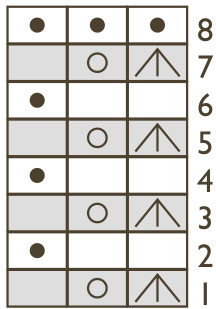
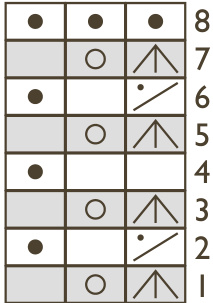
chart 1
Row 2 (Ws): Work Edging pattern to marker, work Chart 2, p to 3 sts before end of row, w&t.
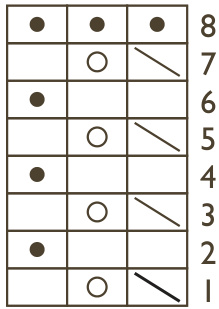
chart 2
Rows 3, 5, 7 (Rs): K to 3 sts before marker, work Chart 2 to marker, slip marker, work Edging pattern to end. Note: Correctly wrapped stitches will present as pairs, with one wrapped stitch and one unwrapped stitch sitting together.
chart 3
chart 4
Rows 4, 6 (WS): Work Edging pattern to marker, work Chart 2, p to 2 sts before previously wrapped st, w&t.
Row 8 (Ws): Work Edging pattern to marker, work Chart 2, k to 2 sts before previously wrapped st, w&t. Rows I0, I2, I4 (Ws): Work Edging pattern to marker, work Chart 2, p to 2 sts before previously wrapped st, w&t. Rows 9, Il, I3, I5 (RS): K to 3 sts before marker, work Chart 2 to marker, slip marker, work Edging pattern to end.
chart 5
chart 6
Row I6 (WS): Work Edging pattern to marker, work Chart 2, k to 2 sts before previously wrapped st, w&t.
Continue in pattern as est for rows 9 - I6, working until 2 sts before the previously wrapped st on WS, and working a WS knit (purl ridge) row every 8 rows. Note:As you knit, eventually you'll work to a point where you don't have enough sts between the marker and the last wrapped st to work a full repeat of an 8 row chart. When you think you're getting close, count the number of sts between the marker and the last wrapped st and use the the chart on pg XX to determine if you've reached that point. If so, work Final Row (WS) in place of Row I6.If not, continue working until you can no longer repeat.
chart 8
chart 7

| Wedge Number Stitches needed for full repeat | |
| 9 or more | |
| 2 | l0ormore |
| 3 | Ilor more |
| 4 | 12ormore |
| 5 | 13ormore |
| 6 | 14or more |
| 7andbeyond | 15 or more |
Final Row (Ws): Work Edging pattern to marker, work Row 8 of Chart 2, k across row, working wrapped sts together with their wraps, until 2 sts before end of row, yo, k2.
Increase Section
Work this eight-row section between wedges, directly after you have knit across an entire row, picking up and knitting wraps as you go. WWork Edging patterns as established. Row I and all following oddnumbered rows (RS): K2, yo, k to 3 sts before marker, work Chart 2 to marker, slip marker, work Edging pattern to end. Rows 2, 4, 6 (Ws): Work Edging pattern to marker, work Chart 2 over next 3 sts, p to 2 sts before end, yo, k2. Row 8 (Ws): Work Edging pattern to marker, work Chart 2, k to 2 sts before end, yo, k2.
Wedge 2
Work as per Wedge I, using Chart 3 in place of Chart 2. Work Rows I - 8 of Increase Section, using Chart 3 in place of Chart 2. Note: From Chart 3you'll begin working centered double decreases (CDD) to narrow the shawl on some rows.The rows you need to pay particular attention to are shaded grey on Charts 3-8. On Non-CDD RS rows, work to 3 sts before marker; on CDD RS rows, work to 4 sts before marker.
Wedge 3
Work as per Wedge I, using Chart 4 in place of Chart 2. Work Rows I - 8 of Increase Section, using Chart 4 in place of Chart 2.
Wedge 4
Work as per Wedge I, using Chart 5 in place of Chart 2 Work Rows I - 8 of Increase Section, using Chart 5 in place of Chart 2.
Wedge 5
Work as per Wedge I, using Chart 6 in place of Chart 2. Work Rows I - 8 of Increase Section, using Chart 6 in place of Chart 2.
Wedge 6
Work as per Wedge I, using Chart 7 in place of Chart 2. Work Rows I - 8 of Increase Section, using Chart 7 in place of Chart 2.
Wedge 7
Work as per Wedge I, using Chart 8 in place of Chart 2. Work Rows I - 8 of Increase Section, using Chart 8 in place of Chart 2.
Wedges 8 and beyond
Work Wedges 8 and beyond as per Wedge I, using Chart 8 in place of Chart 2, until 16 sts remain between the marker and neck edge, ending with row 8 or I6 of pattern,then work as follows: RS rows: K2, yo, k to 4 sts before marker, work CDD, yo, kl, work edging pattern as established; turn. WS rows: Work edging pattern as established, kl, pl, p3tog, p to last 2 sts, k2; turn. Work as established until Row I5 of the current repeat of the Edging pattern is complete.
BO all sts. Weave in ends. Wet block.


